Salesforce Marketing Cloud messaging
 SMS
SMS
 Zalo
Zalo
This guide explains how to integrate Salesforce Marketing Cloud with the Infobip platform. The integration lets you use the following channels directly in your Salesforce Marketing Cloud customer journeys:
- SMS
- LMS
- MMS
- RCS
- Viber
- Kakao Alim
- Kakao ChinguTalk
- Zalo
What you will need
To set up this integration, you need the following:
- An Infobip account (if you do not have one, you can create one (opens in a new tab))
- Salesforce Marketing Cloud account with Admin permissions
- An API key to enable communication between Salesforce Marketing Cloud and Infobip
- Infobip supplied package containing data extensions
Features
- Implement the most efficient messaging channels to enhance your marketing efforts
- Create end-to-end Journeys with Infobip SMS, MMS, RCS, WhatsApp, Viber and Kakao Alim Talk to increase campaign effectiveness in Salesforce Marketing Cloud
Installation
To use the application, deploy the package provided by Infobip that contains up to six data extensions.
Deploy package
To deploy the package provided by Infobip:
- Log into your Salesforce Marketing Cloud account.
- From the home page, go to Platform > Package Manager.
- On the Deployment tab, click Deploy, and then click Upload.
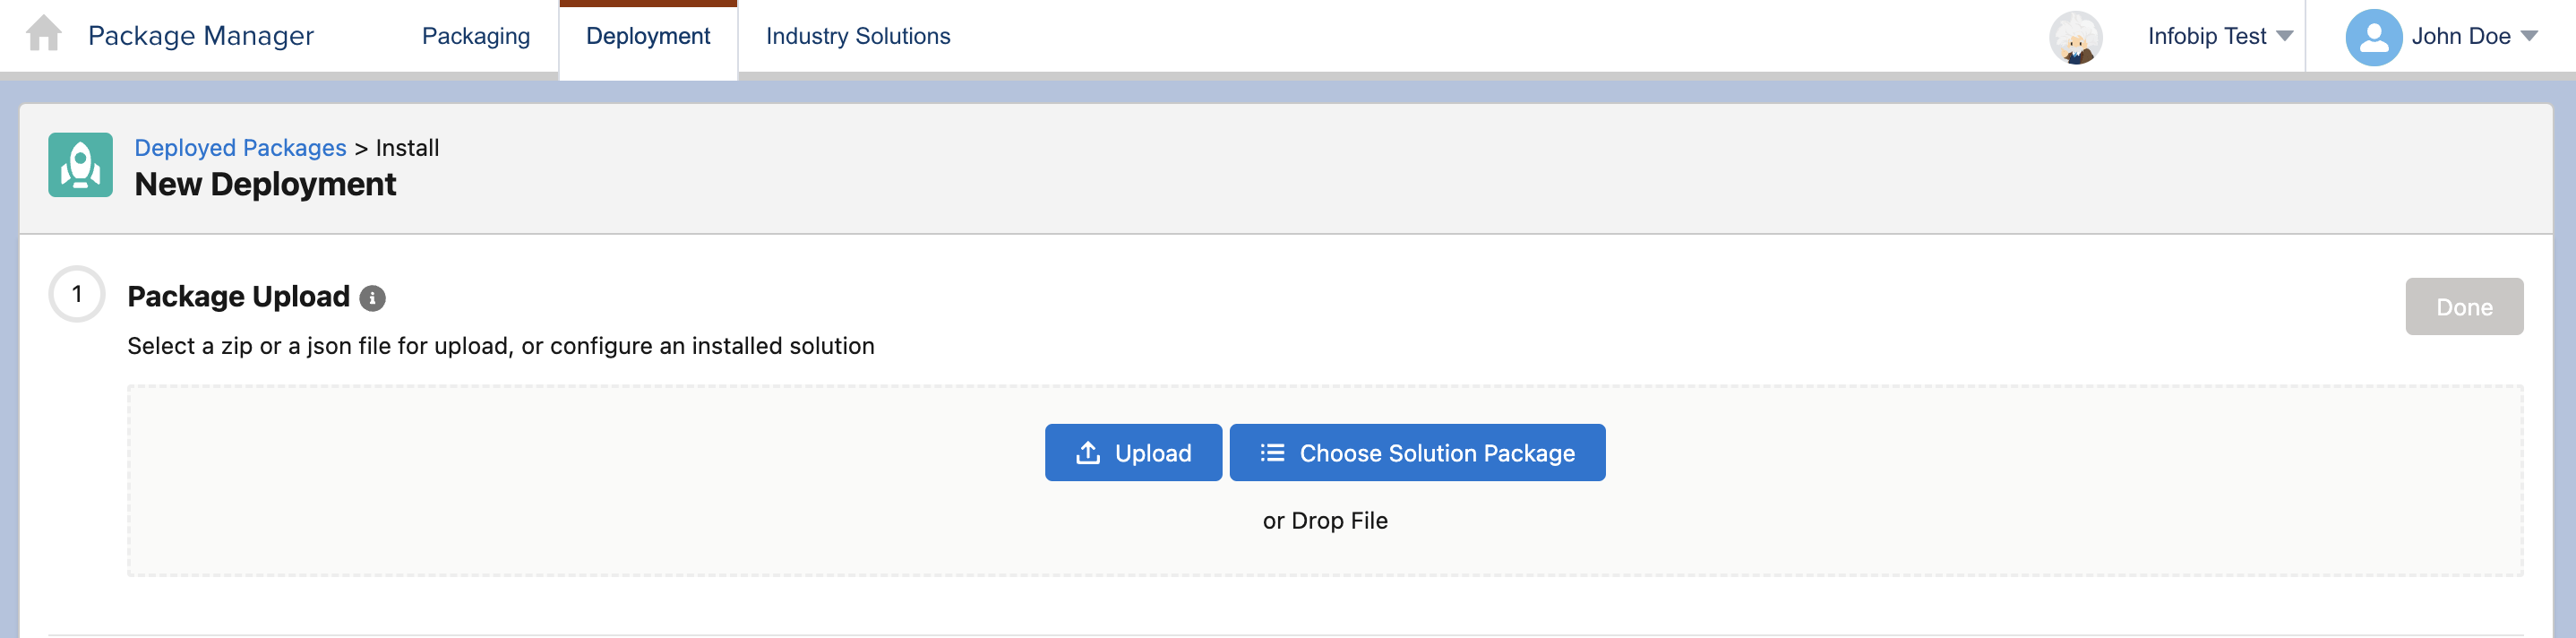
- Select the package file shared by Infobip and click Upload.
- Click Next and then click Deploy.
The Infobip-provided package contains the following data extensions:
| Data extension | Purpose |
|---|---|
| SMS Delivery Reports | Delivery notifications on SMS, LMS, and MMS |
| Omni Reports | Delivery & Seen notifications on Viber, WhatsApp, RCS, Kakao Alim, Kakao ChinguTalk, and Zalo |
| Unified URL Tracking | Click notifications on SMS, LMS, Viber, and WhatsApp |
| Inbound Messages | Storing inbound message replies on SMS, RCS, Viber, and WhatsApp |
| SampleAudience | Audience sample |
Once the package is deployed, the data extensions listed above are configured automatically. Their purpose is to allow message data, such as delivery reports, to be sent from Infobip to your Salesforce Marketing Cloud instance. This in turn allows your system to take action based on the data. For example, if an SMS delivery report indicates that a message failed, then your system can use that status information to retry sending the message.
If you plan to use multiple business units in Marketing Cloud separately for sending messages, deploy this package in every business unit separately.
App components configuration
This section explains how to add components inside the installed package for configuring the connector and sending messages.
To install the packages and start using the Salesforce Marketing Cloud app, use the following steps:
- Log into your Salesforce Marketing Cloud account.
- From the homepage, go to the drop-down menu with the name and avatar on the top right.
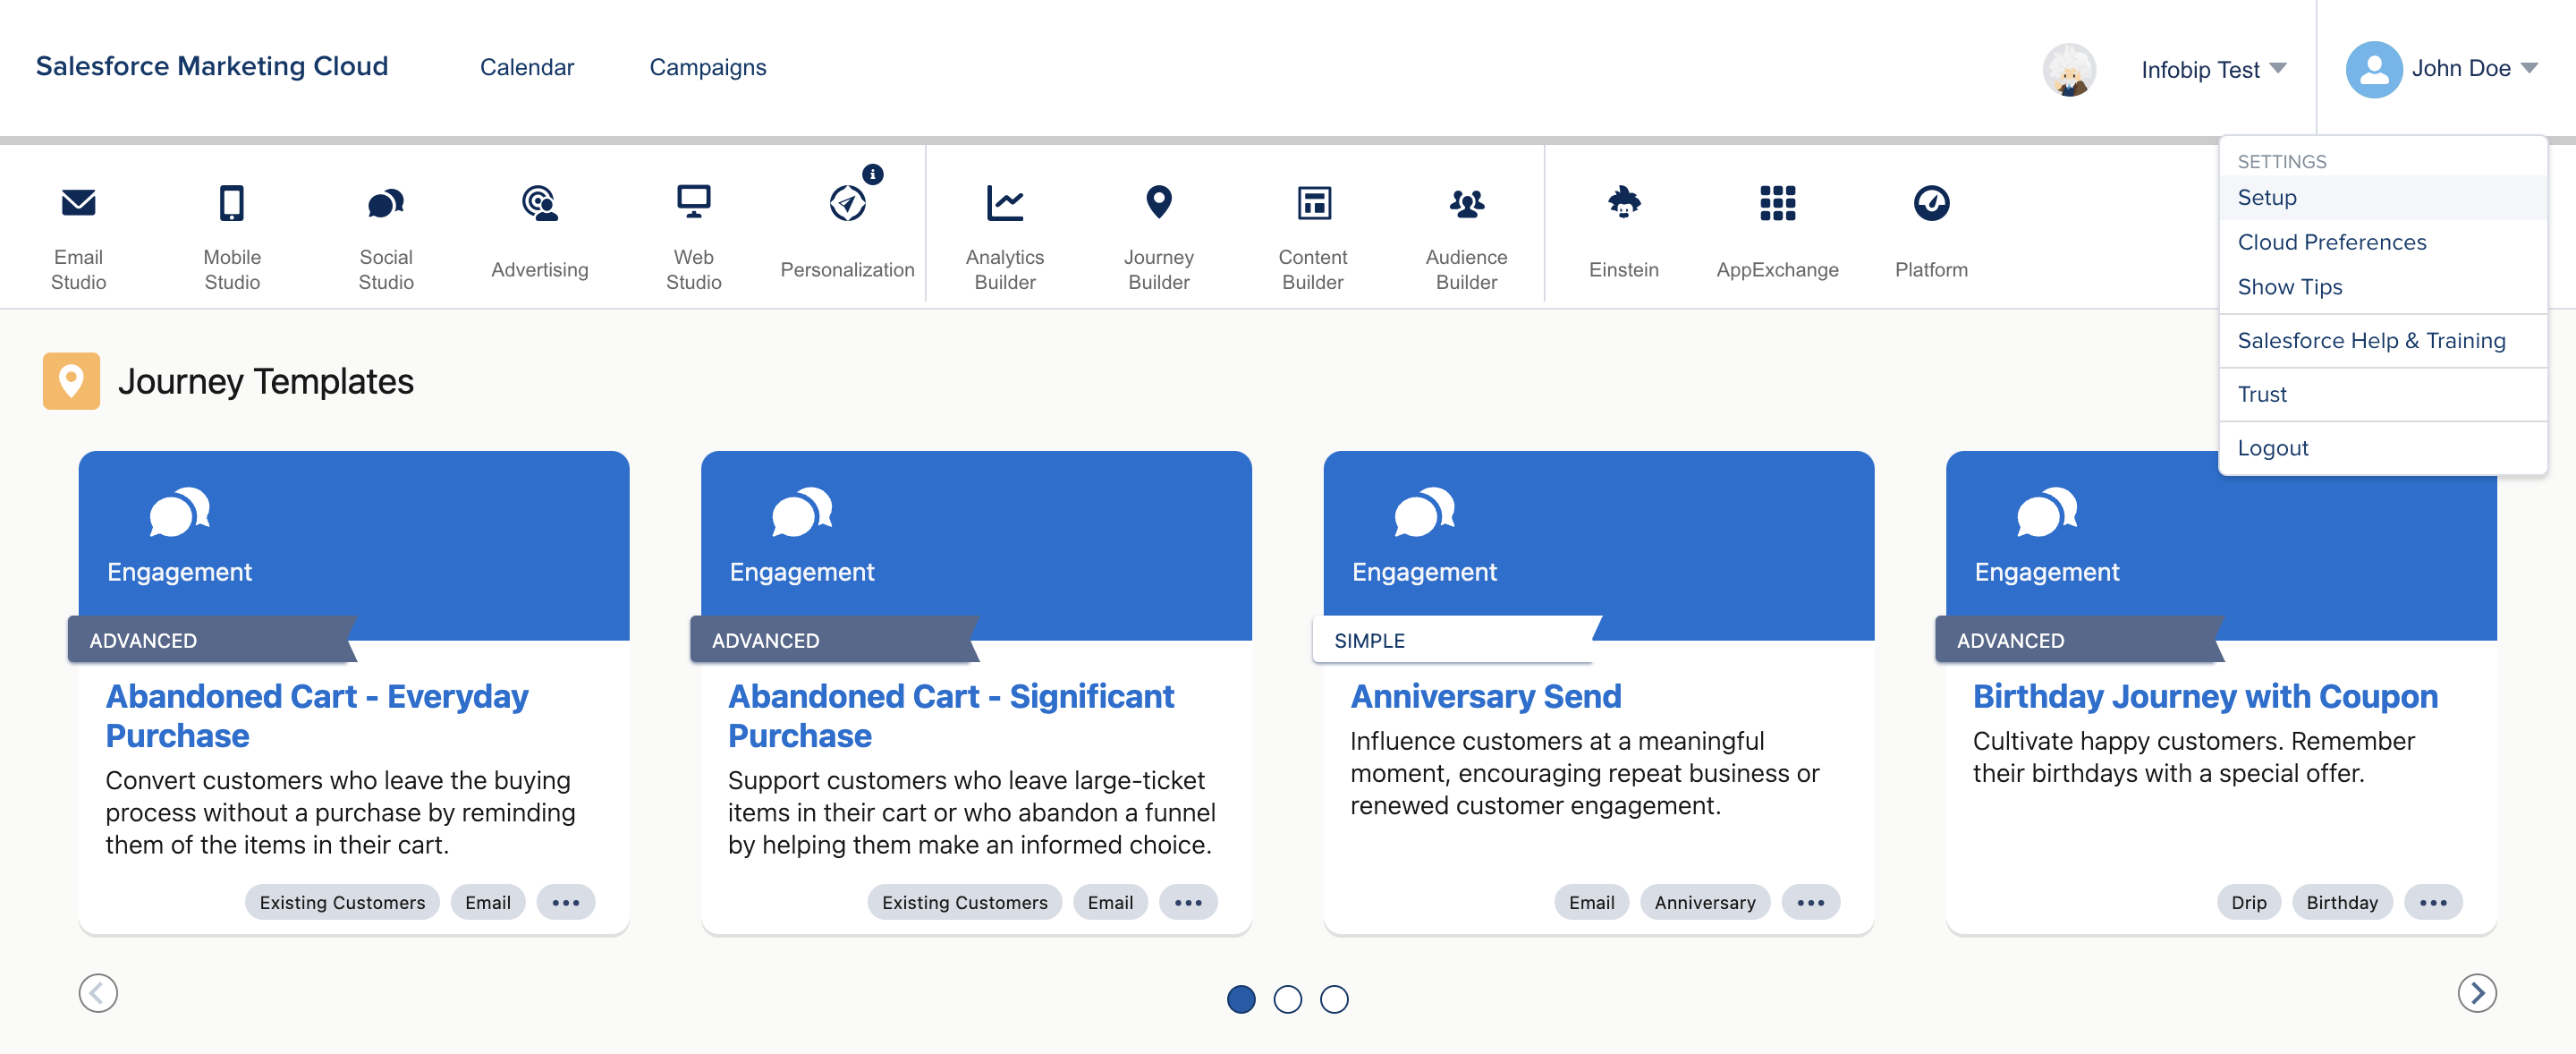
- Click Setup.
- On the setup page in the sidebar, go to Platform Tools > Apps > Installed Packages.
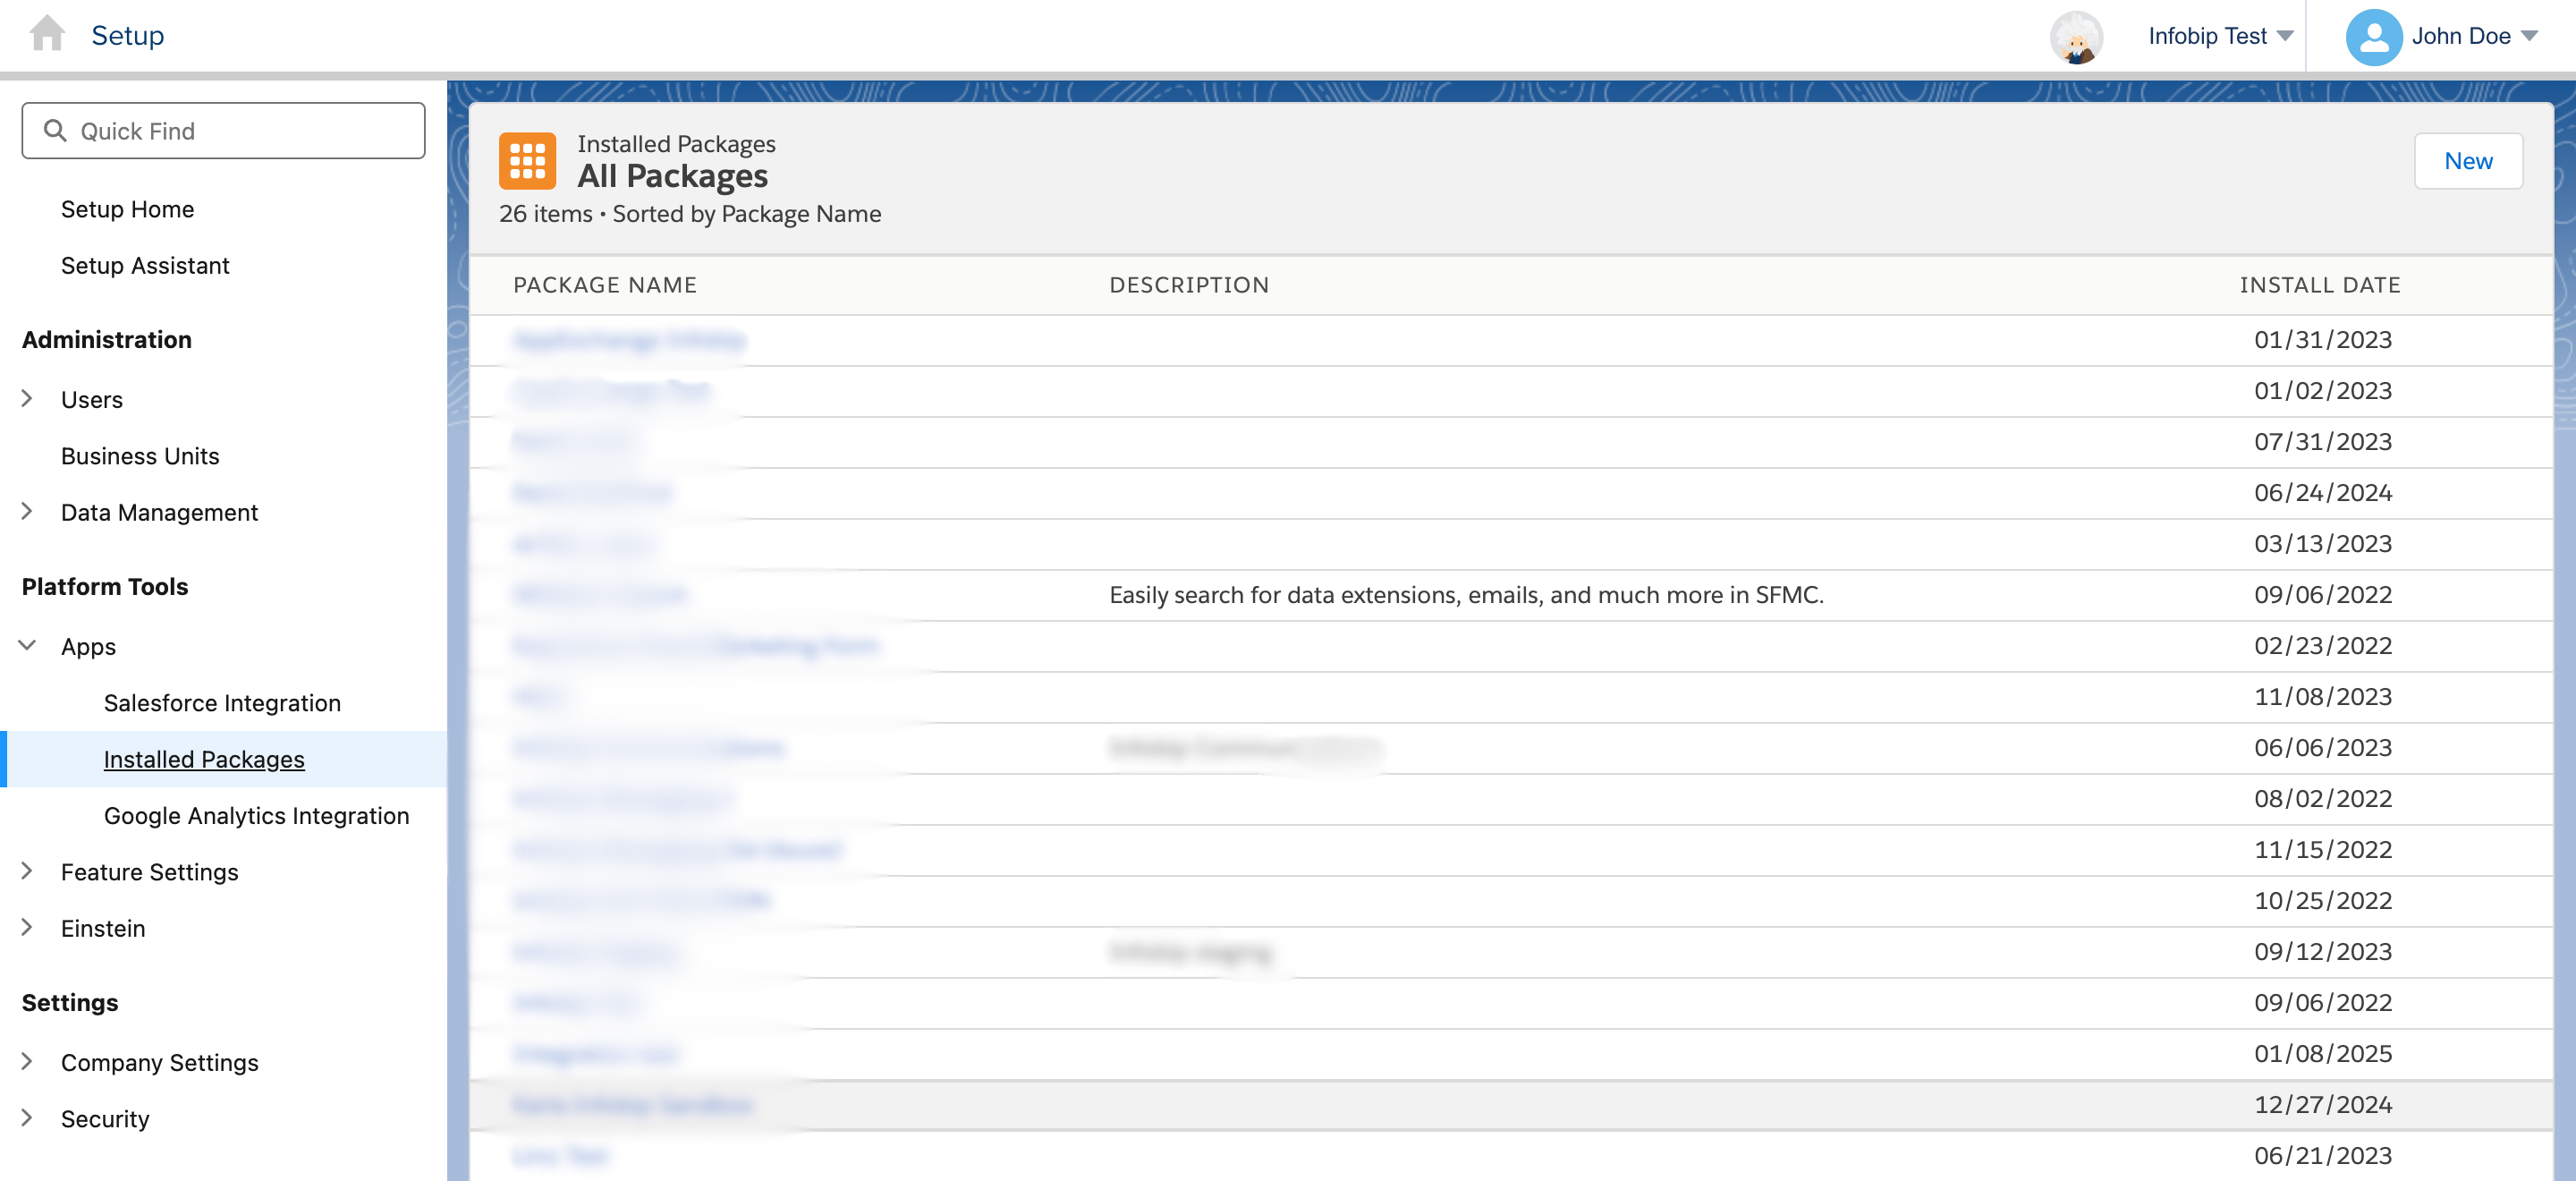
- Click New, and then enter the package details.
- Click Save.
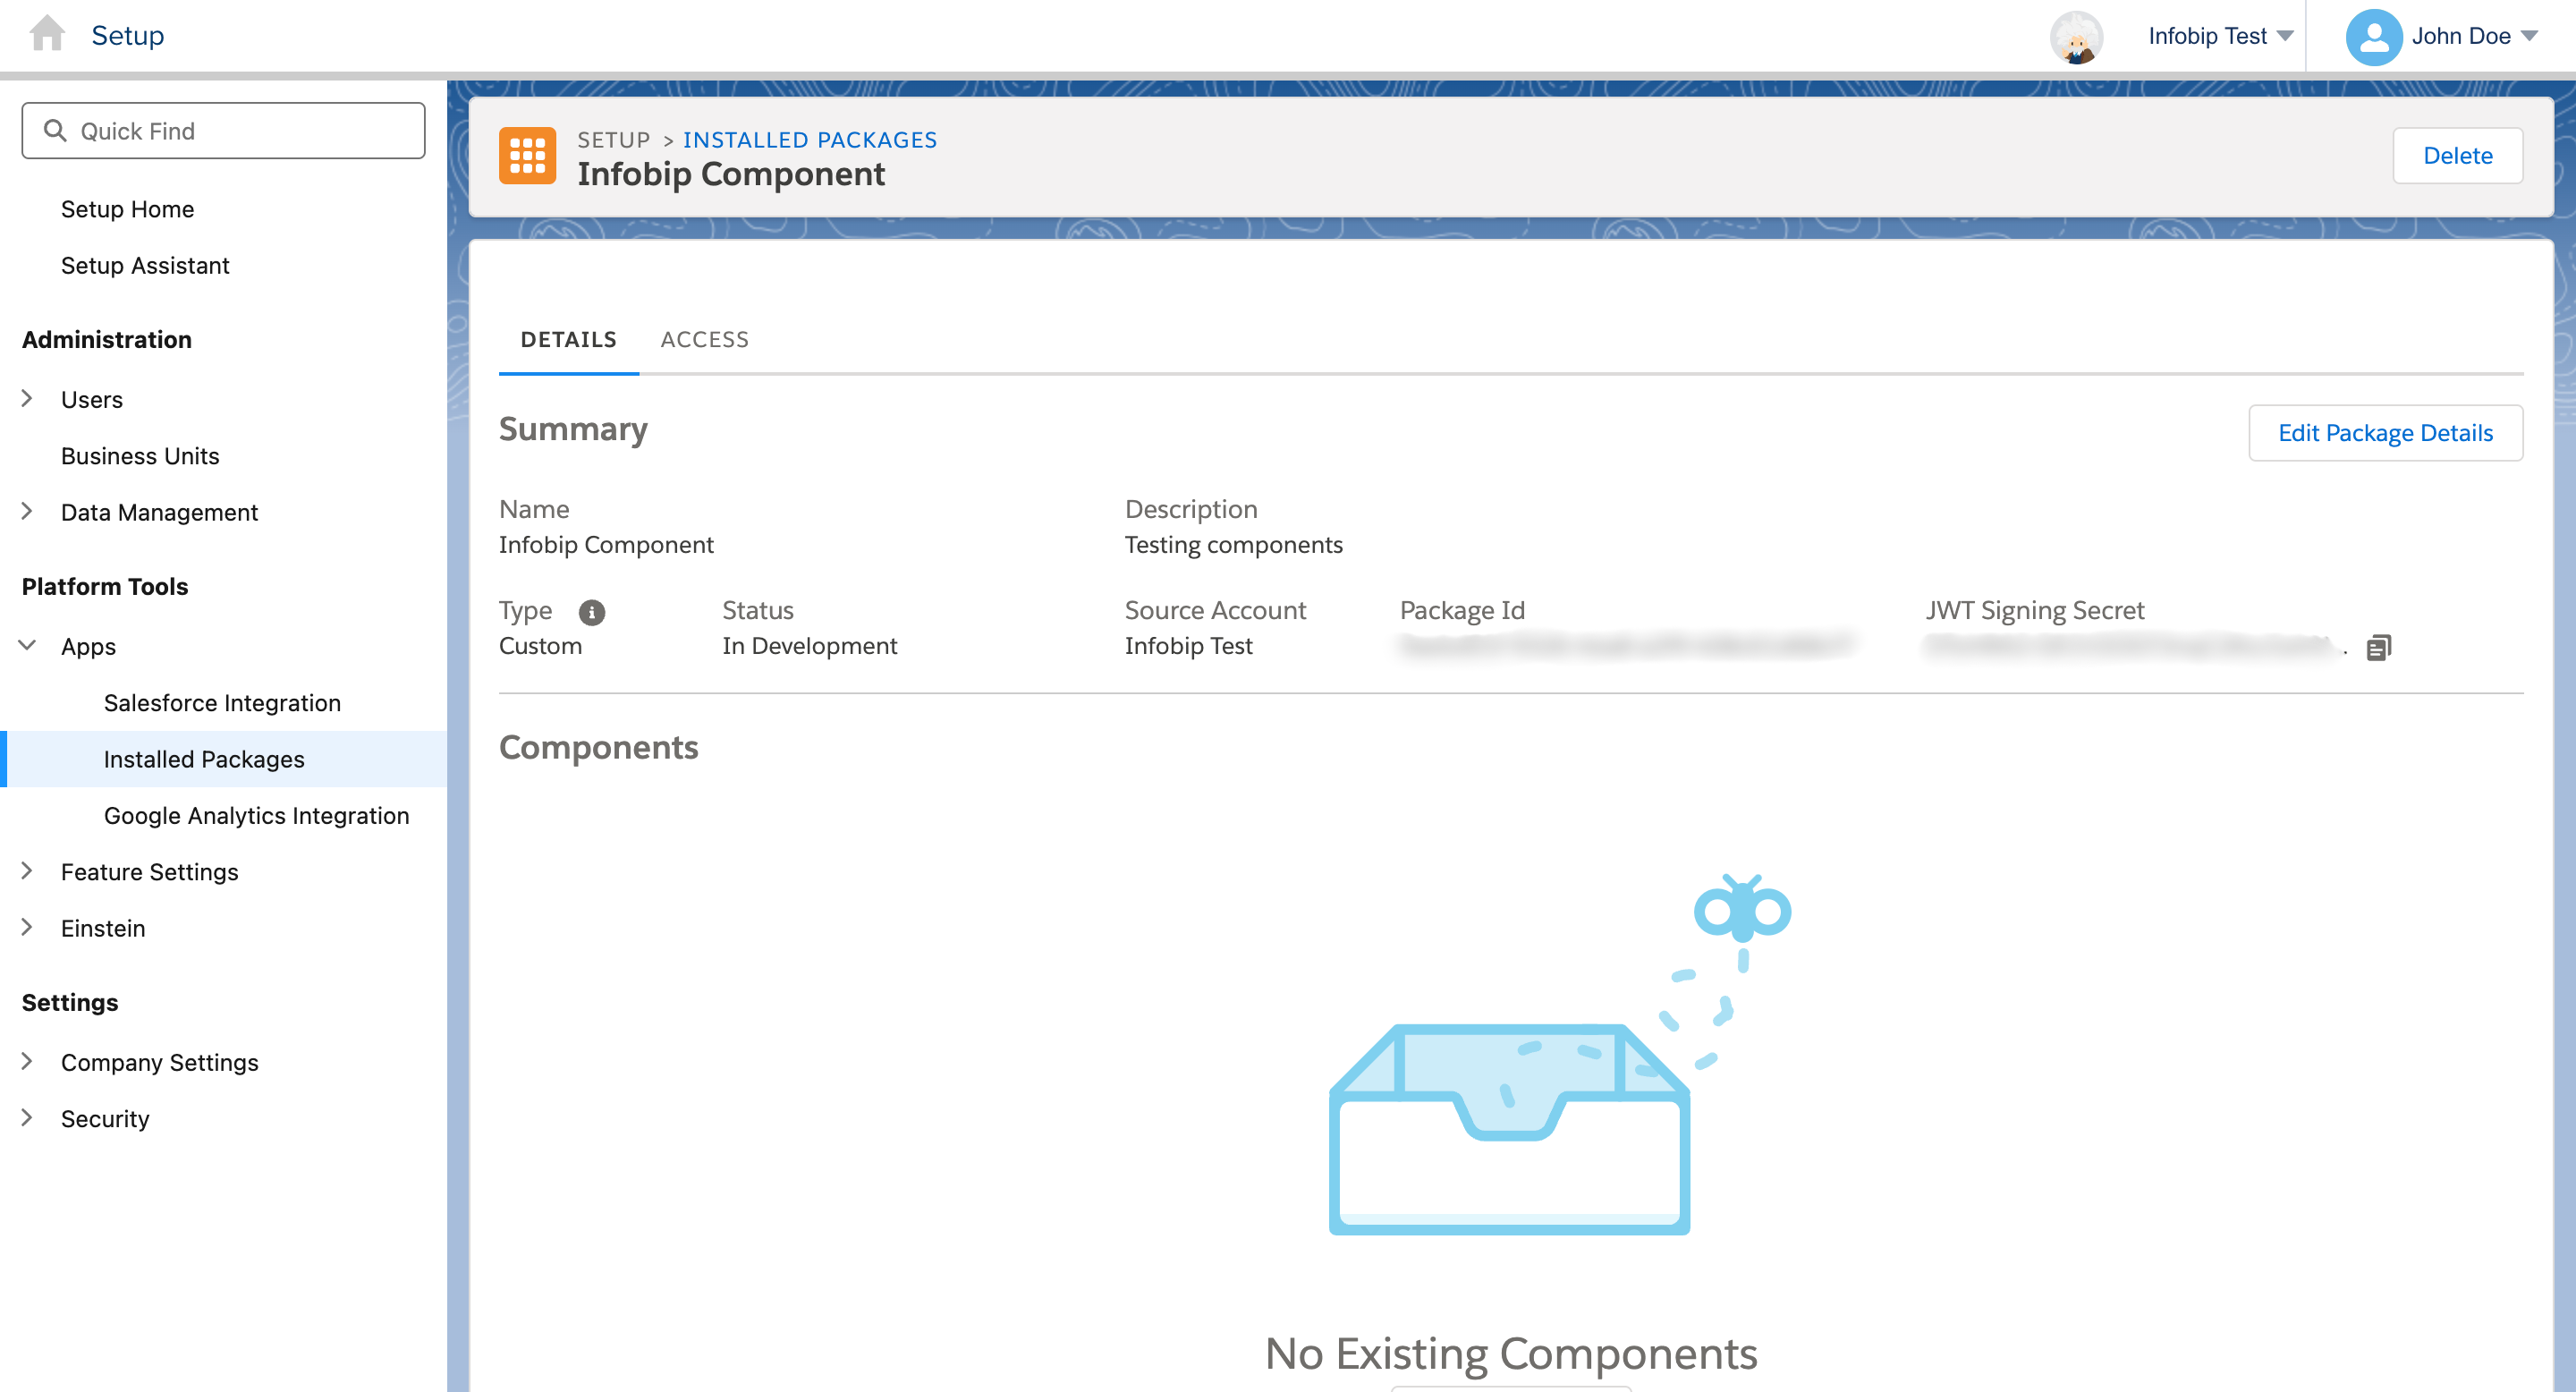
The next section explains how to add components inside the installed package for configuring the connector and sending messages.
API integration component
To add the API integration component:
- Click Add Component.
- Select API integration and click Next.
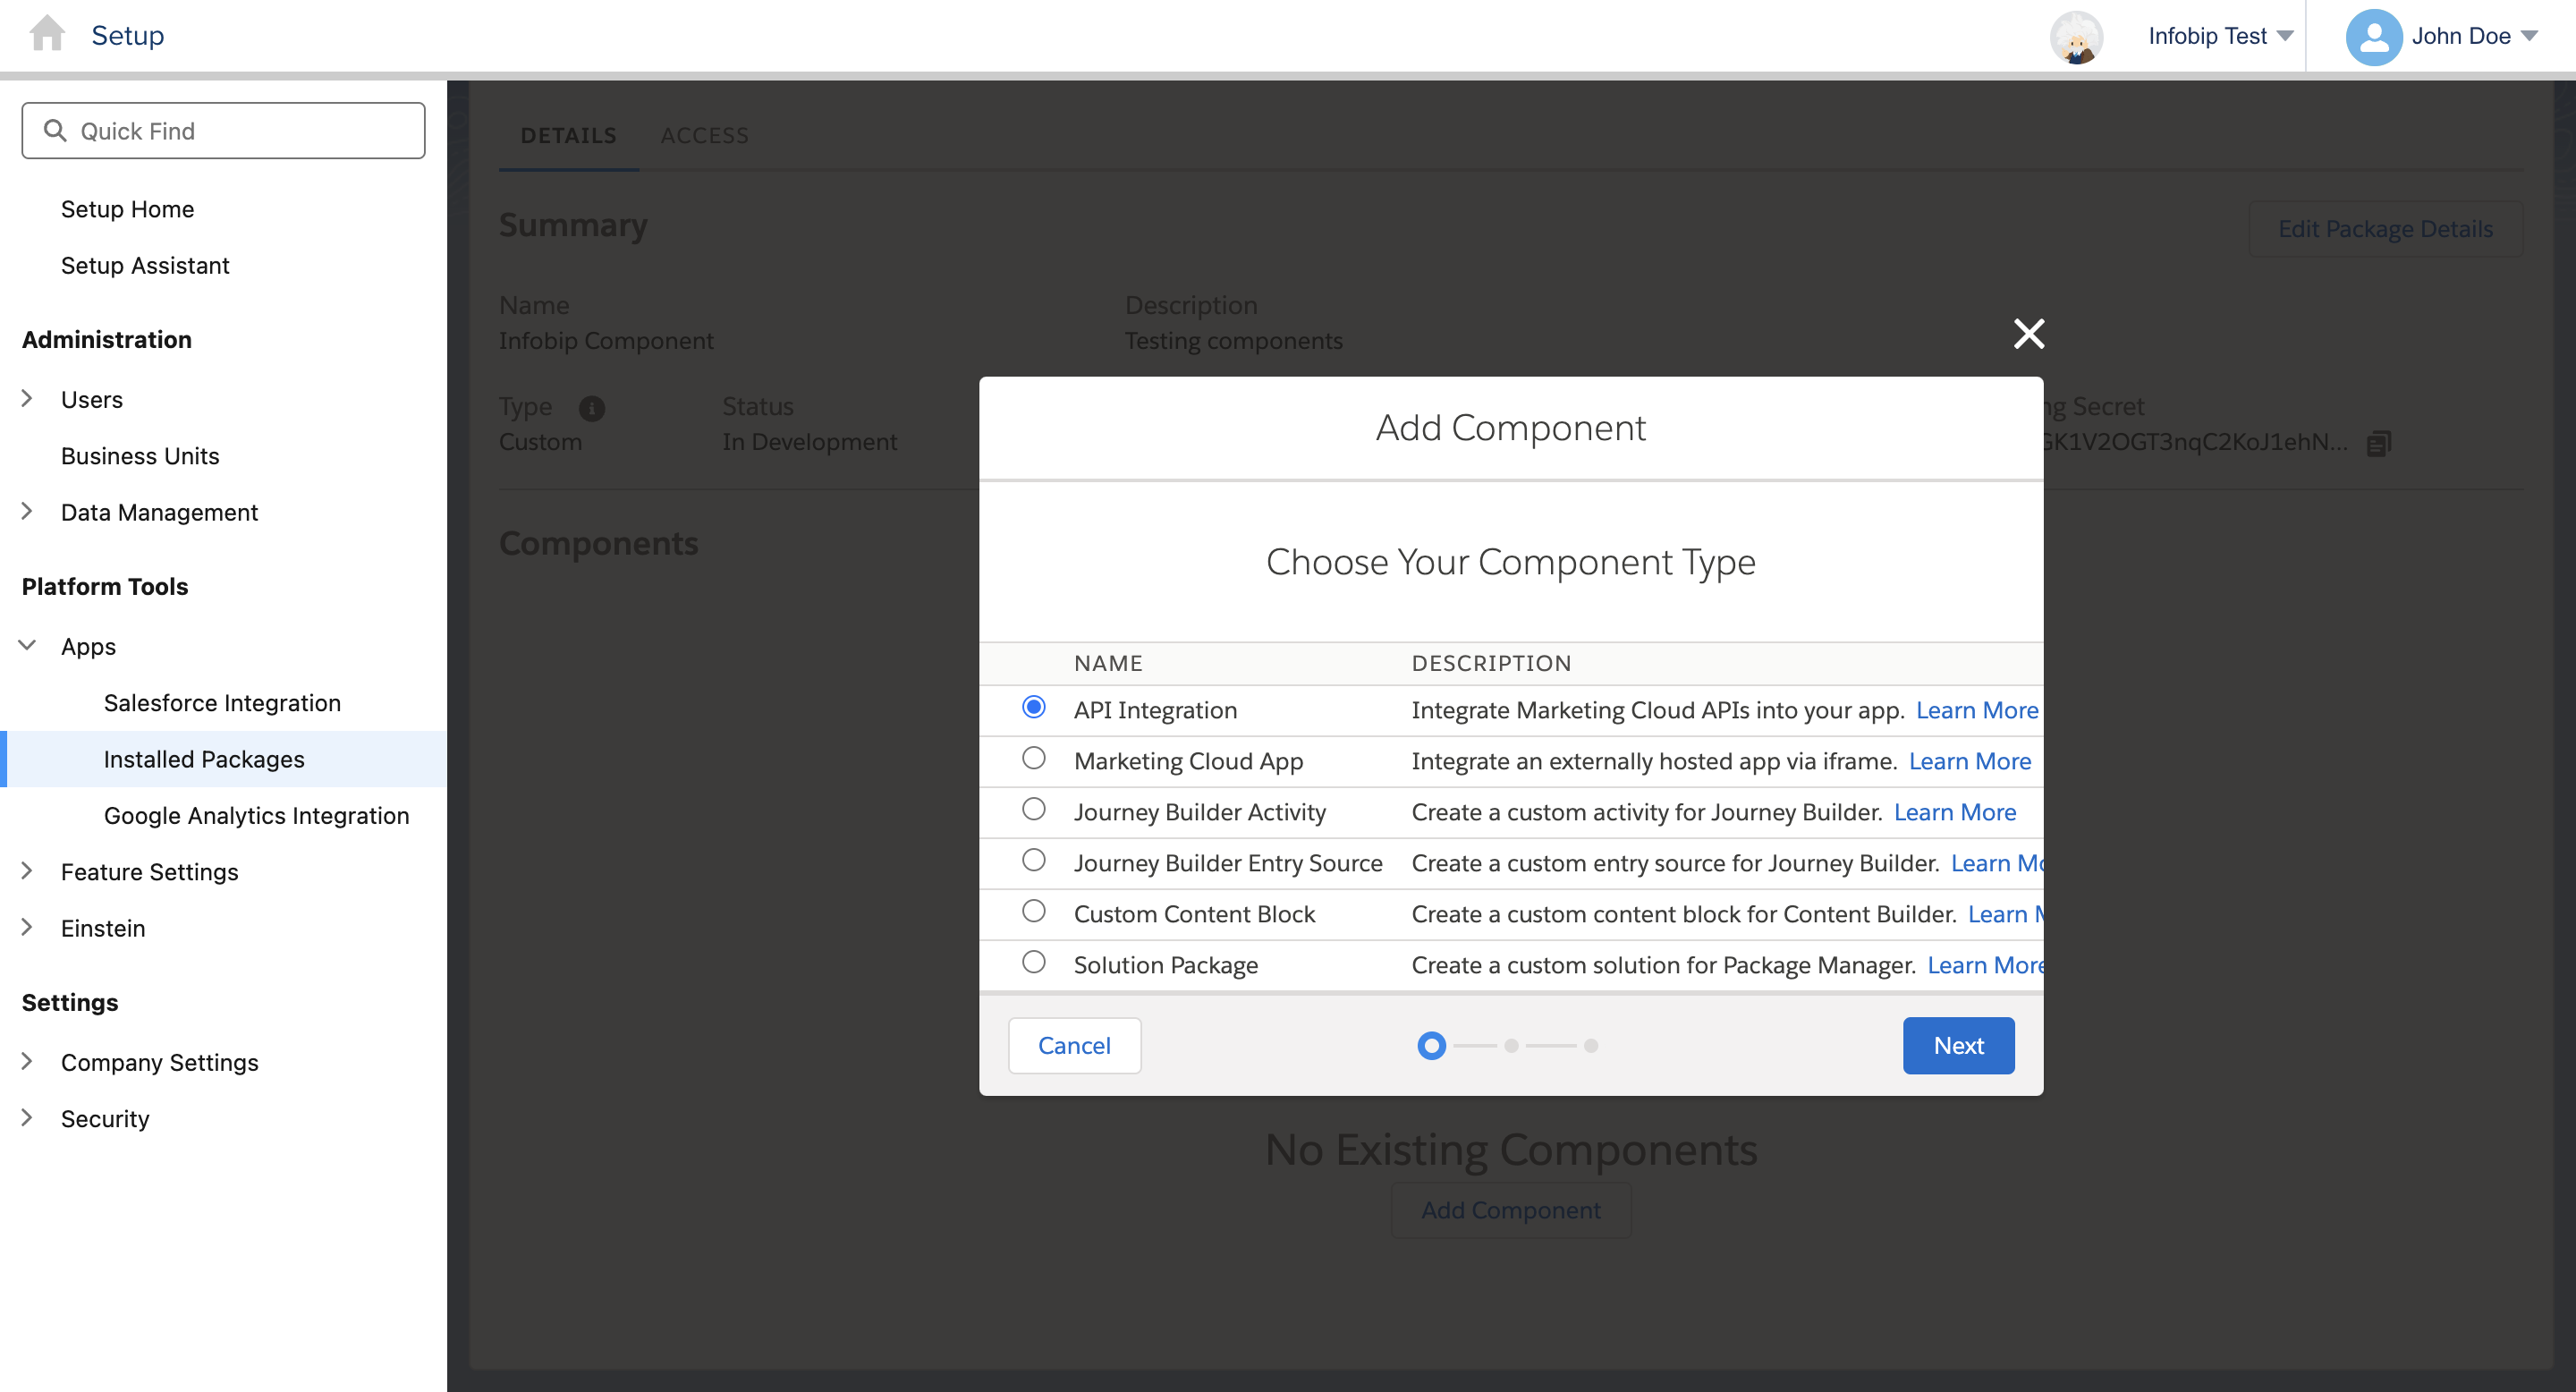
- Choose Server-to-Server Integration type and click Next.
- Select the Server-to-Server properties:
- Enable Automation Journeys properties:
- Read
- Write
- Execute
- Activate/Stop/Pause/Resume/Send/Schedule
- Delete
- Enable all Data properties:
- Data Extensions Read and Write
- File Locations Read and Write
- Tracking Events Read and Write
- Enable Automation Journeys properties:
Before creating Marketing Cloud and Journey Builder components, contact your account manager to get the required endpoints.
Marketing Cloud component
To add the Marketing Cloud App component:
- Click Add Component.
- Select Marketing Cloud App and click Next.
- For a convenient configuration, when adding the names of components, consider using Infobip Configuration.
- Enter the same endpoint shared by the Infobip team in both the Login and Logout textbox.
Journey Builder components
Add two different components for sending messages and receiving delivery reports:
- Click Add Component.
- Select Journey Builder Activity and click Next.
- For a convenient configuration, when adding the names of components, consider using Infobip Messaging for messaging component and Infobip Reports for delivery reports component.
- From the Category drop-down, select the Custom property.
- Enter the endpoint shared by the Infobip team and save.
Once the components are complete, give access to any user who wants to use application inside the Journey Builder. Without these permissions, the application is hidden.
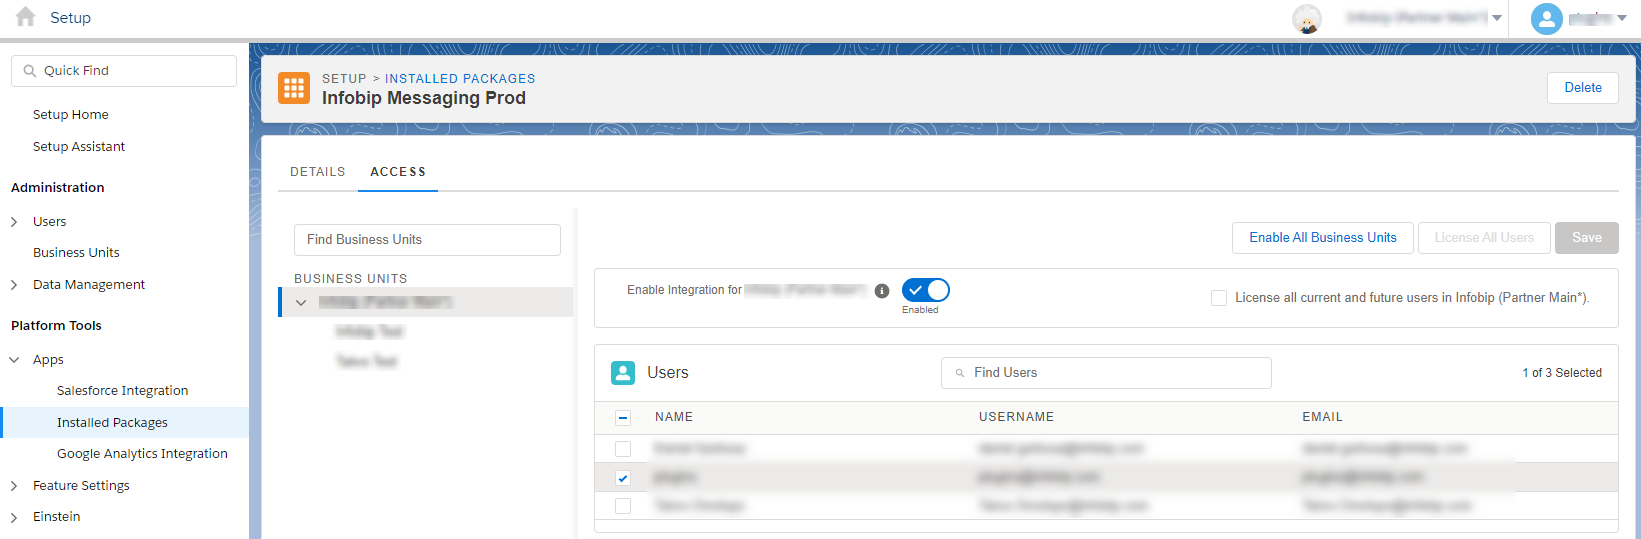
The setup must be completed for every business unit separately.
Configure Infobip app
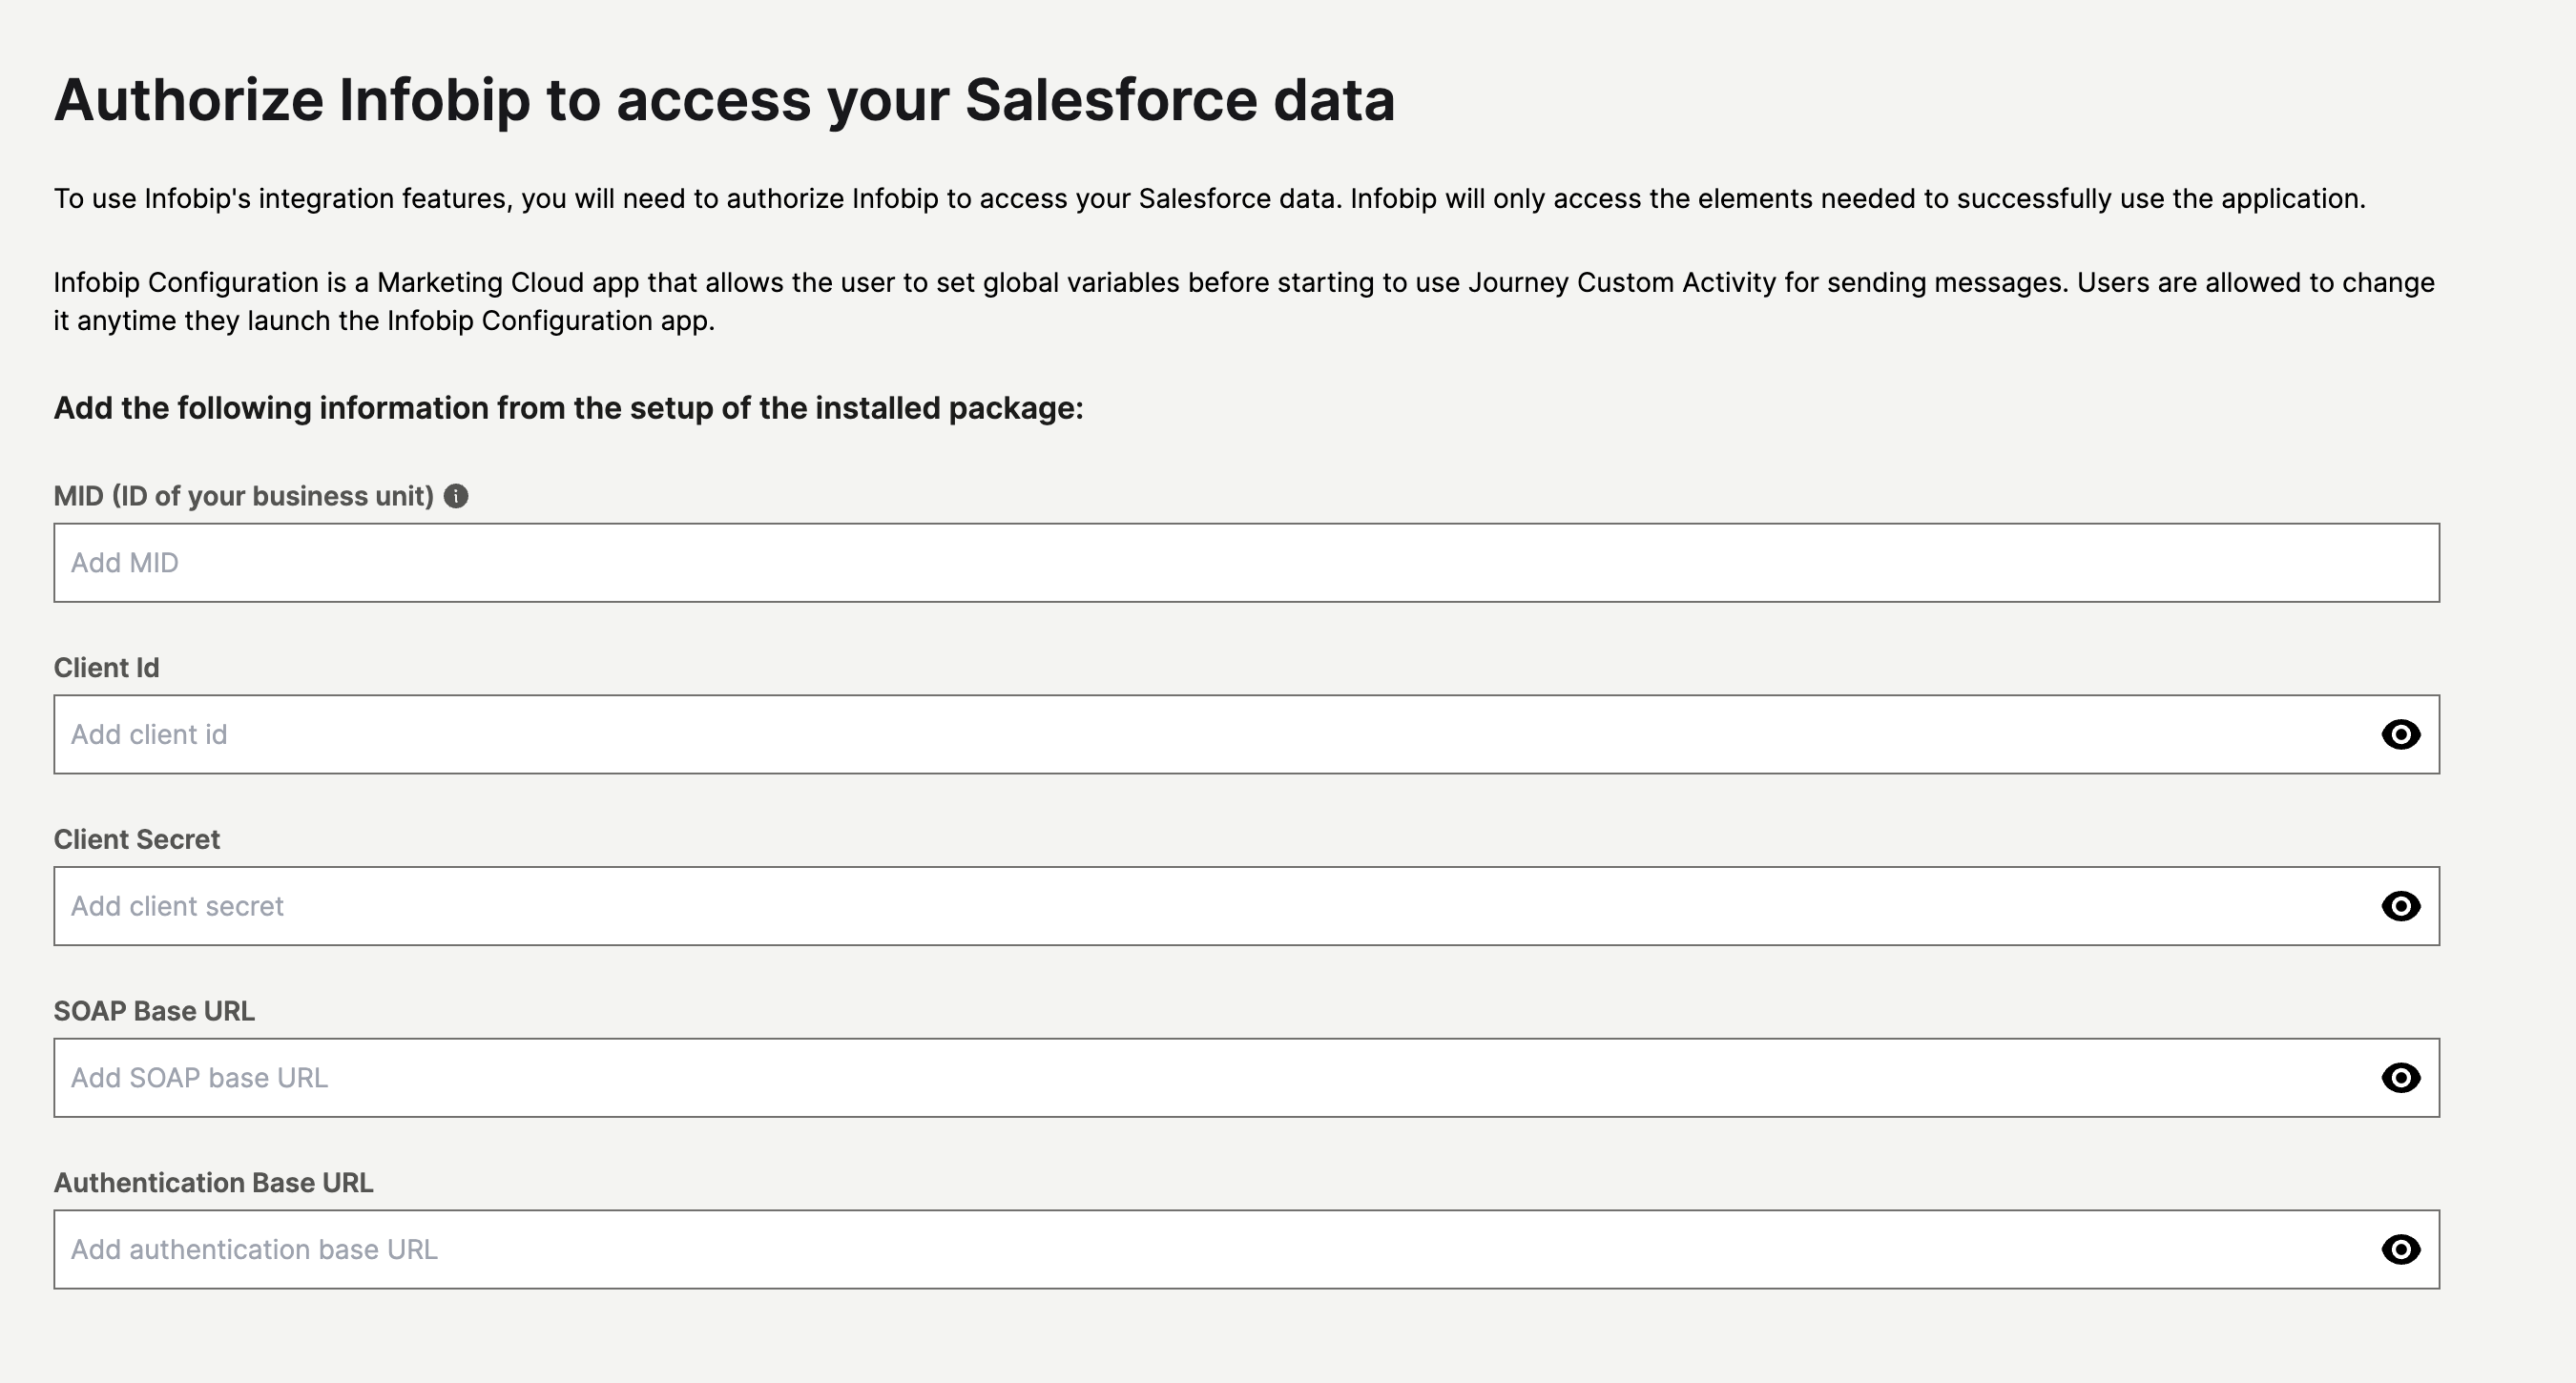
Infobip Configuration is a Marketing Cloud App that allows users to set global variables before starting to use Journey Custom Activity for sending messages. Users can change it anytime they launch an Infobip config app.
To go to the Configuration app, on the Marketing Cloud homepage, hover over the Salesforce Marketing Cloud home icon and then hover over the AppExchange icon. Click on Infobip Configuration.
Authorize the Infobip Configuration app to access your Salesforce Marketing Cloud data:
- MID - Enter the ID of your business unit, which can be found in top right corner of the Salesforce Marketing Cloud screen.

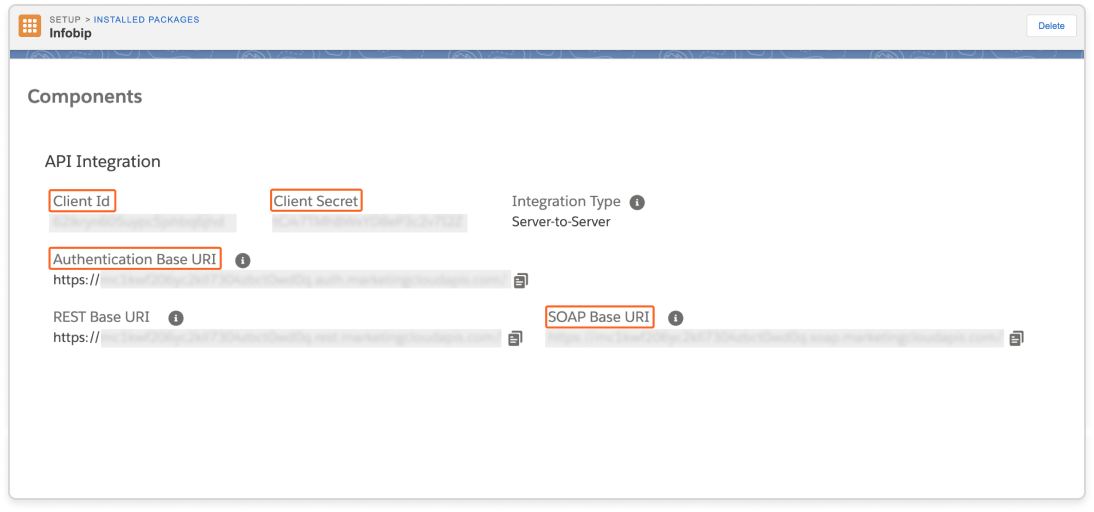
- Client Id - Copy and paste the tenant-specific Client Id, which can be found in the setup of the installed package.
- Client Secret - Copy and paste the tenant-specific Client Secret, which can be found in the setup of the installed package.
- SOAP Origin - Copy and paste the tenant-specific SOAP Base URI, which can be found in the setup of the installed package.
- Auth Origin - Copy and paste the tenant-specific Authentication Base URI, which can be found in the setup of the installed package.
Once you click Next, the authorization is done, and you have to connect the Infobip account to the Salesforce Marketing Cloud account.
Connect multiple Infobip accounts to the same Salesforce Marketing Cloud business unit.
Fill out the next section with the following information. If you don't have an Infobip account, you can create one (opens in a new tab).
- Add API Key - Connect one or multiple Infobip accounts to your Salesforce Marketing Cloud account by entering the API key (opens in a new tab). Enable the following API scopes:
message:sendaccount-management:managenumbers:managesubscriptions:manageapplication-entity:managewhatsapp:manage
- Add API Base URL - Add your Infobip Base URL and connect your account to the Salesforce. You can find it on the Homepage in the upper right section:
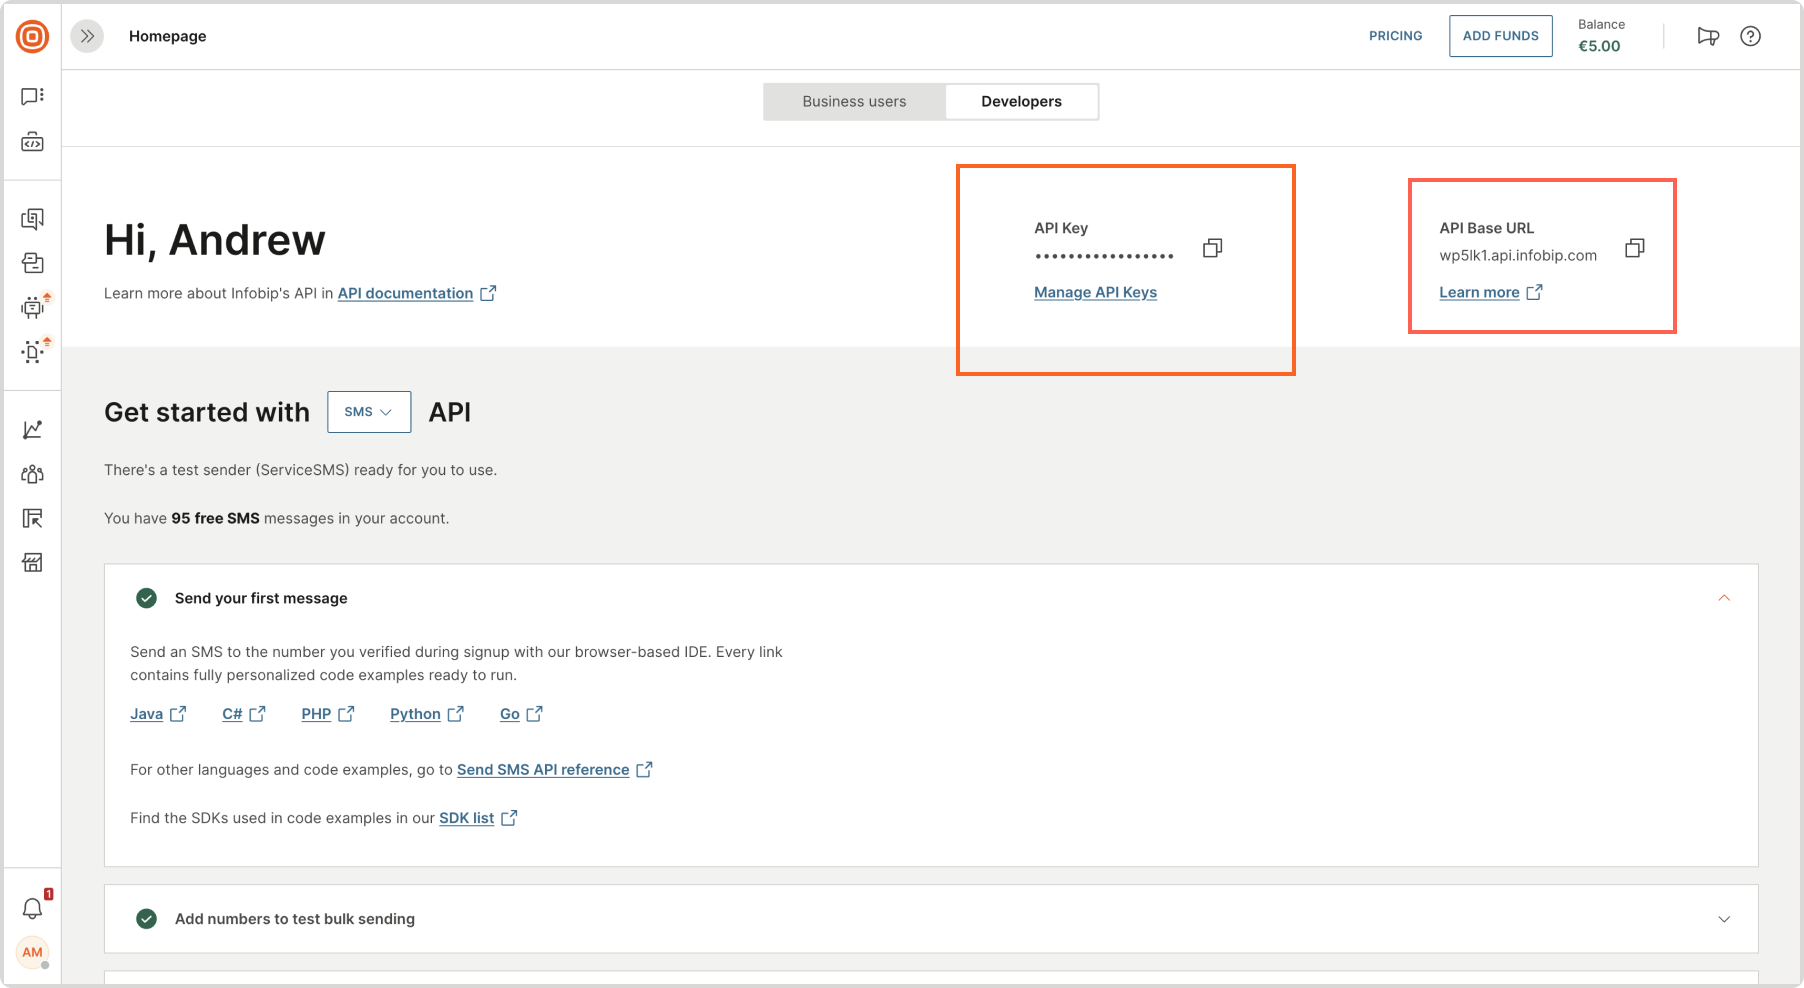
- To connect to another Infobip account, click
CONNECT ANOTHER ACCOUNTand repeat the steps. - When you have connected all the Infobip account/s, go to the next step.
- Configure the channels to be used within Salesforce. See Configure channels.
Configure channels
To configure the channels to be used in Salesforce:
-
Add the custom domain you want to use when sending URLs in Custom Domain. To use a Custom domain for URL shortening, start by registering and verifying the domain through the Infobip web interface (opens in a new tab). It is recommended that you create a subdomain for shortening, following the format
test.sample.com. The custom domain is then accessible for use within messaging activities. -
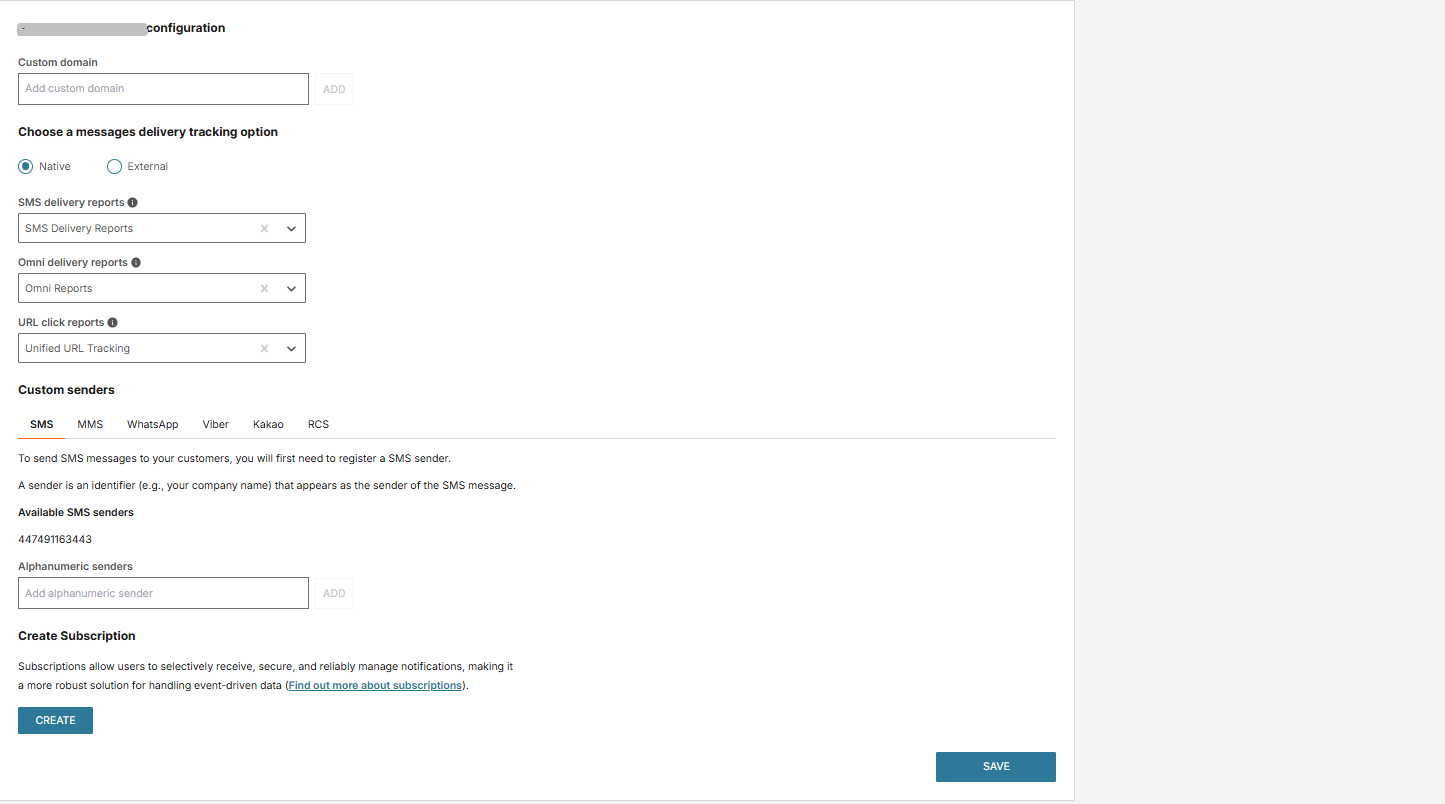
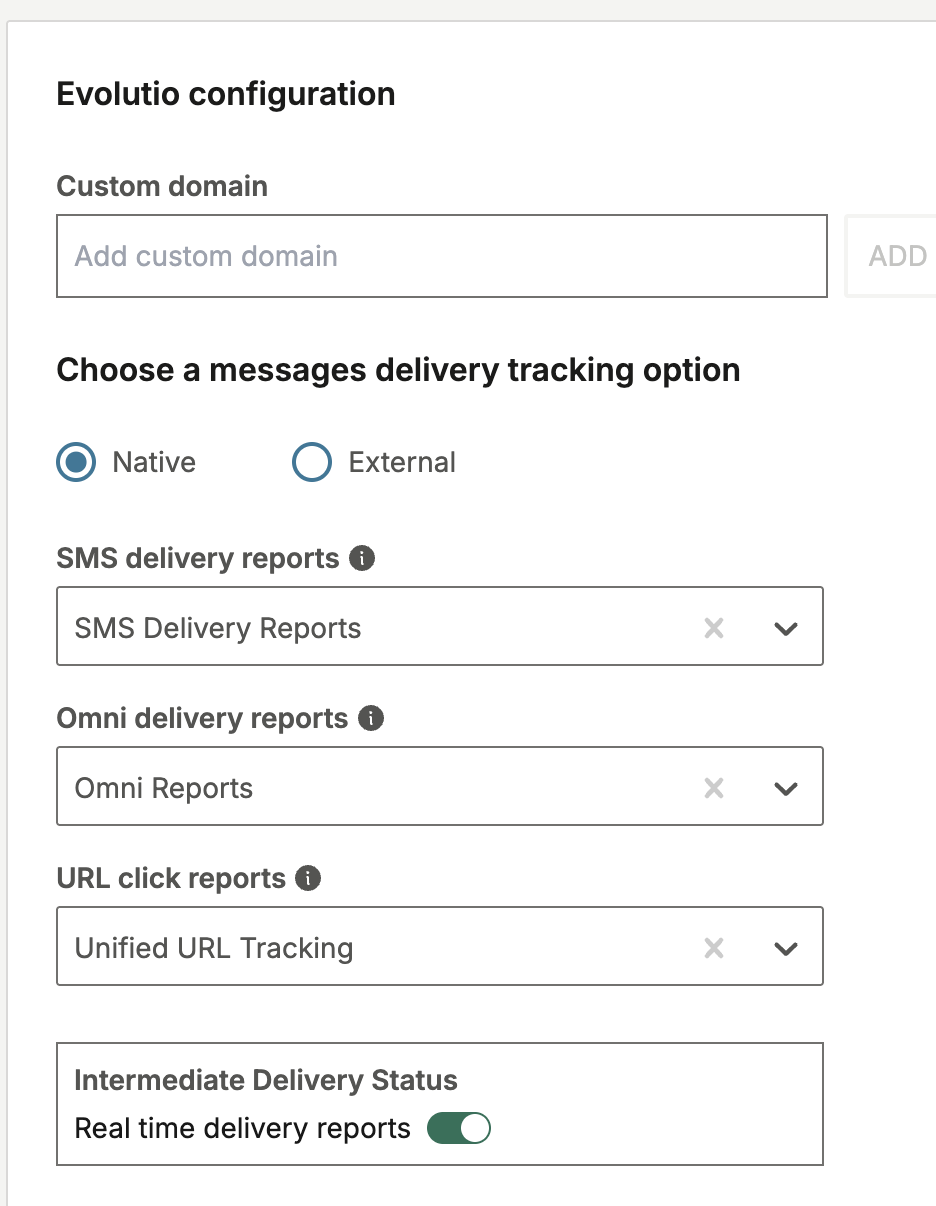
Choose a messages delivery tracking option - select between the native and external ways of storing delivery notifications:
Native External SMS delivery reports - Select from the drop-down list where to save SMS, LMS and MMS delivery reports. Default data extension would be SMS Delivery Reports. SMS Notification URL - Add webhook resource URL which will be used for storing SMS reports. Omni delivery reports - Select from the drop-down list where to save WhatsApp, Viber, RCS, Kakao Alim, Kakao Chingu, Zalo delivery reports. Default data extension would be Omni Reports OMNI Notification URL - Add webhook resource URL which will be used for storing Omni reports. Url click reports - Select from the drop-down list where to save click reports for all channels. We suggest using Unified URL Tracking data extension. ImportantIf you select the Native method of storing report data, it is not recommended that you add custom fields in the report's data extensions, unless those custom fields are designated as optional. Custom fields are not populated automatically. Be aware that you need to populate them after reports are saved.
If you intend to add custom data fields in report data extensions, it is advisable that you select an External method and use cloud pages for the storage.
-
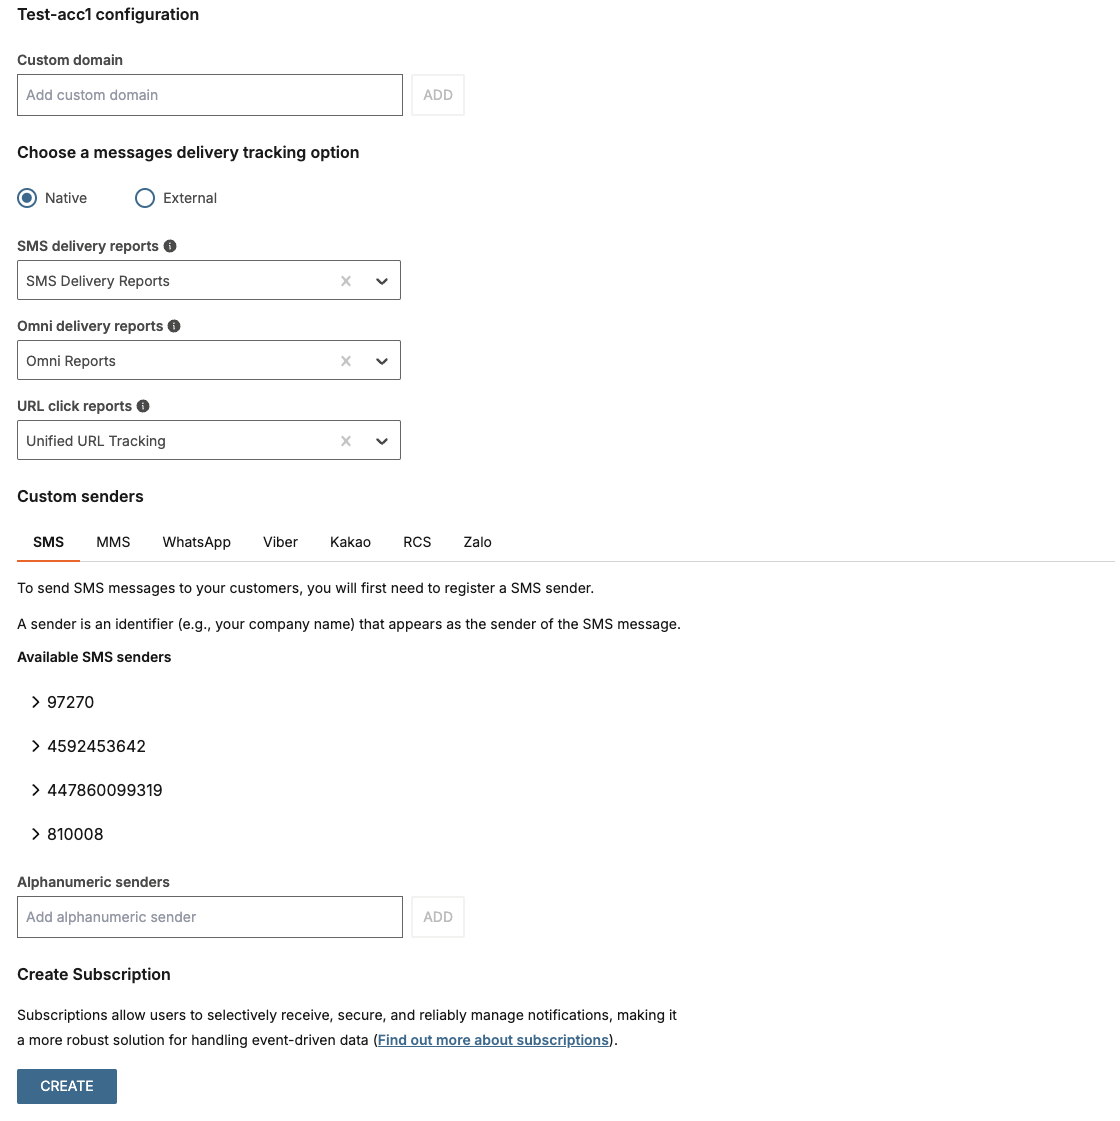
Add your custom Alphanumeric senders:
- SMS Sender Name * - your sender name for SMS channel
- Viber Sender Name * - your sender name for Viber channel
- Kakao Sender name * - your sender name for Kakao channel
- RCS Sender name * - your sender name for RCS channel
- Zalo Sender name * - your sender name for Zalo channel
* Custom domain, SMS Sender Name, Viber Sender Name, RCS Sender Name, Zalo Sender Name, and Kakao Sender Name fields are optional. When adding Alphanumeric sender names or custom domain, after typing the name, press Enter to create a token similar to the following screenshot.
-
Manage subscriptions. Subscriptions allow users to selectively receive, secure, and reliably manage notifications, making it a more robust solution for handling event-driven data:
- If you have added a new account with the
subscriptionsscope selected in the API key, subscriptions are automatically created for that account configuration - If you have already added an account and want to enable the subscriptions feature, enable the required API scopes to your API Key and follow the configuration steps. At the step for connecting to another Infobip account, click Create.
The Subscription action creates a new application in your Infobip web interface (opens in a new tab) under the Applications and Entities section. You can view all subscription details in the Subscriptions Management section.
Each subscription has its own notification profile where you can customize the webhook URL for getting DLR reports.
- If you have added a new account with the
-
Manage inbound number configuration. This feature allows users to manage inbound number configurations within the configuration application. Setting up an inbound configuration is necessary to enable two-way messaging and receive delivery reports (DLRs). Users can check the status of their number configuration in the Infobip web interface under Inbound Configuration. There are three possible configuration states:
- Create Configuration
- Indicates that the number does not have a default inbound configuration
- Creates an inbound configuration necessary for using two-way messaging actions in Salesforce Marketing Cloud
- Remove Configuration
- Deletes the default inbound configuration for the number
- Use Default Configuration
-
Indicates that the inbound number configuration is already set up for another application instead of SFMC
-
By selecting this option, the inbound configuration will be reassigned to SFMC
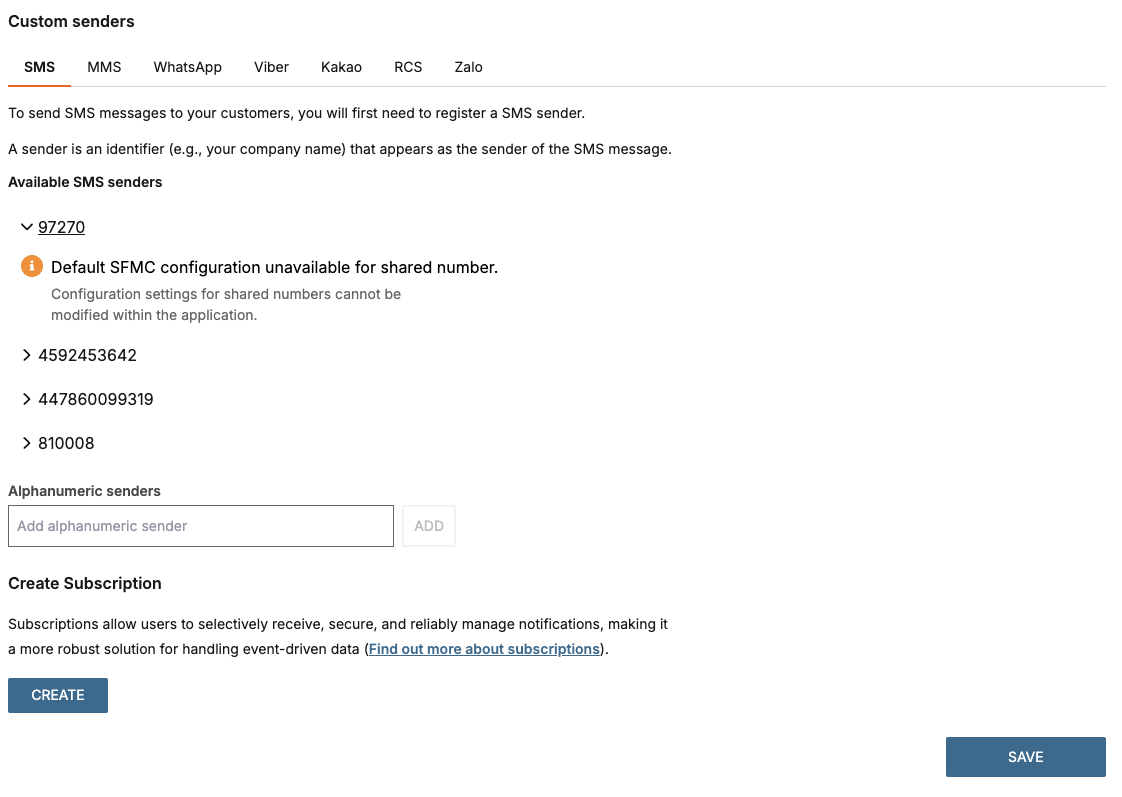
You cannot modify the inbound number configuration within the application if:
- The number is shared, disabling the configuration settings
- You do not have the necessary permissions to edit number settings on the account.
For any changes or troubleshooting, check your permissions and ensure the number is not shared before attempting modifications.
-
- Create Configuration
-
Enable Intermediate delivery status feature. Real-time delivery reports provide live SMS delivery insights, starting with an initial status that appears when the message is submitted. If the message is delivered later, you receive an updated report that includes the final delivery status and details such as pricing, GSM error codes (if any), and network or country information. When an error occurs, all relevant fields in the delivery event (DE) update to help you identify and resolve delivery issues quickly.
This automatically applies to every channel that supports the feature — SMS, RCS, MMS, Viber, Zalo, and KakaoTalk (Chingu) — ensuring consistent behavior across all message types.
Data is saved securely in the Infobip Configuration data extension using encryption methods and the next section is enabled.
Sender names are mandatory in case you are using senders that are not configured for two-way communication.
When you complete all the fields, click Save to save changes for the connected account. When you save changes for every connected account, go to the next step and finish the configuration.
When the changes are successful, you receive confirmation that the application has been successfully configured.
Journey Audience Builder
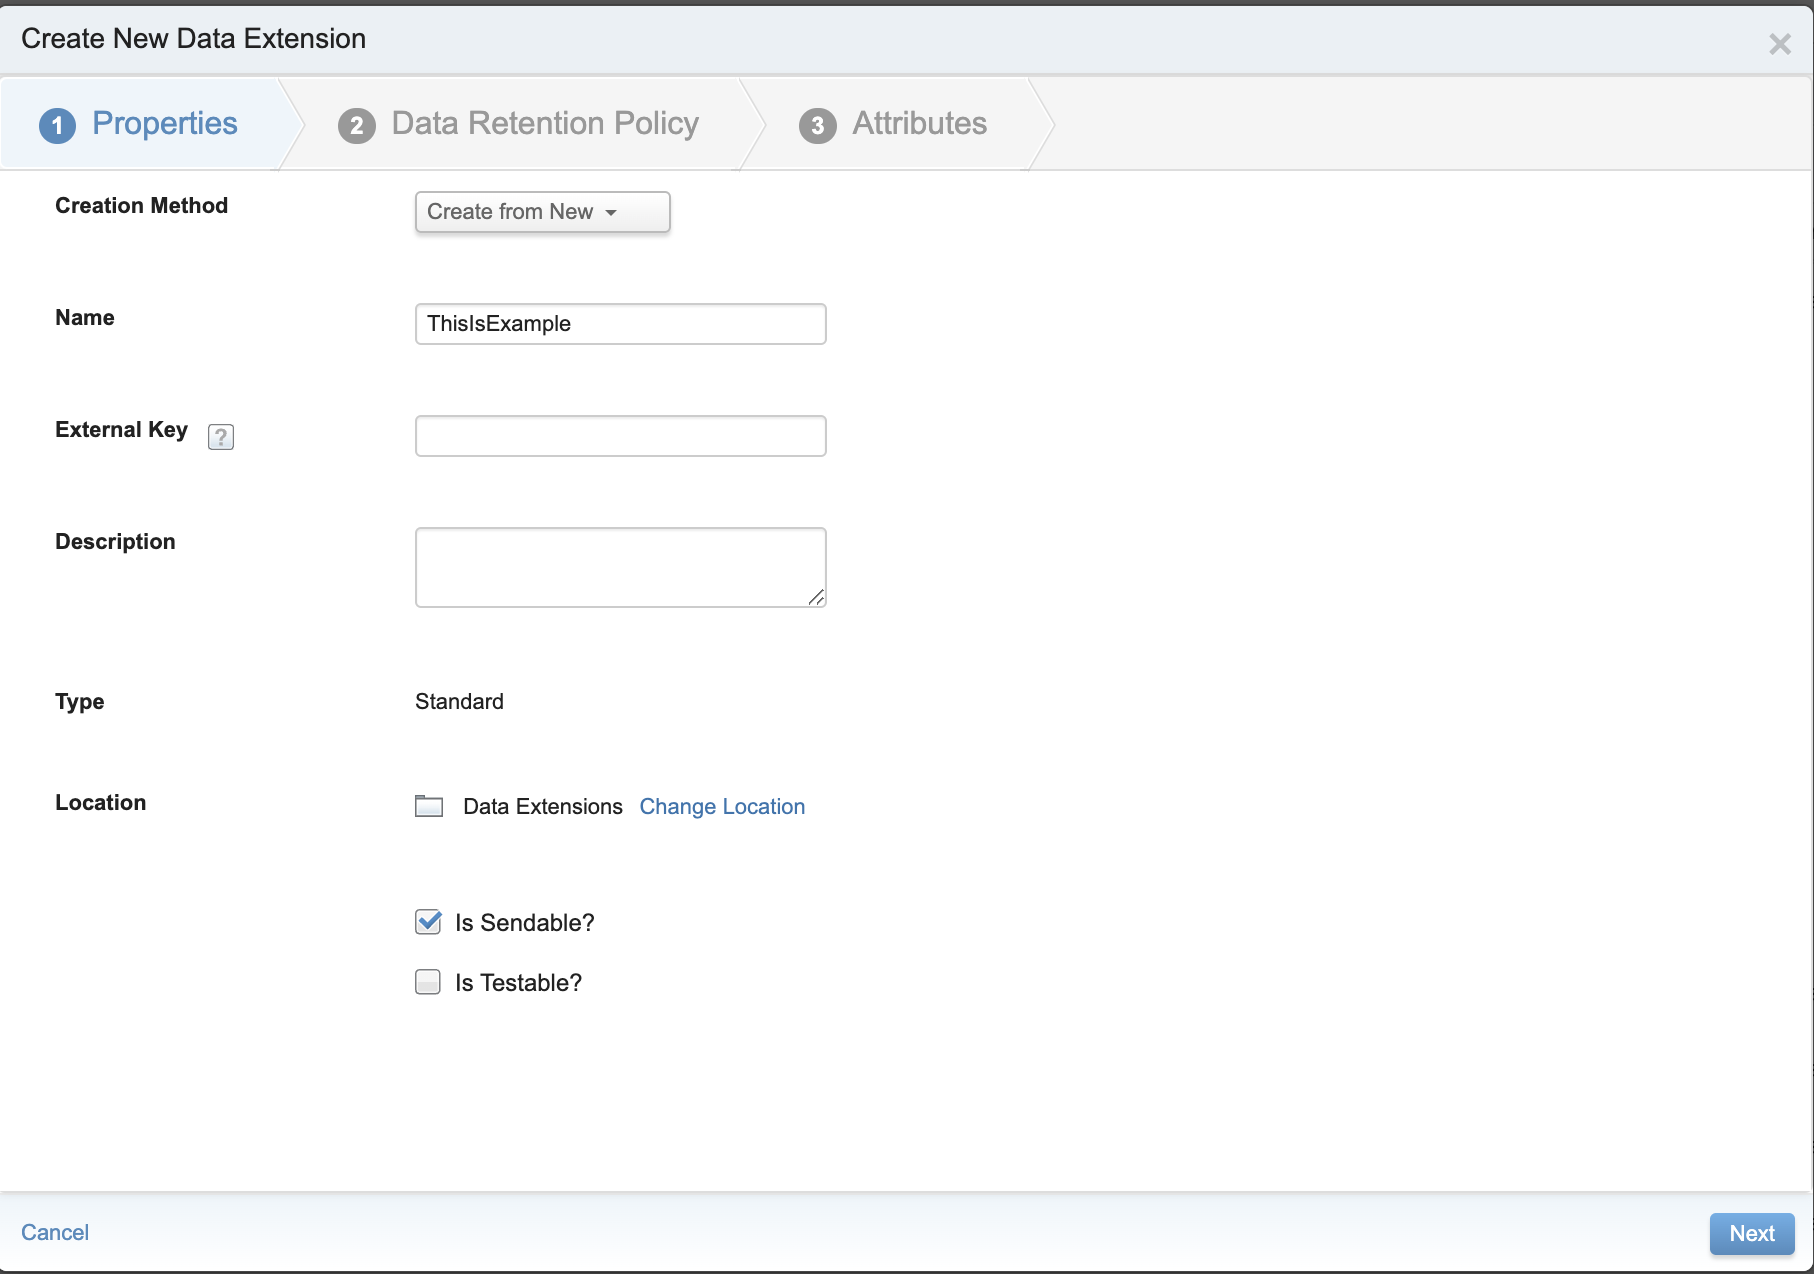
To prepare the Journey Audience and create Audience data extension, consider the following:
- Enable the Is Sendable? feature
- Adding mobile phone is mandatory - add it with Phone attribute type
- Setting Subscriber key is mandatory - set unique relationship for Subscriber key (for example,
ContactKey)
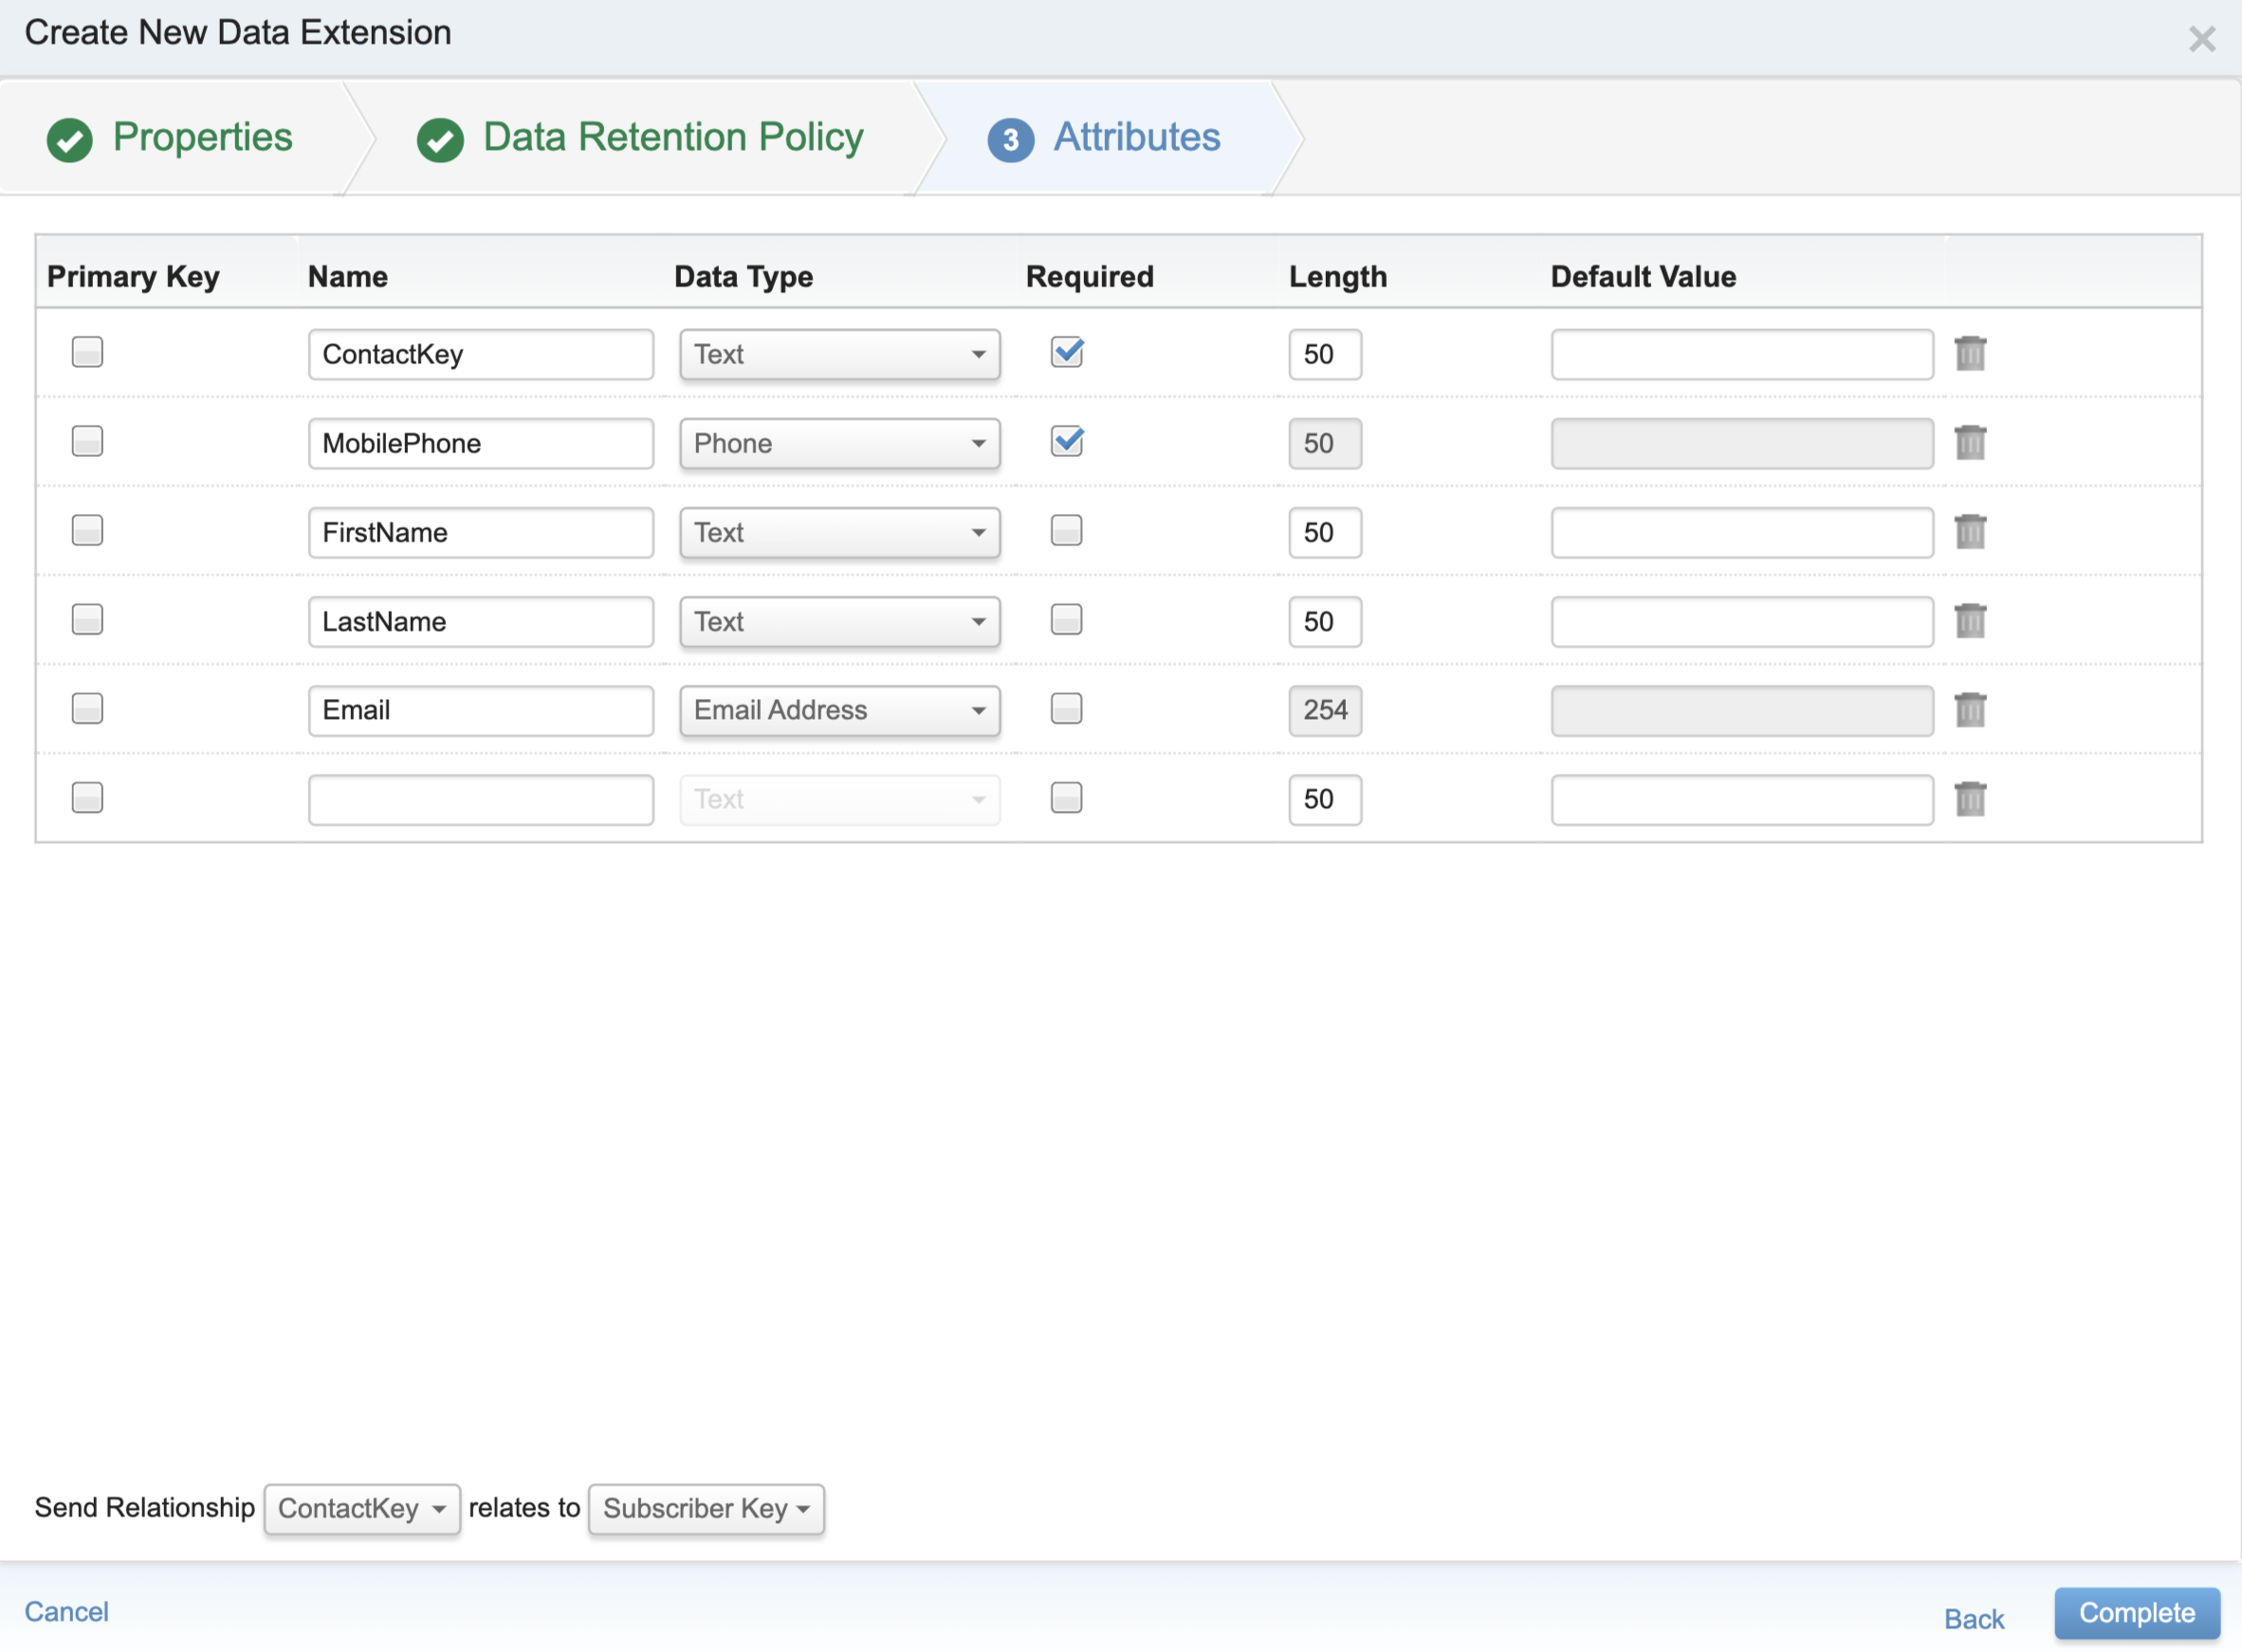
Attribute names must not include any spaces because Infobip Message will not be able to process it.
For reconfiguring the Subscriber Key relationship and sending feature, enter the data extension audience you want to reconfigure and click Edit on the left side of the screen. Then select the Used for Sending checkbox and map your ContactKey field to relate to the Subscriber Key. Click Save.
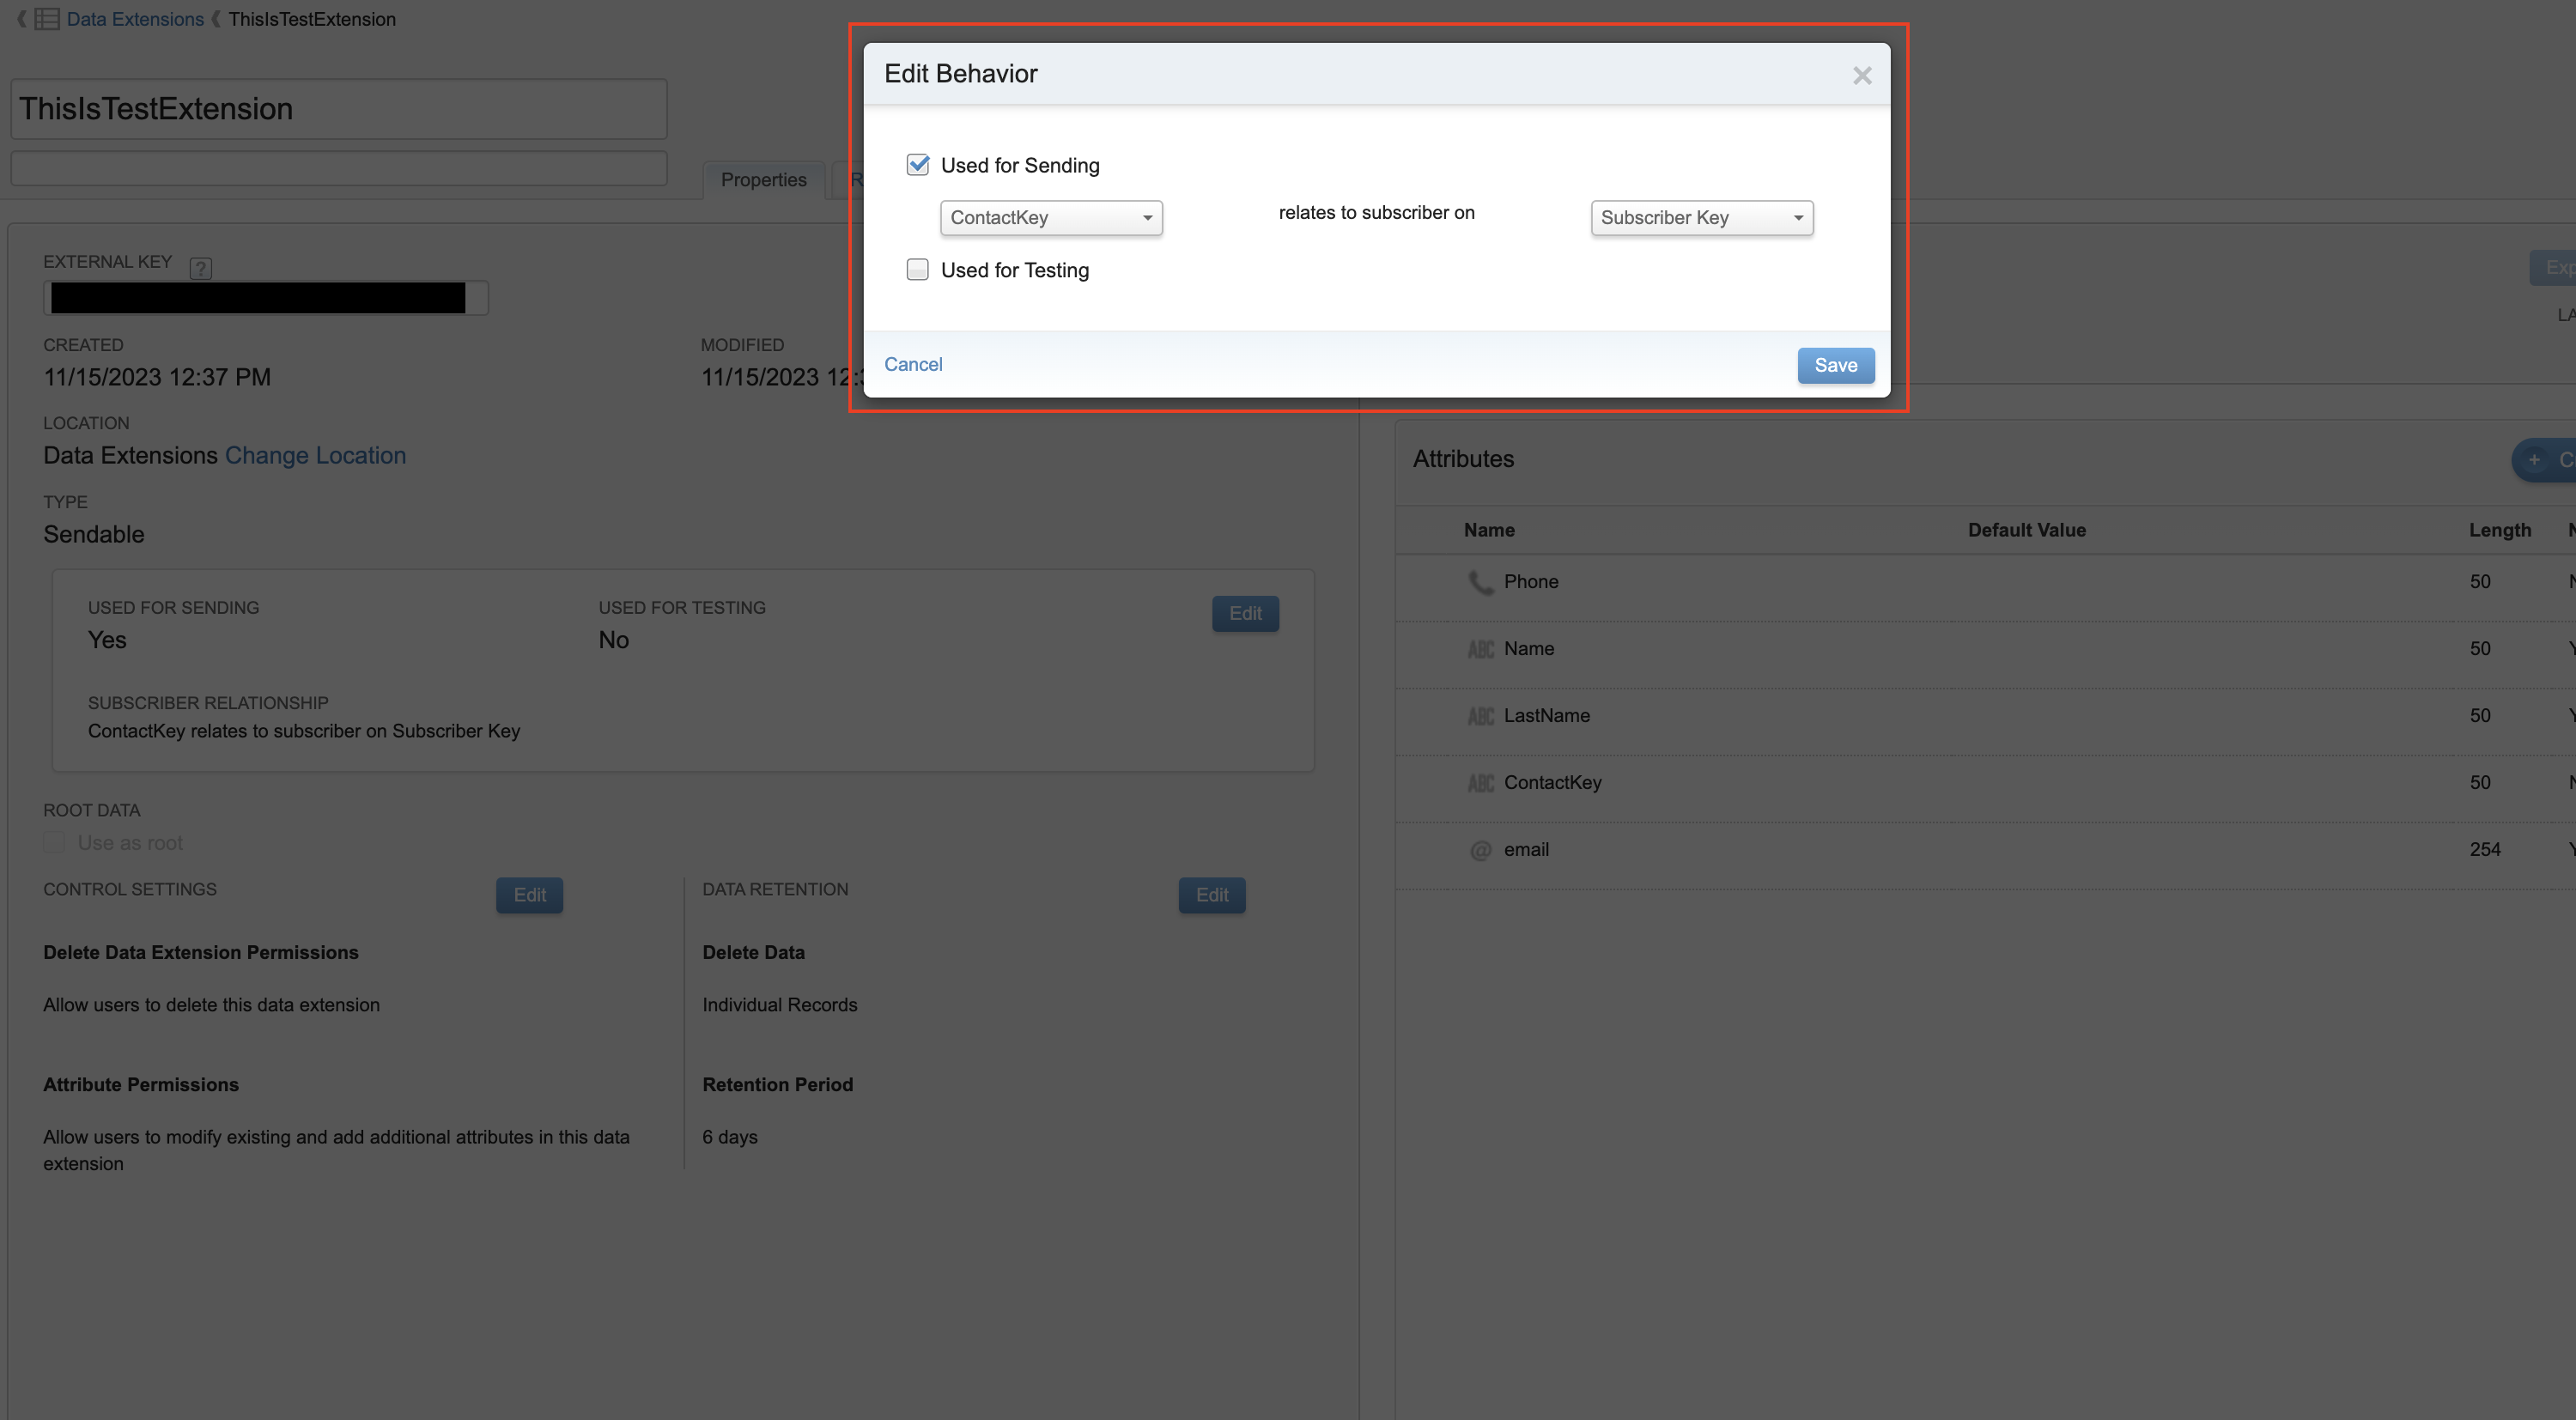
Your data extension is now ready for use in the Journey Builder. You can add your custom attributes to data extension. The next step is to map the Journey data extension to system data and message reports.
Infobip connector also works with Salesforce Data entry source (Salesforce Campaign and Salesforce Data are supported).
If there are multiple fields with Phone type in the audience data extension, messages are sent to the first populated phone-type field encountered.
Whitelist Infobip IP address
If you have enabled the Log Violations & Deny Access option in the Restrict Logins by IP Address (IP Allowlisting) feature, add the following IP addresses:
| 20.126.166.55 20.126.166.74 20.126.166.90 20.126.167.113 20.126.167.168 20.126.167.39 20.23.163.147 20.23.32.13 20.23.33.11 20.23.33.133 20.23.33.9 20.23.34.108 20.23.34.16 20.23.34.43 20.23.35.21 20.23.35.230 20.23.38.27 20.23.38.31 20.23.38.58 20.31.80.114 20.31.80.17 20.31.80.45 20.31.81.173 20.4.153.241 | 20.4.153.250 20.4.153.255 20.4.154.140 20.4.154.181 20.4.154.190 20.4.154.203 20.4.154.22 20.4.154.227 20.4.154.41 20.4.154.46 20.4.154.52 20.4.155.122 20.4.155.124 20.4.155.133 20.4.155.138 20.4.155.182 20.4.155.19 20.4.155.193 20.4.156.16 20.4.156.185 20.4.156.228 20.4.156.74 20.4.157.109 20.4.157.128 | 20.4.157.185 20.4.157.217 20.4.157.53 20.4.158.126 20.50.2.92 52.137.60.189 52.137.60.234 52.137.61.87 52.137.63.144 52.137.63.216 52.137.63.63 52.157.237.214 52.157.238.0 52.157.238.110 52.157.238.137 52.157.238.226 52.157.238.38 52.157.238.66 52.157.239.126 52.157.239.149 52.157.239.242 52.236.144.49 52.236.144.93 |
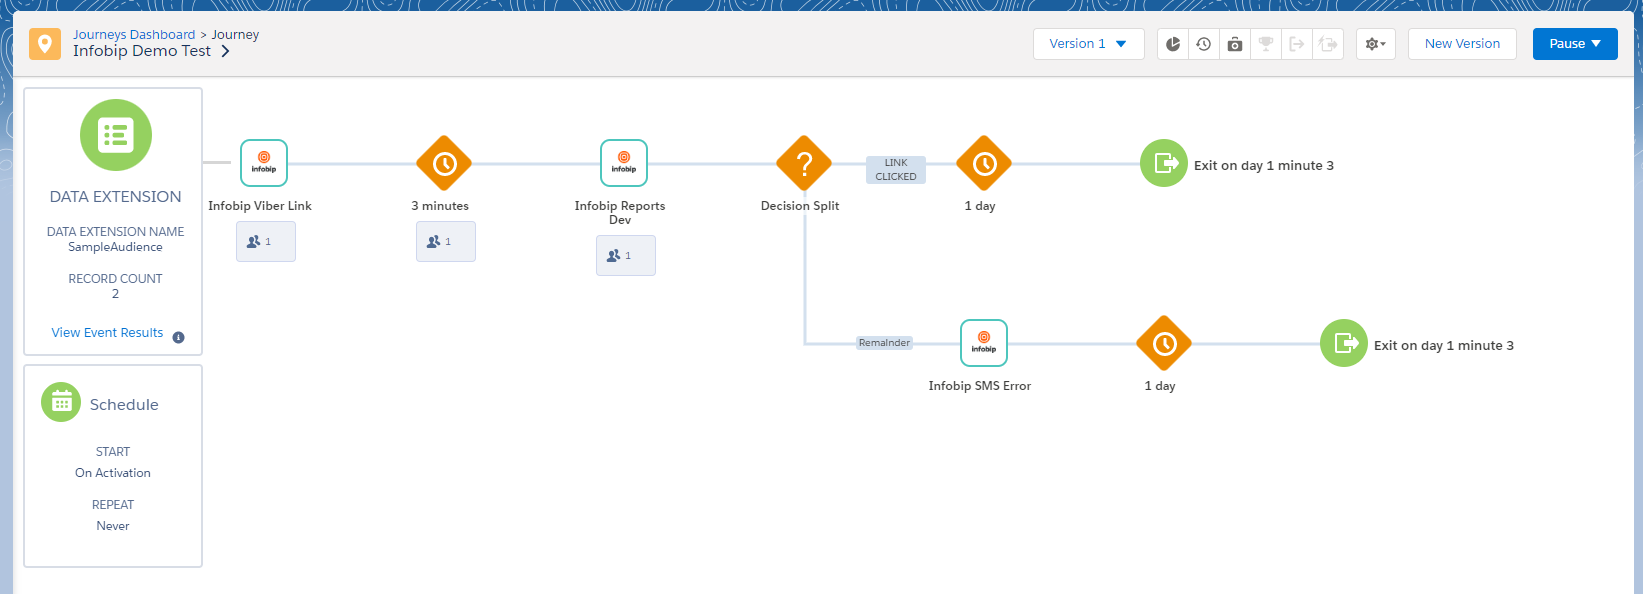
Create a Journey using Infobip channels
This section gives an example of how to create a journey that includes SMS, LMS, MMS, Viber, WhatsApp, Kakao Alim, Kakao ChinguTalk and Zalo. To get started:
- Log into Salesforce Marketing Cloud and go to Journey Builder.
- Create the new journey.
- Select whether to build a multi-step journey with the Data Extension or Salesforce Data entry point.
- Select the data extension that was created for this journey.
Include a message in a Journey
Make sure that you have Administrator role or you allow the Manage Data (Email/Subscribers/Data Extension) and WebService API (Email/Admin/API Access) permissions in your user settings.
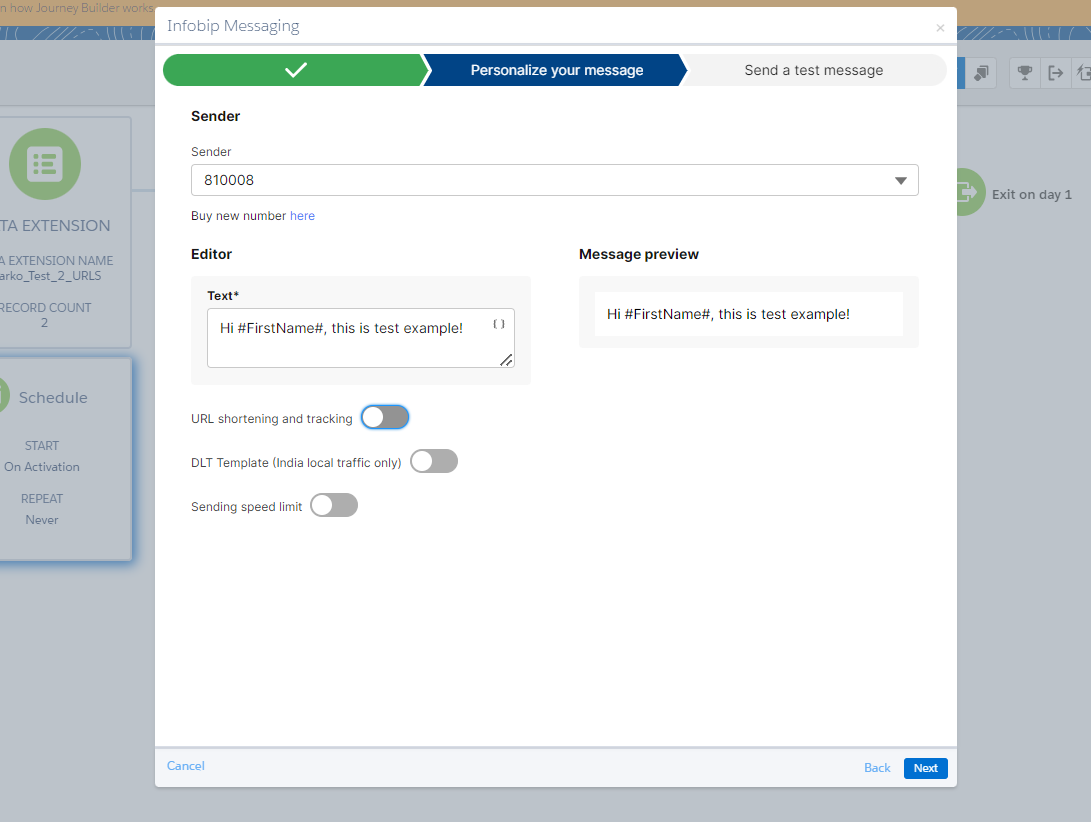
To include a message in a journey, select Infobip Message Custom Activity and choose the communication channel you want to use. You then automatically see a list of all available senders for the selected channel. Select a sender, and then click Next.
You must define the data extension before configuring the Infobip Message element. If you include the data extension after already defining the Infobip Message element, you may experience issues with the Journey, for example, not being able to pull records from the data extension when messages are being sent.
By default, Bulk Id in reports is defined for SMS, LMS, MMS, Viber, Kakao, and WhatsApp as Infobip SMS, Infobip LMS, Infobip MMS, Infobip Viber, Infobip Kakao, and Infobip WhatsApp, respectively. To change Bulk Id to a different value, provide a different activity name before the activity is configured.

To use hashtag (#) in a message, you must add an escape character (\). For example, This is a sample message with hashtag \#haveaniceday \#hello \#its2025 !.
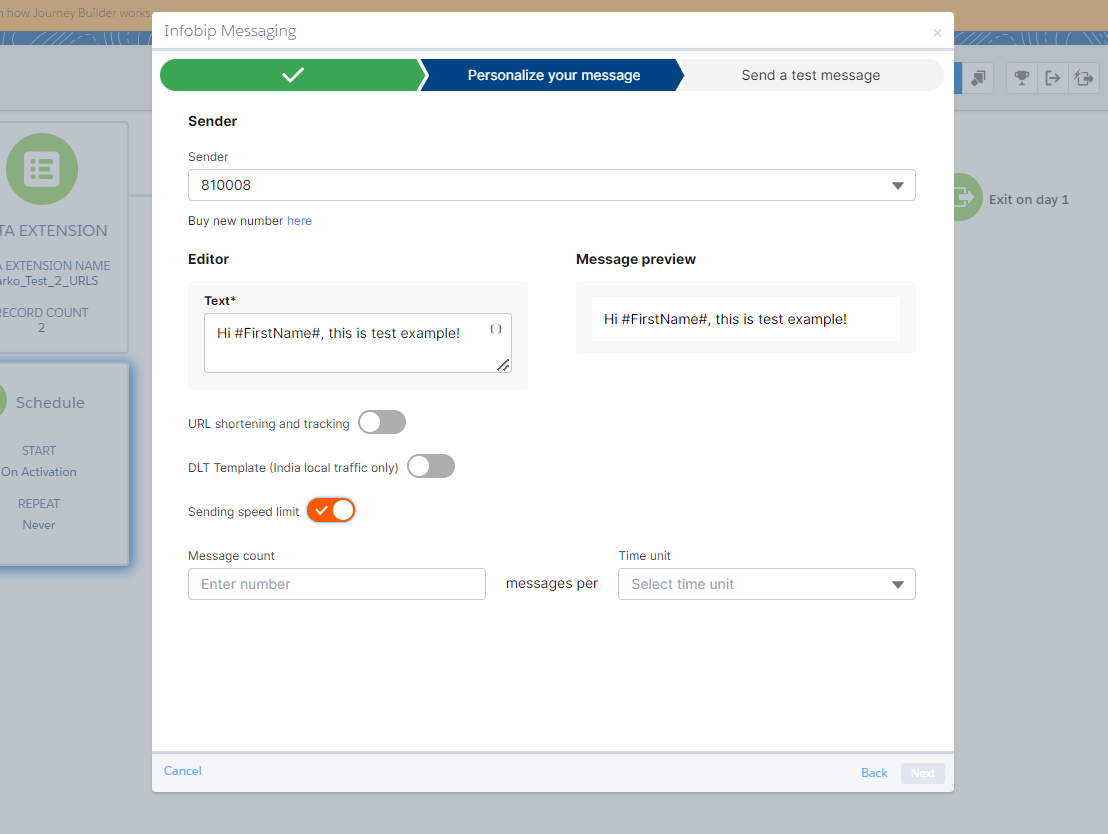
SMS in a Journey
Set up the message according to the form and click Next. For SMS, you can add a link to the message for URL tracking. When an end user clicks the link, a report is sent to the SMS URL Tracking data extension. You can send a test message if you want to, but placeholder values will not be dynamically replaced in test messages.
Regional
Region-specific parameters are often imposed by local laws. Use the following information if the country or region that you are sending an SMS to requires additional information.
Language character set
This feature uses the language code to set the correct character. The possible values are:
TRfor TurkishESfor SpanishPTfor PortugueseAUTODETECTto let platform select the character set based on the message content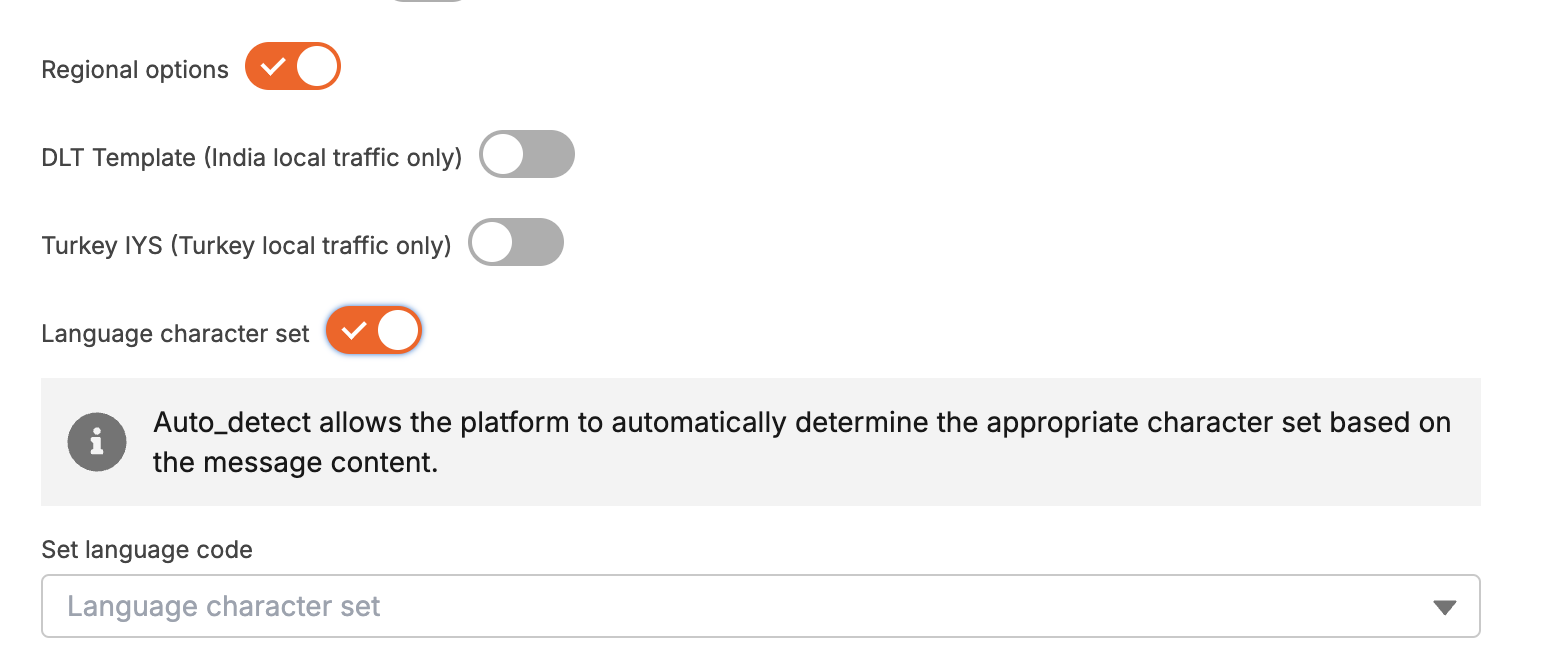
Turkey local traffic only
To send promotional SMS to phone numbers registered in Turkey, include IYS regulations specific parameters:
- Brand Code (optional) - ID of the company based on a company VAT number
- Recipient Type (mandatory) - must be
TACIRorBIREYSEL
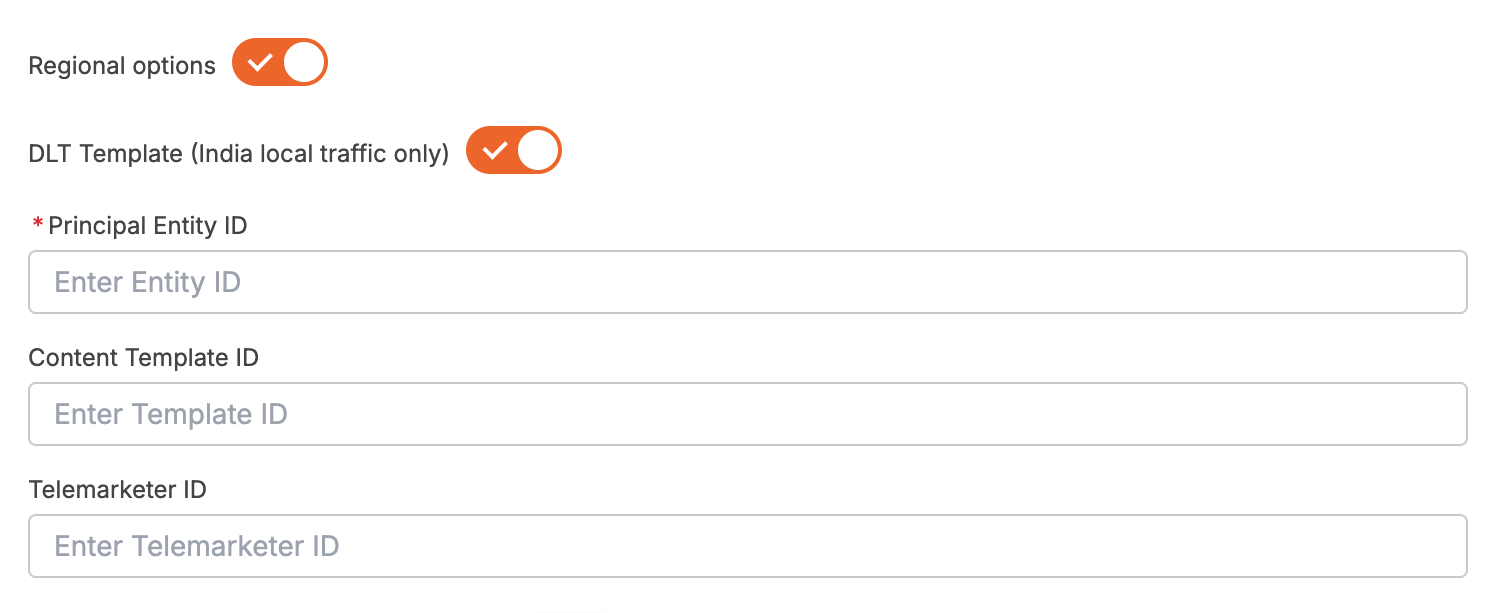
India local traffic only
To define the DLT (Distributed Ledger Technology) template, select DLT Template (India local traffic only) and update the following fields:
- Principal Entity ID (mandatory) - your assigned DLT principal entity ID
- Content Template ID (optional) - the registered DLT content template ID that matches the message you are sending
- Telemarketer Id - your assigned Telemarketer Id (required for Aggregators)
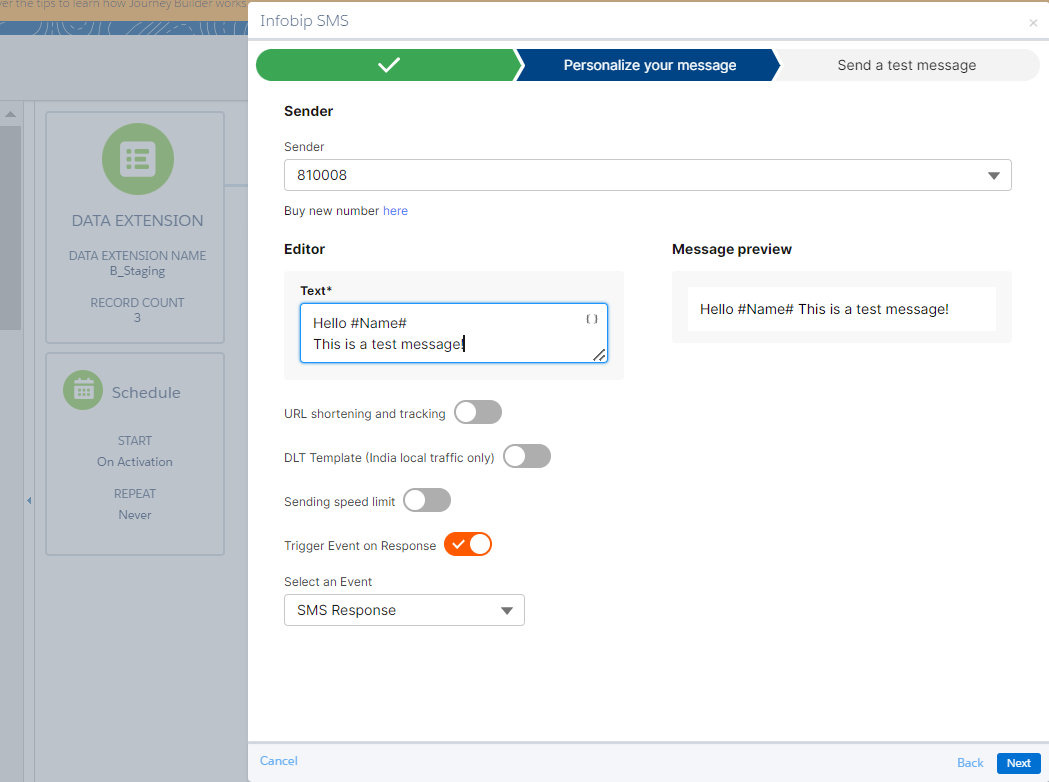
To include additional features for this channel (URL shortening and tracking, sending speed limit, trigger event on response, SMS failover, custom callback data), see Additional features.
To enable two-way communication, enable the Trigger Event on Response toggle.
LMS in a Journey
LMS stands for Long SMS. Give your message a title and personalize it so every end-user in the journey gets personalized message. Please keep in mind that the Reseller code is mandatory field and you need to enter one to send SMS messages to phone numbers registered in South Korea.
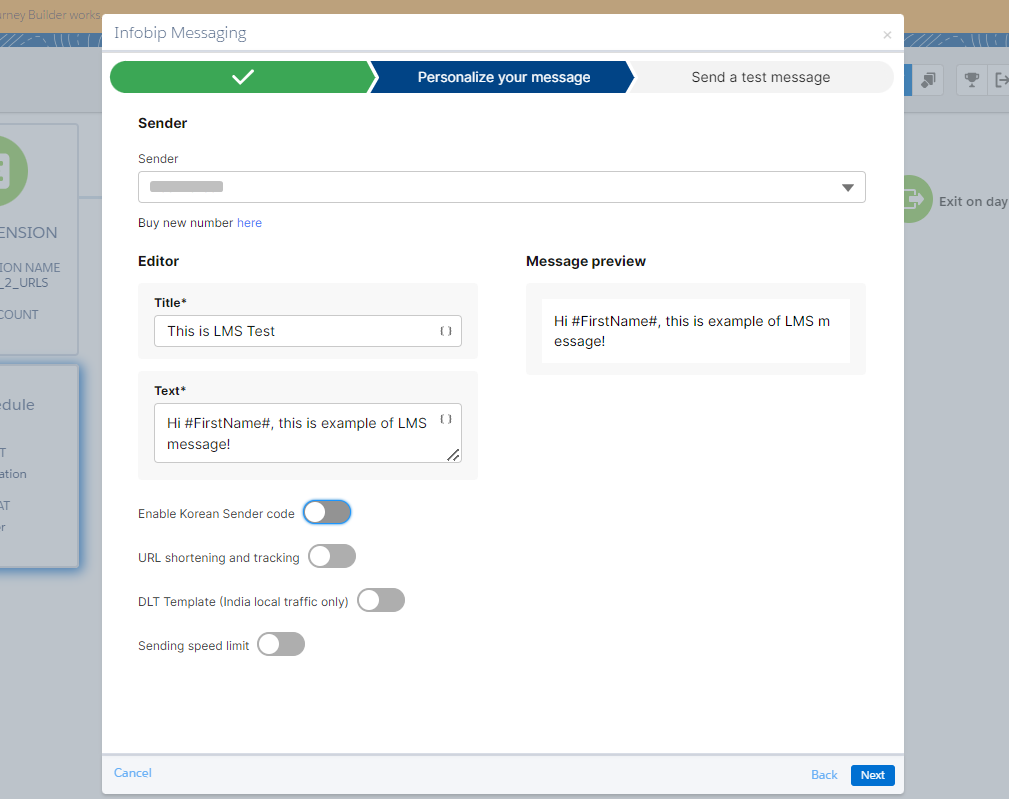
To add tracking and URL shortening for URLs in the LMS body, enable URL Shortening & Tracking.
To include additional features for this channel (URL shortening and tracking, sending speed limit, trigger Event on Response, SMS failover, custom callback data), see Additional features.
MMS in a Journey
Send interactive MMS messages and get delivery reports. Add MMS segment type and create interactive messages. Text and Media files (image, video, audio, documents) are supported. Personalize the message by adding merge fields from the drop-down list.
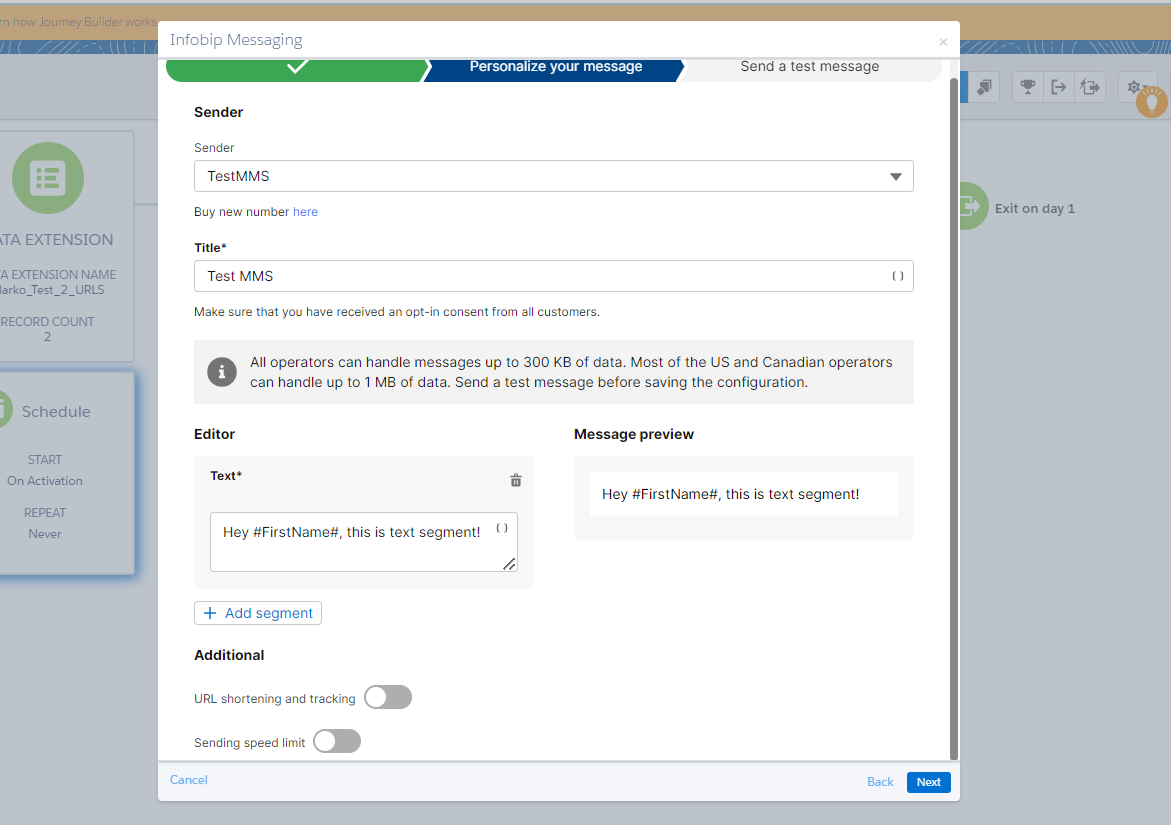
All operators handle messages of up to 300KB of data. Most of the US and Canadian carriers can handle up to 1MB of data. It is recommended that you send a test message before saving.
To include additional features for this channel (URL shortening and tracking, sending speed limit, trigger event on response, SMS failover, custom callback data), see Additional features.
To enable two-way communication, enable the Trigger Event on Response toggle.
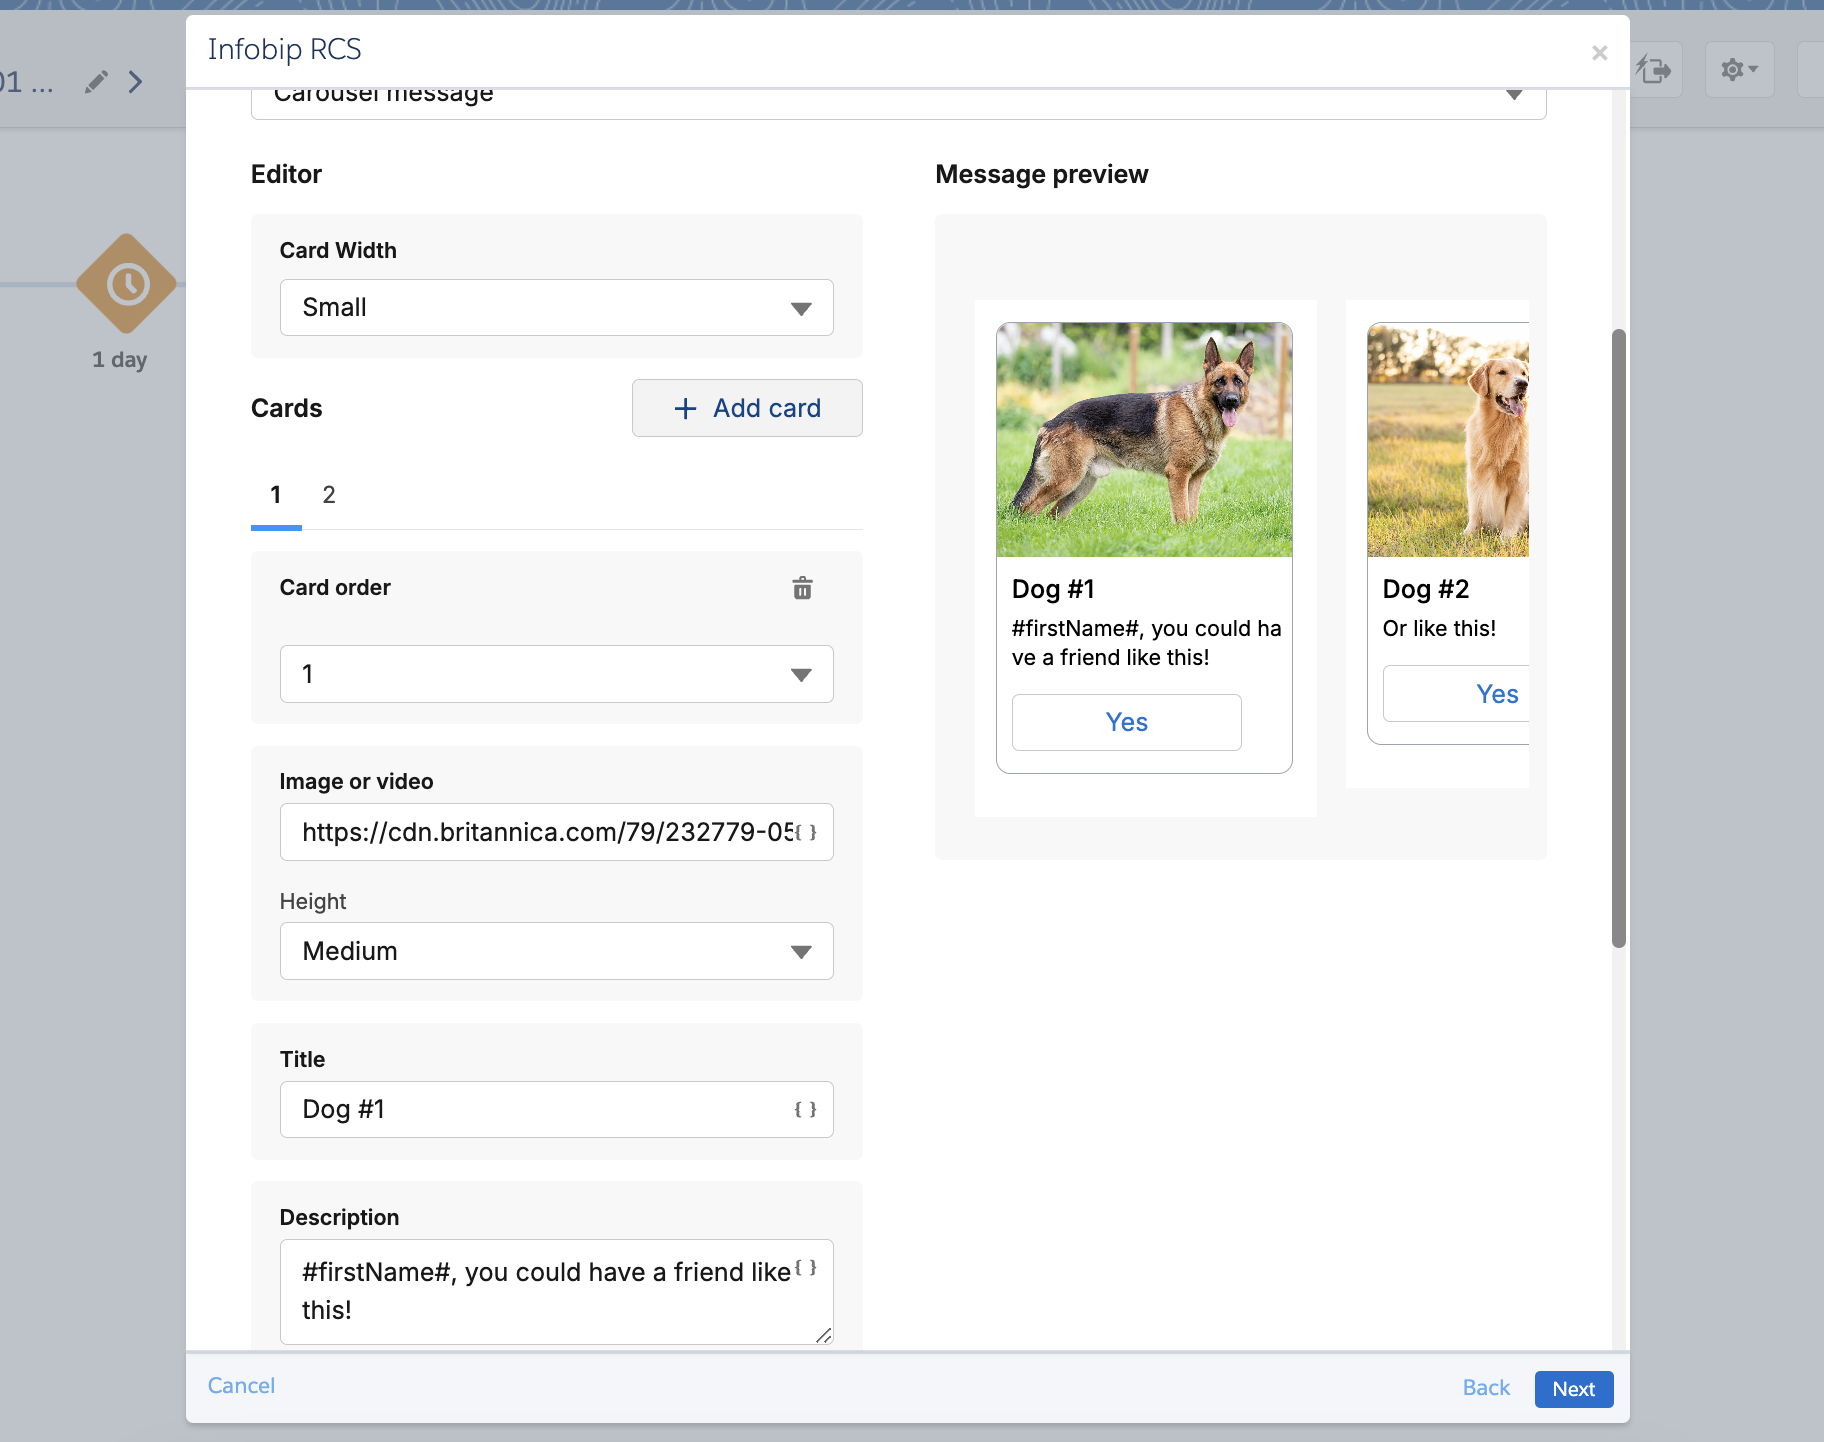
RCS in a Journey
To send messages using the RCS channel, you must have a registered sender on your Infobip account. For more information, see RCS.
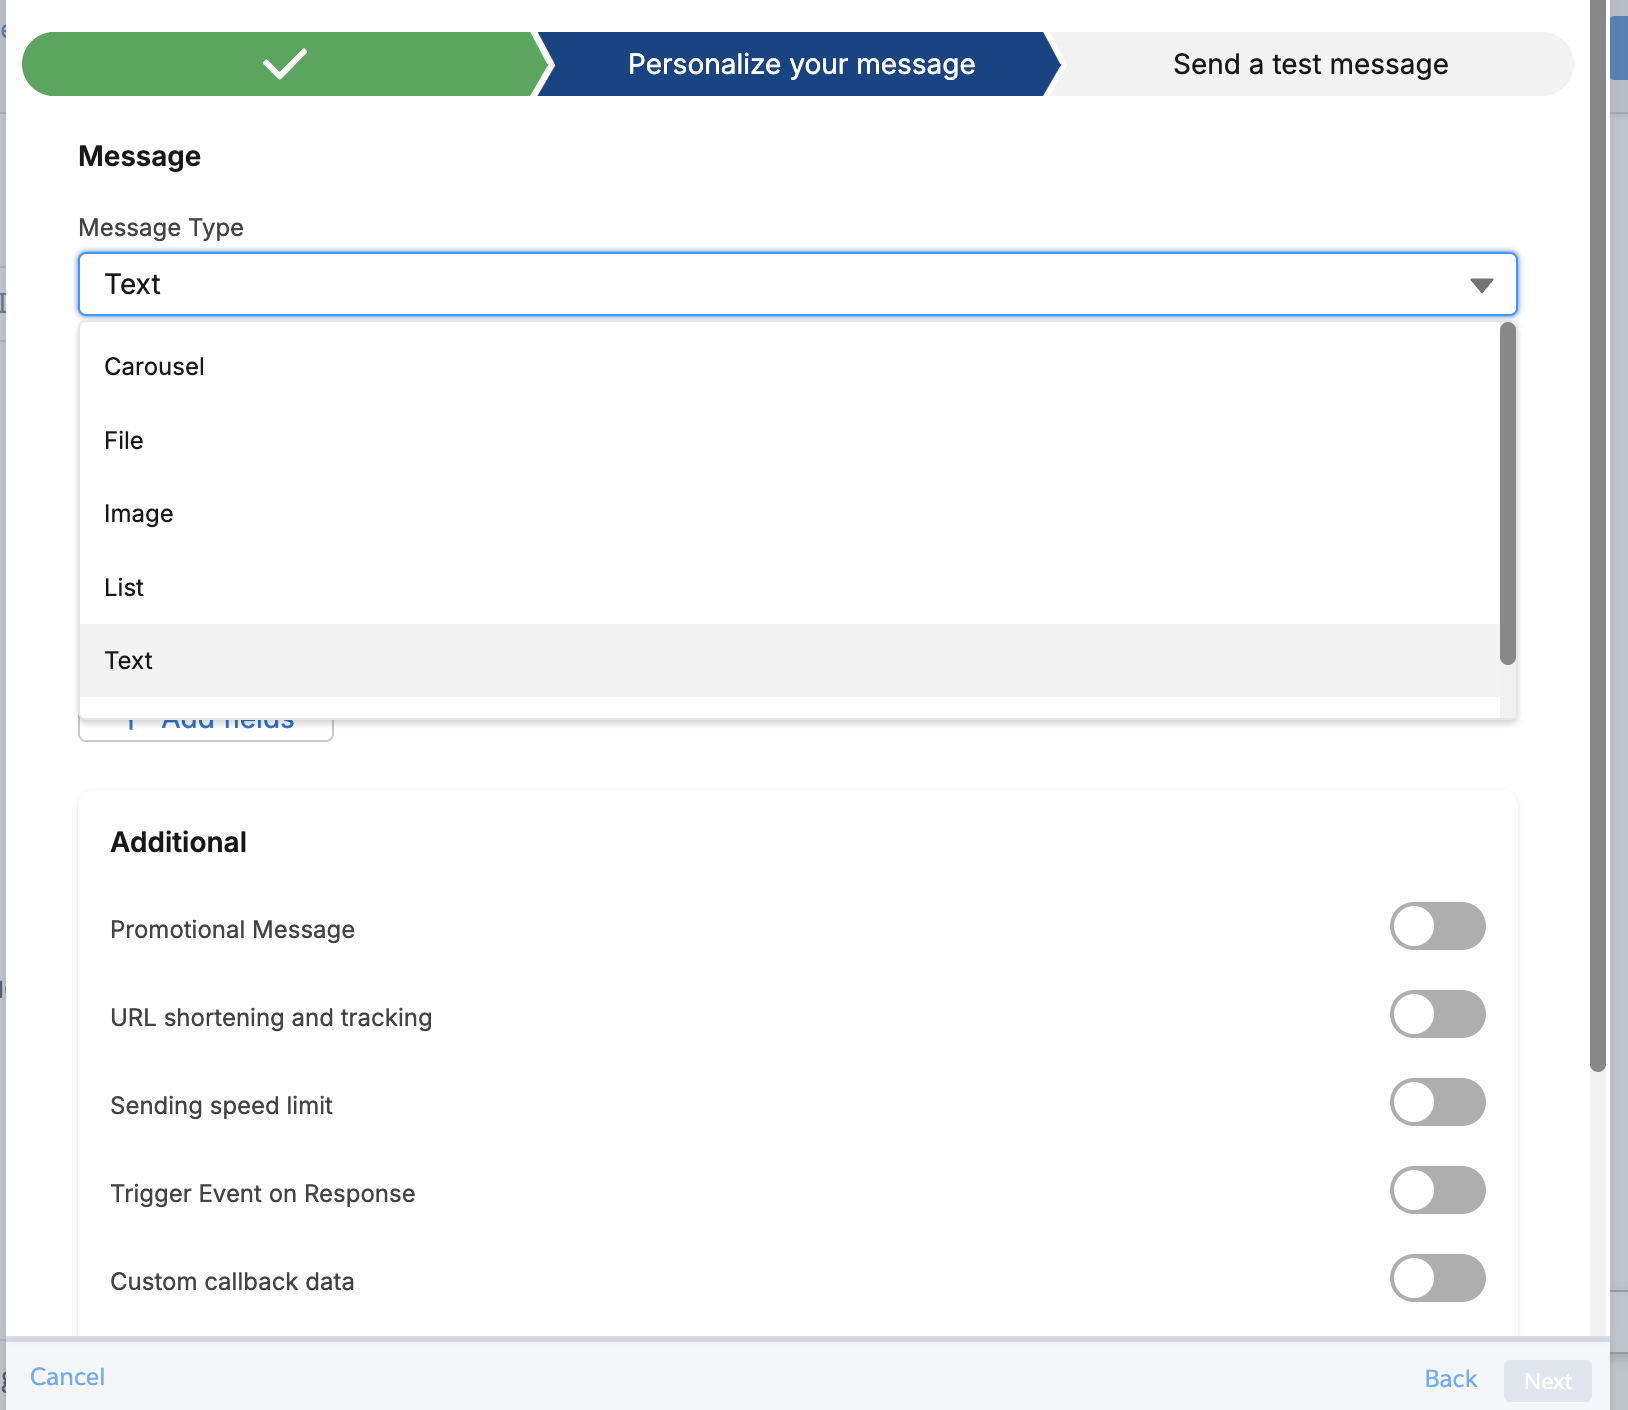
Send messages to one of the following supported types:
- text
- file
- card
- carousel
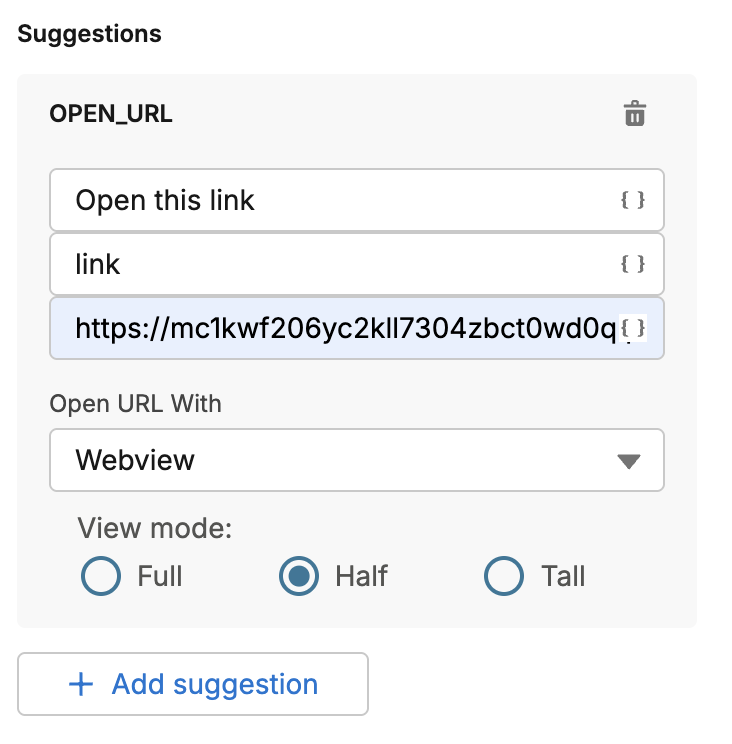
You can add suggestions as clickable actions to the entire message or as a single suggestion to individual cards within a carousel. The possible combinations include:
- Reply
- Open URL
- Dial phone
- Show location
- Request location
- Calendar event
The Open URL suggestion type shows further options that define how the URL is displayed.
| Open URL | Description |
|---|---|
| Browser | Opens the link in the device's default browser. This is the default option when no specific method is selected or when the device does not support Webview. |
| Webview | Opens the link inside the app using embedded Webview for a more integrated in-app browsing experience. When you choose the Webview option, View mode lets you specify how much screen space the Webview occupies on the device:
|
To include additional features for this channel (custom callback data, sending speed limit, URL shortening and tracking), see Additional features.
Viber in a Journey
Viber enables you to send rich, interactive messages to include more than plain text. Using Viber, you can enhance your messages with buttons, images, videos, and structured content to deliver engaging user experiences.
Viber supports four basic message types, each with optional fields that allow additional interactivity:
- Text
- Image
- Video
- File
In addition to the standard message types, you can also use advanced interactive formats, including:
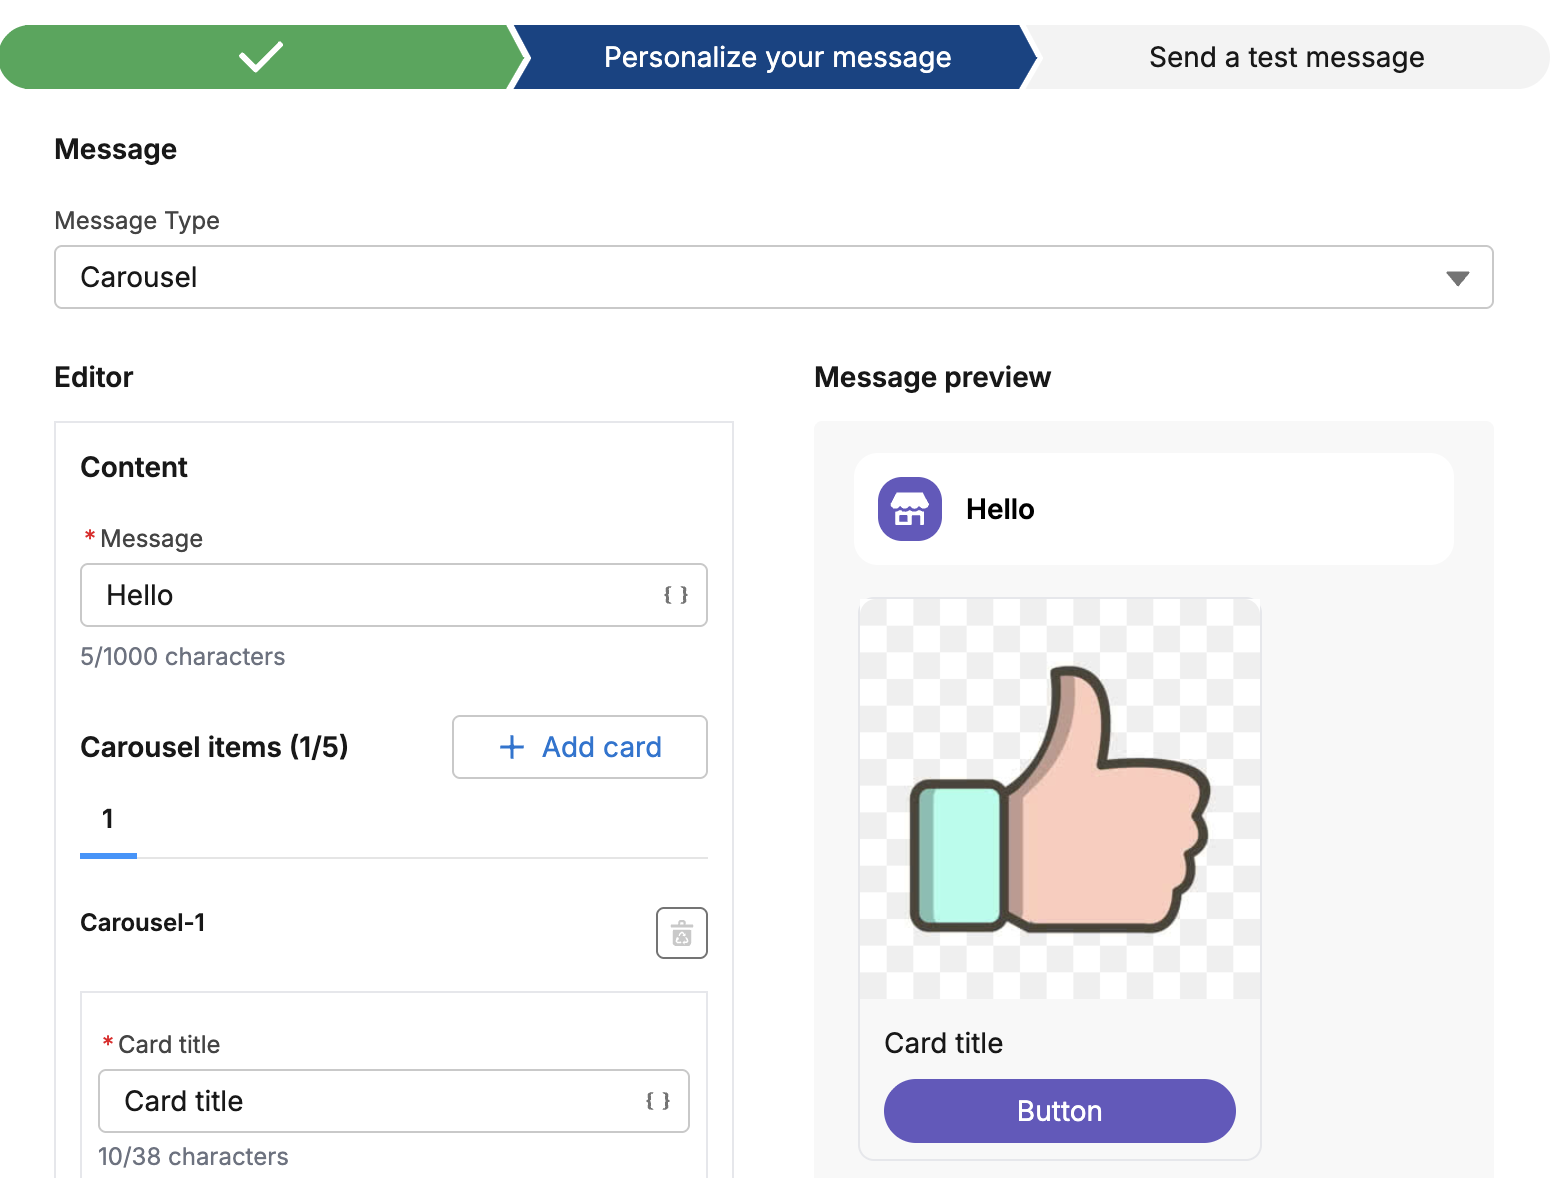
- Carousel messages, which display multiple swipeable cards
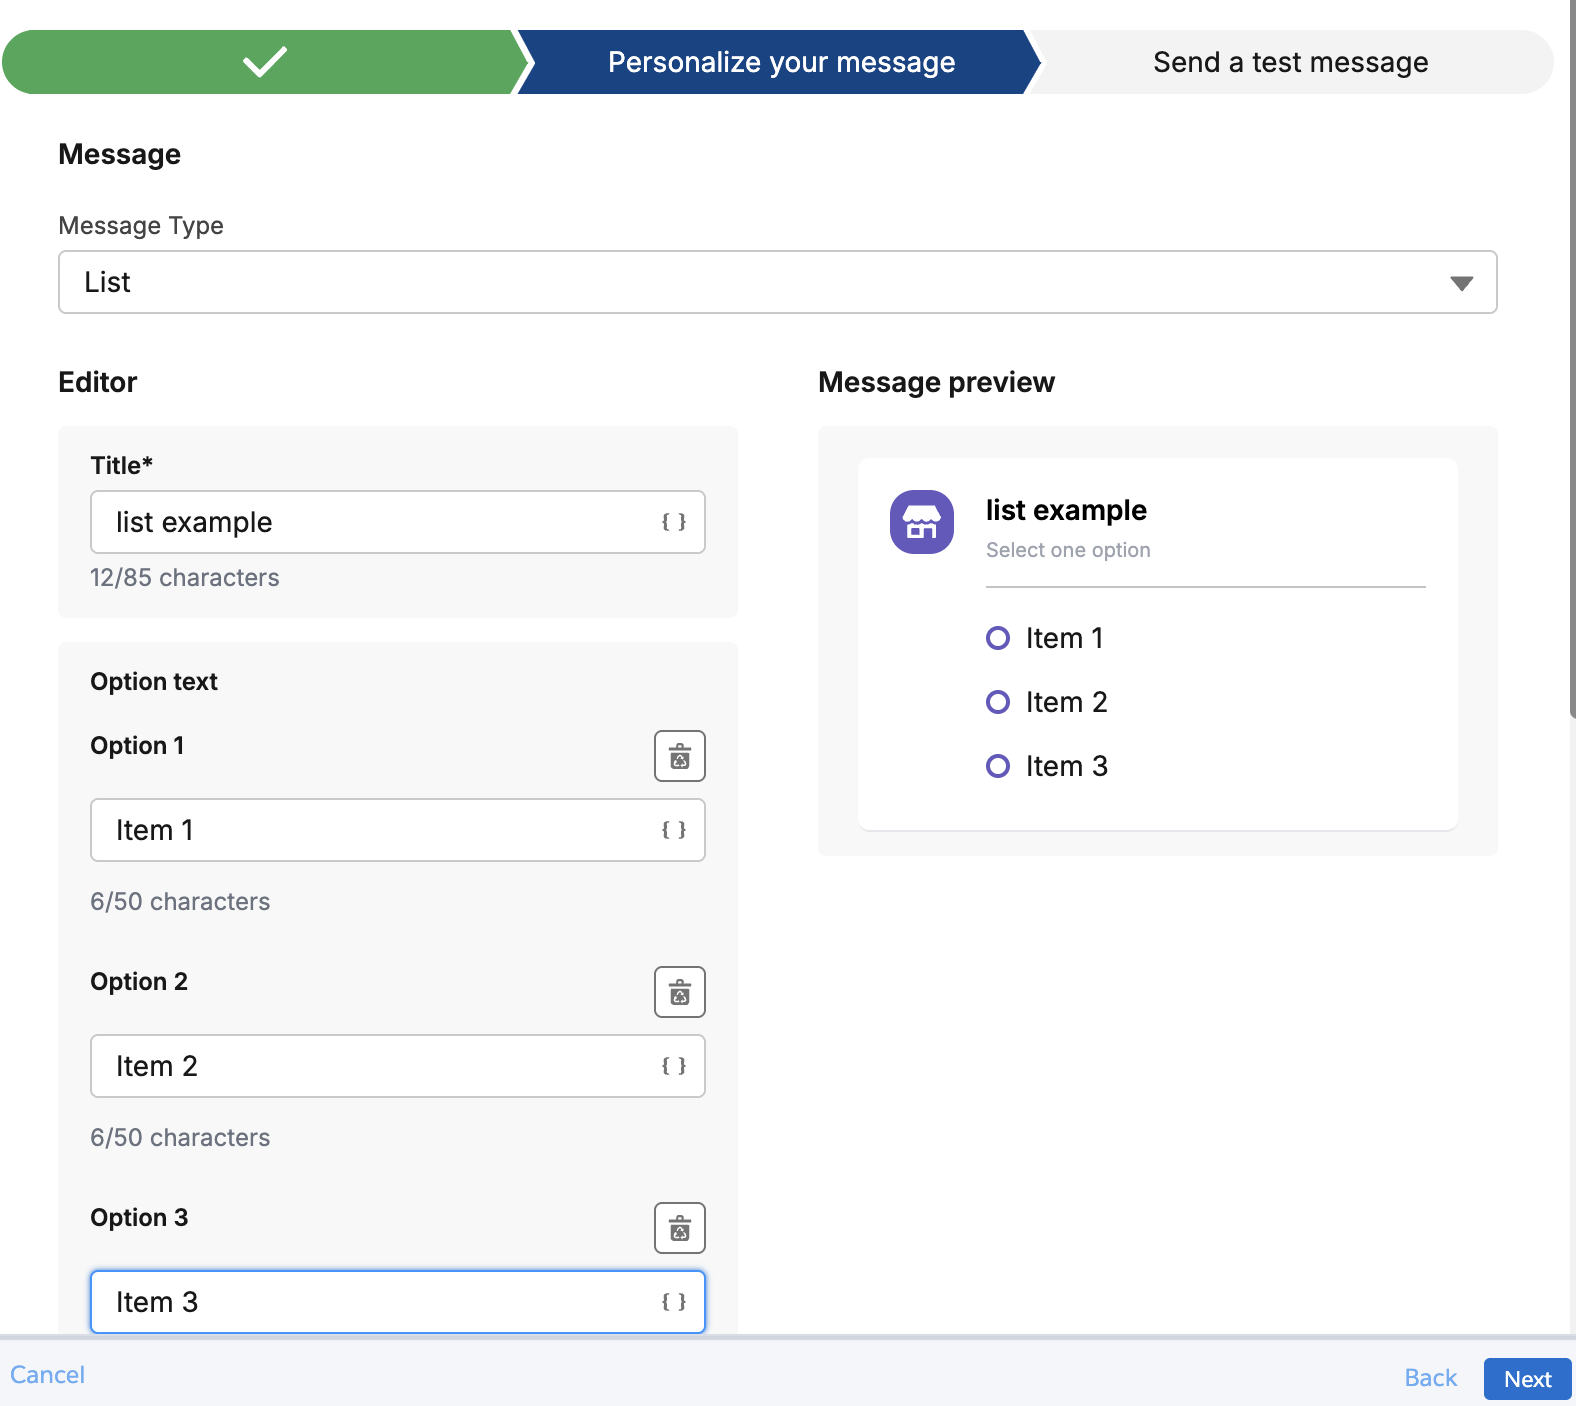
- List messages, which present selectable items in a structured layout
Advanced message types help you to create more dynamic, guided, and visually engaging conversations with users.
Each basic message type supports additional optional fields, depending on the type, which can be used to extend functionality and enhance interactivity.
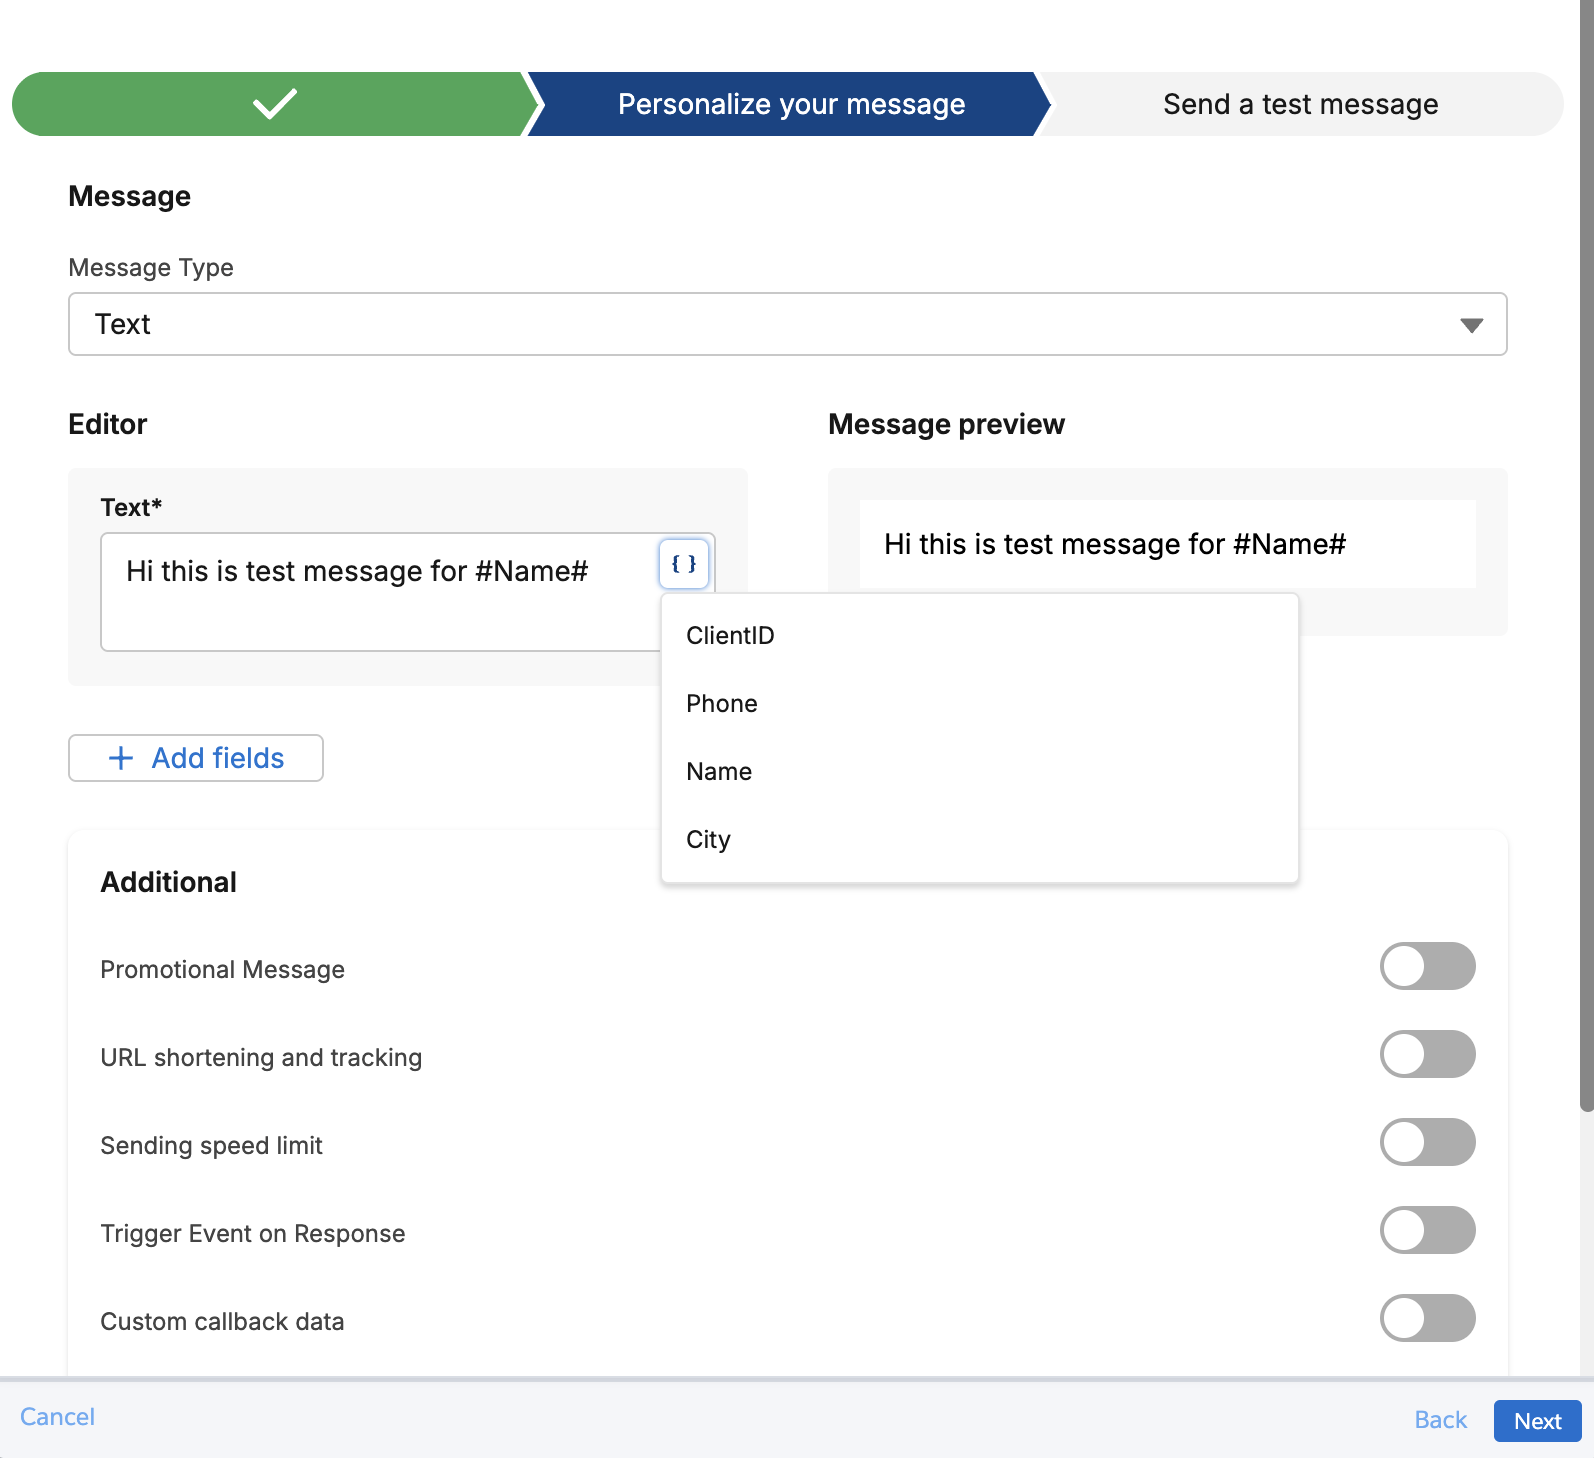
You can personalize the message by adding merge fields from the drop-down list.
Viber channels also support a carousel message type, which requires a minimum of two cards.
Viber also supports list options, with a maximum of five list items.
To include additional features for this channel (URL shortening and tracking, sending speed limit, trigger event on response, SMS failover, Custom callback data), see Additional features.
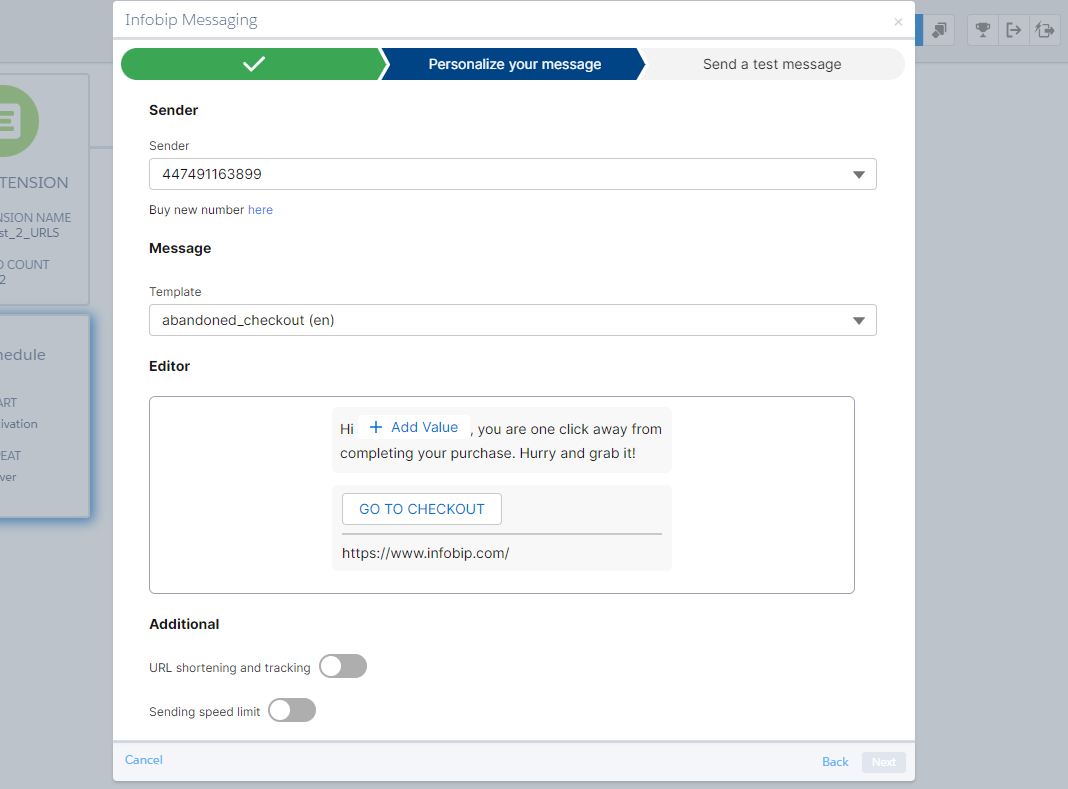
WhatsApp in a Journey
To send journey messages by using the WhatsApp channel, you must create and register your message templates (opens in a new tab) and then submit the templates to WhatsApp for approval. Select a template from the Template drop-down list.
The supported templates are:
- Text Templates
- Media Templates
Personalize templates by adding placeholder values. For more information about supported templates, see Message types.
To include additional features for this channel (URL shortening and tracking, sending speed limit, SMS failover, custom callback data), see Additional features.
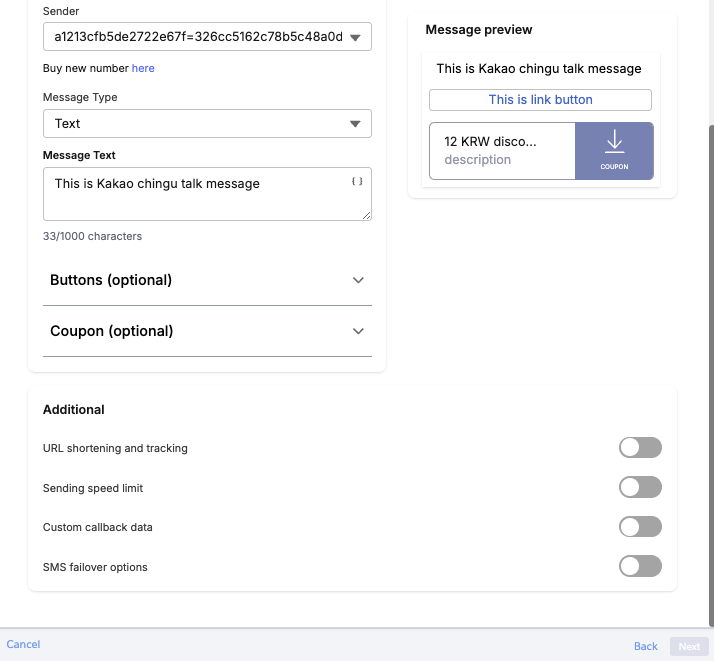
Kakao Chingu Talk in a Journey
Kakao Chingu Talk allows you to send a variety of message types. You can choose from the following main message formats:
- Text
- Image
- Commerce
- Item list
- Premium video
- Carousel
- Carousel commerce
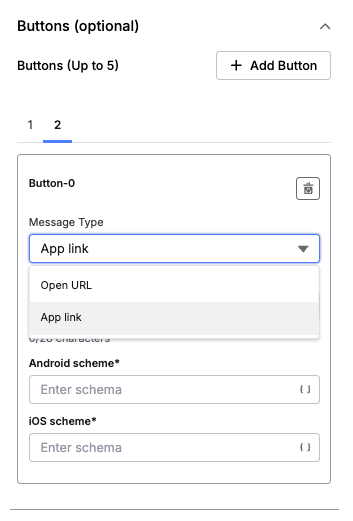
There are two main button types that can be included in messages:
- App link
- Open URL
The number of buttons you can add depends on the message type.
You can include different types of discount coupons in your messages:
- Price discount coupon
- Percentage discount coupon
- Shipping discount coupon
- Free coupon
- Up coupon

To include additional features for this channel (sending speed limit, SMS failover, custom callback data), see Additional features.
Kakao Alim in a Journey
This channel is currently in a test version and uses templates to send messages. To register a template, contact Kakao Alim support.
To create a template, there are some mandatory fields you need to fill in. Please make sure you enter the correct data for the template you are trying to use, as currently there are no validations. Templates are built of Mandatory fields: Template name and Message Body, and Optional fields: Template title, Image URL, and Buttons.
Kakao Alim supports seven different button types:
- App Link
- Delivery Tracking
- Web Link
- Chatbot Switch
- Bot Keyword
- Message Delivery
- Add Channel
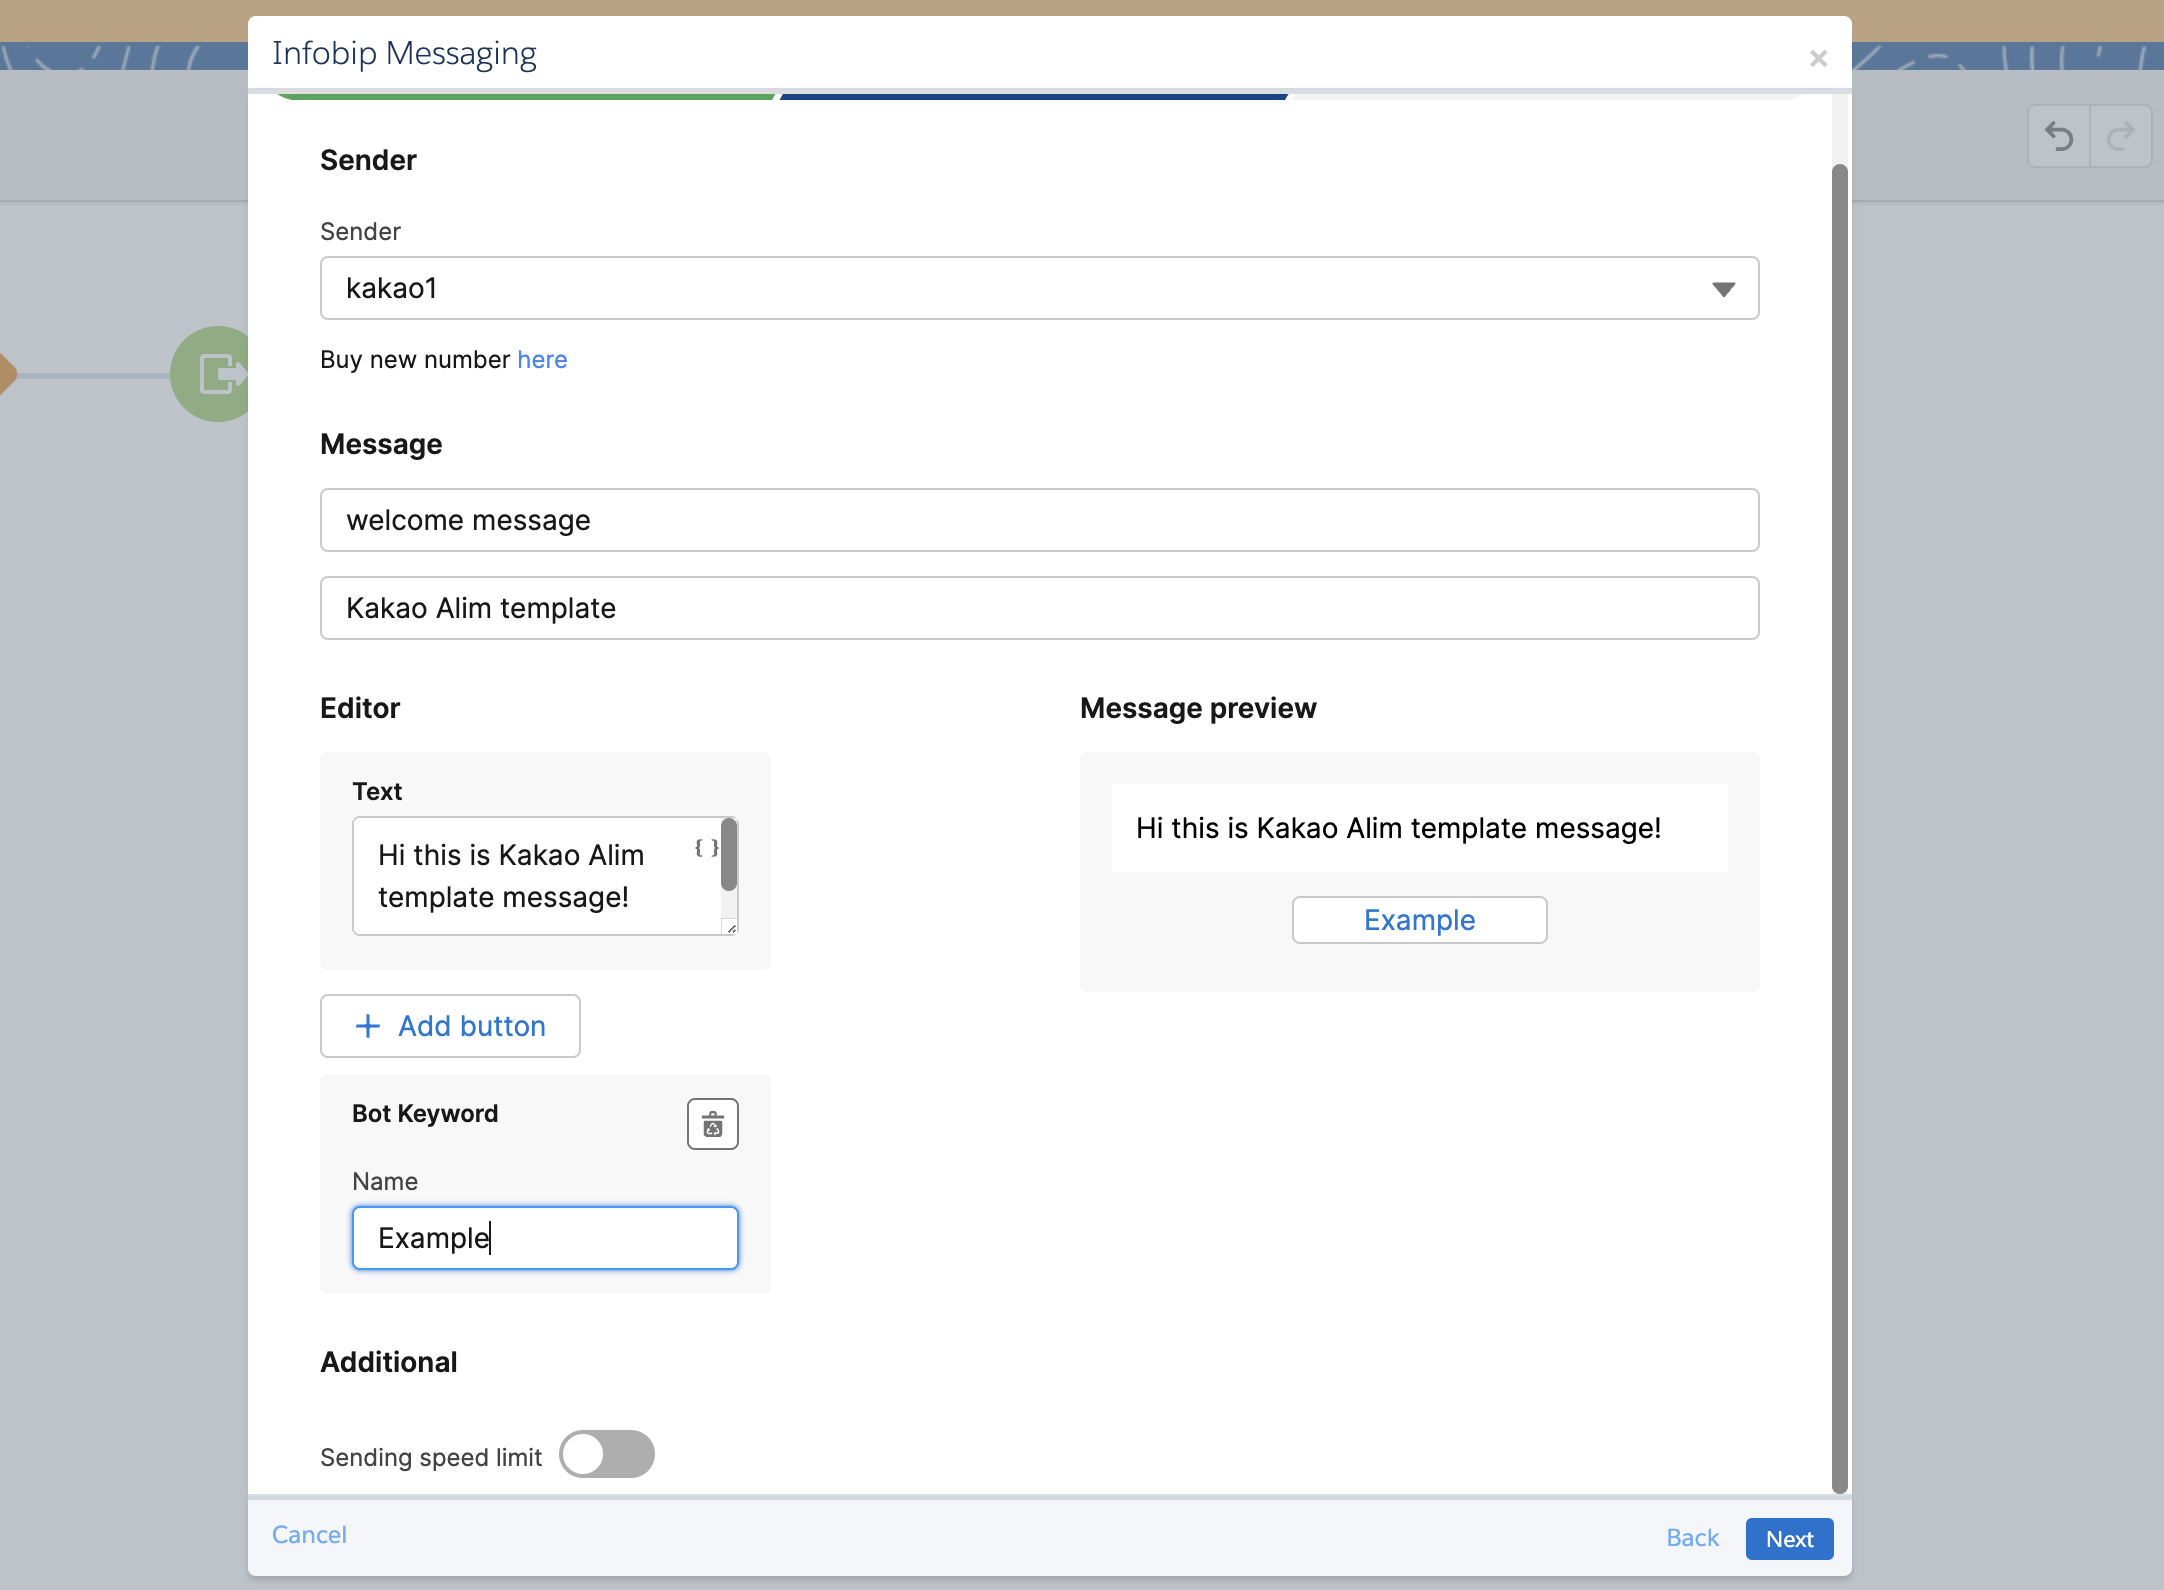
You can personalize the message by adding merge fields from the drop-down list in the Message Body.
To include additional features for this channel (sending speed limit, SMS failover, custom callback data), see Additional features.
Zalo in a Journey
To send messages using the Zalo channel, you must have a registered sender on your Infobip account. For more information, see Zalo. Infobip supports different zalo templates.
Templates need to be registered with Zalo's system and approved before they can be used.
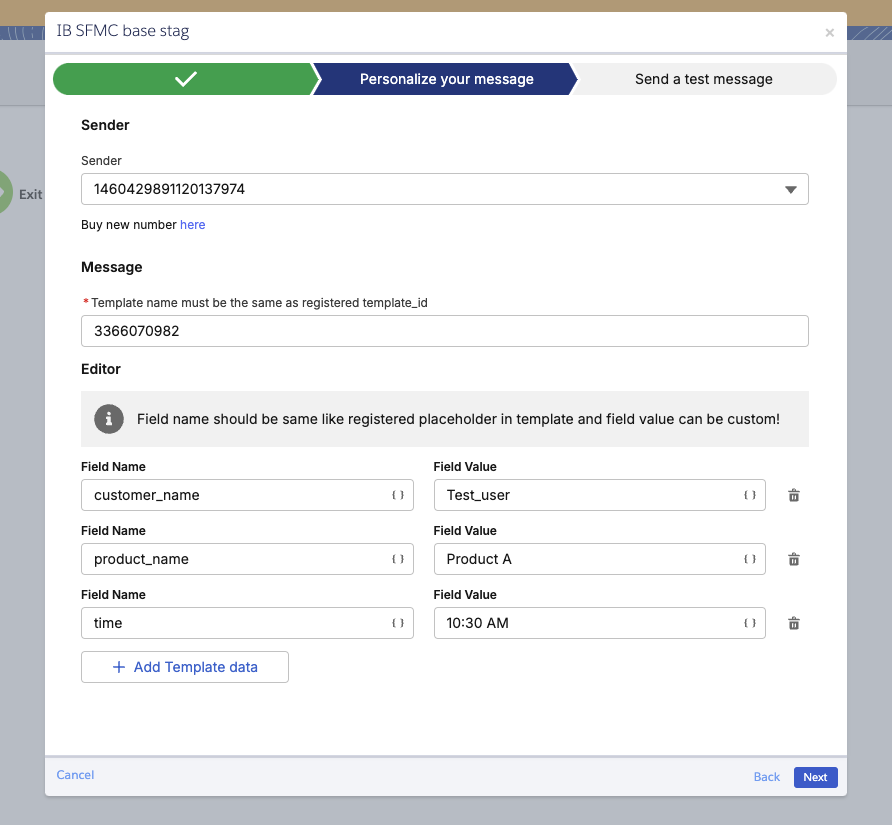
The name of the template must be identical to its registered ID. For example, if the registered template ID is 3366070982, the template name must also be 3366070982.
The template data must only include placeholders that are registered for the specified Zalo template. For instance, if the placeholder customer_name is registered for the template with ID 3366070982, ensure that the template data contains only customer_name and no additional or unregistered placeholders.
Additional features
The following sections describe how to use additional features to modify and improve the implementation.
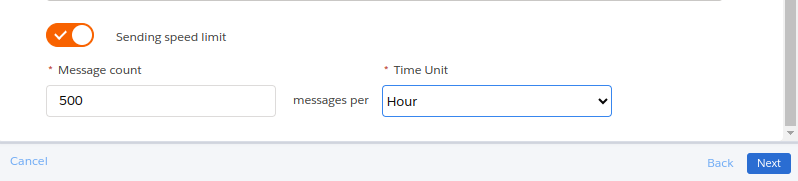
Sending speed limit
The sending speed limit is an optional feature that allows you to determine the rate at which Infobip dispatches messages to recipients. The sending speed limit can be configured on all channels.
Once enabled, two values must be configured:
- message count of messages
- time unit
Message count is a number between 1 and 100.000, and the time unit can be defined as a minute, hour, or day. This setup defines the maximum number of messages that can be sent within the specified time unit.
Messages will be evenly distributed throughout the chosen time unit. For instance, if the configuration instructs the system to send 500 messages per hour, it will dispatch a message approximately every 7.2 seconds.
Systems throughput limitation
Both Salesforce and Infobip systems have inherited limitations on how fast messages can be processed for a single activity, so if the configuration would require to send more than couple hundred messages per second, for example 30.000 per minute, it would be better to just turn this option off.
Journey configuration limitation
Sending speed limit is set per journey version and activity! When a new version of the journey is created and executed, it does not consider the messages sent in the previous version. If journey is configured with two messaging activities sending speed limit is applied separately.

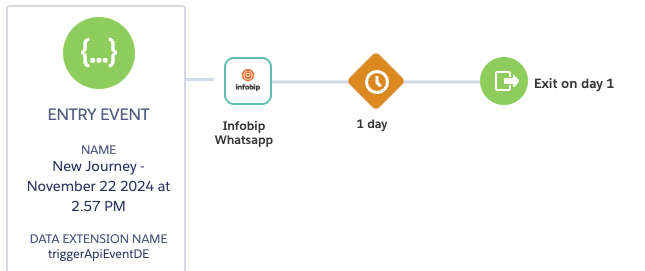
Reports activity limitation
Using Reports activity for Messaging activities with Sending speed limit should be done with a lot of thought. In this context, Salesforce Marketing Cloud moves contacts to the activity based solely on the wait time specified within the journey.
In the screenshot above, the messaging activity is configured with a sending speed limit of 50.000 messages per day, and there is only a one-hour delay between the messaging and reports activities. Considering a total contact count of 100.000, the delivery of all messages will span two days. However, as all contacts reach the reports activity after just one hour, a substantial number will be categorized as undelivered.
Journey stopping/pausing limitation
If you pause or stop the journey after all messages have been queued for sending, it won't affect the delivery process. For instance, if there are 100.000 contacts in the audience with a sending speed limit of 50.000 messages per day, it may take only a couple of minutes for all contacts to pass through the messaging activity. Even if youpause or stop the journey after 10 minutes, the queued messages will continue to be delivered as scheduled over the next 2 days.
URL shortening and tracking
To add tracking and URL shortening for URLs in the SMS body, select URL Shortening & Tracking. You can use the default domain or select custom domain you've added in the Infobip Config.
To remove https:// from the URL, enable Remove https:// from URL.
URL Shortening & Tracking are exclusively applied to URLs within the template body parameter. If a URL is placed in the template header, it will be shortened but not tracked. Similarly, URLs within the template-defined button will not be tracked.
URL shortening and tracking is supported for SMS, LMS, MMS, RCS, Viber and WhatsApp channels.
Trigger event on response (Receive inbound messages)
With the two-way communication feature, once a journey is activated, the end-user will receive a message. They can respond directly to this message, and their reply text will be captured in the Inbound Messages data extension.
Installation and configuration
To set up the app to receive inbound messages for two-way communication:
- Update the installed package to obtain the Inbound Messages data extension where received messages will be stored. To update the installed package, follow instructions for deployment.
- In App permissions update, enable the List and Subscribers permissions to trigger API Events, and click Save.

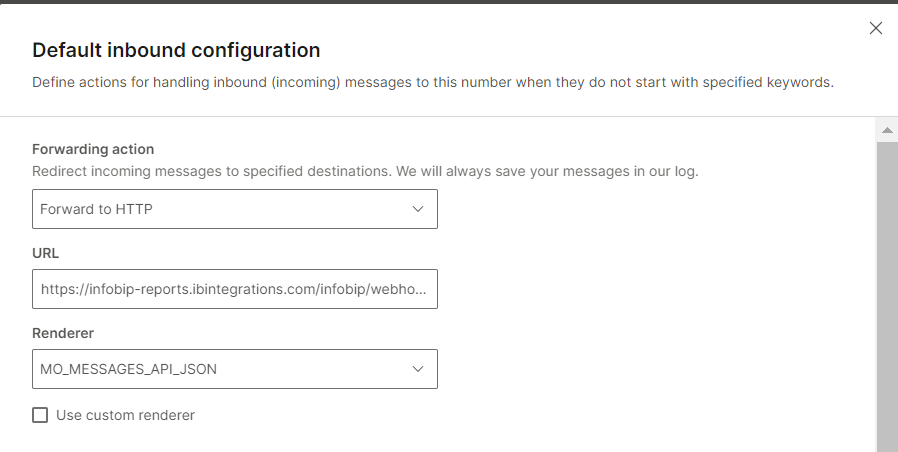
- Update the number configuration you want to use in Infobip Numbers for receiving inbound messages:
- Insert the URL:
https://infobip-reports.ibintegrations.com/infobip/webhooks/inboundMessage - Select
MO_MESSAGES_API_JSONfor the Renderer.
- Insert the URL:
Enable two-way communication
Use API event activities to handle incoming messages and trigger appropriate responses.
To enable two-way communication in the journey, add and configure the Wait Until Event activity in your journey.
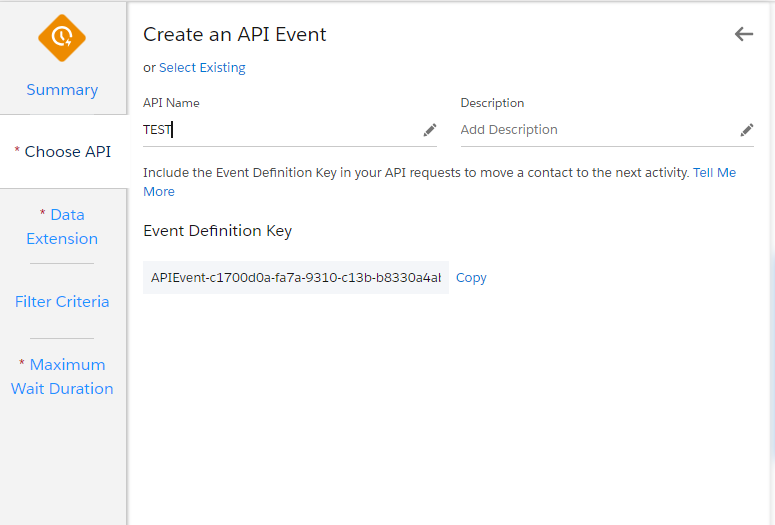
- On the Wait Until API Event Summary page, click Create New.
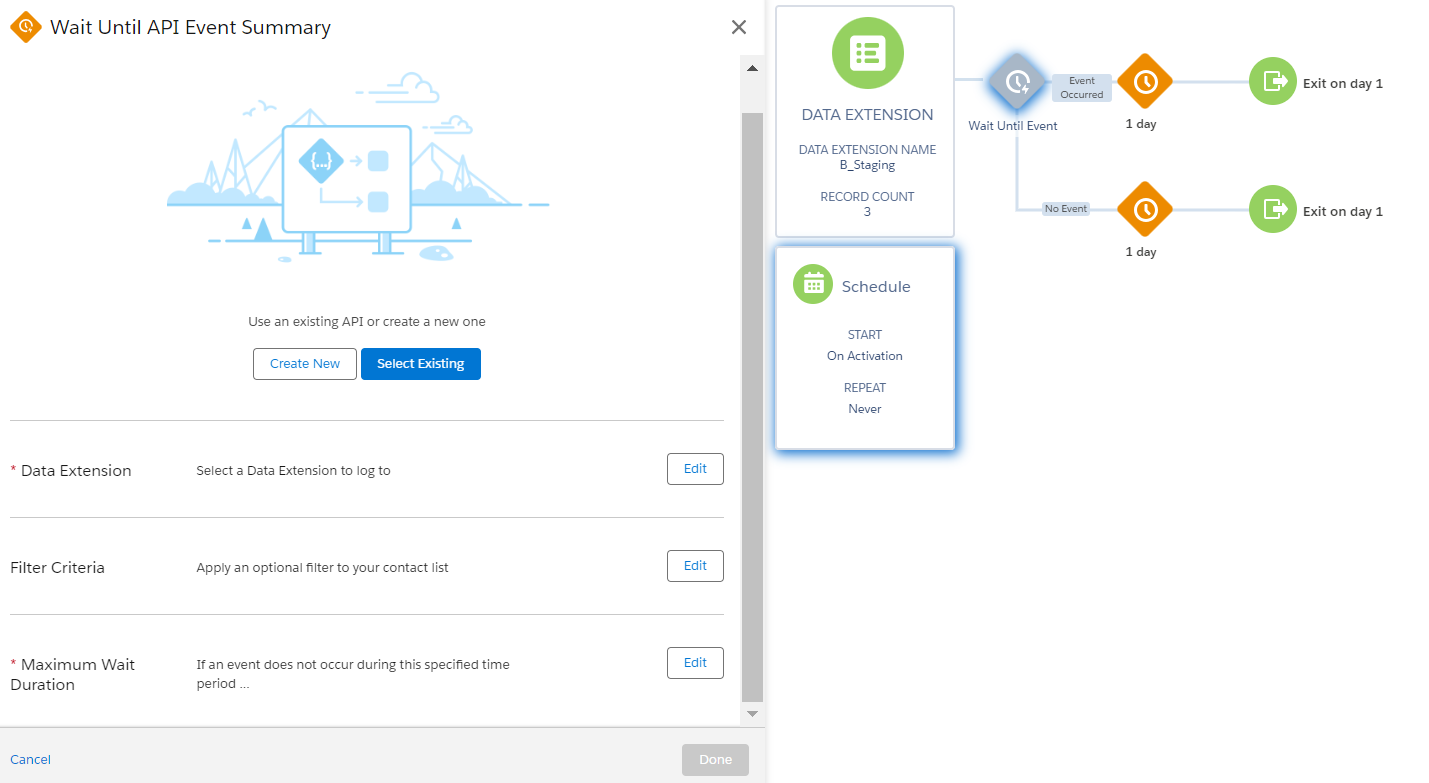
- Enter the API name to create the new API Event.
- On the Data Extension tab, select Inbound Messages from the webhooks.
- On the Maximum Wait Duration tab, select a time period. If an event does not occur during the specified time period, the contact continues on the
no-eventpath of this split. This setting prevents the contact from remaining in the wait step indefinitely. - Rename the Wait Until Event (SMS Response in the example below) activity.
- Enter the API name to create the new API Event.
- Configure the Infobip Messaging Activity and enable Trigger Event on Response.
- Add the Infobip Reports activity after the Wait Until Event to fetch the response, enabling decision-making within the journey.
- Add a decision split to handle all end-user responses and route contacts to the appropriate paths.
- Check the end-user replies in the Inbound Messages data extension.

During the renaming process, be cautious as this activity must be added first for every messaging activity that requires two-way communication. Ensure that you do not use the same name for this activity more than once.
For inbound WhatsApp messages, text, image, video and document reply are supported. For inbound Viber messages, only text reply is supported. For inbound RCS messages, only suggestion replies are supported.
Two-way communication is supported for SMS, MMS, RCS, Viber and WhatsApp channels.
Enable custom callback data
Custom callback data is an optional feature that allows you to add custom fields to your callback data.

To add custom callback data, enable the toggle button in the Message Activity configuration and click + Add custom callback data.
You then see the Field name and Field value inputs. Insert free-form values or select and personalize callback data with merge fields from a drop-down.
The following table shows the limitations and recommendations for keywords and file names.
| Restricted keywords for field name: | Field name restrictions: |
|---|---|
ActivityIdBulkIdFromMessageJourneyNameContactKeyMIDVersionIdVersionNumberTemplateName |
|
The callbackData parameter is limited to 4000 characters both on the Infobip API and data extensions. Salesforce Marketing Cloud currently uses 250-600 characters for callback data, depending on message length, so it is important to stay within the limits. The message fails if the limit is reached.
The following image shows custom callback data saved in the Delivery reports data extension.

Multiple phone fields
The Multiple phone fields feature is applicable only when a data extension contains more than one field of the type phone. This feature is particularly useful in scenarios where different customer phone numbers need to be stored across various columns within the same data extension. For example, if a business needs to store separate phone numbers for home, work, and mobile contacts, each can be saved in different columns (for example, Home Phone, Work Phone, Mobile Phone) in the same data extension. This allows for greater flexibility in targeting communications, ensuring the right message reaches the right phone number based on the intended use case.
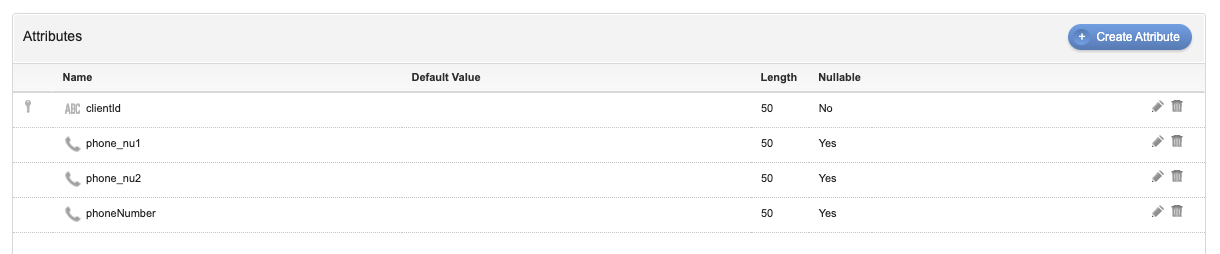
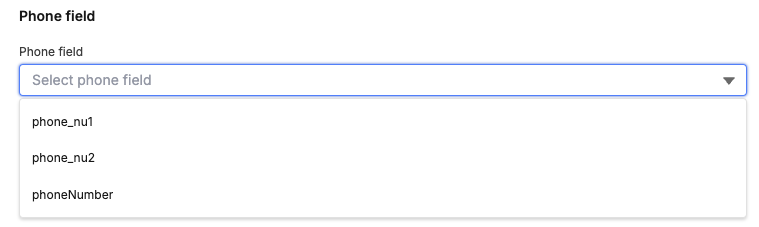
This feature is automatically activated if the data extension contains more than one phone type field. The feature will not be visible if data extension contains only one field of type phone.
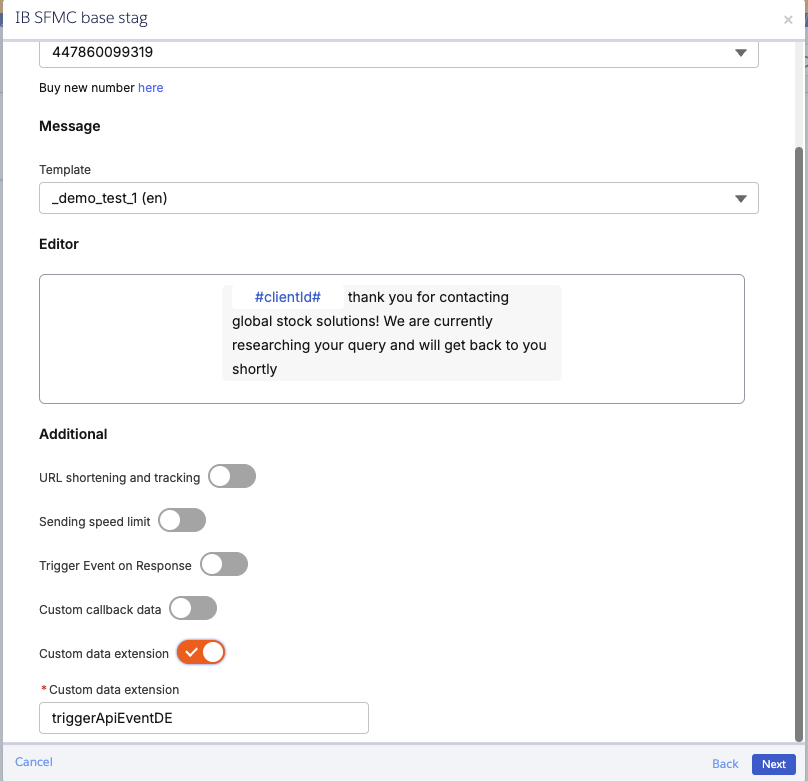
Custom data extension
The custom data extension feature is available only when the entry source is an API Event. Without this feature enabled, our activity will use data directly from the API Event request body. However, if the feature is activated, the system will fetch data from the selected data extension and use that data to send messages.
This feature is especially useful in scenarios where a client initiates a journey with an API trigger event but also performs manipulations or other activities within the journey that update data extension rows. If the client wants to use the updated data extension data for sending messages, they must enable this feature in the additional options and specify the name of the data extension they want to use.
Enable SMS failover
SMS failover lets you send a message if the original message from the primary channel (for example, Viber, WhatsApp, RCS) cannot be delivered. This ensures message delivery through an alternative channel when the primary channel is unavailable.
To enable an SMS failover message:
- Select SMS failover options.
- Choose the sender from the Select sender drop-down list.
- Enter the message text in the Message content field.
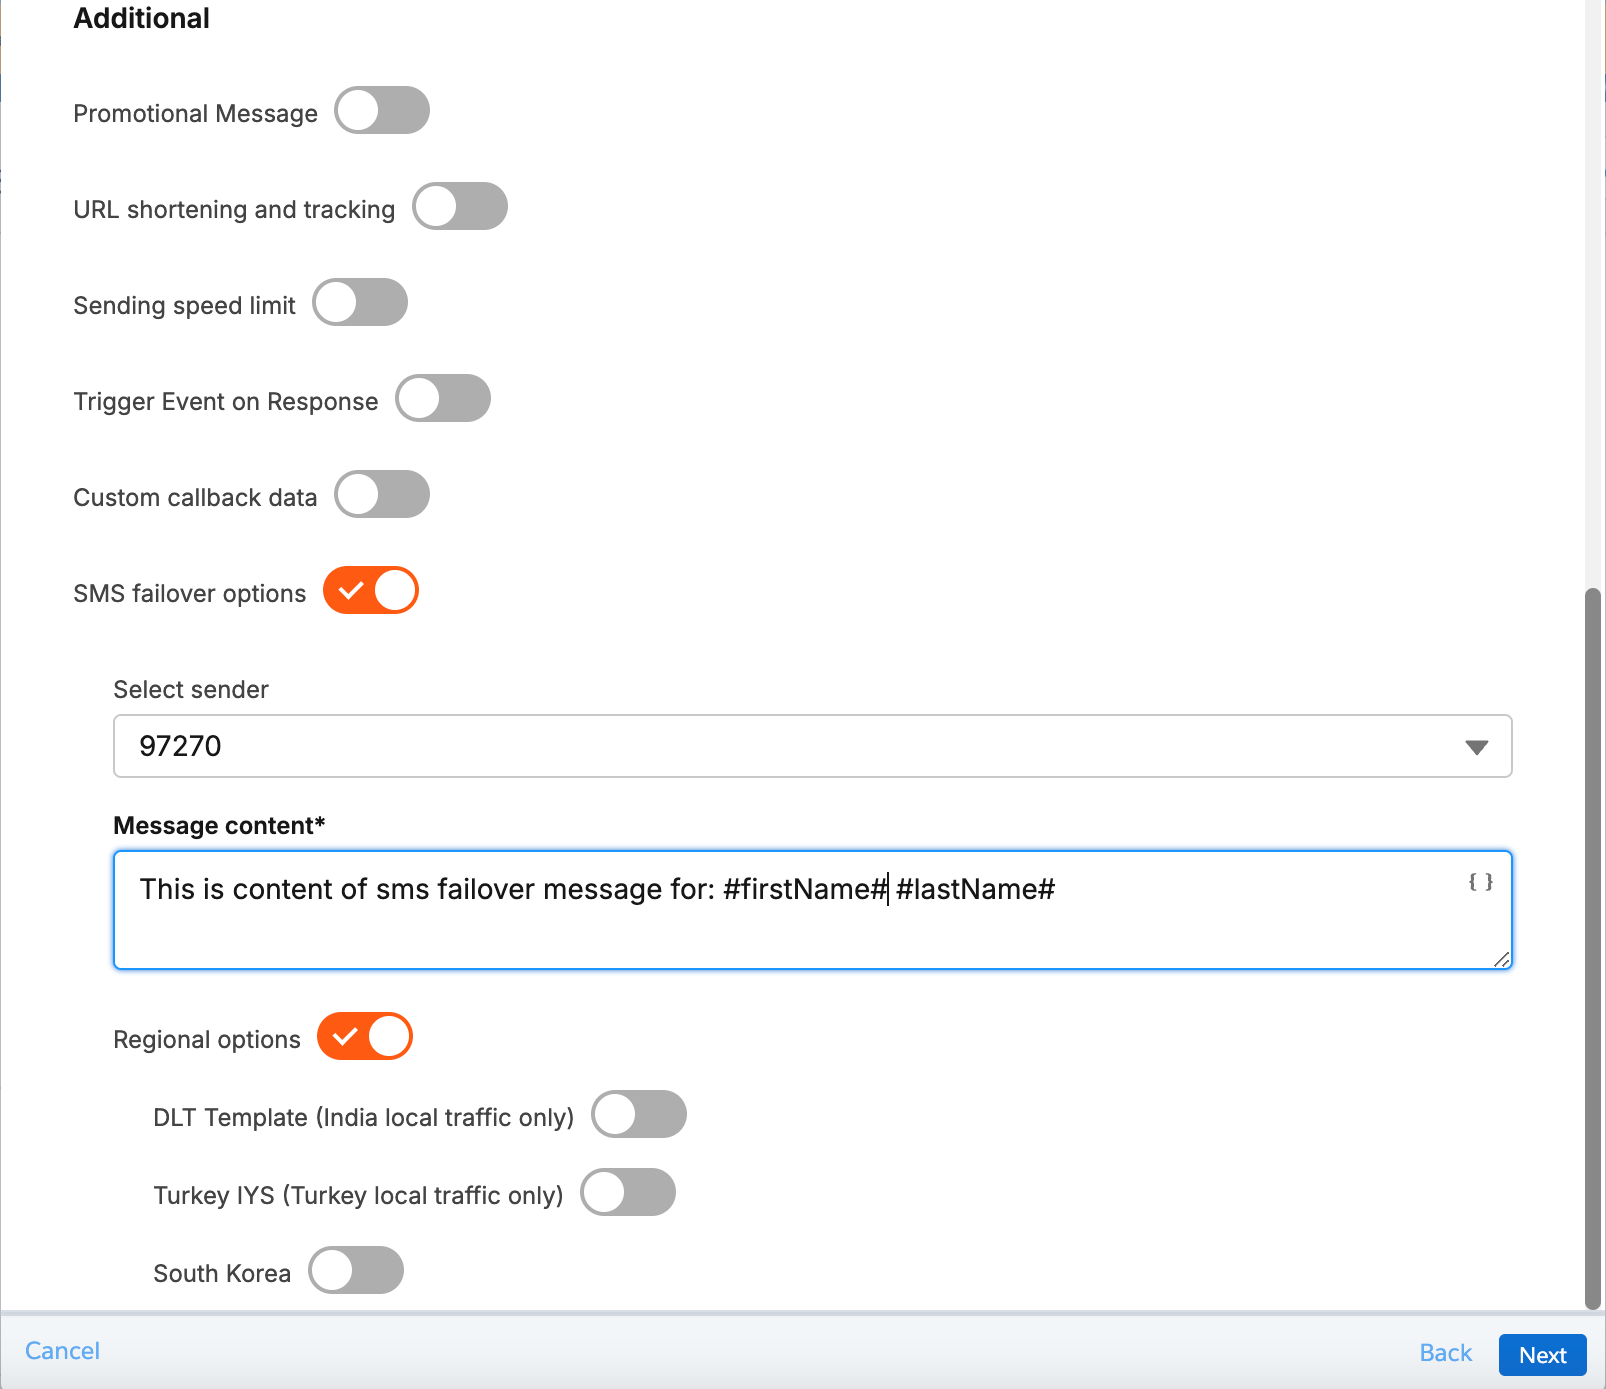
- Click the Receive triggered failover reports option to receive delivery reports (DLRs) for each step in the failover process, not just the final one.

For example, if the primary channel is RCS and SMS is configured as failover, you receive DLRs for both the RCS and the SMS delivery attempts. This helps with tracking and transparency of message delivery across channels. This feature is available only when RCS or Viber is used as the primary channel.
Regional options contain region-specific parameters that may be required due to local regulations. These options vary depending on the destination country and should be used when sending SMS to regions with specific compliance requirements.
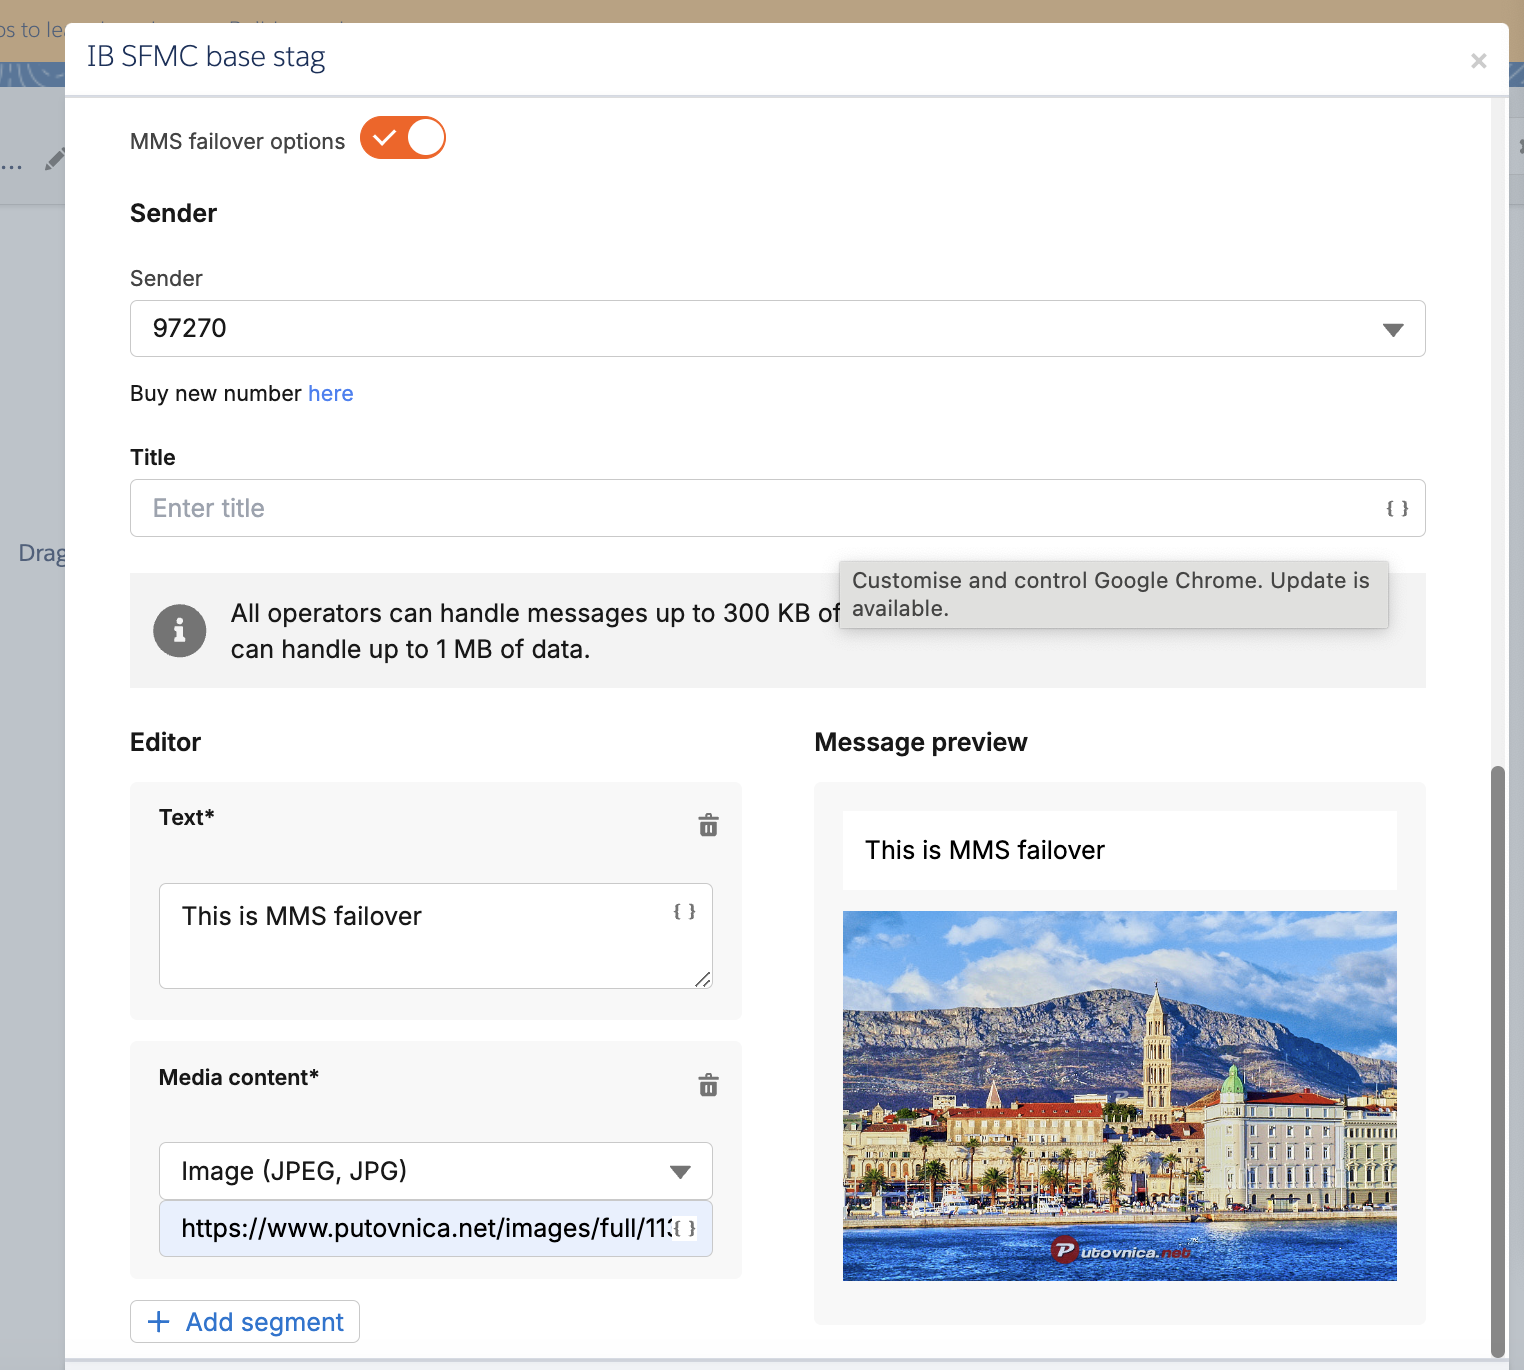
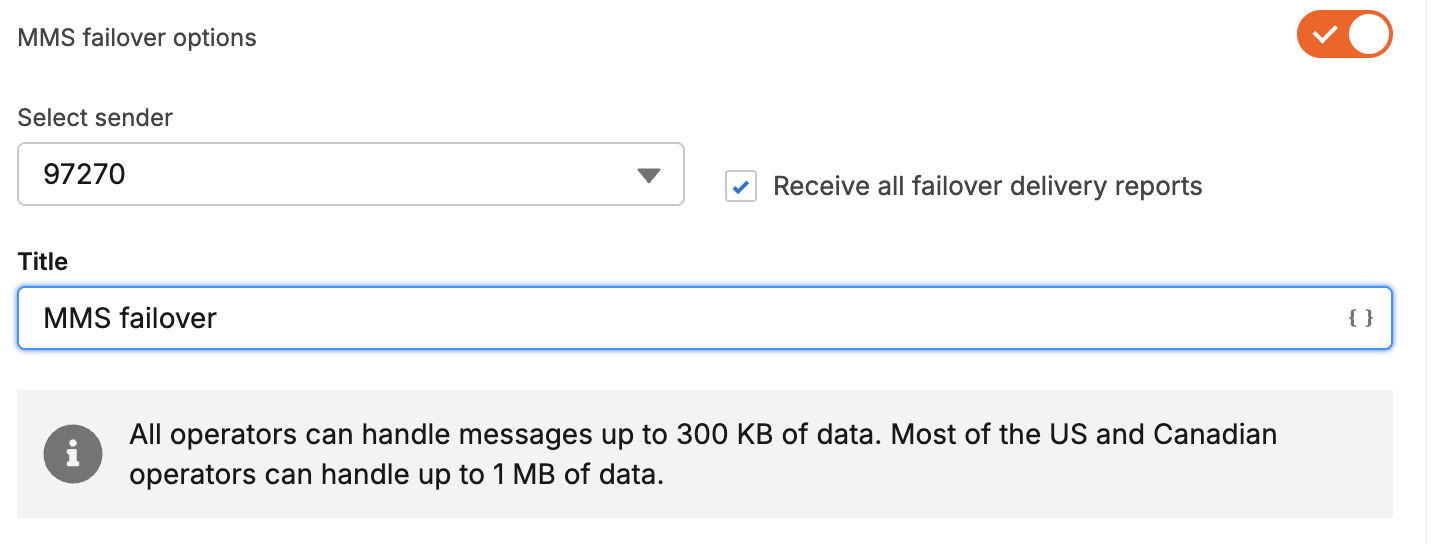
Enable MMS failover (available with RCS only)
If a message sent using RCS cannot be delivered, MMS failover ensures continuity by automatically sending an MMS instead. MMS failover supports rich media content to enhance the messaging experience. This option is exclusive to the RCS channel.
To enable an MMS failover message:
- Select MMS failover options.
- Choose the sender from the Select sender drop-down list.
- Enter a title and choose the multimedia content for the failover message.
- Click the Receive triggered failover reports option to receive delivery reports (DLRs) for each step in the failover process, not just the final one.
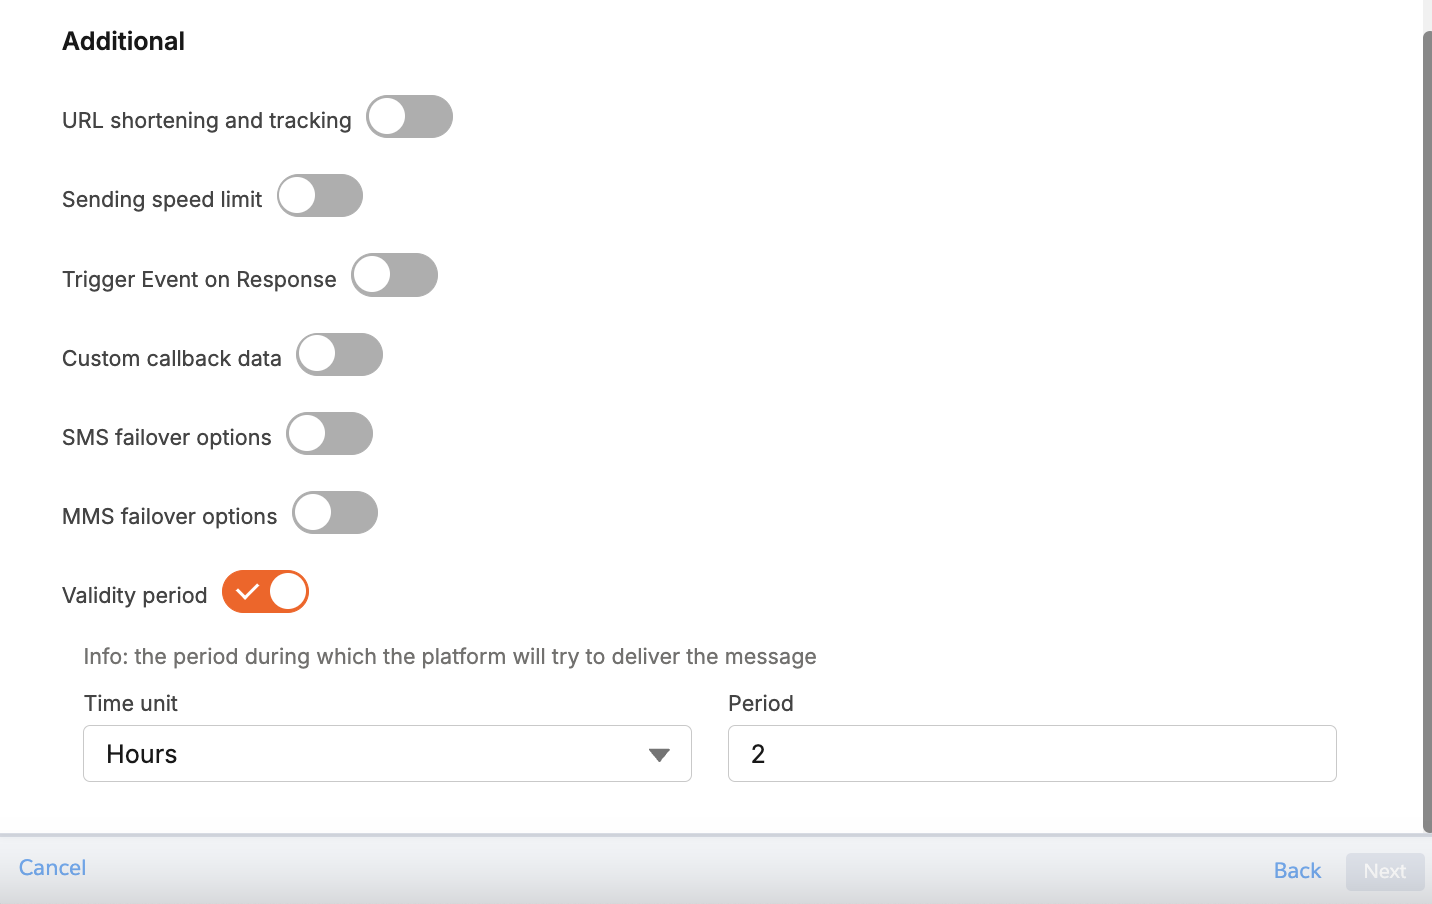
Message validity period (available with RCS and Viber only)
The validity period parameter defines the duration for which a message remains valid before it expires. If the message is not delivered within this period, it will not be sent. The maximum allowed validity period is 48 hours, and if a longer duration is provided, it will be automatically adjusted to 48 hours. This feature ensures that time-sensitive messages are delivered within an appropriate timeframe, improving reliability and user experience.
Create dynamic content with AMPscript
AMPscript is a powerful scripting language designed for use within Salesforce Marketing Cloud. It enables marketers to create highly personalized, dynamic content by leveraging data stored in Data Extensions, Lists, and other Marketing Cloud resources. The full scripting capabilities of AMPscript makes it ideal for flexible, off-platform message building, and is especially valuable for constructing entire message bodies dynamically.
Use AMPscript on a Cloud Page (Code Resource type) to generate and process off-platform content.
To use AMPscript with an Infobip activity in Salesforce Marketing Cloud:
- Go to Web Studio > CloudPages.
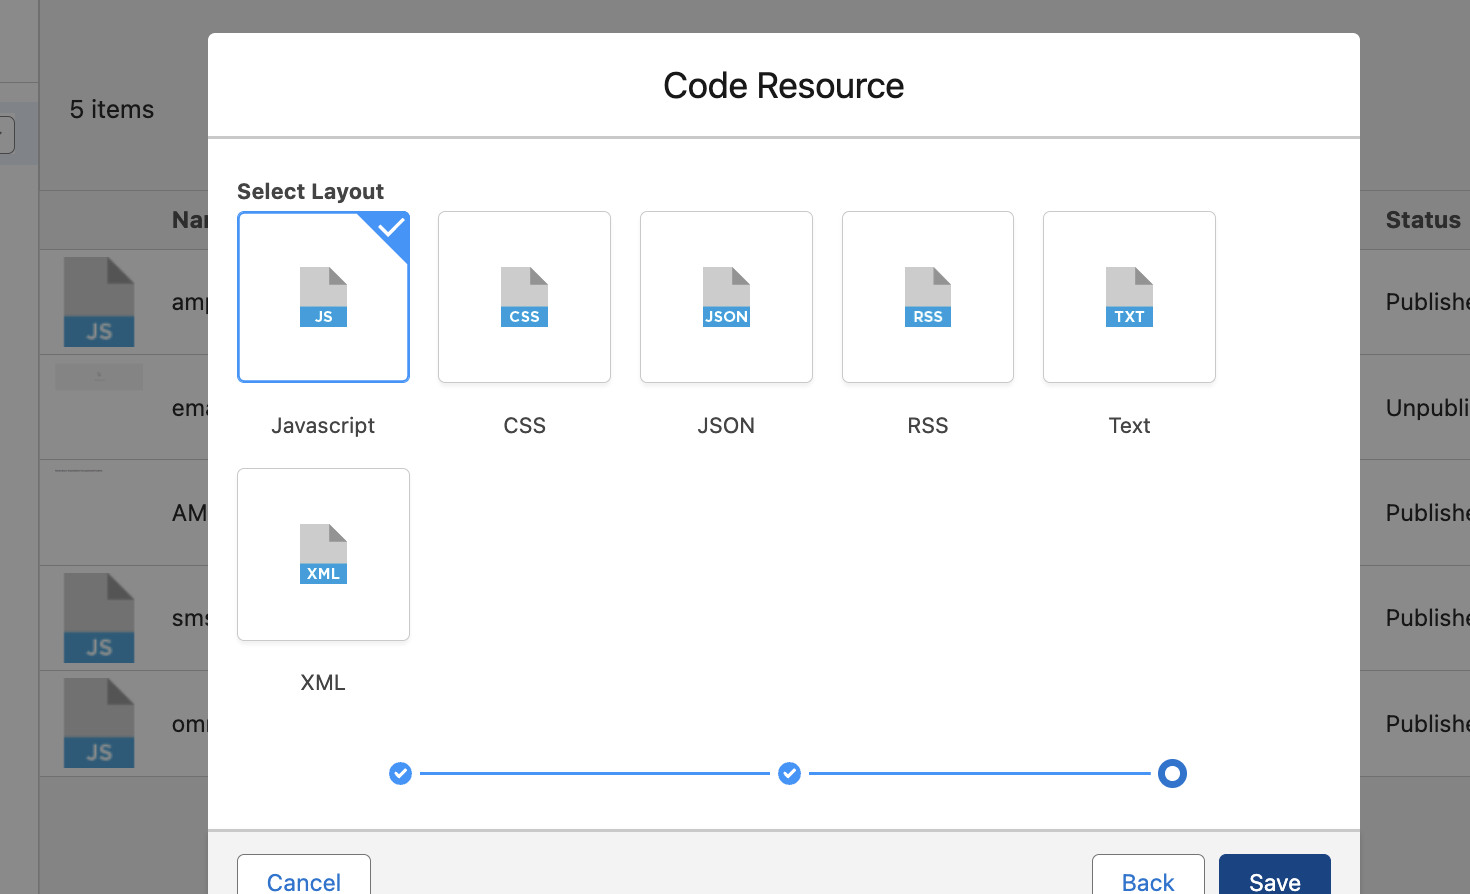
- Click Add Content and then select Code Resource.
- Enter a name for the page.
- Select a code layout.
- Click Next.
- Insert the AMPscript logic into the CloudPage. CloudPages supports all AMPscript features. Ensure that the AMPscript logic is correctly implemented.
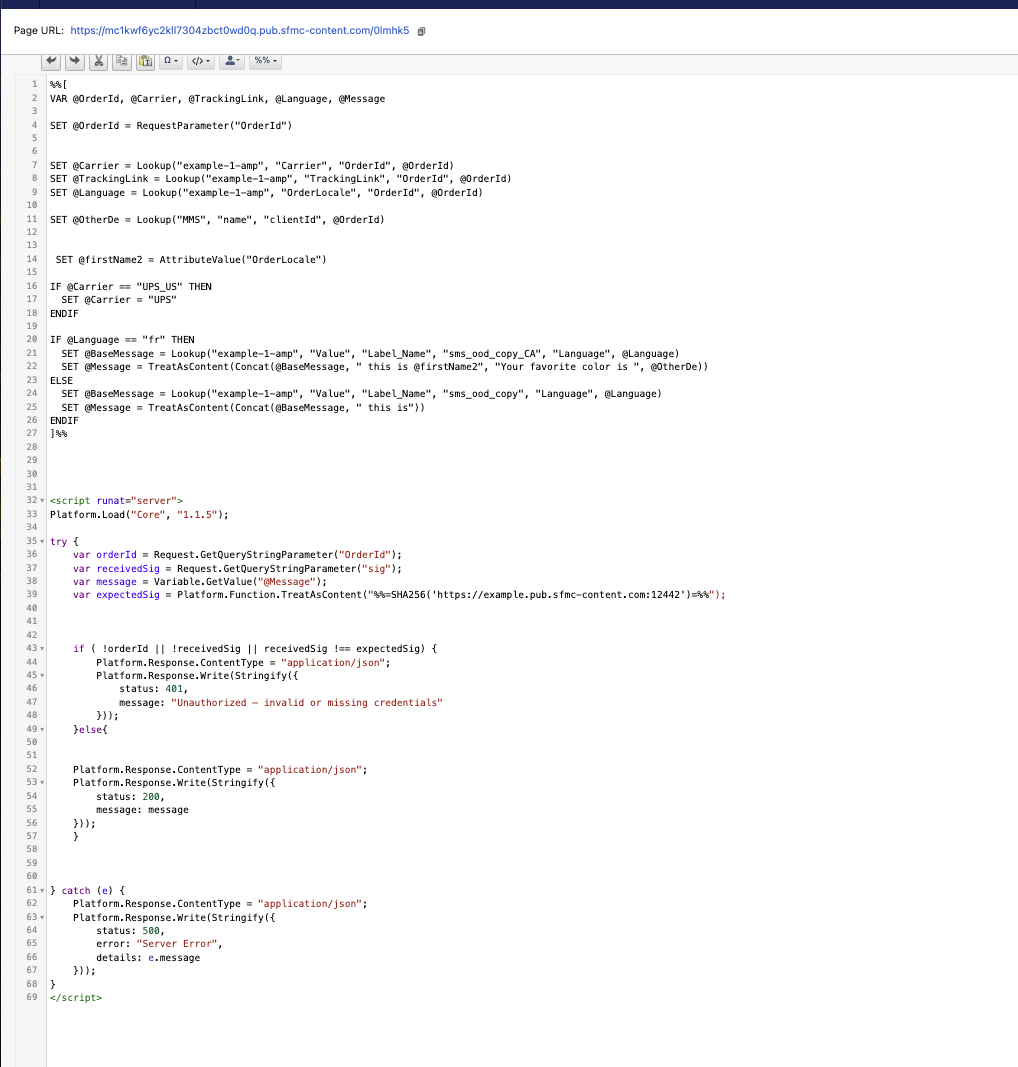
Set up SMS, Viber, and RCS using AMPscript
The following code is only an example of AMPscript logic.
%%[
VAR @reference, @Carrier, @TrackingLink, @Language, @Message, @OtherDe, @firstName

/* Update the argument in the RequestParameter function (line below)
   to match the corresponding field name from your Data Extension. */
SET @reference = RequestParameter("OrderId")

SET @Carrier = Lookup("example-1-amp", "Carrier", "OrderId", @reference)
SET @TrackingLink = Lookup("example-1-amp", "TrackingLink", "OrderId", @reference)
SET @Language = Lookup("example-1-amp", "OrderLocale", "OrderId", @reference)
SET @OtherDe = Lookup("MMS", "name", "clientId", @reference)
SET @firstName = AttributeValue("OrderLocale")

IF @Carrier == "UPS_US" THEN
    SET @Carrier = "UPS"
ENDIF

IF @Language == "fr" THEN
    SET @BaseMessage = Lookup(
        "example-1-amp",
        "Value",
        "Label_Name",
        "sms_ood_copy_CA",
        "Language",
        @Language
    )

    SET @Message = TreatAsContent(
        Concat(@BaseMessage, " this is @firstName", "Your favorite color is ", @OtherDe)
    )
ELSE
    SET @BaseMessage = Lookup(
        "example-1-amp",
        "Value",
        "Label_Name",
        "sms_ood_copy",
        "Language",
        @Language
    )

    SET @Message = TreatAsContent(Concat(@BaseMessage, " this is"))
ENDIF
]%%
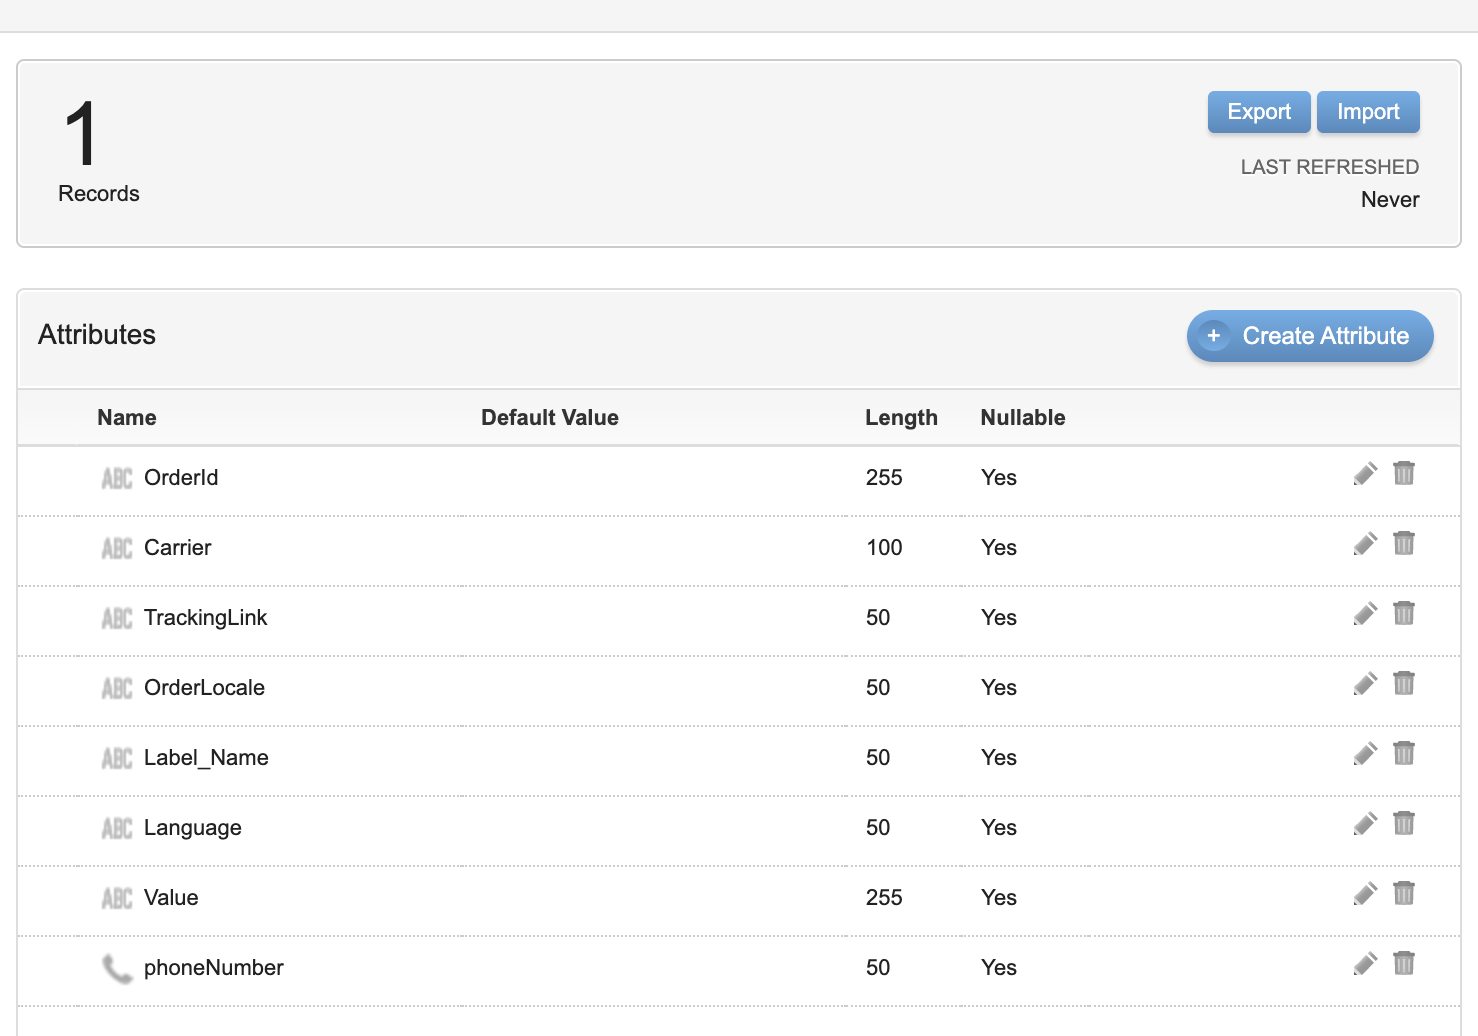
OrderId is the reference item to use in the Lookup function to get other values from the Data Extension. When you create your example, this will be the name of the field from your Data Extension. The field must be unique with a value.
These are the Data Extension fields used as the source data in this example. In this example, OrderId is the reference key to retrieve other values from this Data Extension (for example, get Label_Name value, where OrderId has a value of 1) or from another Data Extension within the CloudPage.
The client can build the message using any functions and logic they prefer. However, it is recommended to return the dynamic content of the message using the Message variable, as shown in LINE 22.
Step 2 in the CloudPage configuration is to add the AMPscript code.
You should modify only the following part: var expectedSig = Platform.Function.TreatAsContent("%%=SHA256('cloud-page-url:MID')=%%");.
Variable.GetValue("@Message") is used to retrieve the dynamic message content generated in your AMPscript logic. Make sure that Message is the same variable name you used when setting the value in the AMPscript.
If you change the variable name, you must also update it in the Variable.GetValue function to match. Additionally, replace cloud-page-url with the actual URL of your CloudPage, and update MID with the correct value for your account.
   <script runat="server">
   Platform.Load("Core", "1.1.5");

   try {
       var receivedSig = Request.GetQueryStringParameter("sig");
       var message = Variable.GetValue("@Message");
       var expectedSig = Platform.Function.TreatAsContent("%%=SHA256('cloud-page-url:MID')=%%");


       if ( !receivedSig || receivedSig !== expectedSig) {
           Platform.Response.ContentType = "application/json";
           Platform.Response.Write(Stringify({
               status: 401,
               error: "Unauthorized – invalid or missing credentials"
           }));
       }else{
     Platform.Response.ContentType = "application/json";
     Platform.Response.Write(Stringify({
           status: 200,
           message: message
       }));
       }


   } catch (e) {
       Platform.Response.ContentType = "application/json";
       Platform.Response.Write(Stringify({
           status: 500,
           error: "Server Error - cloudPage",
           details: e.message
       }));
   }
   </script>
Once everything is set up, save the CloudPage, then click Publish. Salesforce may take some time to make the CloudPage live after publishing.
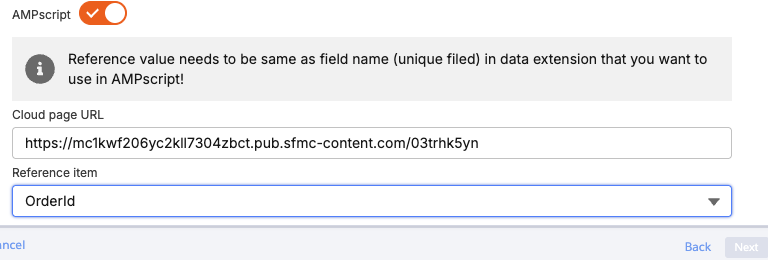
Step 3 is to enable the AMPscript feature in the Infobip activity within SFMC.
In the CloudPage URL input field, paste the URL of the published CloudPage.

Optionally, select a Reference item to fetch additional values from the Data Extension within the CloudPage to build dynamic message content. The reference item must have a unique value in the Data Extension. The available reference item options correspond to the Data Extension configured as the Journey source.
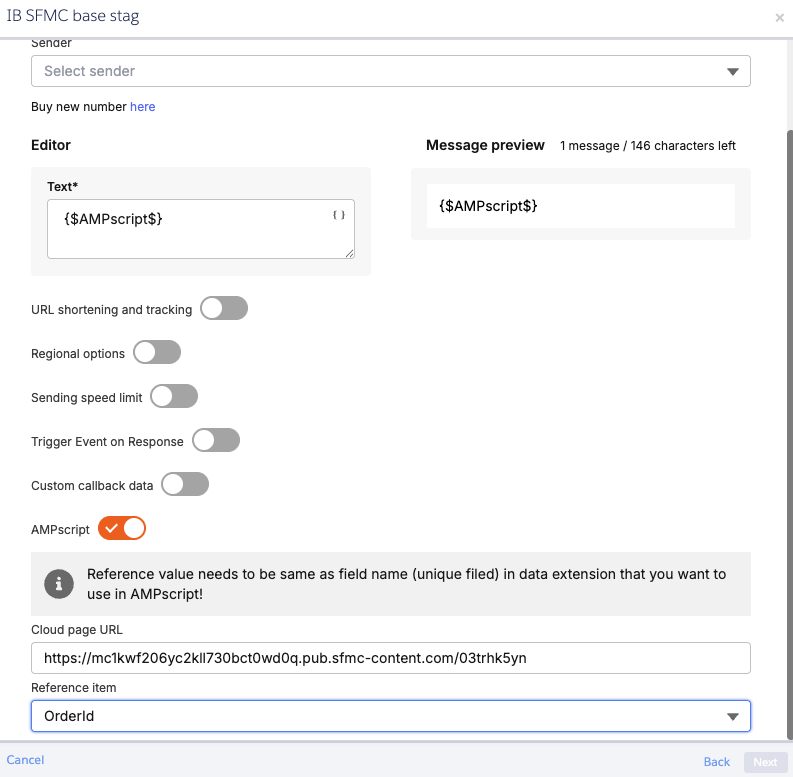
Reference item name must match the argument used in the function at line 5.
You can use the AMPscript feature with other placeholders and static text to build your message dynamically.
This is the expected appearance of the cloud page after setup is complete.
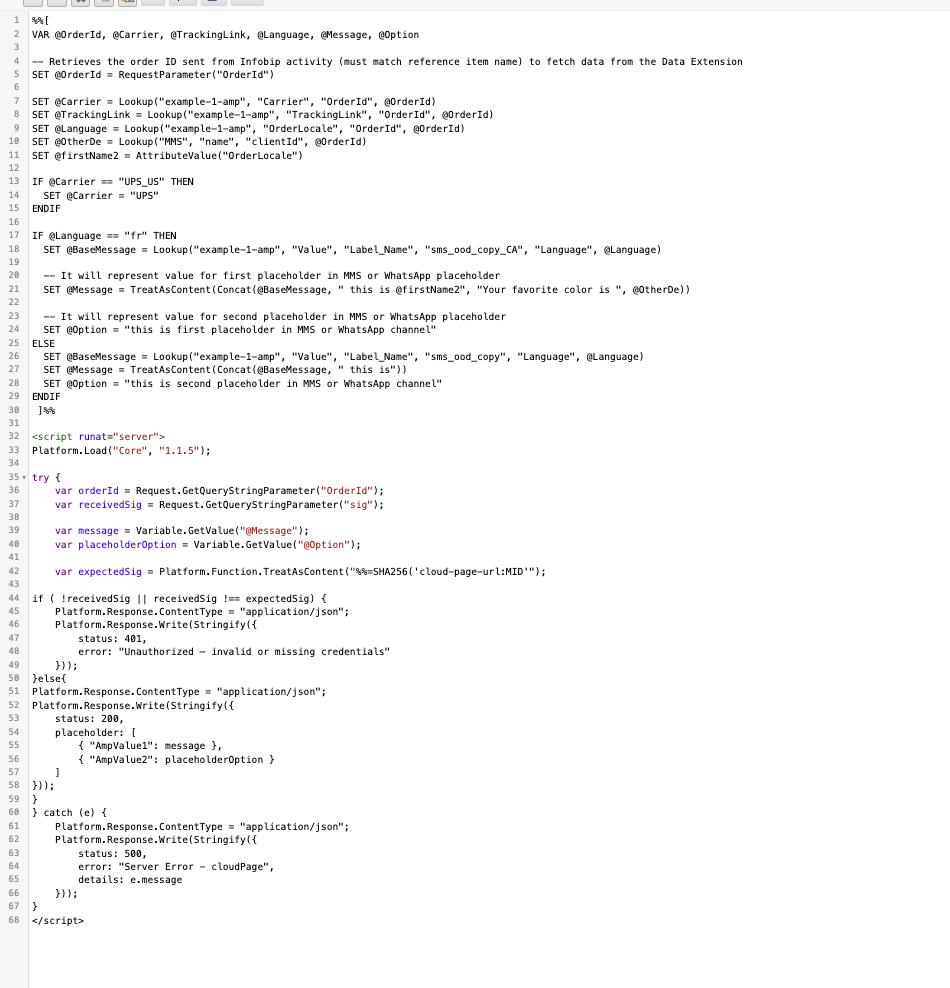
Set up MMS and WhatsApp using AMPscript
If you want to use multiple AMPscript values for each placeholder, you need to return multiple values from the AMPscript, In this example, there are two placeholders in the WhatsApp channel: the first placeholder value represents content in the @Message variable, the second represents the @Option variable. You can add as much as you want to use AMPscript content in placeholders.
This is an example of AMPscript logic.
%%[
VAR @OrderId, @Carrier, @TrackingLink, @Language, @Message, @Option, @OtherDe, @firstName2

/* Retrieves the order ID sent from Infobip activity (must match reference item name)
   to fetch data from the Data Extension */
SET @OrderId = RequestParameter("OrderId")

SET @Carrier = Lookup("example-1-amp", "Carrier", "OrderId", @OrderId)
SET @TrackingLink = Lookup("example-1-amp", "TrackingLink", "OrderId", @OrderId)
SET @Language = Lookup("example-1-amp", "OrderLocale", "OrderId", @OrderId)
SET @OtherDe = Lookup("MMS", "name", "clientId", @OrderId)
SET @firstName2 = AttributeValue("OrderLocale")

IF @Carrier == "UPS_US" THEN
    SET @Carrier = "UPS"
ENDIF

IF @Language == "fr" THEN
    SET @BaseMessage = Lookup(
        "example-1-amp",
        "Value",
        "Label_Name",
        "sms_ood_copy_CA",
        "Language",
        @Language
    )

    /* Represents the value for the first placeholder in MMS or WhatsApp */
    SET @Message = TreatAsContent(
        Concat(@BaseMessage, " this is @firstName2", "Your favorite color is ", @OtherDe)
    )

    /* Represents the value for the second placeholder in MMS or WhatsApp */
    SET @Option = "this is the first placeholder in MMS or WhatsApp channel"
ELSE
    SET @BaseMessage = Lookup(
        "example-1-amp",
        "Value",
        "Label_Name",
        "sms_ood_copy",
        "Language",
        @Language
    )

    SET @Message = TreatAsContent(Concat(@BaseMessage, " this is"))
    SET @Option = "this is the second placeholder in MMS or WhatsApp channel"
ENDIF
]%%
OrderId is the reference item to use in the Lookup function to get other values from the Data Extension. When you create your example, that is the name of the field from your Data Extension. The field must be unique with a value.
These are the Data Extension fields used as the source data in this example.
In this case, OrderId is the reference key to retrieve other values from this Data Extension (for example, get Label_Name value where OrderId has value 1) or from another Data Extension within the CloudPage.
Step 2 in the CloudPage configuration is to add the AMPscript code shown below.
You should modify only the "@Message" and "@Option" parts.
Variable.GetValue("@Message") is used to retrieve the dynamic message content generated in your AMPscript logic for the first placeholder and Variable.GetValue("@Option") retrieves content for the second placeholder. Make sure that Message and Option are the same variable names you used when setting the value in AMPscript.
If you change the variable name, you must also update it in the Variable.GetValue function to match.
Additionally, replace cloud-page-url with the actual URL of your CloudPage, and update MID with the correct value for your account.
The return value for placeholders is shown as:
placeholder: [
{ "AmpValue1": message },
{ "AmpValue2": placeholderOption }
]
Use the format key:value as shown in the example, to set up: key is AmpValue1 that can be any preferred name that you want, and value is a message that is fetched from AMPscript logic.
<script runat="server">
Platform.Load("Core", "1.1.5");

try {
 var orderId = Request.GetQueryStringParameter("OrderId");
 var receivedSig = Request.GetQueryStringParameter("sig");

var message = Variable.GetValue("@Message");
 var placeholderOption = Variable.GetValue("@Option");

 var expectedSig = Platform.Function.TreatAsContent("%%=SHA256('cloud-page-url:MID')=%%");

if ( !receivedSig || receivedSig !== expectedSig) {
 Platform.Response.ContentType = "application/json";
 Platform.Response.Write(Stringify({
 status: 401,
 error: "Unauthorized – invalid or missing credentials"
 }));
}else{
Platform.Response.ContentType = "application/json";
Platform.Response.Write(Stringify({
 status: 200,
 placeholder: [
 { "AmpValue1": message },
 { "AmpValue2": placeholderOption }
 ]
}));
}
} catch (e) {
 Platform.Response.ContentType = "application/json";
 Platform.Response.Write(Stringify({
 status: 500,
 error: "Server Error - cloudPage",
 details: e.message
 }));
}
</script>
Once everything is set up, save the CloudPage, then click Publish. Salesforce may take some time to make the CloudPage live after publishing.
Step 3 is to enable the AMPscript feature in the Infobip activity within Salesforce Marketing Cloud.
In the CloudPage URL input field, paste the URL of the published CloudPage.
Optionally, select a Reference item to fetch additional values from the Data Extension within the CloudPage to build dynamic message content. The reference item must have a unique value in the Data Extension. The available reference item options correspond to the Data Extension configured as the Journey source.
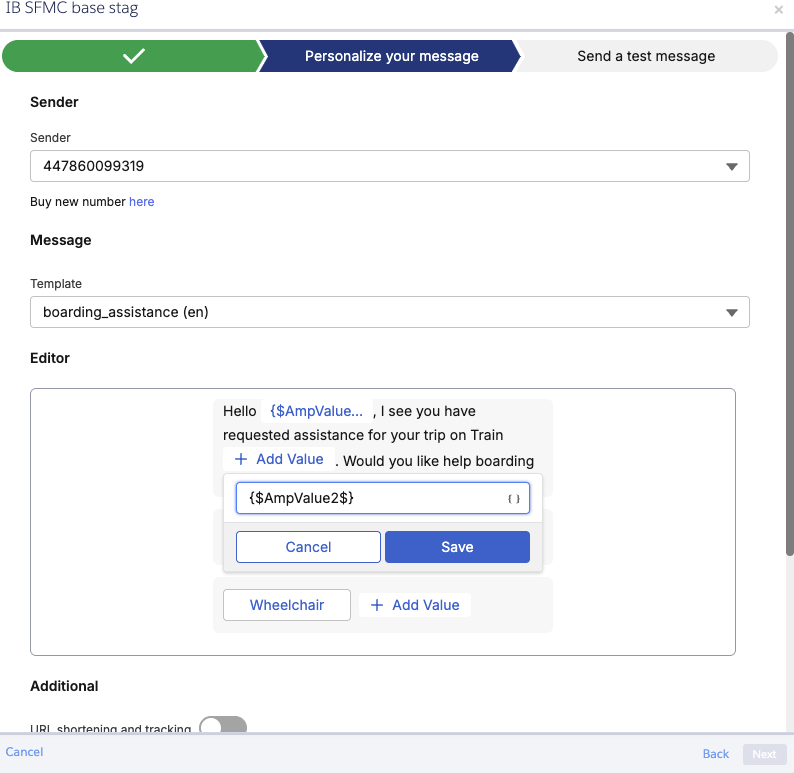
To use AMPscript in the MMS or WhatsApp channel, you must manually insert {$NAME_OF_YOUR_PLACEHOLDER$} into placeholders in this example, that is {$AmpValue1$} and {$AmpValue2$}.
The Reference item name must match the argument used in the function at line 5.
You can use the AMPscript feature with other placeholders and static text to build your message dynamically.
This is the expected appearance of the cloud page after setup is complete.
Register WhatsApp templates
You can register and manage your WhatsApp message templates directly within Salesforce Marketing Cloud (SFMC). This streamlines the approval process and enables faster, compliant deployment of rich, interactive messaging campaigns.
This feature supports multiple template formats for versatile and engaging customer communication:
- Text-only templates
- Rich media templates (images, videos, documents)
- Carousel templates
- Limited-time offer templates
- Templates with coupon codes
- Templates with Brazilian WhatsApp payment button
- In SFMC, click Create template.
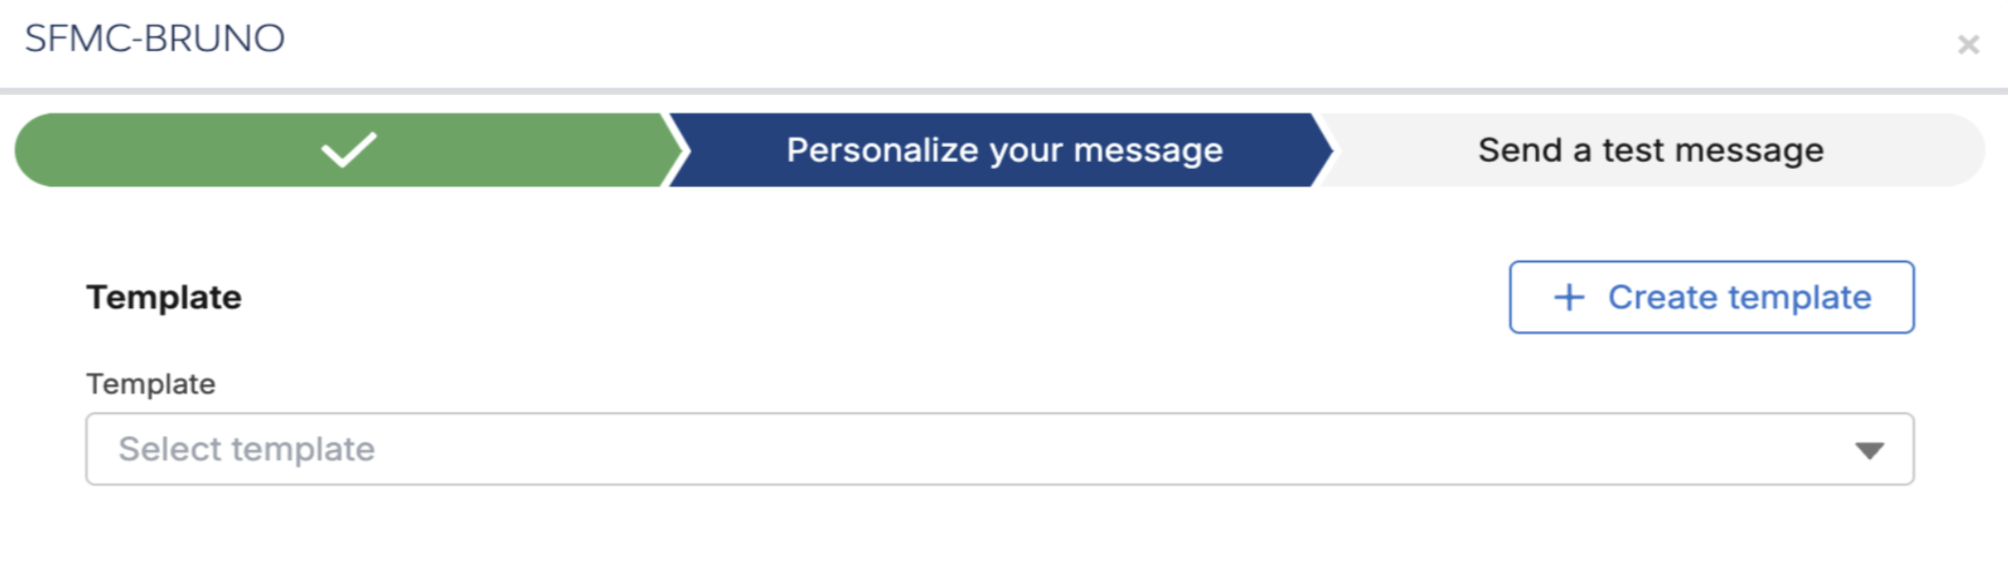
- Define template details: Register your template with the configurable options:
- Message – Add text or media, depending on the selected type.
- Footer – Optional field, supported for certain template types.
- Buttons – Configure call-to-action buttons tailored to your template type (for example, carousel, coupon redemption).
This example is to register a template named
connect_to_bot (en). During registration, provide example values only - these placeholders will be dynamically replaced during the actual campaign journey.
- Select the Template language and Template type.

- In the Message field:
- Add text with placeholders (for example,
{{1}},{{2}}) where dynamic values will appear at send time. - Use multiple placeholders for personalized or data-driven content.
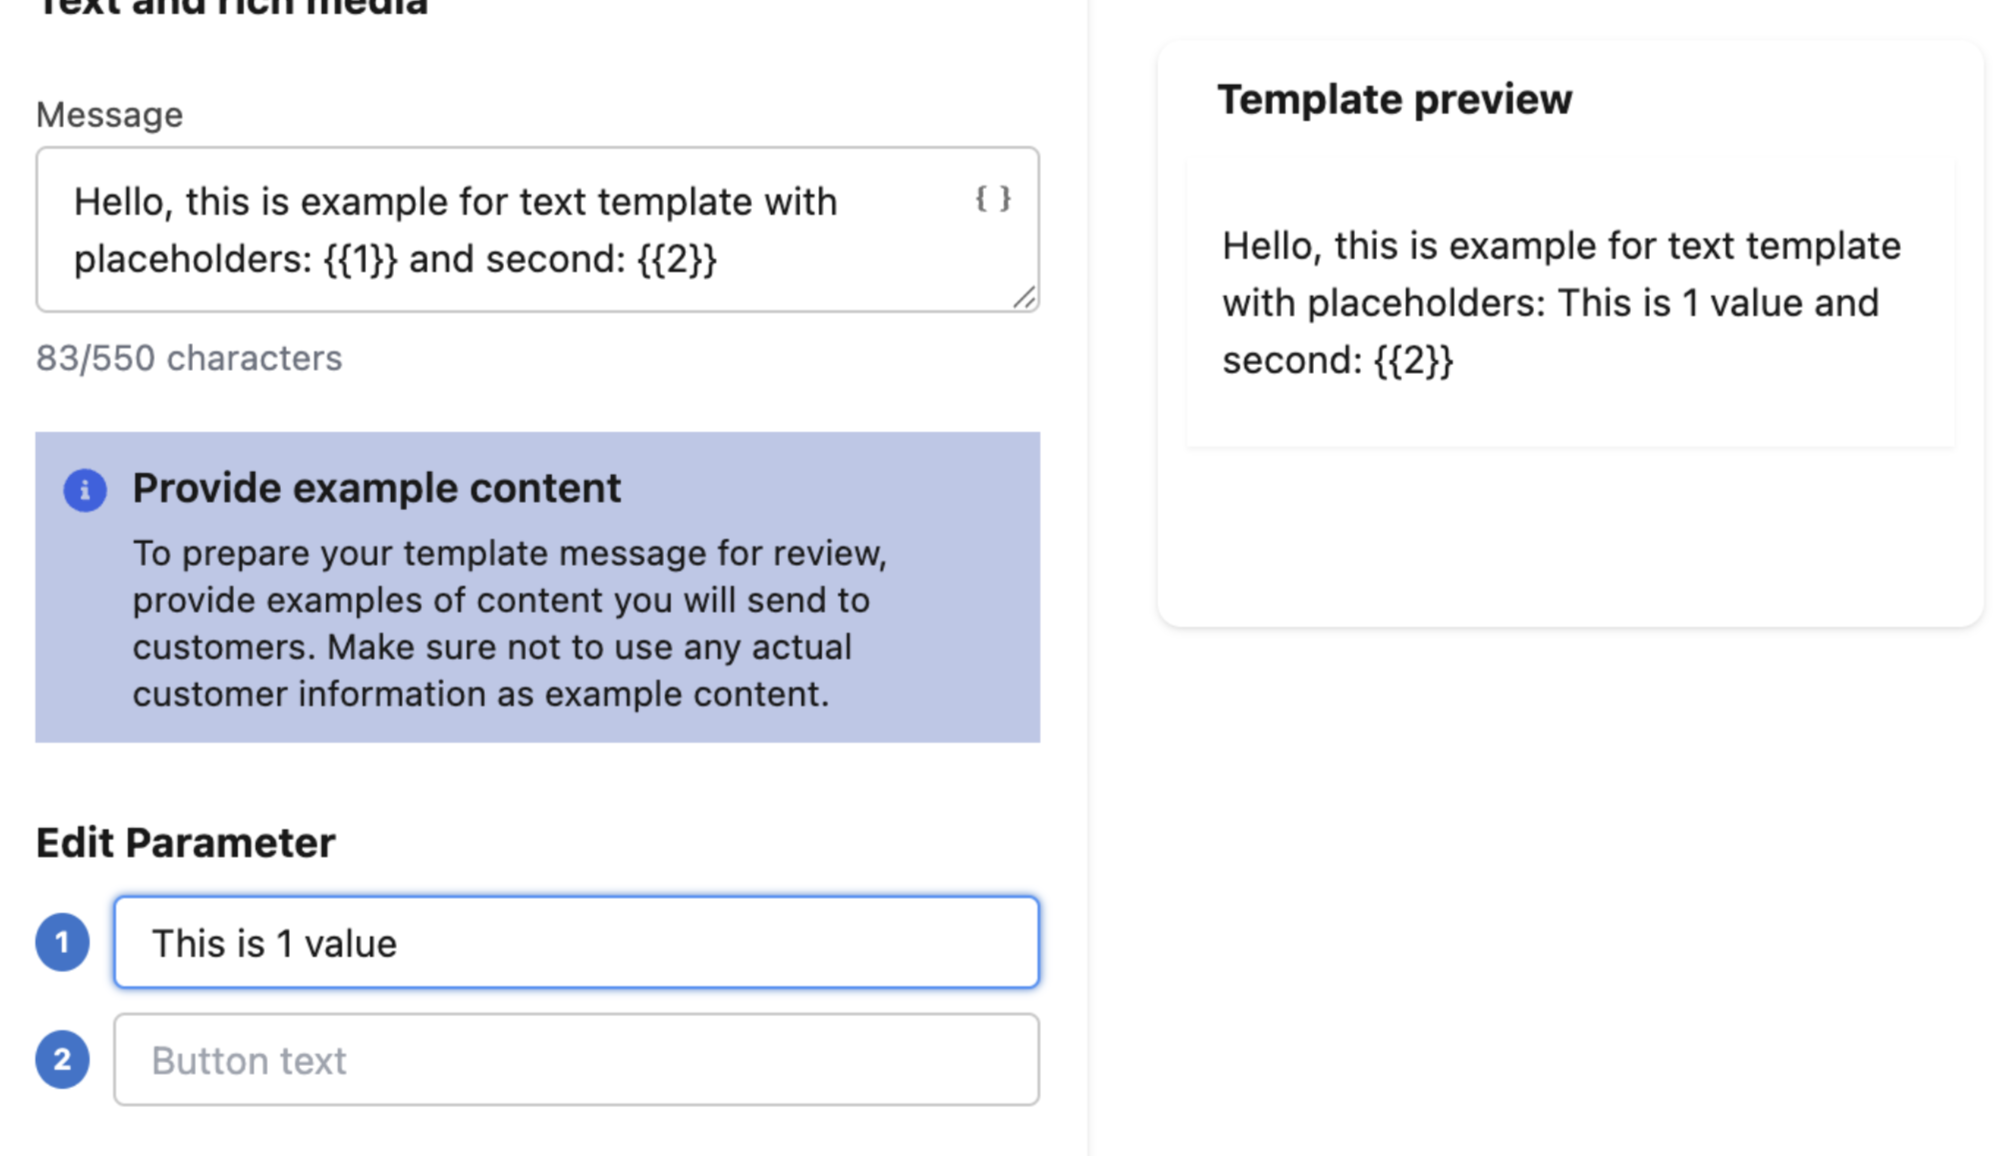
- Add text with placeholders (for example,
- In the Footer (Optional), add a footer for the selected template type (if supported) for additional context.
- In the Buttons (Optional) field, select specific registration buttons based on the selected template type. This makes the interface more dynamic and tailored to the user's selection. Button options vary by template type (for example, carousel, rich media, coupon templates).
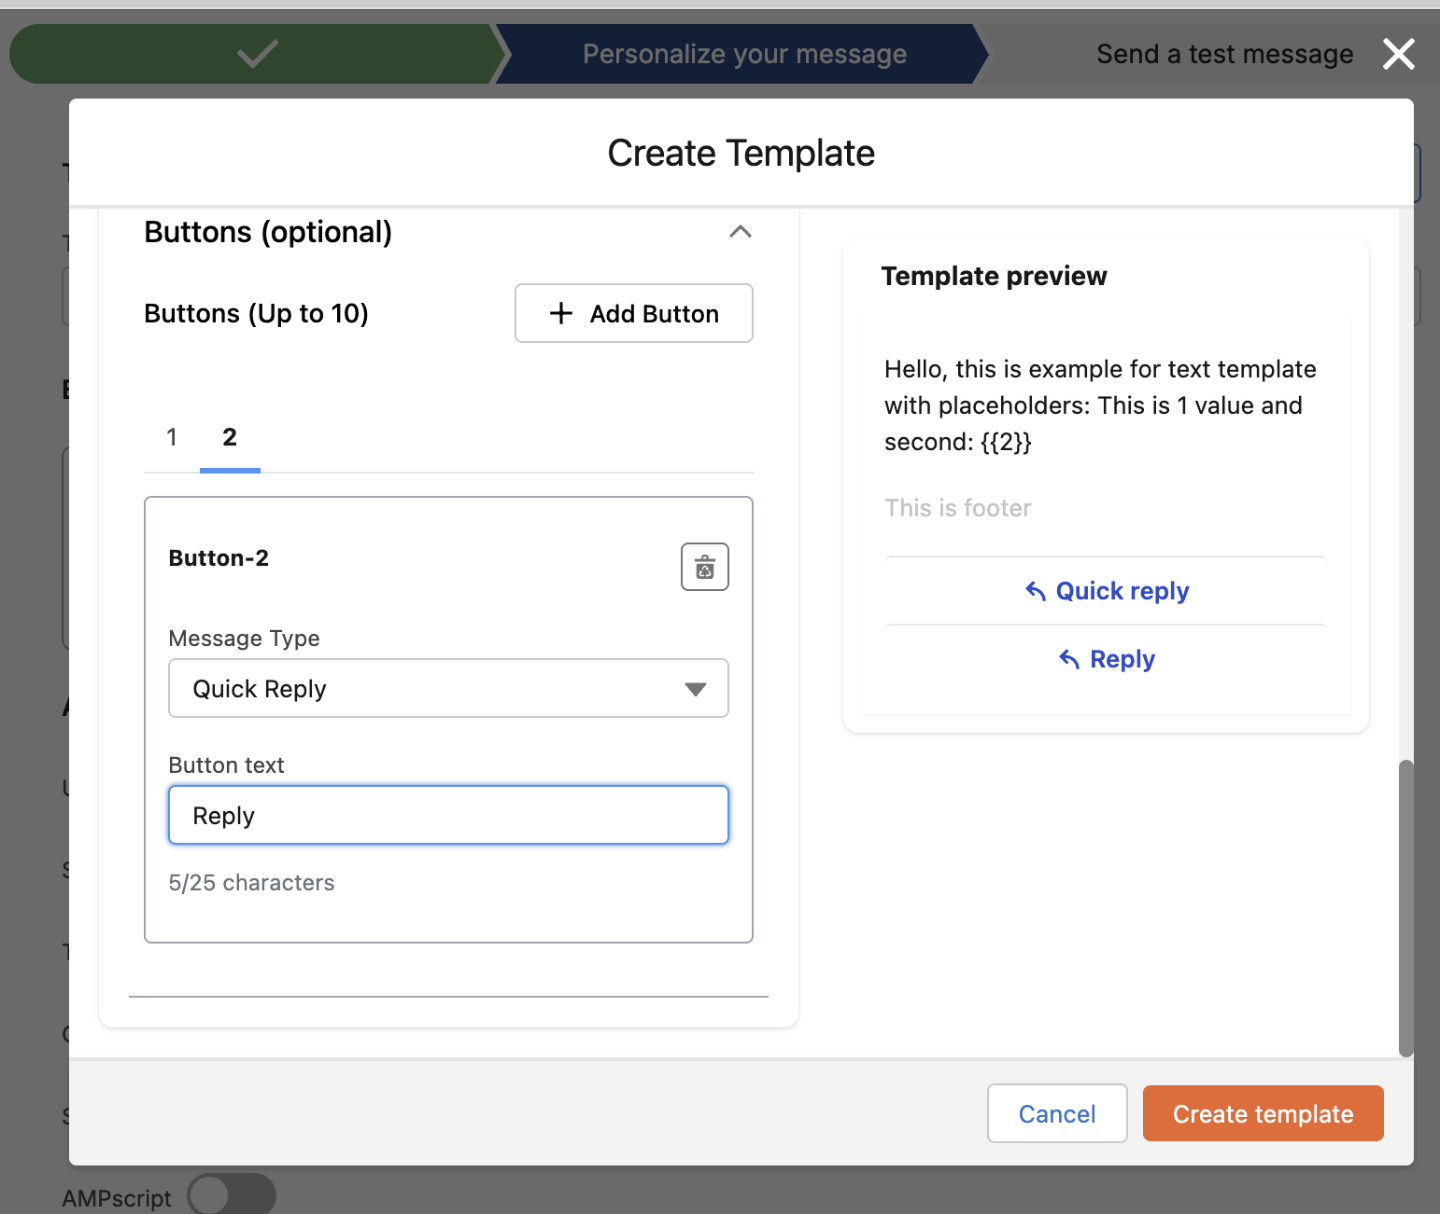
- Submit the template for approval.
- Click Create template to submit.
- The template is sent to Meta (WhatsApp Business) for review against business and policy guidelines.
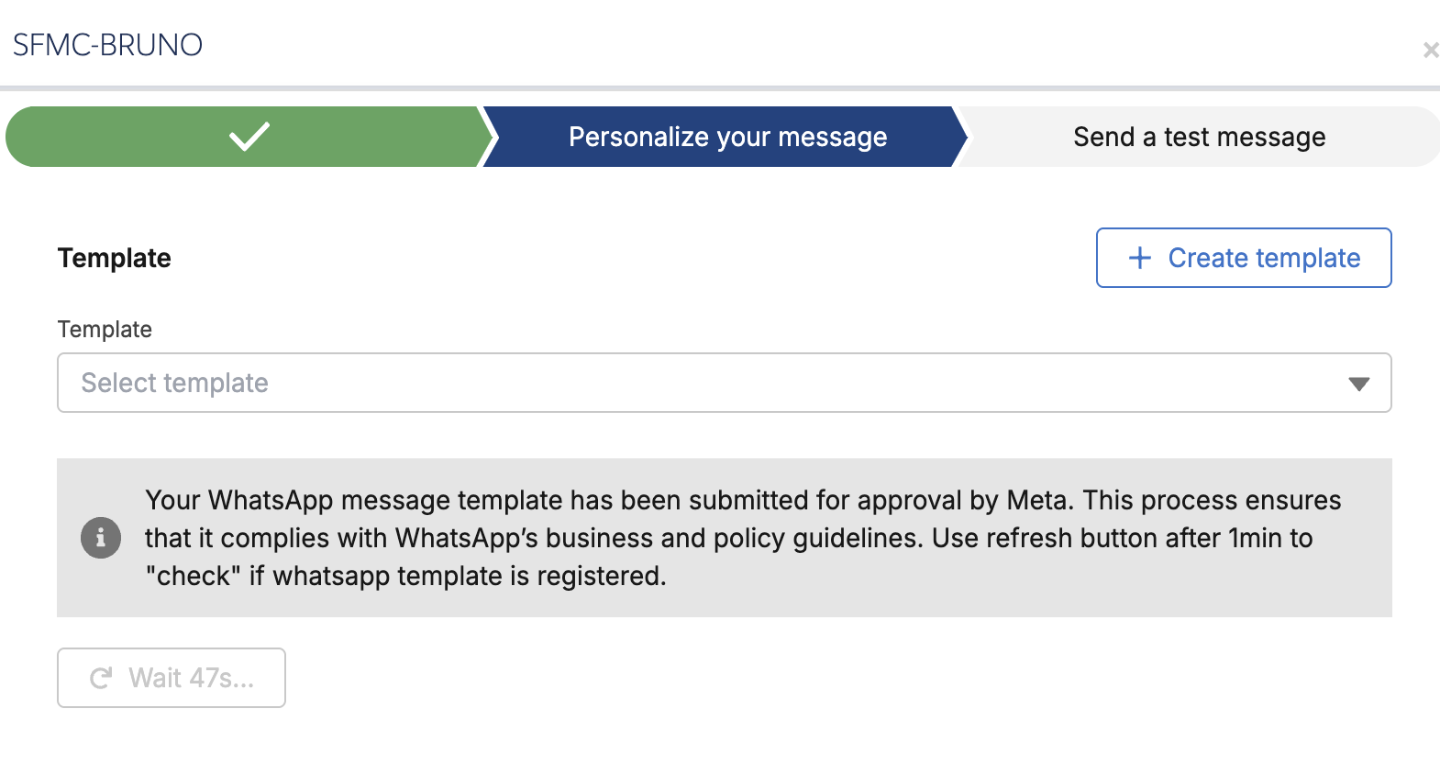
- Check the approval status.
- After submitting a template, a 1-minute timer appears on the Refresh button.
- Once the timer ends, click Refresh, then check the Select template drop-down menu.
- If the template is not yet listed, wait one more minute, refresh again, and recheck.
You can also check the template approval status directly in the Infobip web interface (opens in a new tab).
Once approved by Meta, the template will be available for use in your WhatsApp campaigns within Salesforce Marketing Cloud.
Error handling for Infobip message custom activity
In situations where a user makes an error or if Marketing Cloud doesn't send all of the details for a successful request, the app returns messageStatus as outArgument in the Journey Data, rather than a hard error. A hard error would cause the record to become stuck on this activity and not continue with the journey.
So, if something is wrong with the request, the app returns success but with an additional payload that describes the error. You can use this payload to evaluate whether you wish to re-engage the record with another message.
This type of error handling is useful for validating and creating a decision split when the request record is re-engaged. For example, the following scenario describes decision split checking where the phone field is empty. In this example, you can see a data extension where one record has phone and the other record is empty.

To set up the decision split, add the data extension to a journey as an entry source and configure Infobip message activity.
Create the decision split and choose messageStatus from Custom Activity (Infobip SMS).
You can see in this example that messageStatus is: Error: Missing phone number in request.

The result of the sample send is similar to the following:
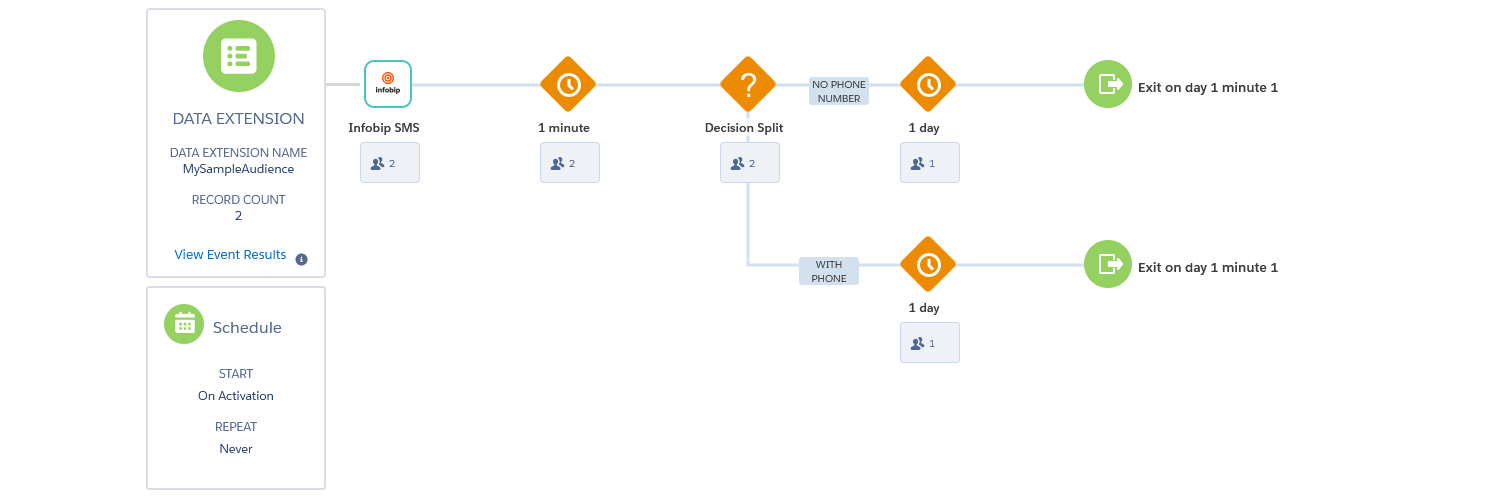
The record with an empty phone number is injected to the NO PHONE NUMBER path.The record with a phone number follows the WITH PHONE path.
In the custom activity details, you see a success status.
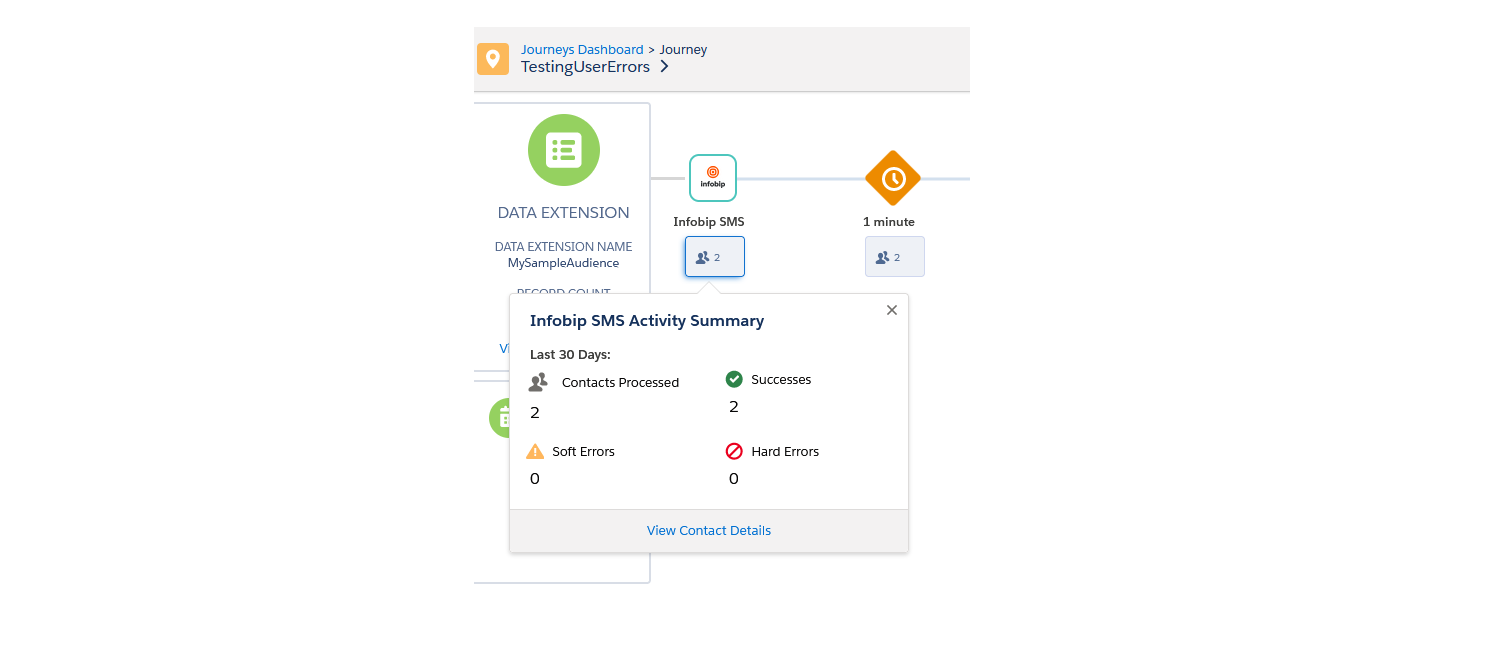
In the status detail for the record with the empty phone, you see the BadRequest status.

See the following table for the full list of possible responses for messageStatus and the channels available for that response.
| Message status | Channels |
|---|---|
| Success: Message pending | SMS, LMS, MMS, Viber, WhatsApp, Kakao ChinguTalk, Kakao Alim |
| Error: Missing trackClicks flag | Viber, SMS, LMS, WhatsApp |
| Error: Missing shortenUrl flag | Viber, SMS, LMS, WhatsApp |
| Error: Missing phone number in request | SMS, LMS, MMS, Viber, WhatsApp, Kakao ChinguTalk, Kakao Alim |
| Error: Invalid tracking url length | Viber, SMS, LMS, WhatsApp |
| Error: Invalid text length | SMS, WhatsApp, Viber |
| Error: Invalid template name | |
| Error: Invalid scenario key | Viber |
| Error: Invalid promotional flag | Viber |
| Error: Invalid image url length | Viber, Kakao |
| Error: Invalid from field | WhatsApp, Kakao, Viber |
| Error: Invalid custom domain length | Viber, SMS, LMS, WhatsApp |
| Error: Invalid buttons field length | Kakao |
| Error: Invalid button url length | Viber |
| Error: Invalid button text length | Viber, Kakao |
| Error: Invalid button text length | Kakao |
| Error: Invalid androidScheme and iosScheme length | Kakao |
Get message report
After you add the Infobip Message element, you can add the Infobip Reports activity element to retrieve a report from the message sent. Infobip reports activity is optional and should be used only when making a split decision in a journey based on message reports.
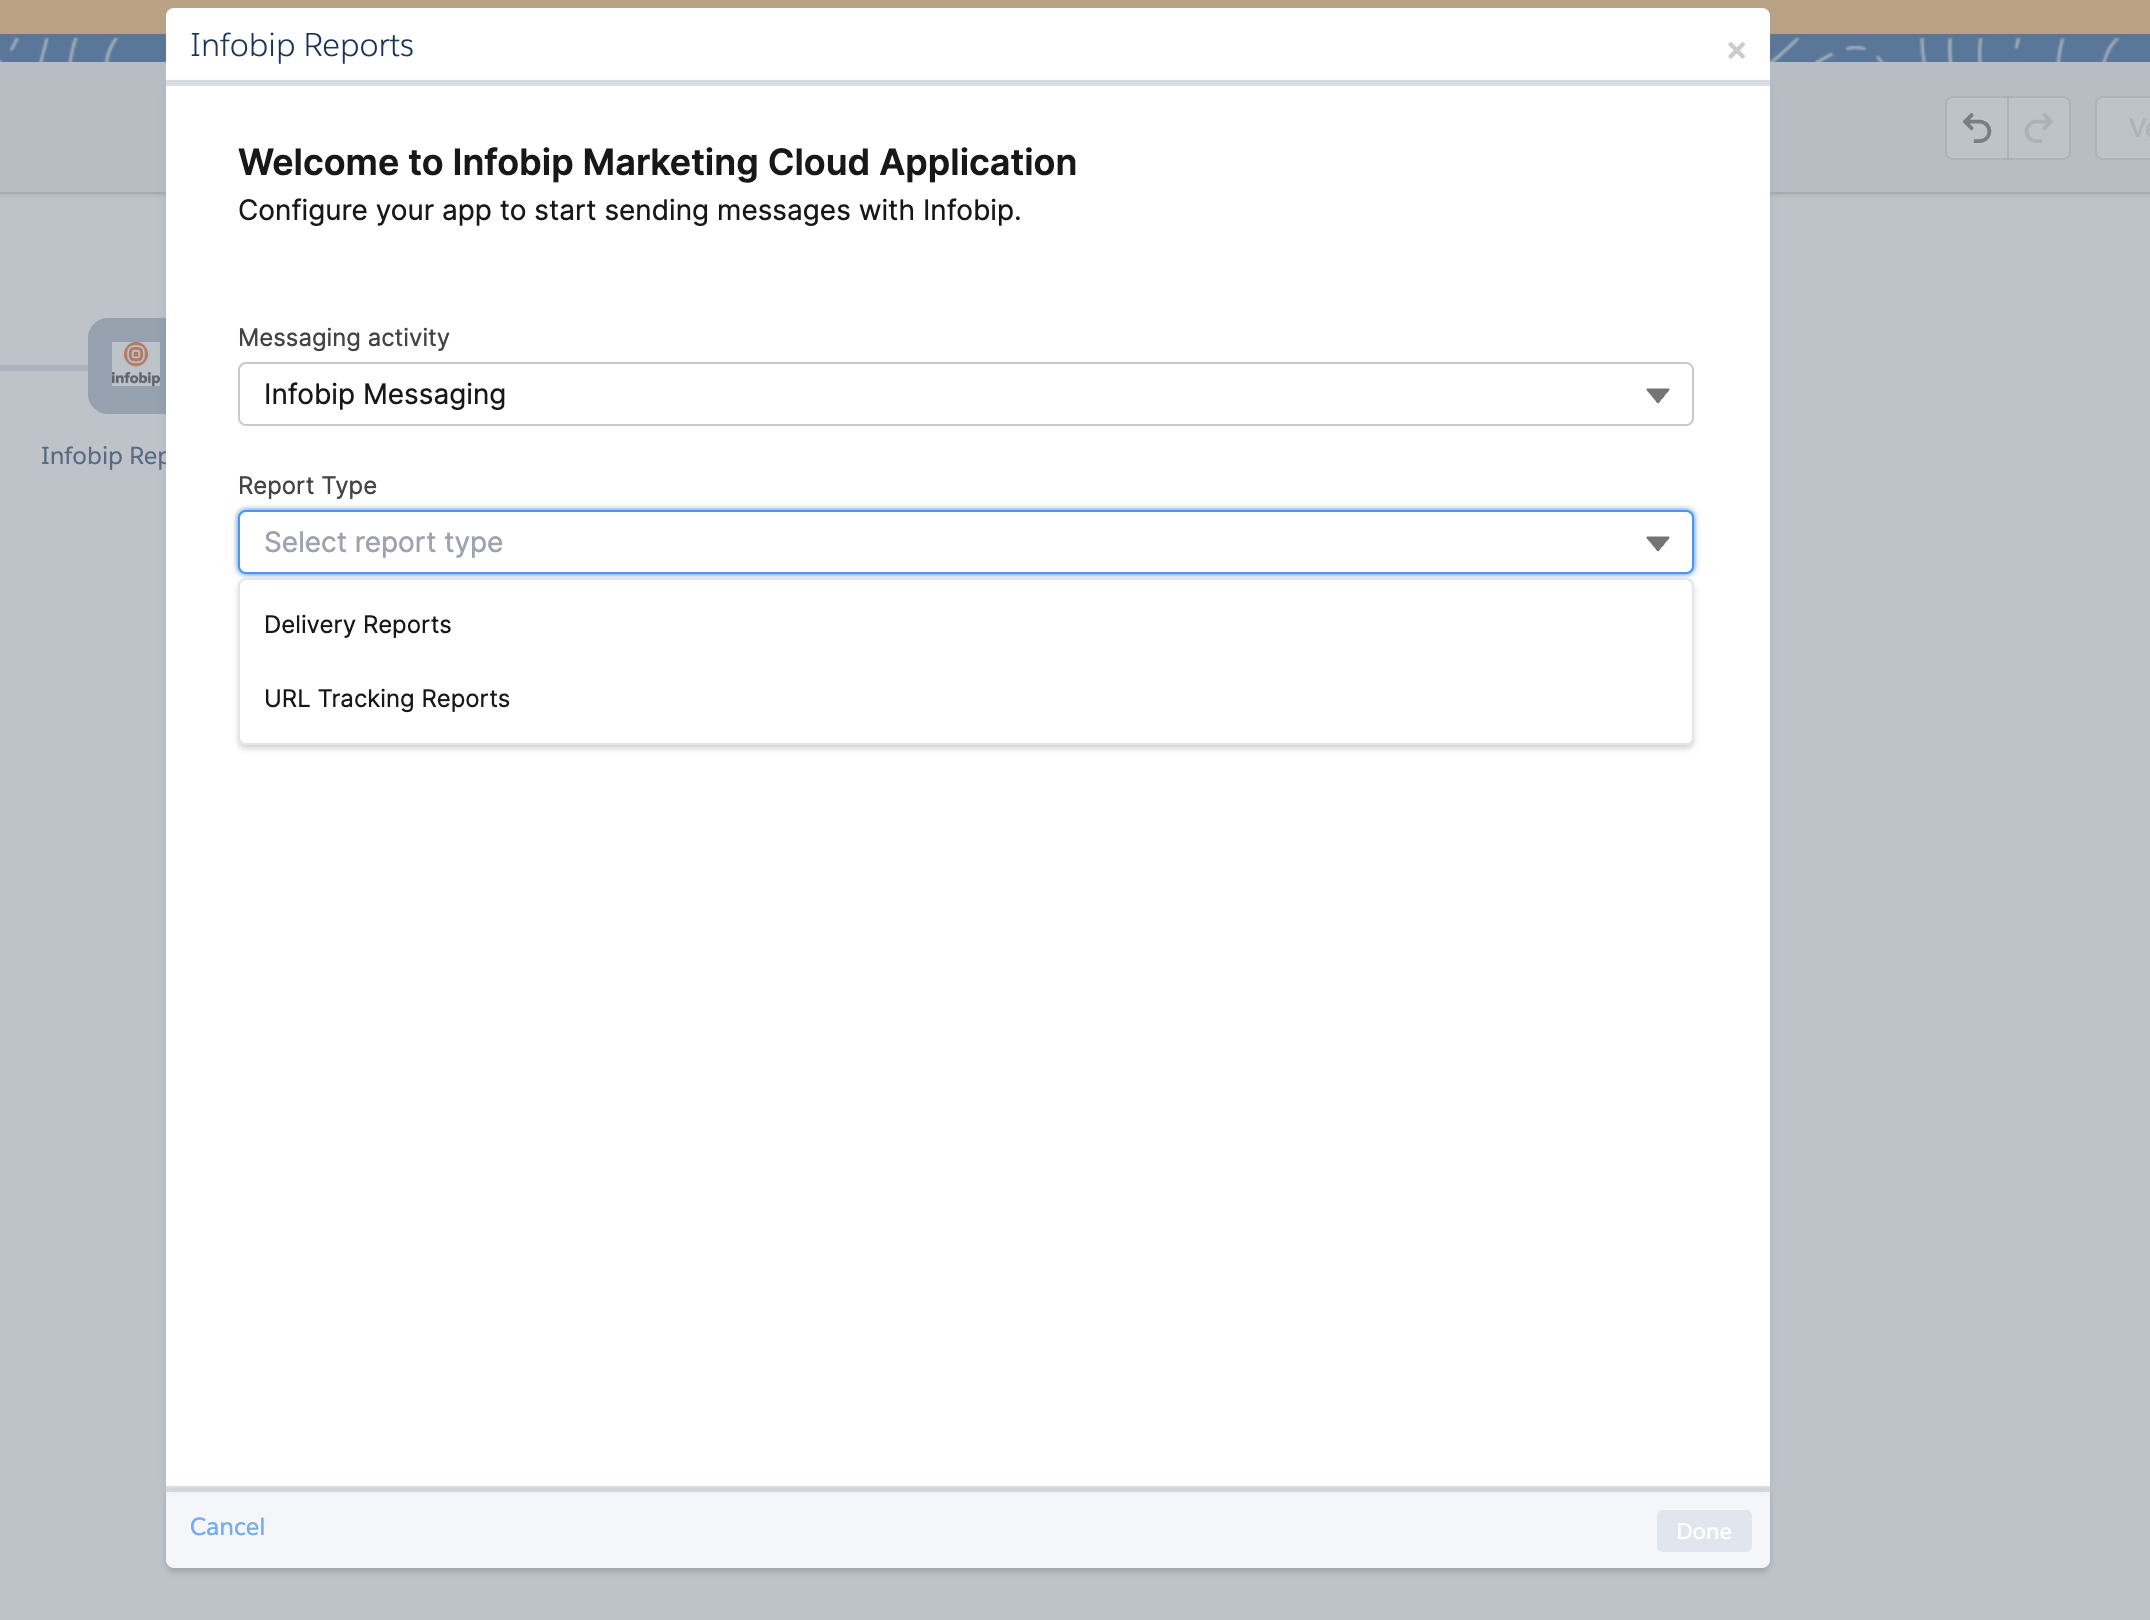
Select the message that was configured inside the journey under Select message activity and the data extension where the report has been saved under the Select data extension drop-down list.
The available data extensions for reports are:
- Delivery Reports - fetching information if the message was delivered, rejected, or seen.
- URL Tracking Reports - fetching information if the URL link inside the message, for that proper channel, was clicked.
Message status is saved under Journey Data and it is available in the decision split.
In the cases where Infobip is trying to deliver a message on a device for some time, no report is created in the data extension. For this, you see Journey Data NOT_AVAILABLE for delivery reports and NOT_CLICKED for click reports.
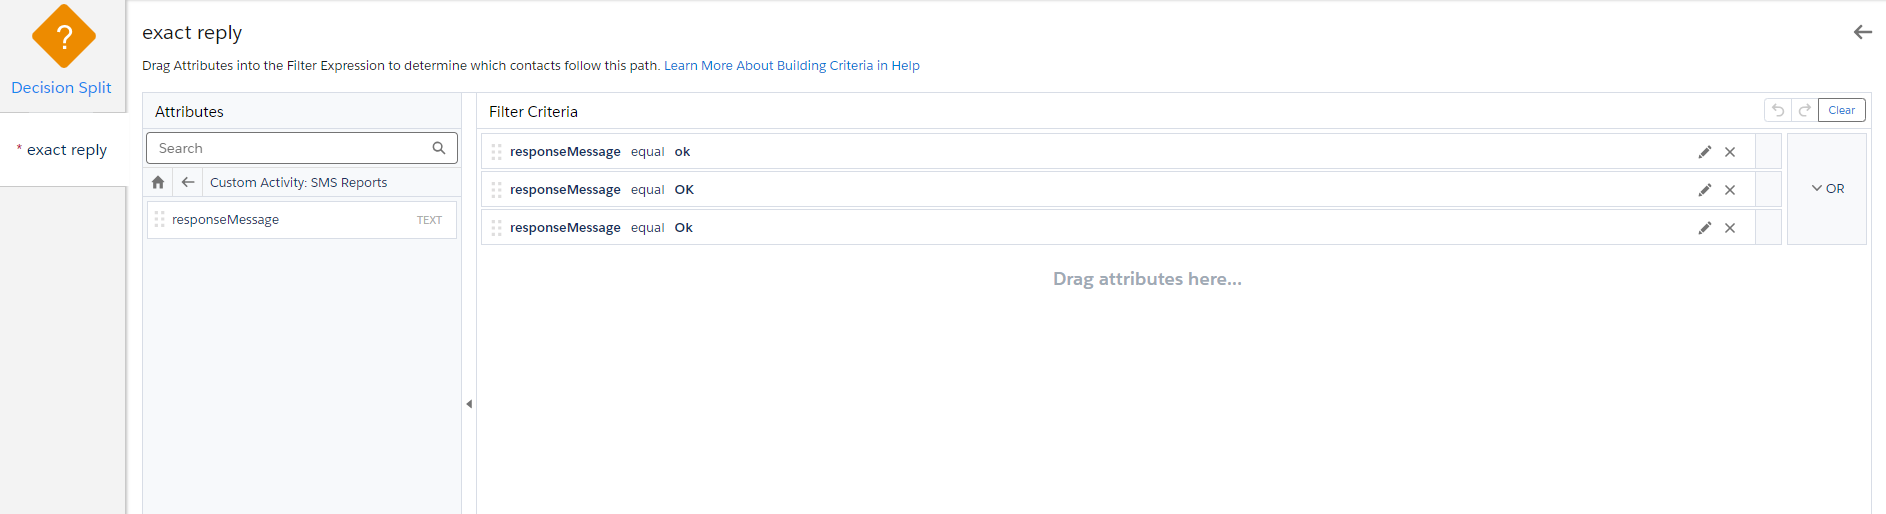
Set Up a Decision Split
After you set up the activity for saving messageId, you can define a decision split in the flow:
- Click Edit.
- Under Attributes, click Journey Data.
- Click Custom Activity: Infobip Reports
- Depending on the report data extension that you selected in the previous step, you see
statusNamefor Delivery reports and the URL for URL Tracking reports.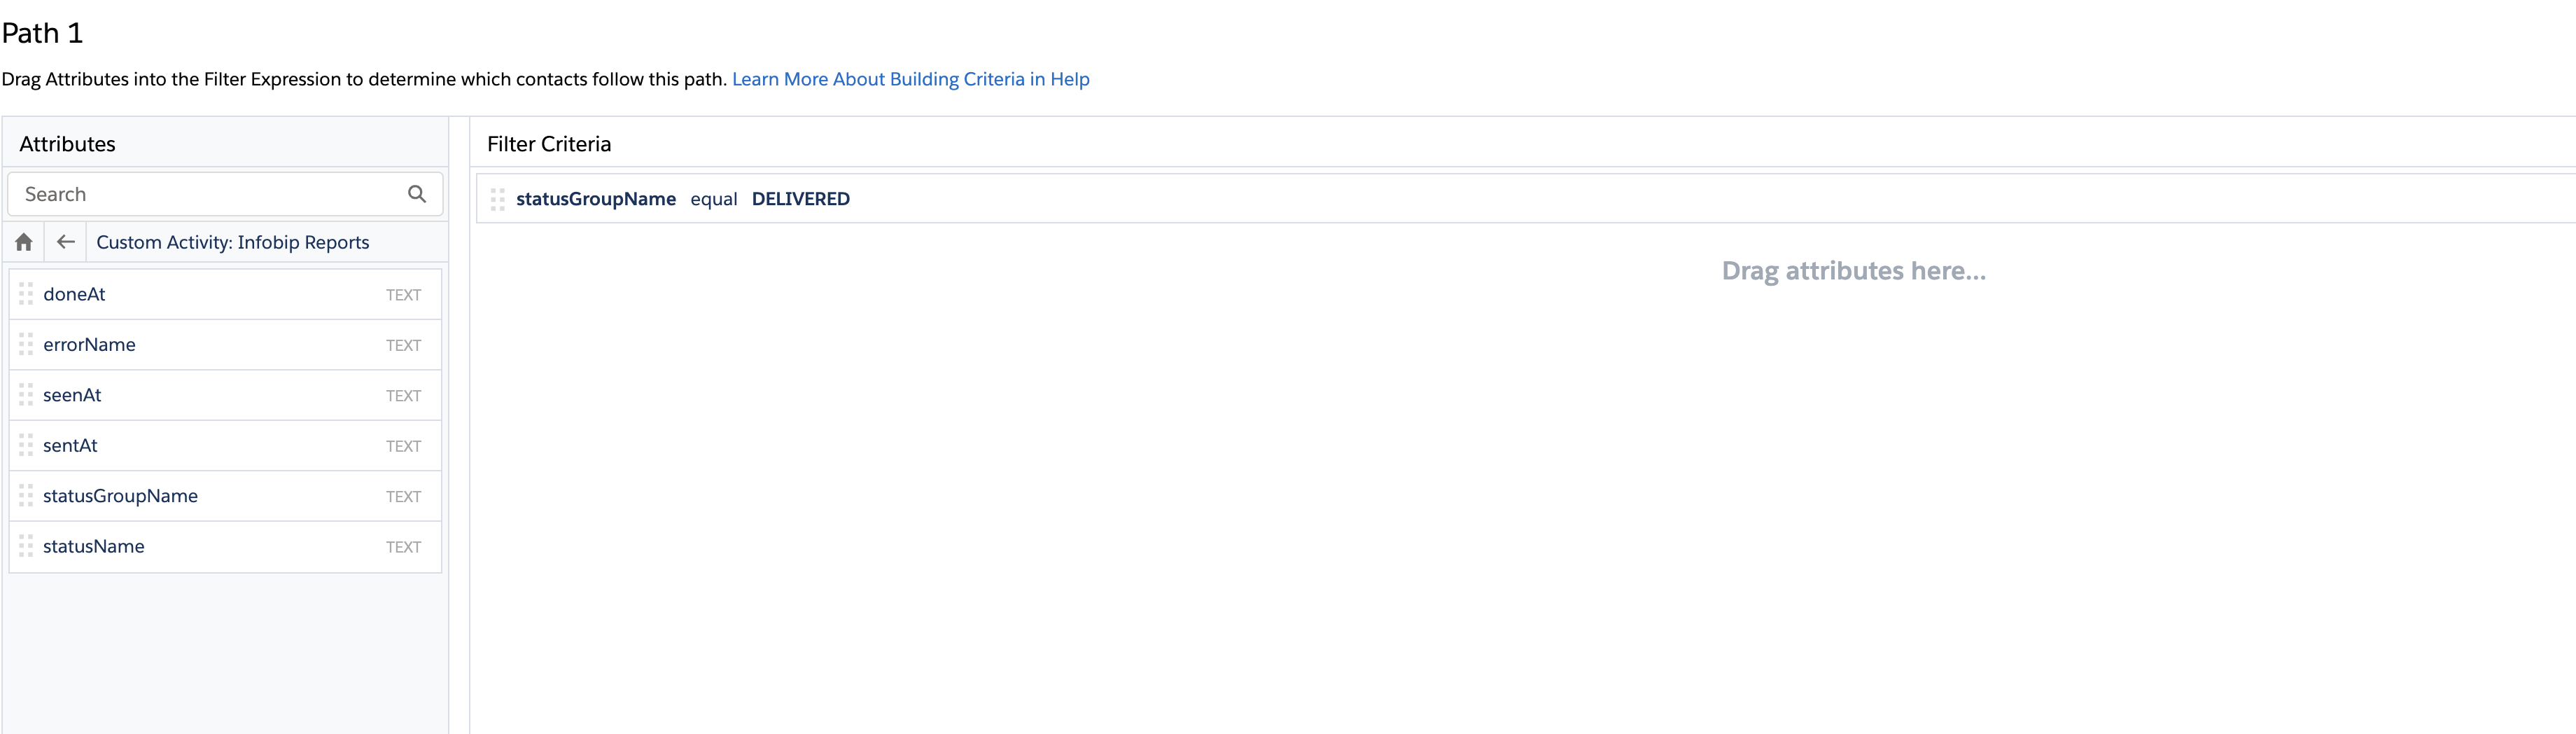
The available parameters for Delivery reports are:
statusNamestatusGroupNameerrorNamedoneAtsentAtseenAt(for Omni reports)
The available parameters for URL Tracking reports are:
notificationTypeurl
The statusGroupName parameter equals to DELIVERED to check delivery status.
If the seenAt parameter is not empty, add SEEN as the value in decision split. Otherwise, use NOT_SEEN.
For URL clicks in SMS messages, you can check the exact value of the url parameters (for example, which URL is being tracked).
For example, if https://www.infobip.com (opens in a new tab) was the URL sent in the message, the decision split branch should check if the URL is equal to https://www.infobip.com (opens in a new tab). If there is no click report saved for a specific customer, check if the URL is equal to NOT_CLICKED. To see if a Viber message was viewed, check whether the seenAt value in the Omni message report is not null.
For descriptions of the possible message statuses, see the Response status and error codes documentation.
There are five statuses that are returned to Journey Data in a Decision Split:
DELIVERED- The message has been successfully processed and delivered.
- If you want to check whether the message arrived to the customer's device, DELIVERED_TO_HANDSET is returned and checked in the decision split.
UNDELIVERABLE- This status is returned if the message was sent to the operator but it was rejected by them or they returned UNDELIVERED status.
- Multiple statuses can be returned, so it's best to check if statusName begins with UNDELIVERABLE.
REJECTED- The message has been received but has either been rejected by Infobip or the operator has reverted REJECTED as final status.
- Multiple statuses can be returned, so it's best to check if statusName begins with REJECTED.
EXPIRED- The message has been sent and has either expired due to pending past its validity period (our platform default is 48 hours), or the delivery report from the operator has reverted the expired as a final status.
- Multiple statuses can be returned, so it's best to check if statusName begins with EXPIRED.
NOT_AVAILABLE- Delivery of the message is pending (message is not yet delivered, however it can technically be delivered), the operator keeps trying to deliver the message until its expiry.
- To check this status, add a new branch and check if statusName begins with or is equal to NOT_AVAILABLE.
Set up contact information for the Journey
After you finish setting up the journey, you need to select a Contact Entry to use. You map the default mobile number to the data type, Phone, in your data extension. This is available from the drop-down list.

When setting up a Journey based on a copy of an already existing Journey, make sure that you've reconfigured the Infobip message activity, otherwise you receive an error message.
When activating Journeys based on automations, make sure that the data extension entry source is already defined and the automation already exists before running journeys.
Reports
This section shows the full list of attributes available for each of the reports.
To get the values from callback data, you need to deploy a new package for that feature. Contact Support to get package information.
This feature extracts data from the data extension into additional fields. For example, if the callback data contains a value like Activity ID with this feature, the value is stored in a separate column - Activity ID. Then you can use that value from the added column to make split decision in a Journey.
OMNI delivery reports
OMNI delivery reports fetch the information about whether the message was delivered, rejected, or seen.
| Attribute name | Attribute type | Is nullable | Default value | Length | Description |
messageId | Text | 50 | The ID that uniquely identifies the message sent. | ||
messageCount | Integer | x | 1 | Number of messages sent to end user. Count is always 1. | |
to | Text | 50 | Message destination address. Addresses must be in international format | ||
pricePerMessage | Decimal | x | The price per individual message. | ||
Currency | Text | 5 | The currency in which the price is displayed. | ||
statusGroupId | Integer | Status group ID. | |||
statusGroupName | Text | 50 | Group name for the status. | ||
statusId | Integer | Status ID. | |||
statusName | Text | 50 | Status name. | ||
statusDescription | Text | 100 | Human-readable description of the status. | ||
errorGroupId | Integer | Error group ID. | |||
errorGroupName | Text | 50 | Error group name. | ||
errorId | Integer | Error ID. | |||
errorName | Text | 50 | Error name. | ||
errorDescription | Text | 1000 | Human-readable description of the error. | ||
errorPermanent | Boolean | Indicates whether the error is permanent. | |||
callbackData | Text | x | 4000 | The callback data sent through the callbackData field in your fully featured message. | |
sentAt | Date | 50 | Date and time the message was sent. | ||
doneAt | Date | 50 | Date and time the message was finished processing by Infobip. This is when the final status of the message is returned (delivered, expired, rejected) | ||
seenAt | Date | 50 | Tells when the message was seen. | ||
from | Text | x | 50 | Tells who sent the message | |
channel | Text | x | 50 | Channel which was used for sending messages |
SMS delivery reports
SMS delivery reports fetch the information about whether the message was delivered, rejected, or seen.
| Attribute name | Attribute type | Is nullable | Default value | Length | Description |
messageId | Text | 50 | The ID that uniquely identifies the message sent. | ||
messageCount | Integer | 1 | Long SMS messages have a character limit on how much can be sent over one message. Longer messages are split up into multiple messages and sent separately. This is the total count of messages one SMS was sent over. | ||
to | Text | 50 | Message destination address. Addresses must be in international format | ||
from | Text | x | 50 | Tells who sent the message | |
pricePerMessage | Decimal | x | 7 | The price per individual message. | |
priceCurrency | Text | 5 | The currency in which the price is displayed. | ||
statusGroupId | Integer | Status group ID. | |||
statusGroupName | Text | 50 | Group name for the status. | ||
statusId | Integer | Status ID. | |||
statusName | Text | 50 | Status name. | ||
statusDescription | Text | 100 | Human-readable description of the status. | ||
errorGroupId | Integer | Error group ID. | |||
errorGroupName | Text | 50 | Error group name. | ||
errorId | Integer | Error ID. | |||
errorName | Text | 50 | Error name. | ||
errorDescription | Text | 1000 | Human-readable description of the error. | ||
errorPermanent | Boolean | Indicates whether the error is permanent. | |||
callbackData | Text | x | 4000 | The callback data sent through the callbackData field in your fully featured message. | |
sentAt | Date | x | 50 | Date and time the message was sent. | |
doneAt | Date | x | 50 | Date and time the message was finished processing by Infobip. This is when the final status of the message is returned (delivered, expired, rejected) | |
originalMCC | Text | x | 50 | Mobile country code of the recipients number | |
originalMNC | Text | x | 50 | Mobile network code of the recipients number |
Unified URL tracking
Unified URL tracking fetches information about whether the link inside message was clicked.
| Attribute name | Attribute type | Is nullable | Default value | Length | Description |
|---|---|---|---|---|---|
notificationType | Text | x | 50 | CLICKED | |
messageId | Text | 50 | The ID that uniquely identifies the message sent. | ||
recipient | Text | x | 50 | Contact who clicked on the URL | |
url | Text | x | 1000 | URL that was clicked in message | |
sendDateTime | Date | x | 50 | Date and time contact clicked on the URL. | |
deviceType | Text | x | 50 | Phone or desktop | |
os | Text | x | 50 | OS running on the device | |
deviceName | Text | x | 50 | Device manufacturer (Samsung, PC, Apple) | |
callbackData | Text | x | 4000 | The callback data sent through the callbackData field in your fully featured message. | |
channel | Text | 50 | Channel used for the message (Viber, SMS, Whatsapp…) |
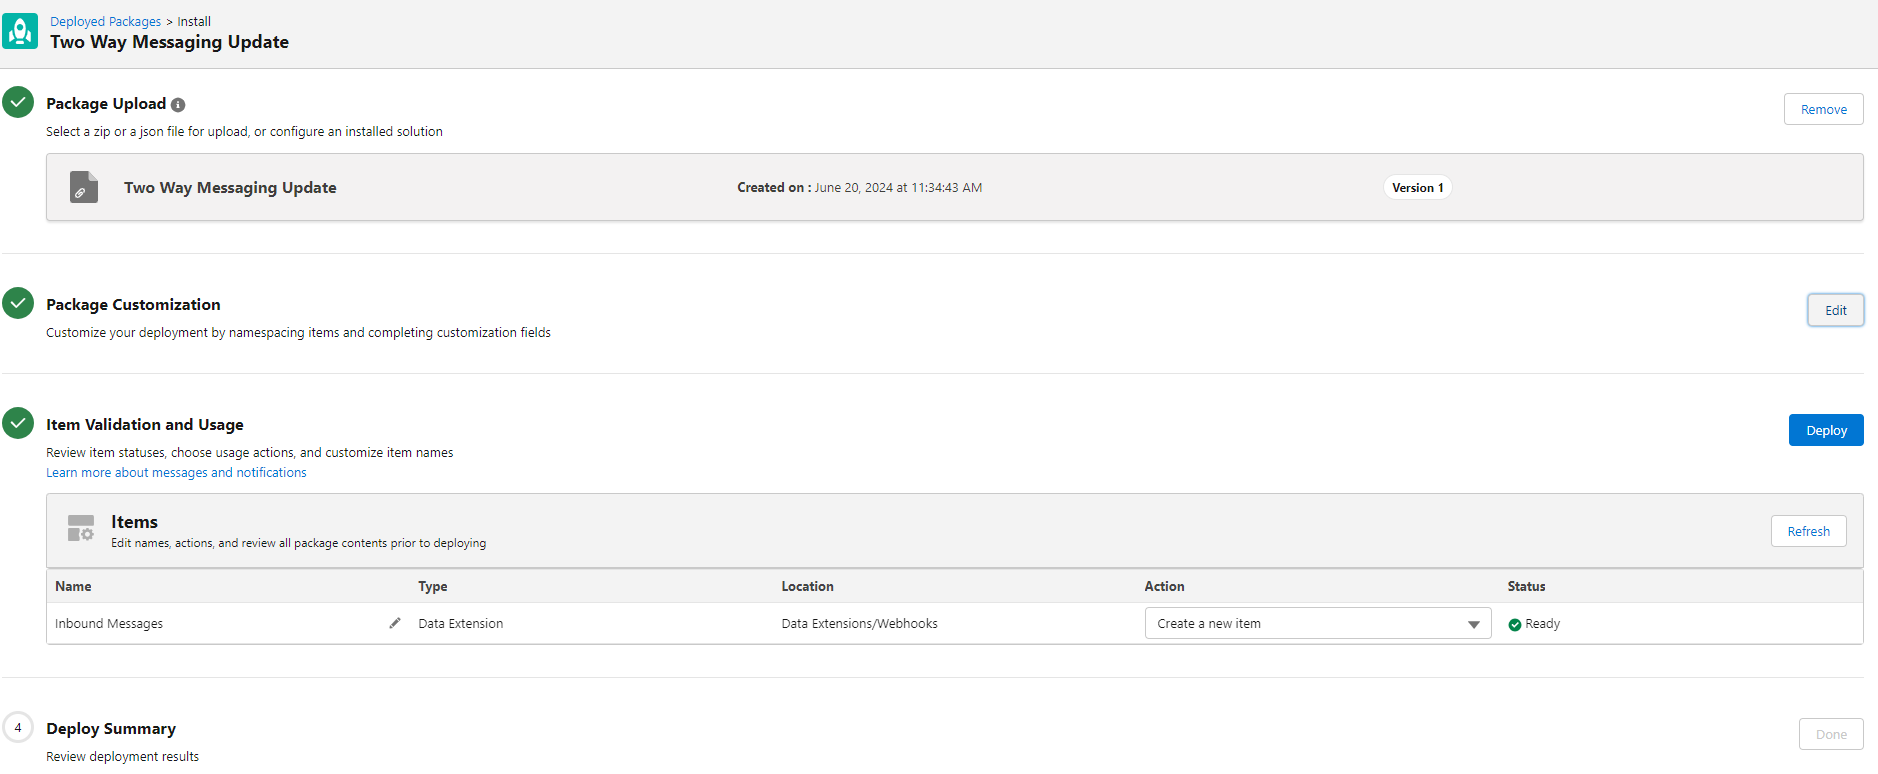
Redeploy latest package version
Ensuring that the latest package version is deployed in Salesforce Marketing Cloud is critical to enabling all available features. If you are using an older version, follow these steps to redeploy to the latest package.
- Download the new package from the Infobip web interface.
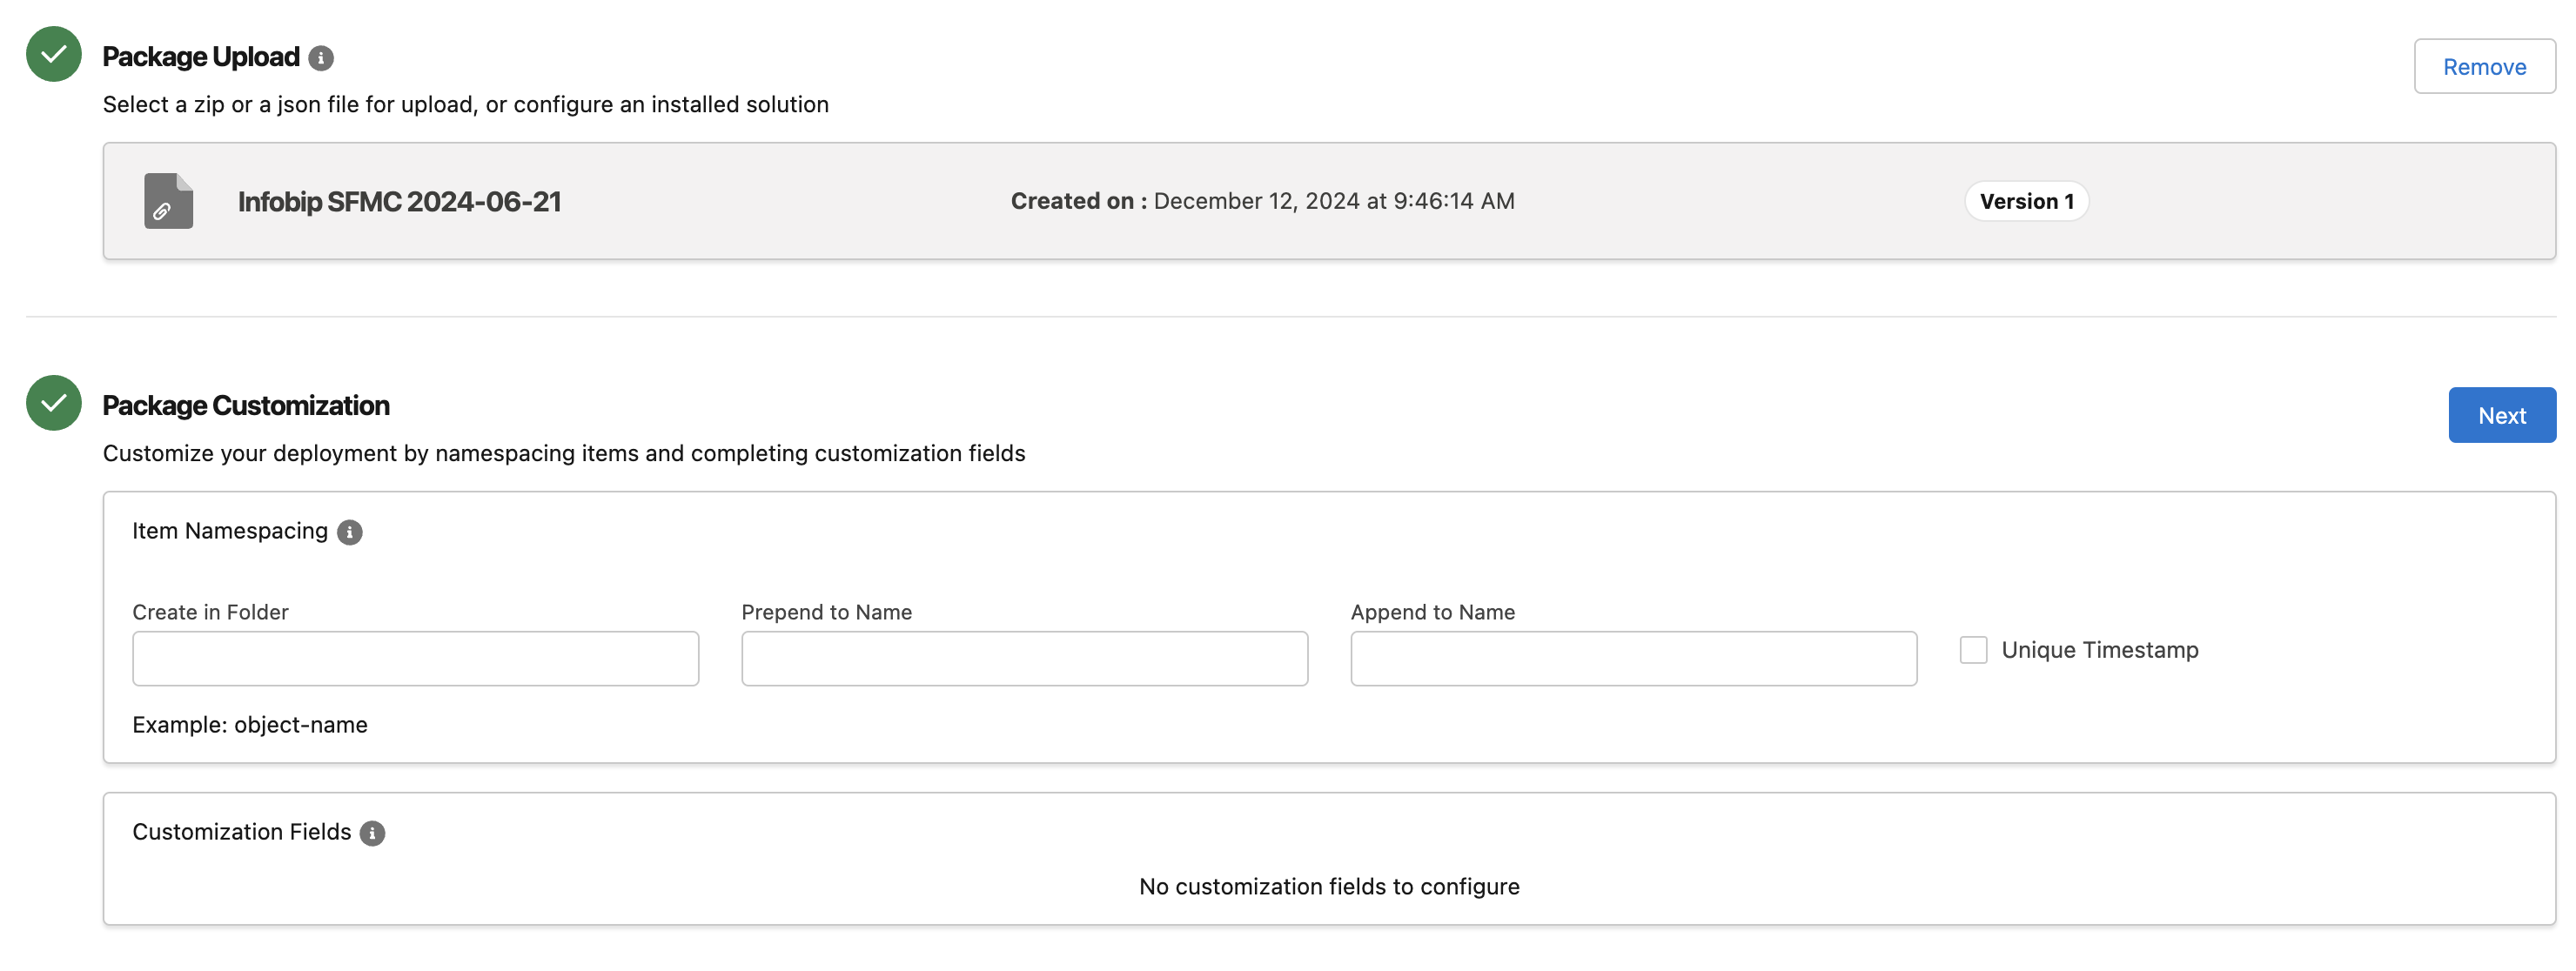
- Redeploy the new package version:
- In Salesforce Marketing Cloud, go to Platform > Package Manager
- Click the Deployment tab
- Click Deploy to start the install and deployment process
- Upload the newly downloaded package file. Click Next to continue.
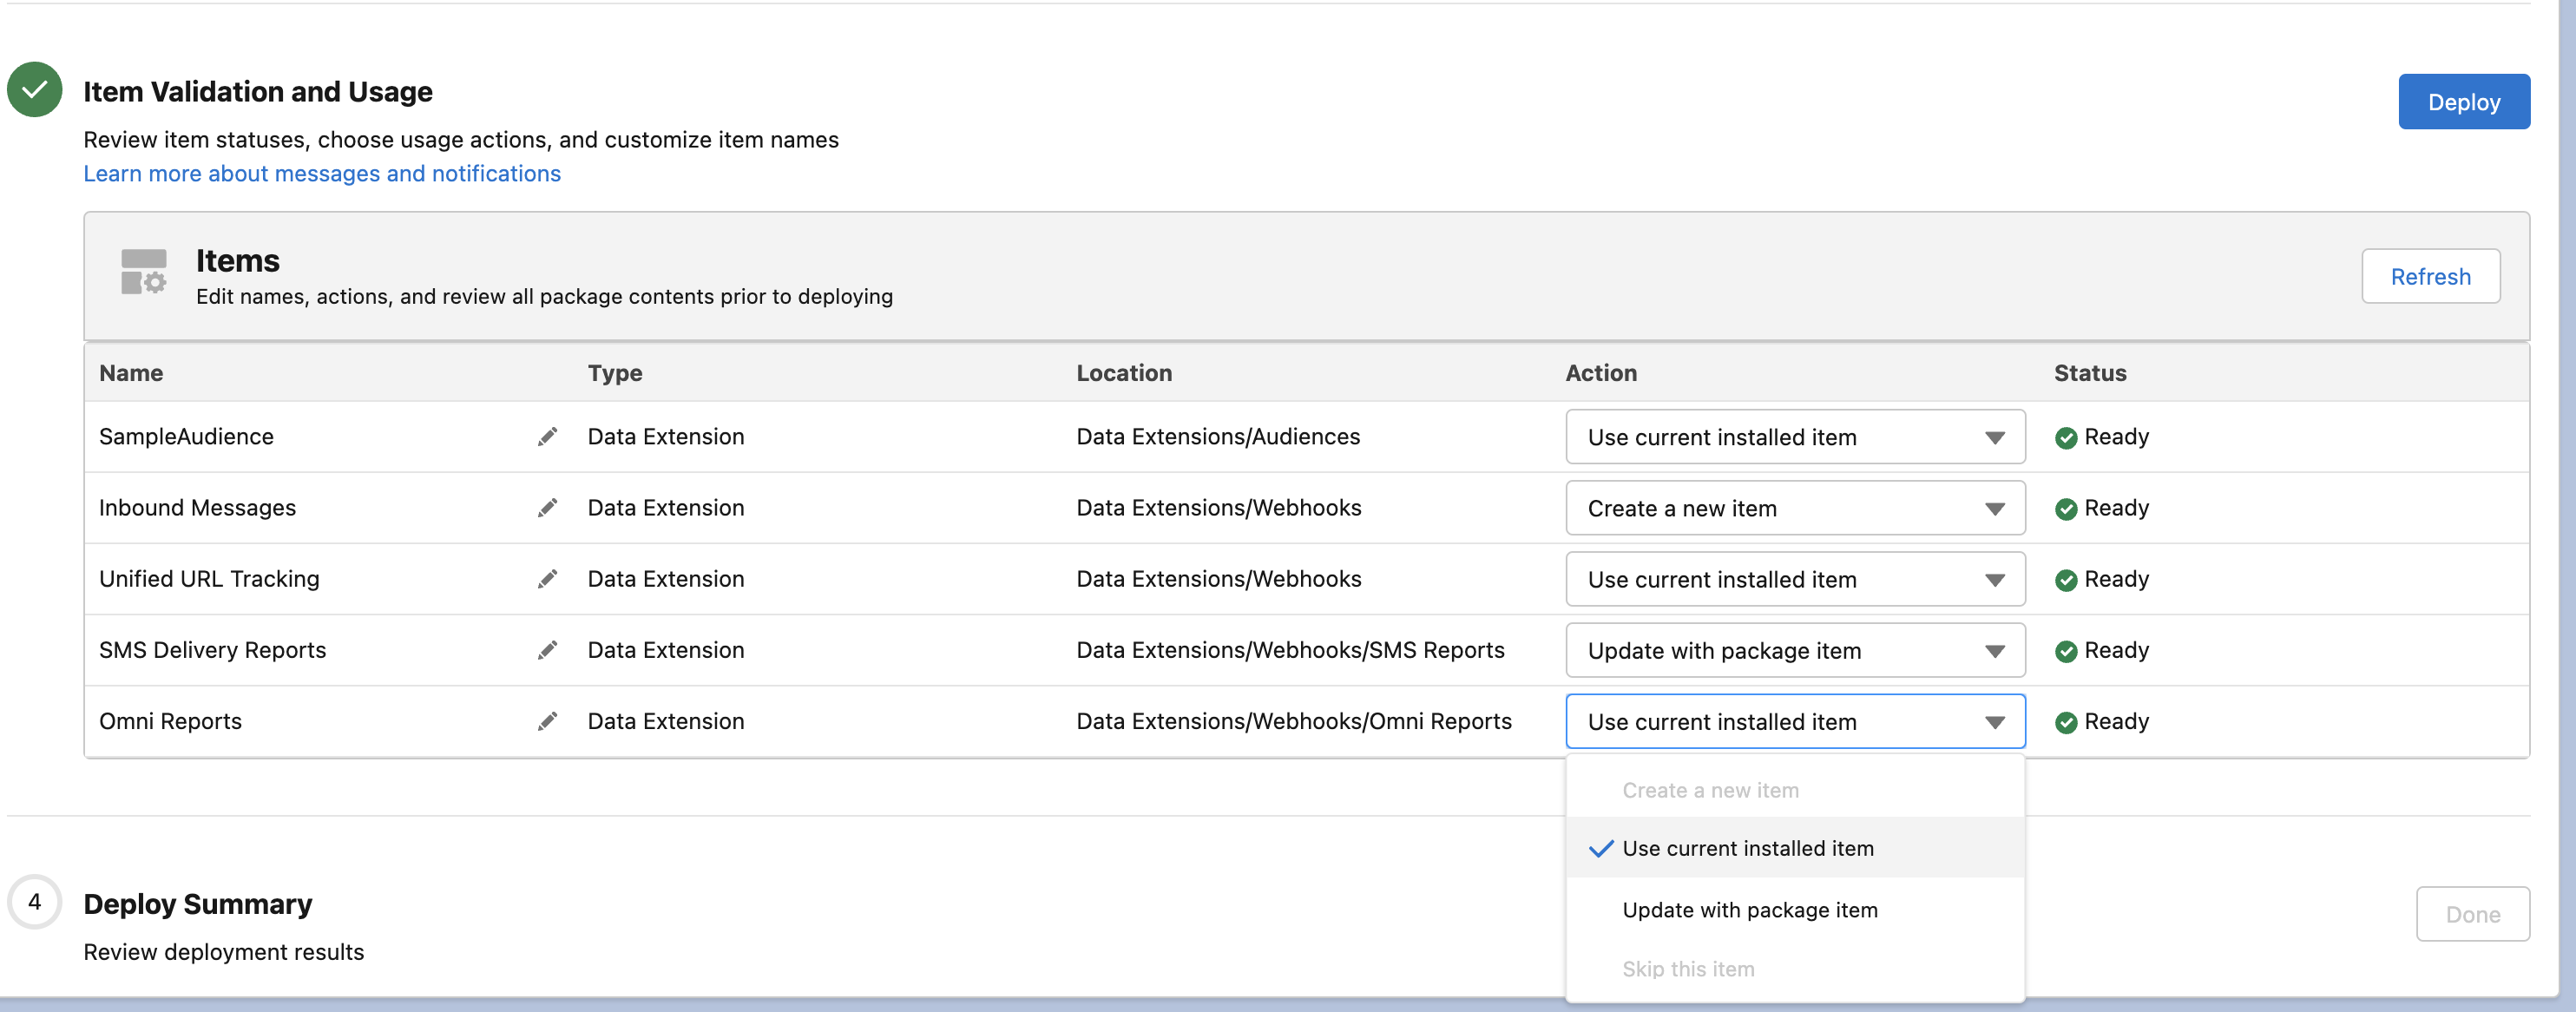
- During installation, you are prompted to manage specific items, particularly data extensions. Choose from the following actions:
- Create a New Item - Select this action if the required data extension does not exist in Content Builder (for example, if the old version lacks the Inbound Messages data extension). This creates and adds the missing data extension automatically.
- Update with Package Item - Choose this action to update an existing data extension with new fields or modifications included in the package (for example, updating SMS Delivery Reports to include the
sentAtfield). - Use Current Installed Item - Select this action to keep the existing data extensions unchanged. If you choose to skip the updates, you may be prevented from using newly introduced features.
- Click Deploy to complete the deployment.
- On the confirmation page, click Done to finalize the deployment.
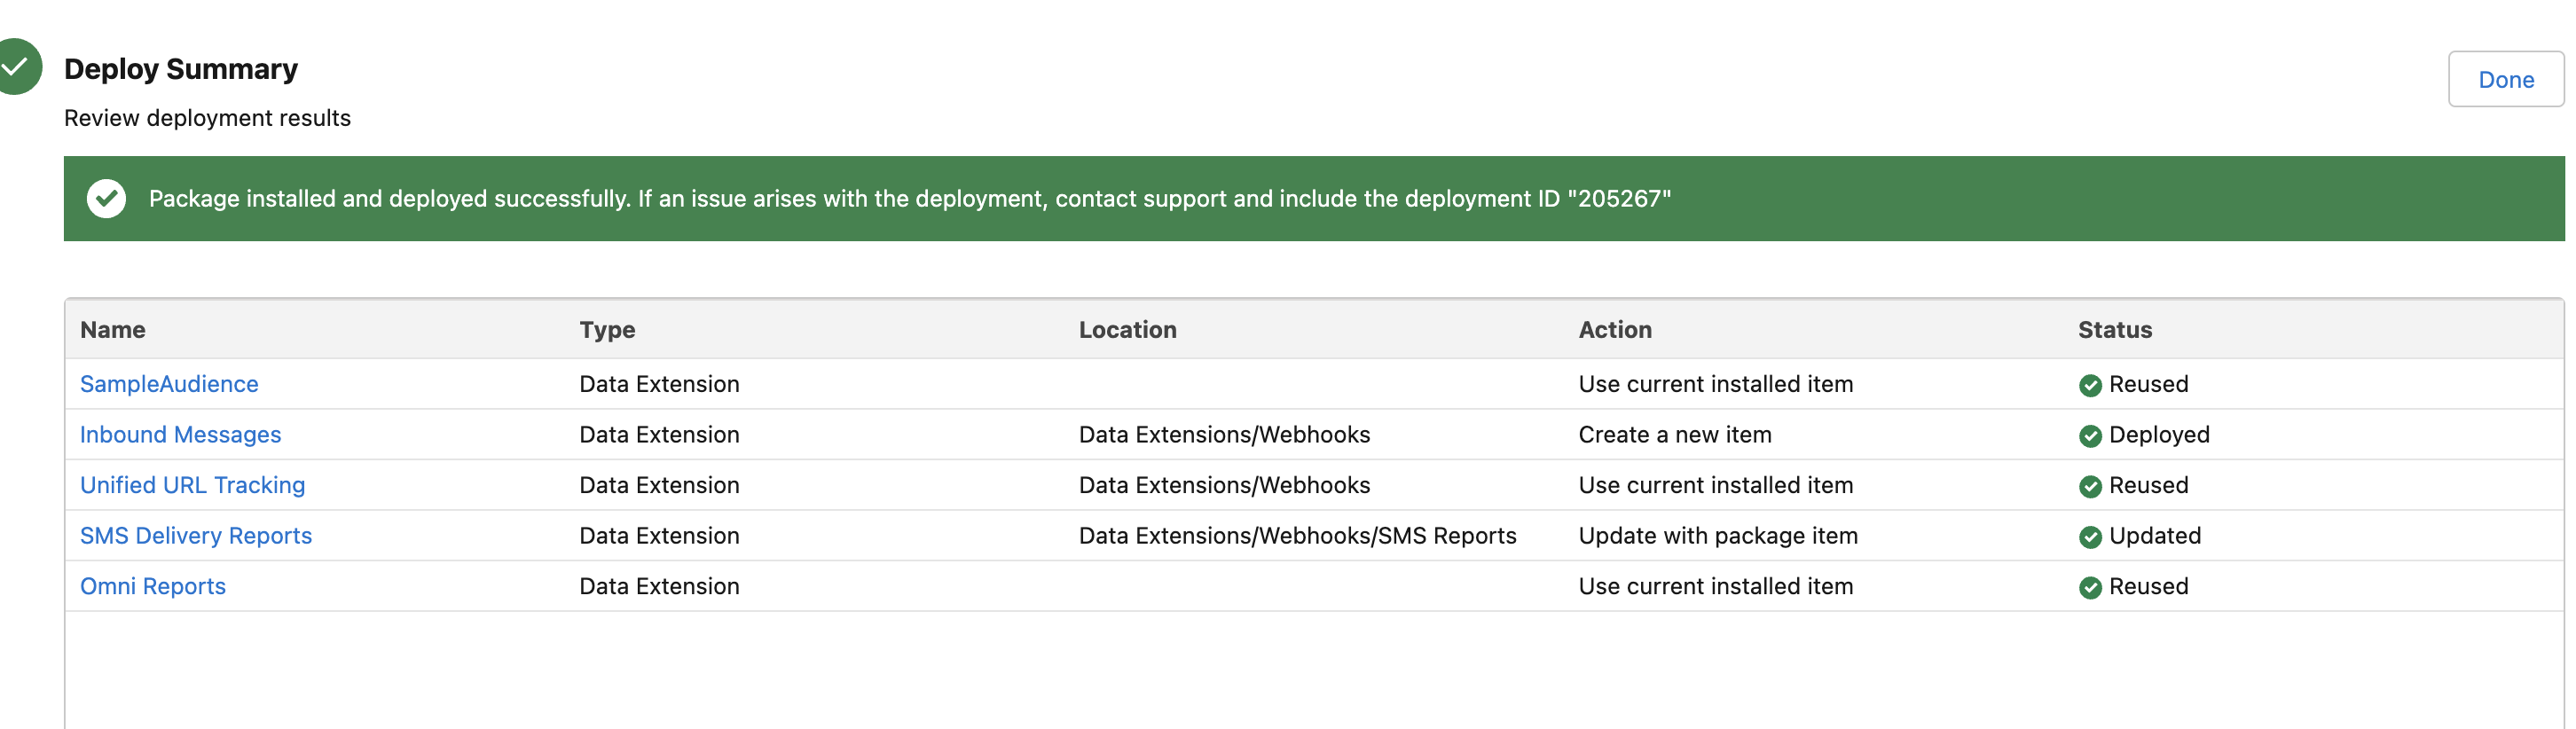
Your package is now successfully updated to the latest version.