WooCommerce messaging
Infobip Omnichannel Messaging for WooCommerce is a powerful plugin that directly integrates Infobip's communication tools into WooCommerce. This enables you to deliver personalized SMS notifications, transactional emails, and targeted marketing campaigns - all from one platform.
Many online stores face challenges engaging their customers with timely updates and personalized messages. This plugin bridges that gap, helping businesses connect with customers through SMS and email, improving satisfaction, and driving repeat sales.
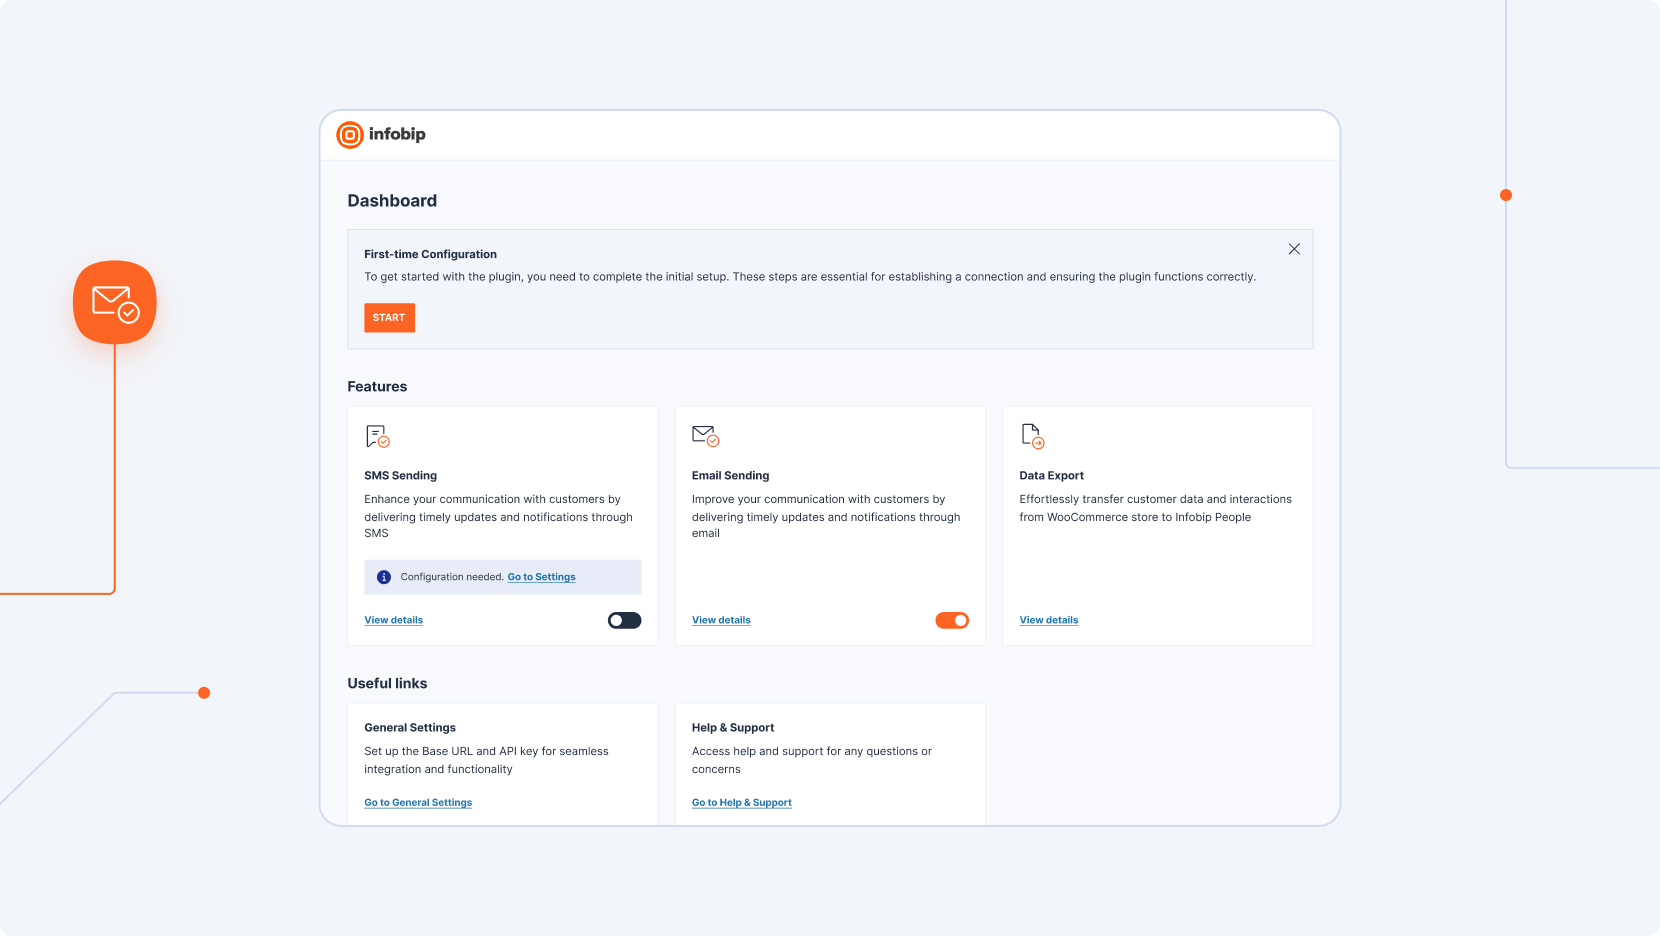
Features
Automated SMS notifications
Provide real-time updates, such as order confirmations and promotional offers, triggered by WooCommerce events.
Transactional email integration
Replace WooCommerce’s default email service with Infobip's highly reliable email solution for greater deliverability and customization.
Customer data export to People
Export WooCommerce customer data to People for data-driven marketing, better targeting, and personalized engagement.
Live Chat integration
Add real-time support with the Live Chat feature.
Note that this requires manual implementation in your WordPress theme.
What you will need
Before getting started with Infobip Omnichannel Messaging for WooCommerce, ensure your environment meets the following prerequisites:
- WordPress (opens in a new tab): Version 6.3 or greater
- WooCommerce (opens in a new tab): Version 8.2 or greater
- PHP (opens in a new tab): Version 7.4 or greater
- Infobip account: An active account with valid API key scopes configured. If you do not have an account, you can create one (opens in a new tab).
These requirements ensure the plugin functions smoothly within your WooCommerce store.
Installation
1. Download the plugin
Download the latest .zip file from the Github repository (opens in a new tab) to your local machine.
2. Upload and install
- Log in to your WordPress dashboard (opens in a new tab) and go to Plugins.
- In the top-right corner, select the Upload button.
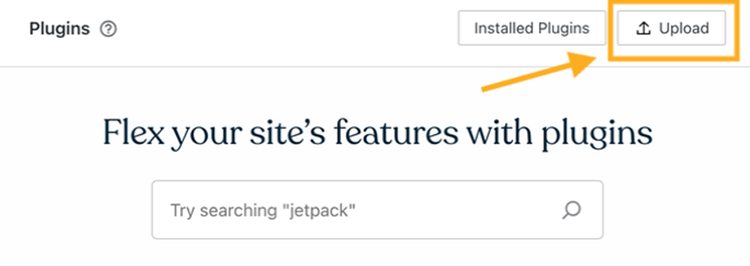
- Drag and drop the
.zipfile or select it from your computer.
Do not unzip/extract the file before uploading.
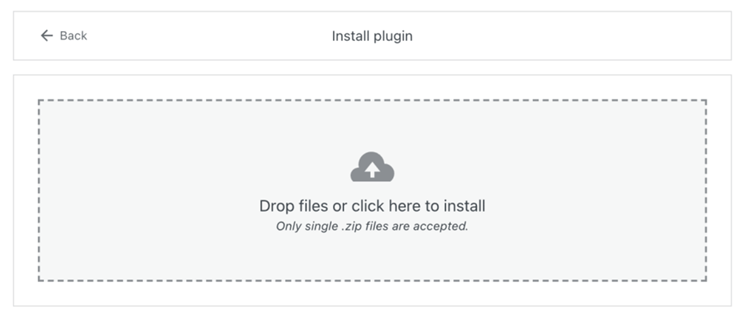
- The plugin will install automatically. Then, select Manage plugin to access the plugin options.
3. Configure the plugin
- If you do not already have one, create an Infobip account (opens in a new tab) and log in (opens in a new tab).
- Locate your API key and base URL (you are automatically assigned one when you sign up):
- Base URL: Displayed on the web interface homepage.
- API key: Found under Manage API Keys.

API keys are visible for only 2 days. After this period, you need to generate a new key by selecting Manage API Keys > Create API Key.
- On the WordPress dashboard, select the plugin's General Settings option. Enter the API key and Base URL you obtained above, and select Save Settings.
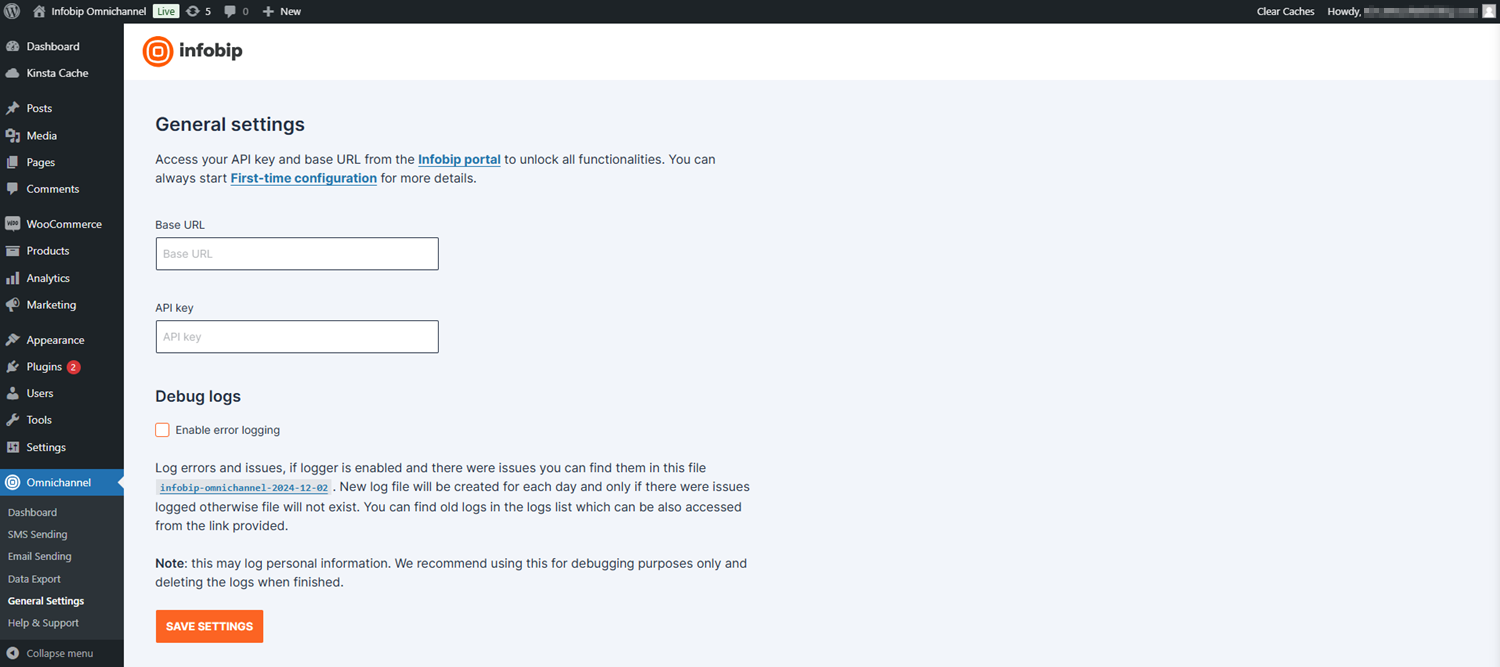
The next step is to configure SMS and email integrations.
4. Set up senders and register a domain
SMS integration
- Log in (opens in a new tab) to your Infobip account and go to Channels and Numbers > Numbers.
- Review available numbers or purchase a dedicated one.
After signing up, you are assigned a shared number. We recommend purchasing a dedicated sender number for improved functionality.
- On the WordPress dashboard, navigate to the plugin's SMS Sending > Settings section.
- In the Sender phone number field, enter the number you were assigned or you purchased above, and select Save settings.
- To verify your setup, use the Testing section to send a test message.
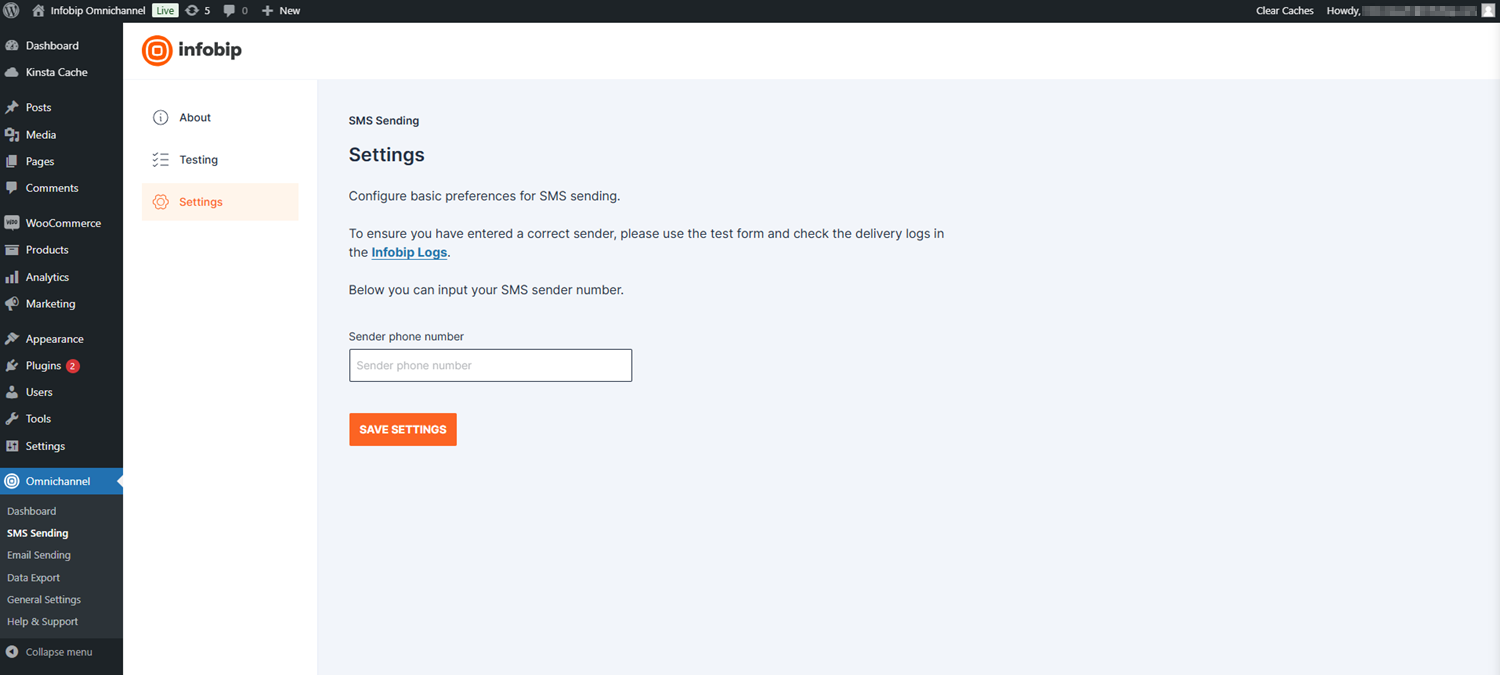
Your SMS integration is now configured and ready to use.
For more information on Numbers, refer to our documentation.
- In the Infobip web interface (opens in a new tab), register a domain or configure a single sender email address.
- Navigate to Email > Marketing and Transactional. On the Senders tab, choose the domain or a single sender you want to use.
- On the WordPress dashboard, navigate to the plugin's Email Sending > Settings section.
- In the "From" email address field, enter the domain or a single sender you chose above. You can also set a custom sender name in the "From" email name field. Then, select Save Settings.
- To verify your setup, use the Testing section to send a test message.
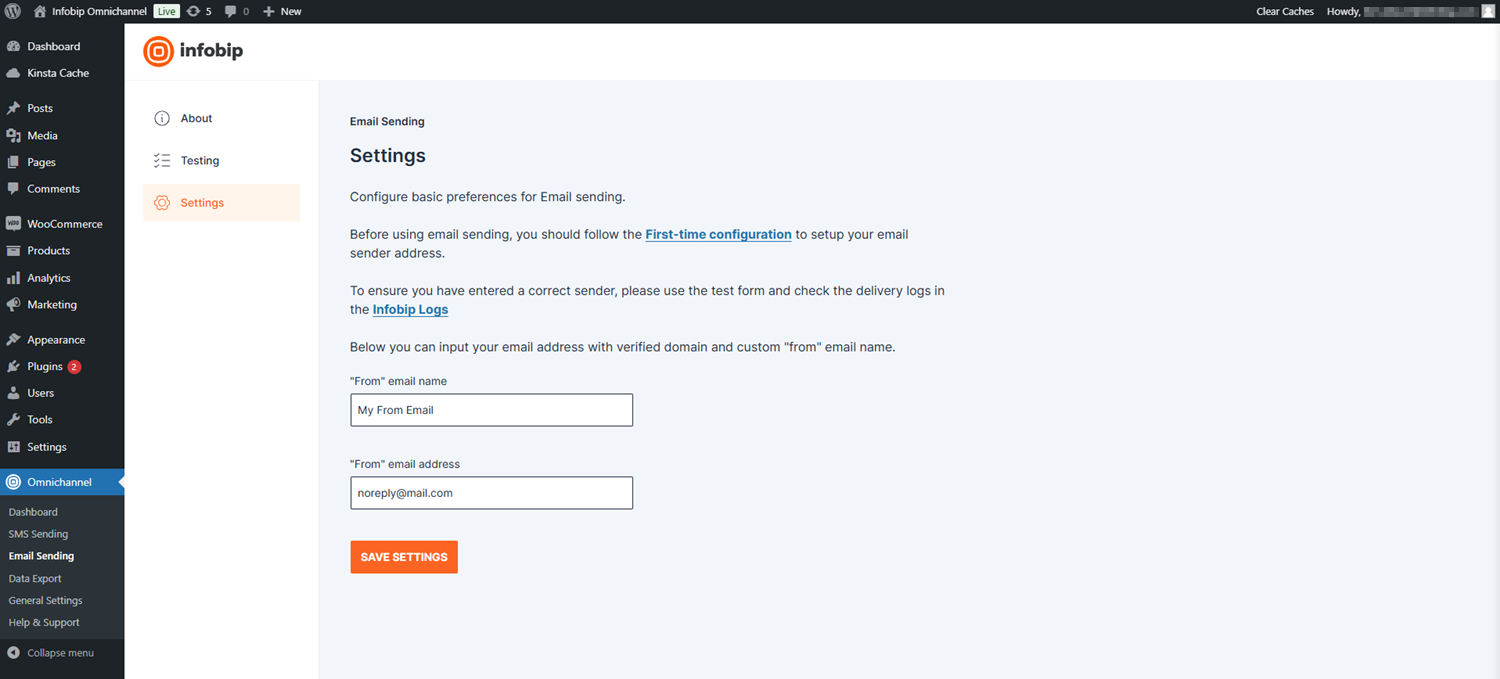
Your email integration is now configured and ready to use.
5. (Optional) Export data to People
Use the export feature to sync your WooCommerce customer data with People. This integration enables you to refine your marketing strategies with better targeting and personalization People offers.
- On the WordPress dashboard, navigate to the plugin's Data Export section.
- Review the data that will be exported and select Export CSV file.
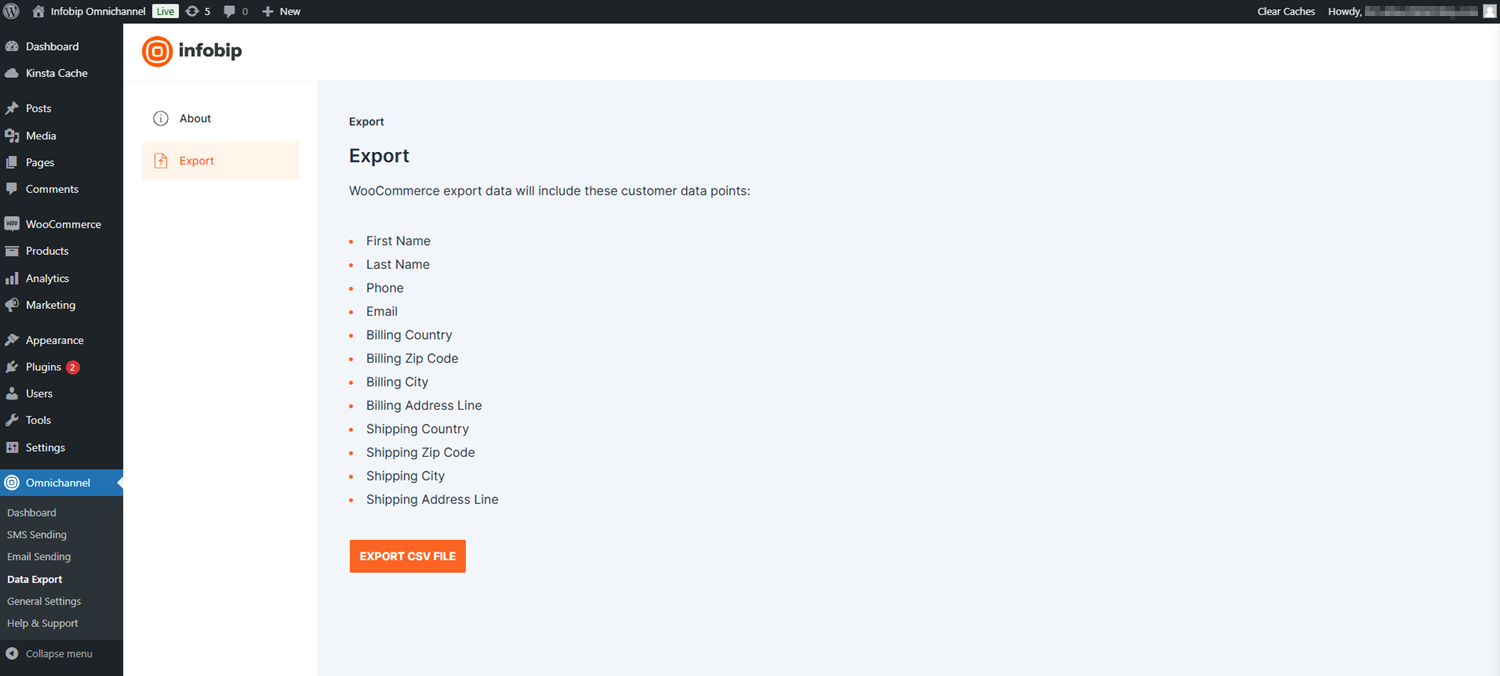
- Use People's native import option to upload the data.
For more information on People, refer to our documentation.
License
The Infobip Omnichannel Messaging for WooCommerce plugin is distributed under an open-source license. For full details regarding licensing terms and usage, refer to the GNU General Public License (opens in a new tab) page.
Additional resources
Explore these resources to make the most of the Infobip Omnichannel Messaging for WooCommerce plugin:
Documentation links:
- Postman suite for testing Infobip API endpoints (opens in a new tab): Access pre-built Postman collections to test and interact with Infobip public API endpoints.
- Slack integration guide (opens in a new tab): Learn how to connect Infobip with Slack to automate workflows and send messages to Slack channels.
Community and support:
- Join our Infobip Developer community (opens in a new tab) on Discord to connect with other users and share insights.
- For direct assistance, contact Infobip Support.
Changelog and Coming soon
We are committed to regularly improving the Infobip Omnichannel Messaging for WooCommerce plugin. Here, you will find two key resources:
- Changelog - A record of released versions, including new features, improvements, and important fixes.
- Coming soon - Planned features and future enhancements we aim to implement based on user feedback and evolving market needs.
Changelog
v1.1
- Direct integration for Live Chat
- Integration helpers for Slack, Zapier, and Postman
v1.0
- SMS sending
- Transactional email sending
- Manual Live Chat implementation
- On-request export of WooCommerce customer data
Coming soon
- Automated synchronization of WooCommerce data to Infobip People
- Two-way synchronization of customer and shopping behavior across platforms
- Live Chat configuration within the Woo admin area
- Marketing automation tools available in the Woo admin area
- Enhanced integration for messaging channels, including WhatsApp, Viber, RCS, Telegram, and more
And many more functions and options! ✨