Messaging channels
Providing your customers with the opportunity to reach you (and vice versa) via a portfolio of different channels calls for a great customer experience.
With Infobip, this means that you can use some of the most popular chat apps and offer your services via:
- Apple Messages for Business
- KakaoTalk
- LINE
- Live Chat
- Messenger
- Open Channel
- RCS
- SMS
- Telegram
- Viber
- and Social Media channels such as Facebook Posts, Instagram Posts, Instagram Messaging, and Google Play Store Reviews.
All of this should boost and enrich your overall customer experience and provide support to your customers via their preferred channels of choice that are most familiar to them.
Note that at present, the default preview limit per chat across all digital channels is as follows:
- 150 messages
- 150 notes
- 150 change logs
If needed, the complete message history can be downloaded.
Open Channel
EARLY ACCESS
Open Channel is a unique channel within Infobip Conversations that enables businesses to integrate any external messaging platform into a unified communication hub, including custom and popular channels not natively supported by Infobip. With Open Channel, agents can manage all communications efficiently while respecting existing routing setups.
How it works
Open Channel operates through an API that facilitates real-time message exchange between customers and agents, so businesses can connect their preferred messaging platforms to Infobip Conversations.
Messages sent through these external platforms are received in Conversations, where agents can handle them like any other supported channel.
To integrate external messaging platforms into Infobip Conversations using the Open Channel API, follow these steps:
- Set up your Infobip account - Ensure you have an active Infobip account. If you do not have one, you can create it here (opens in a new tab).
- Enable Open Channel - Contact your Infobip account manager or the Support team to enable the Open Channel feature for your account.
- Configure the Open Channel sender - Contact your Infobip account manager or the Support team to set up an Open Channel sender in the Infobip web interface. This sender acts as a bridge between Infobip Conversations and your external messaging platform.
- Develop your integration:
- Inbound messages - Configure your external platform to send incoming messages to Infobip using the Open Channel API's inbound message endpoint. This allows messages from your platform to be received within Infobip Conversations.
- Outbound messages - Set up Infobip Conversations to send messages back to your platform by specifying the appropriate webhook URLs where Infobip should deliver outbound messages.
- Test the integration - Conduct thorough testing to ensure that messages flow correctly between your external platform and Infobip Conversations, and that all features like automations and templates function as expected.
For detailed technical guidance and API references, check the following resources:
Key functionalities
All basic conversation functionalities are supported as part of the Open Channel, including:
- Text-based template creation
- Routing channel conditions
- Filtering in All Work
- Automations
- SLA conditions
- Survey sending
- Waiting strategy
- Working hours
- Conversation API and webhook support
Supported content types
The following content types are supported:
- Text - Standard text messages
- JSON - JSON-formatted content, displayed as text if it contains readable text
Chat apps
You can use a broad portfolio of the world's most popular chat apps in Conversations. Below you can find more details about each chat app available in Conversations and how to use them.
Apple Messages for Business
Apple Messages for Business channel helps businesses connect with customers directly from Maps, Siri, and Safari on any Apple device. This channel allows you to reach over 1.65 billion iOS devices worldwide.
You can use Apple Messages for Business in Conversations to provide customers with quick support through one-on-one conversations with a live agent. This way you are offering them the option to switch a conversation from a chatbot to a live agent for requests that chatbots cannot handle further.
Other supported solutions:
Connect your Apple account
To begin, if you do not already have one, create a new Apple Messages for Business account and select Infobip as your Messaging Service Provider (MSP) during setup.
If you already have an account, simply choose Infobip as your MSP. You can find more info in the Apple (opens in a new tab) docs.
Next, connect your Apple account to your Infobip account. This connection can be done automatically through Apple's registration process, where you will be redirected to Infobip's web interface. It is crucial to ensure you are logged into the correct Infobip account during this step.
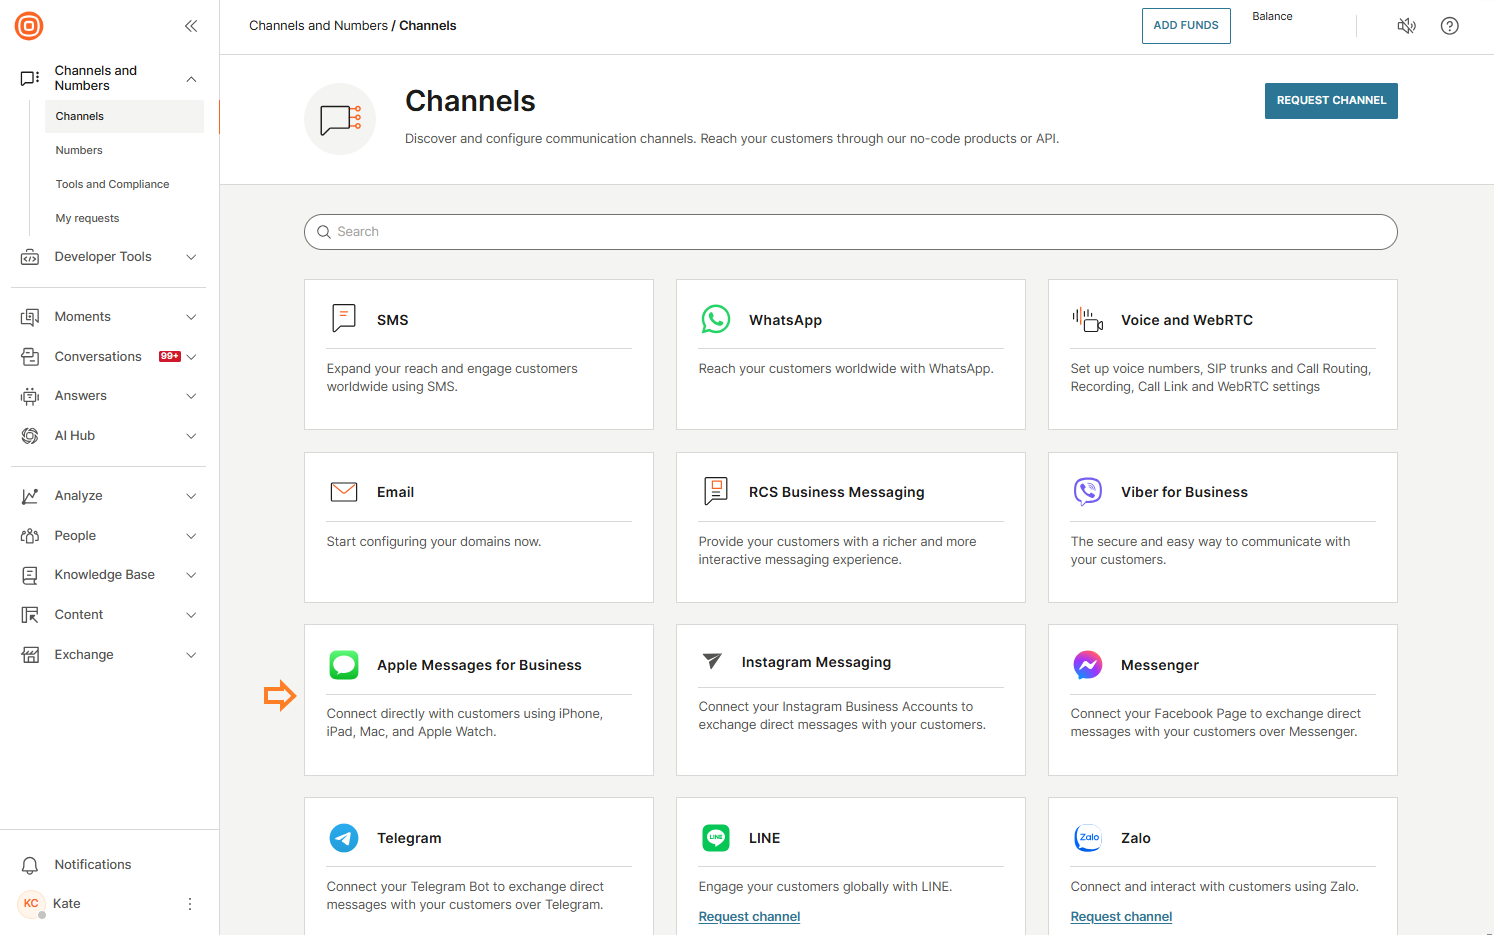
- Once logged into the Infobip web interface, go to Channels and Numbers → Channels and select Apple Messages for Business for further steps.
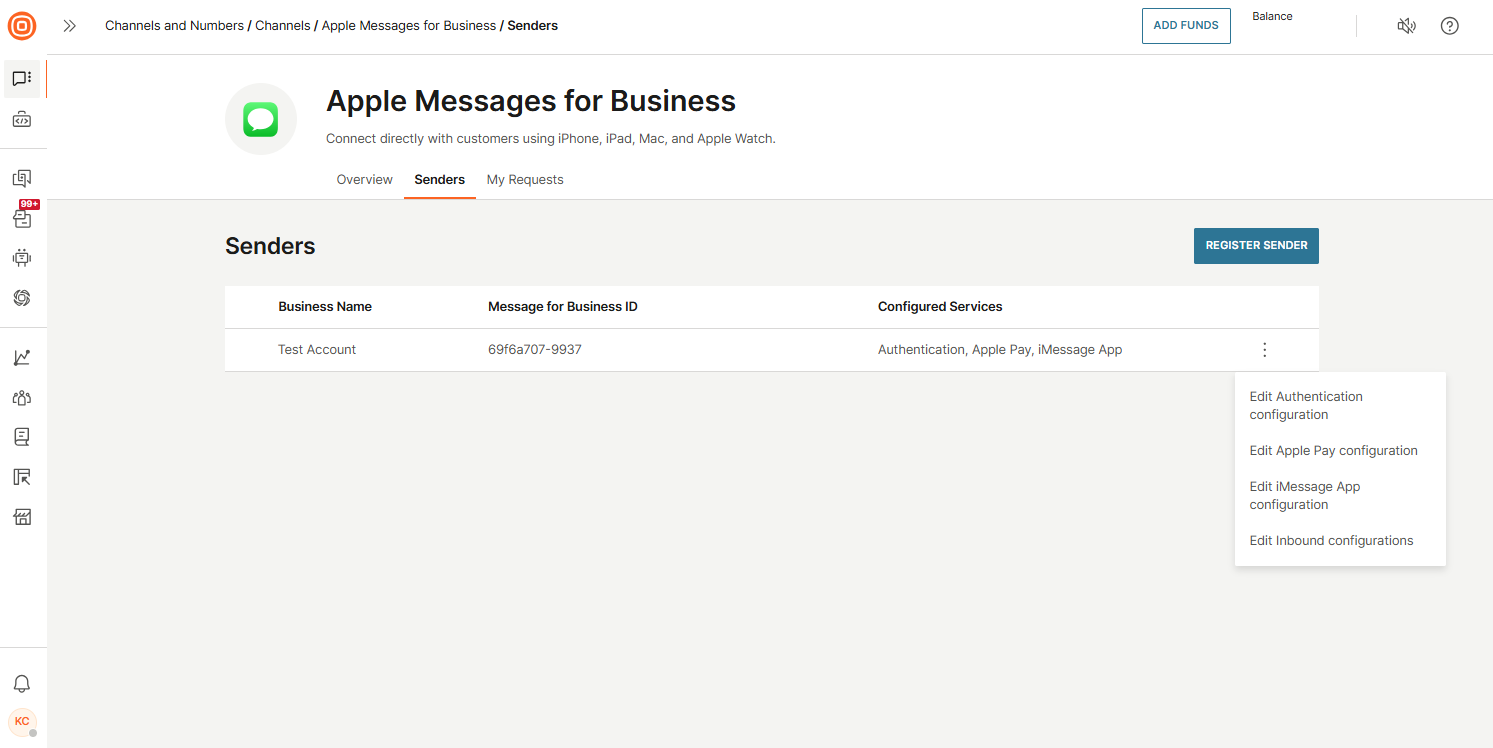
- Select the Senders option at the top, locate the desired sender, click the three dots, and set up the following Apple Messages for Business features:
- Authentication configuration
- Apple Pay configuration
- iMessage App configuration
- Inbound configurations
For more details on these features, visit Manage optional configurations and Configure inbound actions.
Supported message types
The table below outlines supported message types depending on whether the client (mobile-terminated (MT) (opens in a new tab)) sent them or the end user (mobile-originated (MO) (opens in a new tab)).
| Message type | MO messages | MT messages |
|---|---|---|
| Text | ✅ | ✅ |
| Image | ✅ | ✅ |
| Audio | ✅ | ✅ |
| Video | ✅ | ✅ |
| Files | ✅ | ✅ |
| Quick replies | ✅ | Conversations API and preview in message history |
| Authentication request | ✅ | ✅ |
| Apple Pay request | ✅ | ✅ |
| iMessage App sharing | ✅ | ✅ |
| Rich link | ✅ | ✅ |
| List picker | Preview of response | Conversations API and preview in message history |
| Time picker | Preview of response | Conversations API and preview in message history |
| Typing indicator | ❌ | ✅ |
| 3D files (usdz) | ✅ (as file) | ✅ |
Satellite Messaging
Apple's Satellite Messaging feature provides mobile users with connectivity in areas without a signal. Starting with iPhone 14, users can also request roadside assistance during traffic emergencies.
This feature is integrated as a separate functionality within the Apple Messages channel, offering a streamlined experience designed to reduce unnecessary back-and-forth communication.
Key limitations and attributes include the following:
- Only text messages (up to 500 characters) can be sent; attachments are not supported.
- Customers are limited to sending:
- A roadside assistance request (only at the start of the session)
- Location updates (sent every 15 minutes, but only when the customer's phone is connected to a satellite)
- Text messages
- Satellite's session closure (the agent can still send messages to the customer for up to a year through the standard Apple Messages for Business channel)
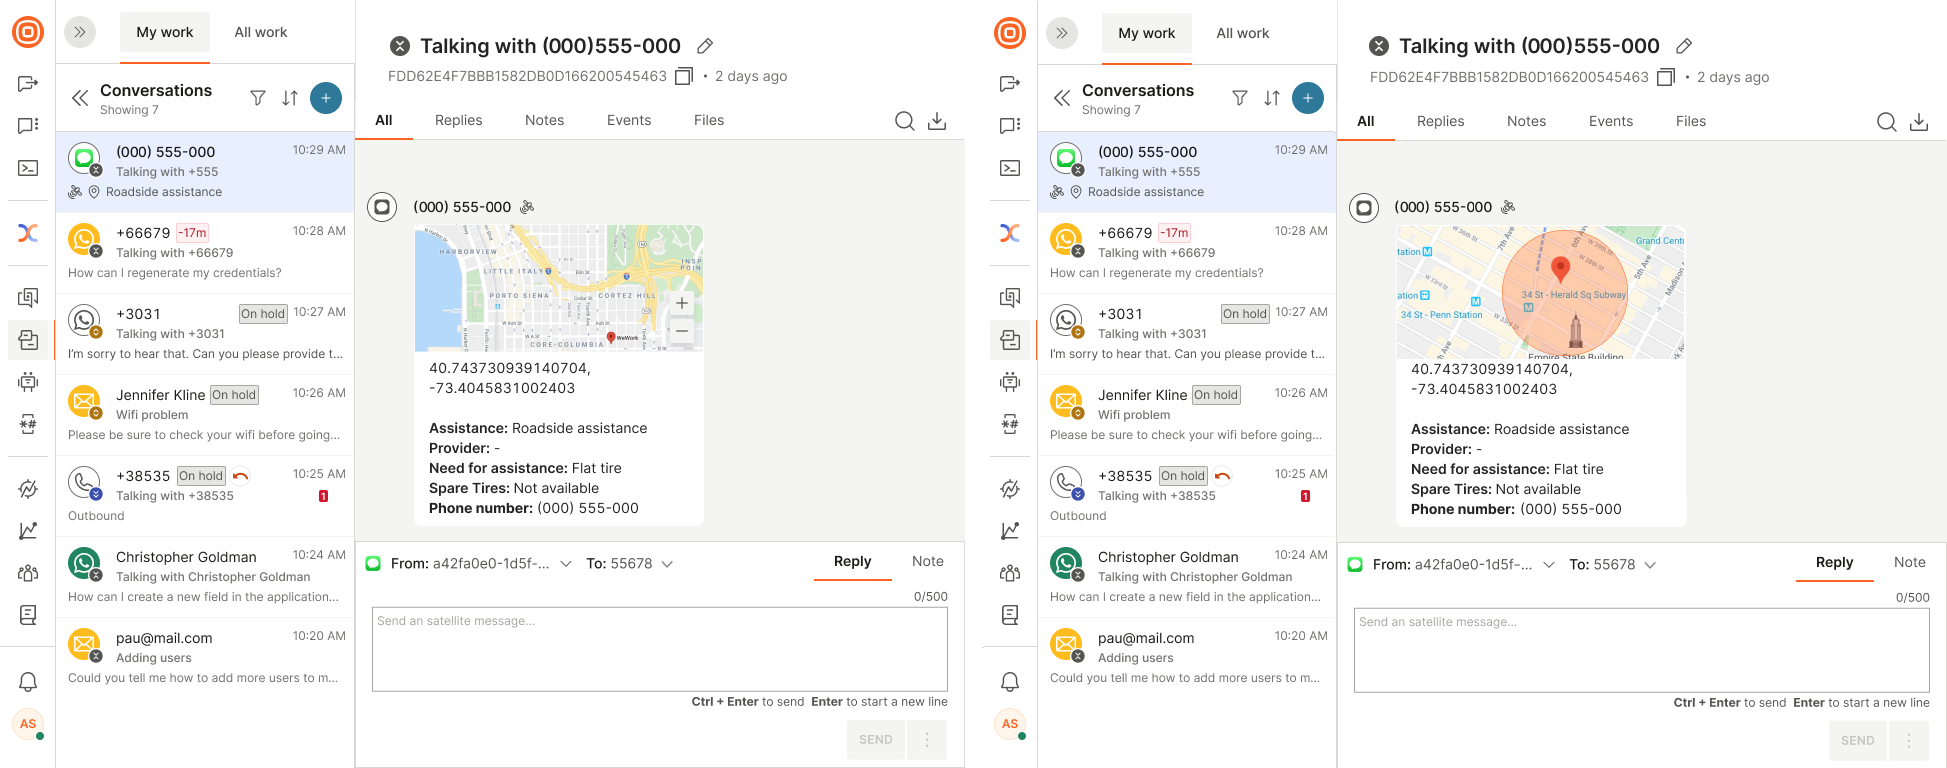
Depending on the type of message the customer sends, the agent will see it in the appropriate format.
This could be a predefined satellite message, a roadside assistance request that includes the customer’s location, an approximate radius, details of the assistance needed, and/or a contact number.
Specific message types
Check out which specific message types you can send to end users in Apple Messages for Business:
- Authentication request support
- Apple Pay support
- iMessage app sharing support
Authentication request
To successfully authenticate a customer, use the Apple Messages for Business action inside the agent panel.
To send the Authentication request to the customer from the agent panel, go to Channels and Numbers → Apple Messages for Business → Senders → locate your connected accounts and click the three-dot menu on the far right. Select the Edit Authentication configuration action.
After configuring this feature, you can use it within the agent panel to send an authentication request to your customer:
- Select the Apple Messages for Business icon.
- Select Authentication within the Apple Messages for Business card in the agent panel.
- Fill in the required data to send the authentication request to the customer.
- Once the customer is successfully authenticated, you will see the confirmation.
Apple Pay request
To send Apple Pay requests inside the agent panel, you need to set this up in the Channels and Numbers section.
Go to Channels and Numbers → Apple Messages for Business → Senders → locate your connected accounts and click the three-dot menu on the far right. Select the Apple Pay configuration action.
For more details about the configuration, check the Apple Pay section.
After configuring this feature, you can use it within the agent panel to send an Apple Pay request to your customer:
- Select the Apple Messages for Business icon.
- Select Apple Pay within the Apple Messages for Business card in the agent panel.
- Fill in the required data to send the Apple Pay request to the customer.
- Once the payment is successfully processed, you will see the confirmation.
iMessage App request
To send an iMessage, you need to set this up in the channel itself.
Go to Channels and Numbers → Apple Messages for Business → Senders → locate your connected accounts and click the three-dot menu on the far right. Select the iMessage App configuration action.
After configuring this feature, you can use it within the agent panel to send an iMessage to your customer:
- Select the Apple Messages for Business icon in the agent panel.
- Choose the iMessage App from the drop-down menu.
- Fill in the necessary data to send the iMessage to the customer.
Apple Messages for Business forms
Use Apple Messages for Business forms as an interactive method to enhance the customer journey in a single step. This approach allows you to collect information from customers using questions and selections, which you can reuse later.
With these forms, users can complete tasks such as surveys, troubleshooting, and account creation without leaving the chat or opening additional windows. If you need to make any edits before using the form, you must edit it in the Forms (opens in a new tab) section.
To be able to use Apple Messages for Business Forms, you must have the channel activated first.
Once the channel is active, you can proceed with creating the forms.
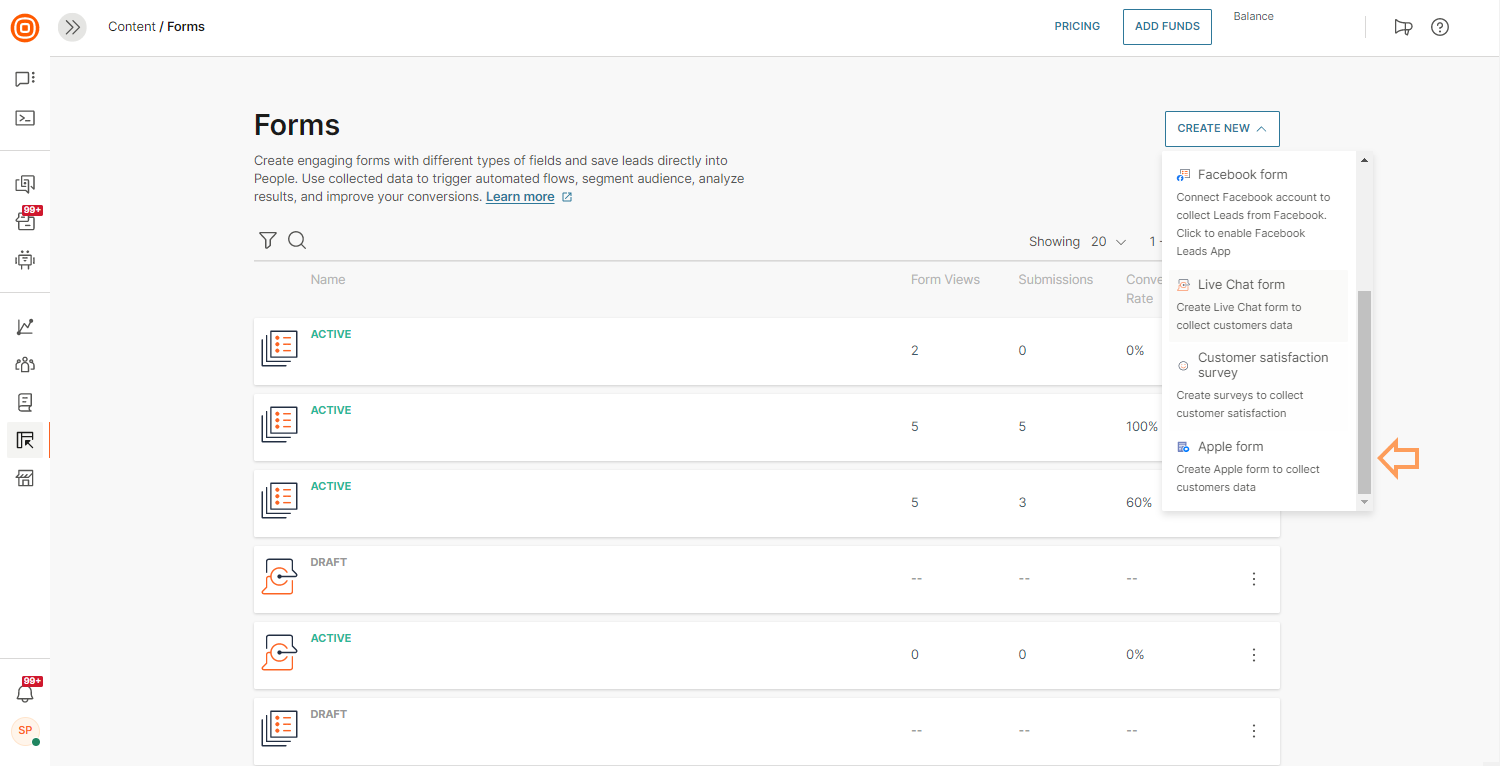
Go to Content on the left side of the web interface. In the Forms tab, select the Create New button to display a drop-down menu with more options:
- Select Apple form.
- Within the editor, use the Component block to create new fields. For example, add the Radio button component and enter the form's name.
- Add options to the component, available in the side panel.
- Select Settings to choose whether the form should be marked as private if you do not want agents to see the responses, or if you want the user to see a summary of their responses before submitting the form.
- Define the processing rules for the form to update profile information in People, enabling its use in future marketing campaigns and funnel analytics.
- Activate the form, allowing agents to send it to customers. Customer responses will be saved in Forms and People.
Use Instagram in Conversations to reply to your end user's requests, both on posts and direct messages. You can also send the first Instagram direct message to the end user from Conversations.
Make sure to activate Instagram Messaging first before you start using it. Then you can benefit from one of the most popular social media platforms by responding to your followers' posts and direct messages.
Instagram conversations are located in the All Work panel. Agents (or supervisors/managers) can simply assign these conversations to themselves and continue with their work as usual inside the My Work panel.
Generic template
Create interactive content for your customers, and engage them in simple communication. You can create and reuse templates that contain generic information or standard responses to customers.
Your agents can share a list of possibilities in a single message to the customer (a maximum of 10 cards per message).
You can create these in the Conversations API (opens in a new tab) solution but can only preview them in the Conversations full solution.
Check out our Instagram docs for more information on the channel itself.
KakaoTalk
With over 52 million global monthly active users (MAU) today, KakaoTalk is the most popular and the most used messenger application in South Korea.
Set up real-time conversations with your customers, offer live agent support, and help your agents provide the best customer service by using our Conversations solution.
To enable KakaoTalk in Conversations, contact your dedicated Account Manager to enable the service for you. Also, refer to our KakaoTalk docs for more information.
LINE
Use LINE in Conversations to offer your customers quick support and resolve issues in one-on-one conversations over their favorite communication channel. Offer different lists and showcase your offerings, and at the same time, decrease your call center operational costs.
You can now use two new content types in LINE in Conversations:
- Carousel message
- Button message
This should help share content with your customers, allowing for a more user-friendly customer experience. Use the LINE channel in Conversations to attach and send PDF files to your customers.
For more information about supported message types, refer to the main LINE documentation, covering end-to-end scenarios.
Live Chat
Here you can see in a bit more detail how to use Live Chat in Conversations. More importantly, it will give you a better insight into leads and customers shown in Live Chat.
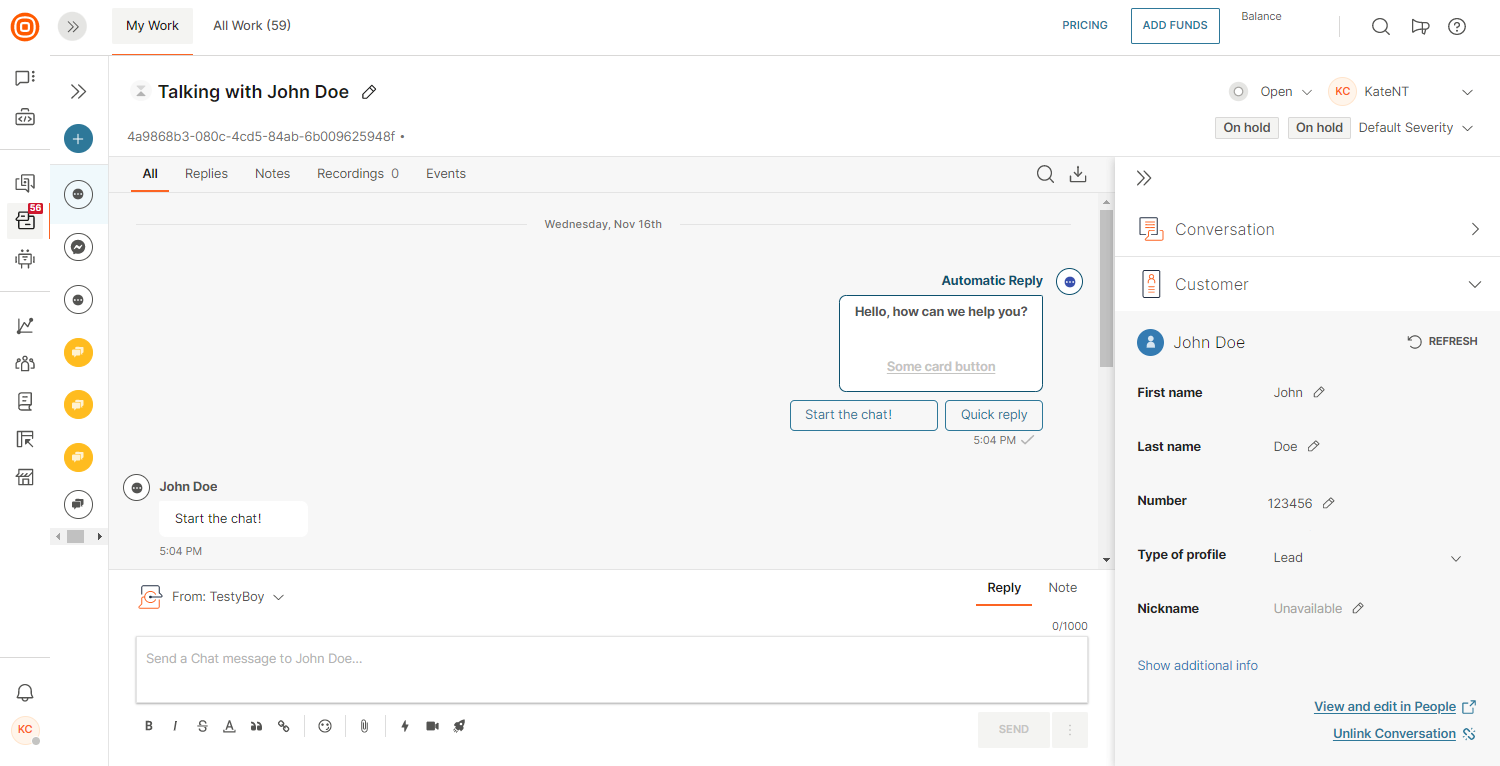
Customers visiting your website or using the mobile app can be classified into two types:
- Leads – An unidentified customer. It can be an existing customer or a potential customer who opens the chat widget and starts a conversation.
- Customer – A customer who has logged in at your website or mobile application and can be identified as your customer within your information system.
Leads
Leads are website users who have not been identified because they did not log in. However, Live Chat can remember visitors within the chat session and associate it with a visitor ID.
This goes even for cases where a conversation was closed, and the same visitor started another conversation. The customer card will still contain the entire conversation history and their previous requests for this visitor. That way the agent can see the backstory and have an overview of the visitor’s previous questions.
Authenticated customers
Authenticated customers are the known customers who have logged in to your website.
Authenticated customers can be grouped in two ways:
- A person that exists in People.
- Authenticated customer not found in People.
Authenticated customer found in People
This is an authenticated customer who has a profile in People. When such a customer starts a conversation on your website, you can rely on People to provide you with additional information about this customer. For example, then you will know their first and last name.
However, sometimes, you might not have a first or last name entered in People. If this is the case, then Conversations will use the provided key identification.
Authenticated customer not found in People
This is an authenticated customer who has not been entered as a profile in People. This means, that this customer and their email address (which is used as a key identity) do not match anyone in People.
Learn more about users and authentication.
Supported file types
The following are all the file types that both agents and customers can share over Live Chat. You will not see a lot of other file types because we want to control which ones can be shared for security purposes, as we want to make Live Chat as secure as possible.
| File Type | |
|---|---|
| Image | jpeg, bmp, gi, svg+xml, png, tiff |
| Video | x-msvideo, mpeg, quicktime, mp4 |
| Audio | aac, mp4, amr, AMR, mpeg, ogg, x-wav |
| Others | xml, x-directory, javacript, x-wav, vnd.ms-excel, text/plain, vnd.oasis.opendocument.spreadsheet, vnd.oasis.opendocument.graphics, x-gzip, octet-stream, pdf, msword, json, rtg, text/html, vnd.oasis.opendocument.text, vnd.oasis.opendocument.presentation, zip, vnd.openxmlformats-officedocument.wordprocessingml.document, vnd.openxmlformats-officedocument.presentationml.presentation, vnd.openxmlformats-officedocument.spreadsheetml.sheet |
Messenger
Use Messenger in Conversations to communicate with your customers. You can use Messenger via templates, same as WhatsApp, so the process is fairly similar for both channels.
Note that you need to submit your Facebook page and Messenger channel to Facebook for review. Check the Get Started section in case you need help.
Messenger has introduced message tags that are used in mobile-terminated (opens in a new tab) (MT) initiated scenarios. This means that it is possible to send a message to a customer even 24 hours after receiving the last message.
To send a message, you need to select one of the three message tags predefined by Messenger. The message content is free-form, meaning it is not predefined by any template. Once a message has been sent, the tag that was used will be visible under the actual message inside the agent's desktop window.

RCS
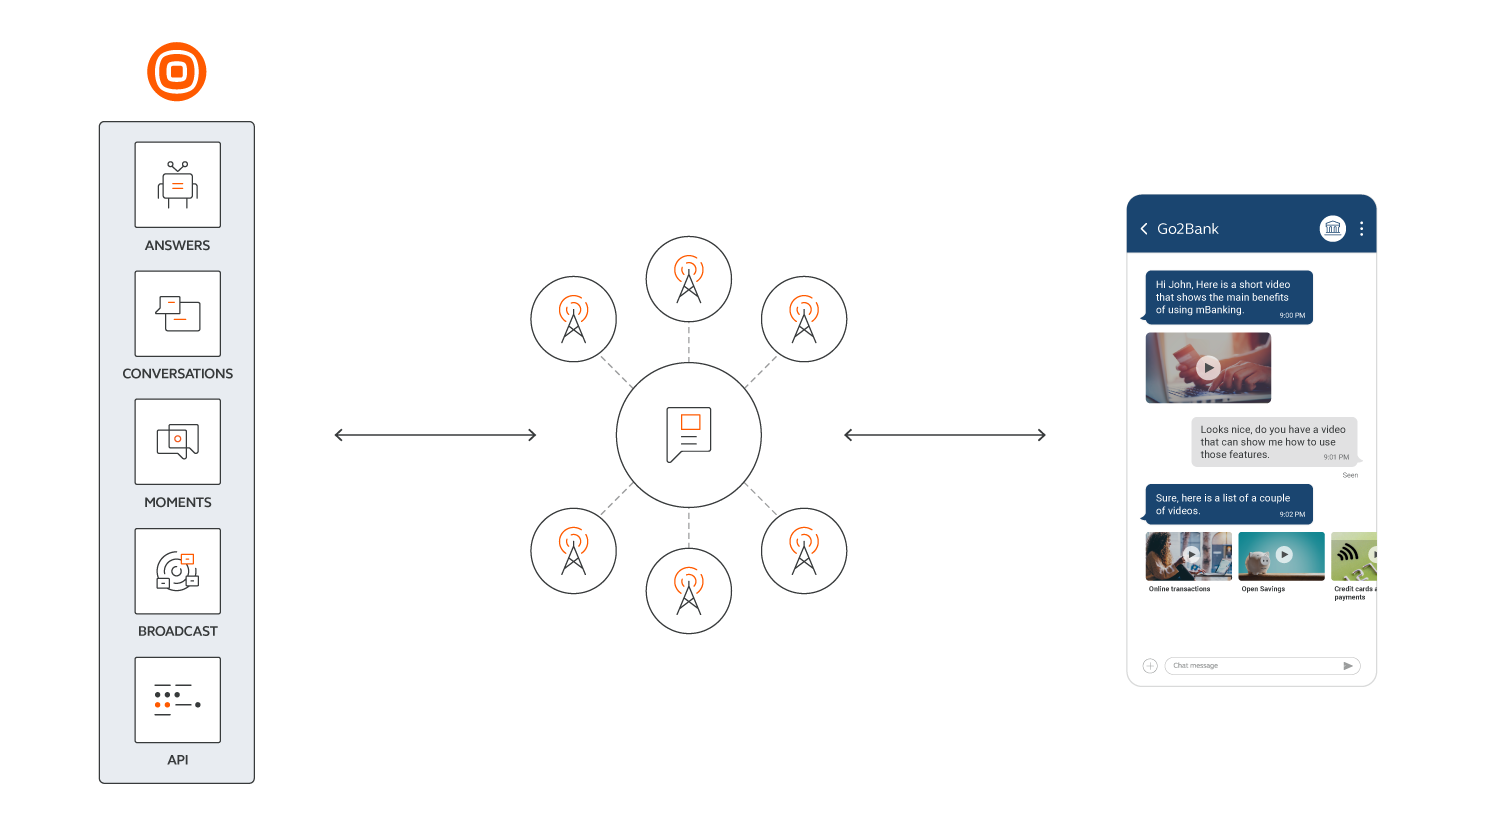
RCS (Rich Communication Services) is an A2P messaging service that uses carriers to send messages offering rich functionality and customization in addition to the features offered by SMS and MMS.
Currently, RCS in Conversations only supports text messages.
If you want to know more about its features and technical specifications, check out the RCS documentation.
SMS
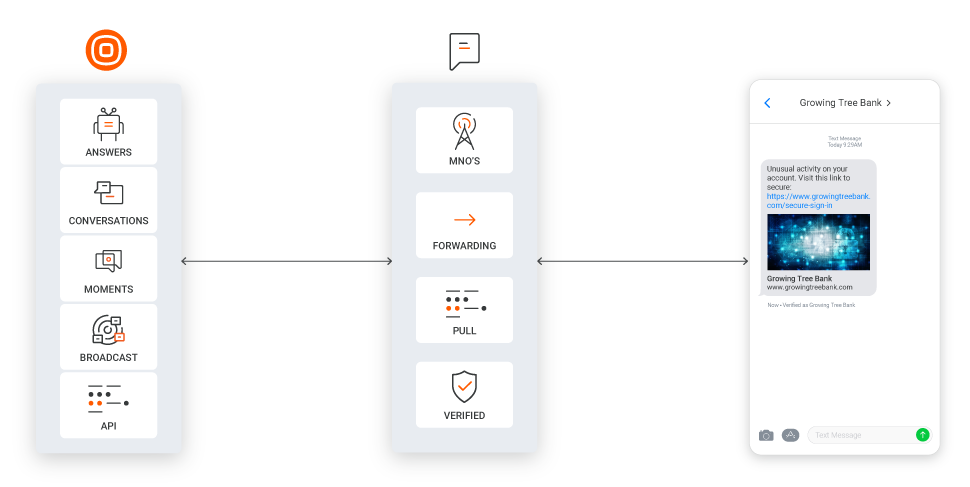
SMS (Short Message Service) is one of the first mobile communication channels familiar to all mobile users. It remains a simple and quick method for delivering text messages to all mobile devices.
Unlike other chat apps, it does not require internet connectivity and it is a secure and fast channel for two-factor authentication.
SMS requires signal coverage for messages to be delivered, and if the user is out of the signal range when the messages are sent, they will be stored for 48 hours by default (can be extended to 72 hours) and will be delivered once the user is within the range.
Standard SMS messages:
- Hold up to 160 characters (or 70 characters if Unicode data coding is used).
- If more characters are used, the messages are broken into parts and reassembled when they reach the mobile phone.
- Do not support media file messages, only text characters.
For more information about SMS features and configuration, visit this page.
Telegram
Being one of the most popular messaging apps and used worldwide, Telegram is a also available in Conversations and agents can use it to communicate with customers.
Currently, agents can send and receive the following:
- Text
- Images
- Documents
- Audio
- Video
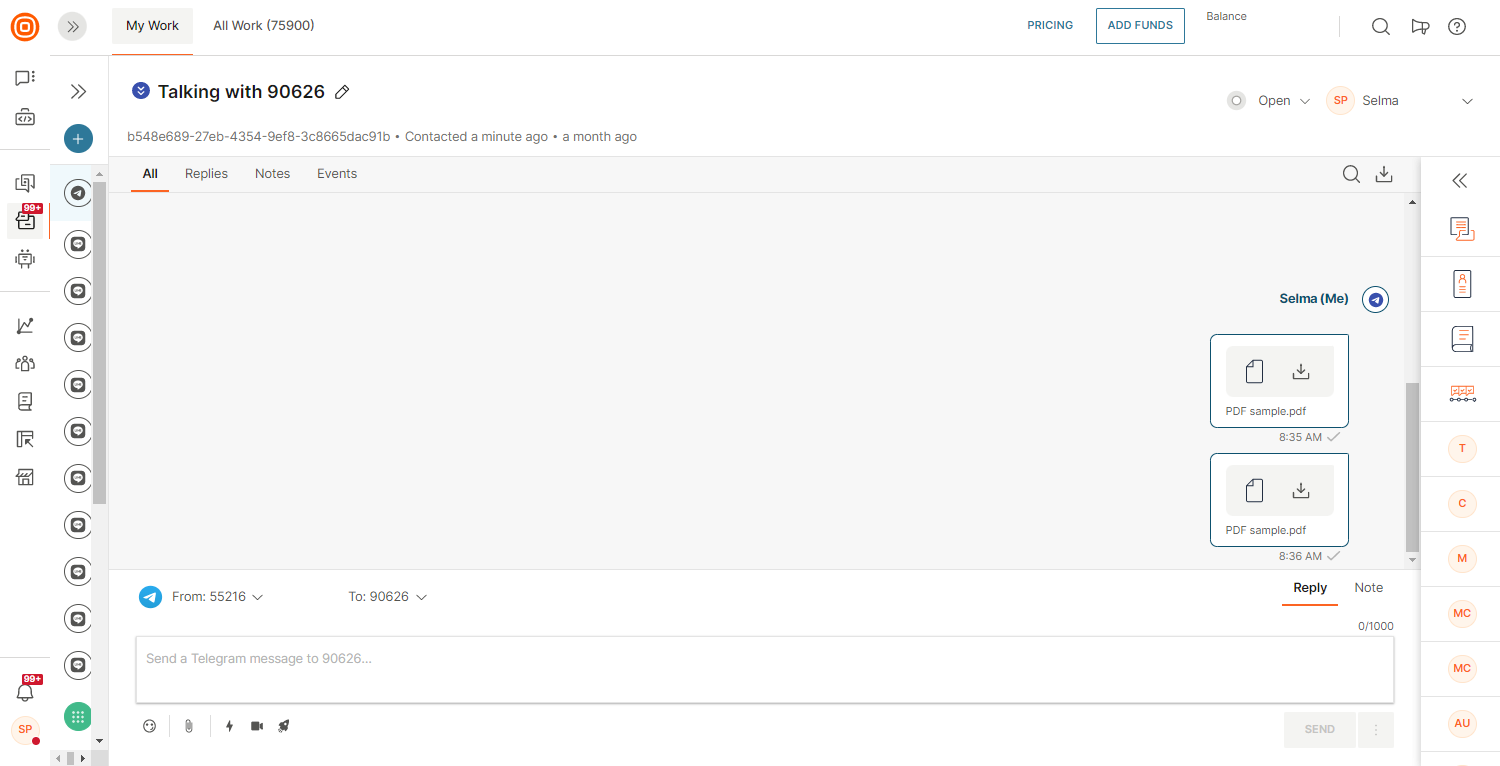
If a user contacts the support over Telegram, their data can be stored in People and used later on in your communication. According to the Telegram business model, agents cannot start a conversation over Telegram. Customers (end users) need to initiate the conversation.
To enable Telegram as a channel in Conversations, refer to Telegram on our documentation Hub.
Viber
You can send all supported formats such as pictures as attachments (.png, .jpg), documents, PDFs, and spreadsheets using Viber in Conversations. Send and receive files as long as they are supported based on the table below:
| File type | File format | Max file size |
|---|---|---|
| Documents | .doc, .docx, .rtf, .dot, .dotx, .odt, .odf, .fodt, .txt, .info | 20MB |
| .pdf, .xps, .pdax, .eps | 20MB | |
| Spreadsheets | .xls, .xlsx, .ods, .fods, .csv, .xlsm, .xltx | 20MB |
Viber Bots
Use Viber Bots in Conversations and allow your agents to utilize this channel for better customer engagement, and faster support.
With Viber Bots you can:
- Widen reach and extend conversations to new and existing customers.
- Customize the end user's keyboard capabilities and use rich media to offer a dynamic and immersive messaging experience.
With the API portion, you can provide your customers the possibility to:
- Reply in real time to subscriber requests with the information they need: purchase receipts, account setup change confirmation, bank balance status, and more.
- Identify new and existing audience types to engage and send them customized offers.
Channel specifics
You can only start a conversation with the customer if they have subscribed on their mobile device through Viber. If they have not subscribed, you will not be able to communicate with them using Viber Bots.
Message types
You can use the following types of messages in Viber Bots:
| Web interface | Support |
|---|---|
| Text message with keyboard | Text only |
| Picture message | Yes |
| Video message | Yes |
| File message | Yes |
| Contact message | No |
| Location message | Yes |
| Sticker message | No |
| URL message | No |
| Carousel message | No |
Additionally, you can use these available attachments:
Audio
| Audio format | Audio description |
|---|---|
| aac | aac |
| mp4 | MPEG-4 audio file (mp4) |
| amr | Adaptive Multi-Rate (amr) |
| mp3 | MP3 audio file (mp3) |
| ogg | Ogg Audio (ogg) |
Image
| Image format | Image description |
|---|---|
| jpeg | JPEG Image |
| png | Portable Network Graphics (PNG) |
Video
| Video format | Video description |
|---|---|
| mp4 | MPEG-4 Video |
Document
| Document format | Document description |
|---|---|
| Adobe Portable Document Format (.pdf) | |
| msword | Microsoft Word (.doc) |
| vnd.openxmlformats-officedocument.wordprocessingml.document | Microsoft Office - OOXML - Word Document (.docx) |
| vnd.ms-powerpoint | Microsoft PowerPoint (.ppt) |
| vnd.openxmlformats-officedocument.presentationml.presentation | Microsoft Office - OOXML - Presentation (.pptx) |
| vnd.ms-excel | Microsoft Excel (.xls) |
| vnd.openxmlformats-officedocument.spreadsheetml.sheet | Microsoft Office - OOXML - Spreadsheet (.xlsx) |
Read more about Viber Bots.
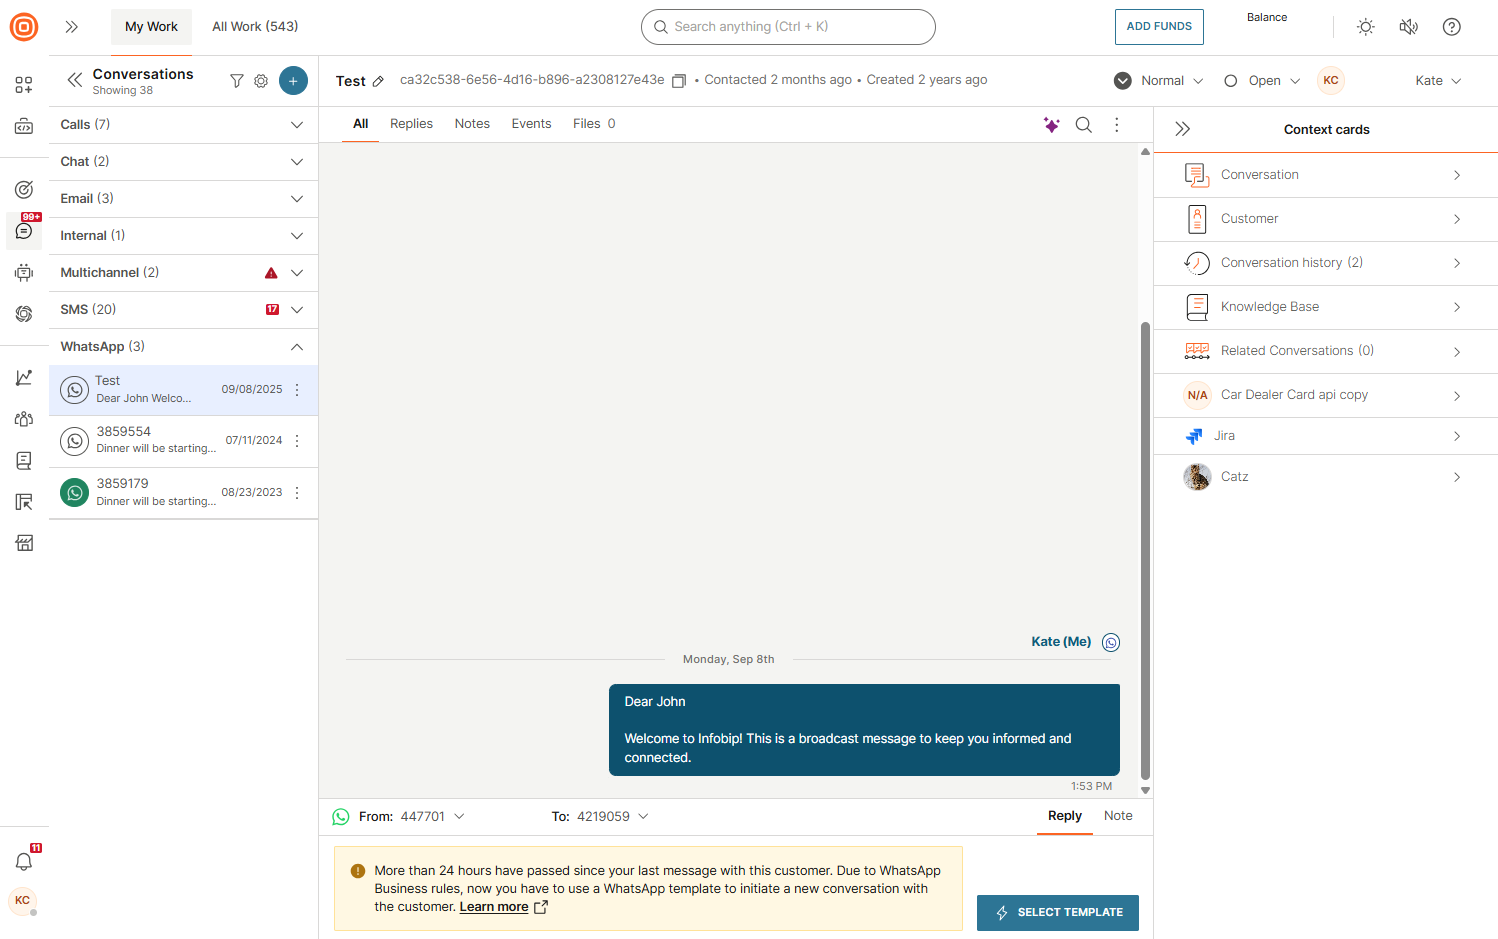
When you select WhatsApp as your channel of communication, the system automatically detects if this is the first contact or if more than 24 hours have elapsed from the last customer interaction.
So, if it is the first contact or if more than 24 hours have passed since your last message with the customer, you must use a WhatsApp template to initiate a new conversation due to WhatsApp Business rules.
In the above cases, you are shown an alert within the message reply box:
WhatsApp templates in Conversations
You can use WhatsApp templates within ongoing conversations or when starting a new one.
When you click the Select Template button, a pop-up opens where you can select a template from already registered and approved WhatsApp templates by your company. A template can contain placeholders, which are special markers used for personalization that allow you to manually insert specific information. To personalize the template, you will need to map all placeholders by entering a value for each.
You are only allowed to edit the placeholders, while the rest of the template content cannot be modified.

You can only use text templates at the moment, not media templates.
Typing indicator
A typing indicator is displayed during WhatsApp conversations, allowing both human agents and chatbots to show when they are composing a response.
Message types
Use WhatsApp product messages type to send an interactive message about a product or service that is present in your catalog. Customers can ask questions about the product, add the product to the cart, and submit the cart without leaving the chat.
To send a Product message, you must have a Meta catalog that is connected to your WhatsApp Business Account.
Refer to the WhatsApp product documentation for more information on WhatsApp message types, as well as the Enable Meta catalog for product-based messaging section.
You can set this up via Conversations API (opens in a new tab) but the agent can only preview this in the agent panel (no modifications available at that time).
WhatsApp referral information
The WhatsApp referral information encompasses all the essential attributes required to determine the ads your customers are coming from, enabling you to customize their experience based on this insight.
Within your Facebook ads and posts, you have the option to incorporate the WhatsApp call-to-action feature. When a user clicks on the ad or post, they can initiate contact with an agent through WhatsApp. The agents can see the ad's origin the user interacted with. If the message has been triggered by ads, the agent can see the URL, image, or video of the ad.
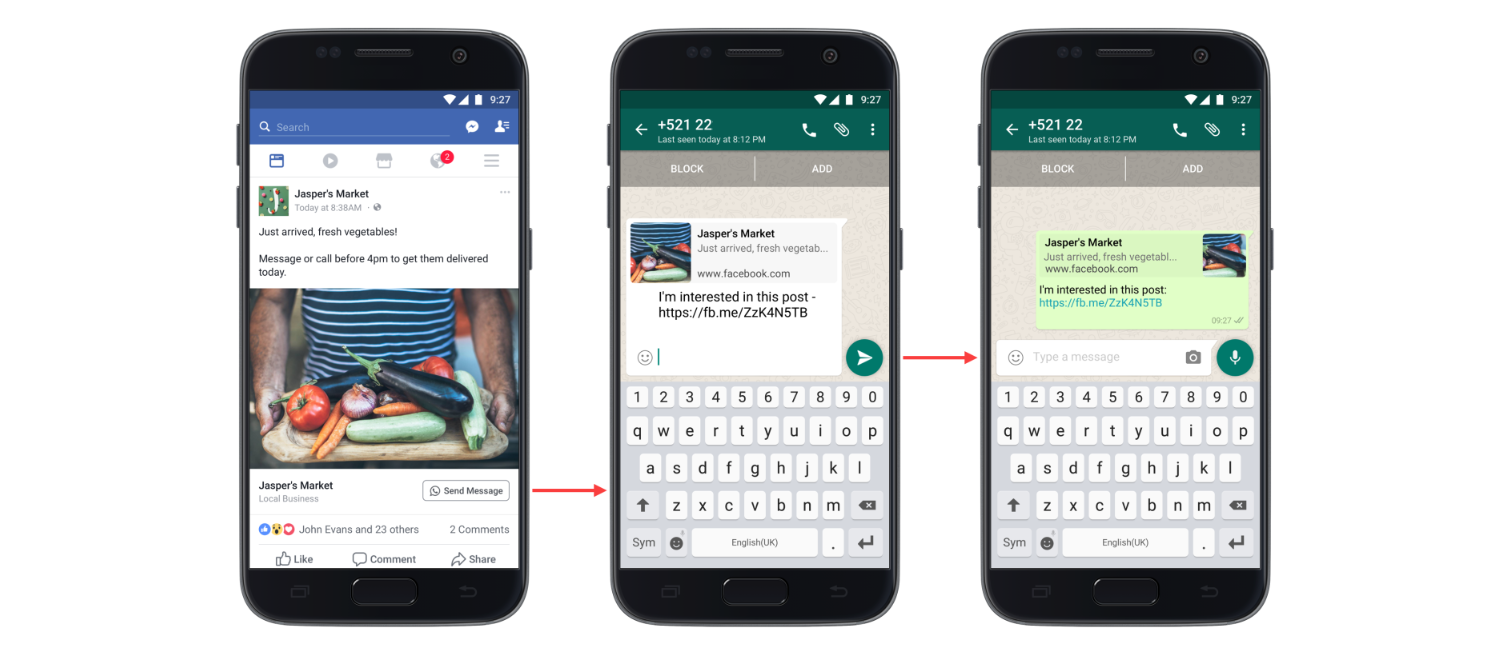
The following fixed attributes are present in webhooks for Conversations API:
- whatsAppMoReferralSourceType fixed attribute is used to identify whether the end user contacted the chatbot through a Facebook ad, a Facebook post, or a different entry point.
- whatsAppMoReferralSourceId fixed attribute is used to obtain the unique ID of the Facebook ad or post.
- whatsAppMoReferralSourceUrl fixed attribute is used to obtain the URL of the Facebook ad or post.
- whatsAppMoReferralCtwaClickId fixed attribute is used to obtain the unique click ID.
For more information about the WhatsApp referral information and the fixed attributes, refer to the following pages:
Quotes
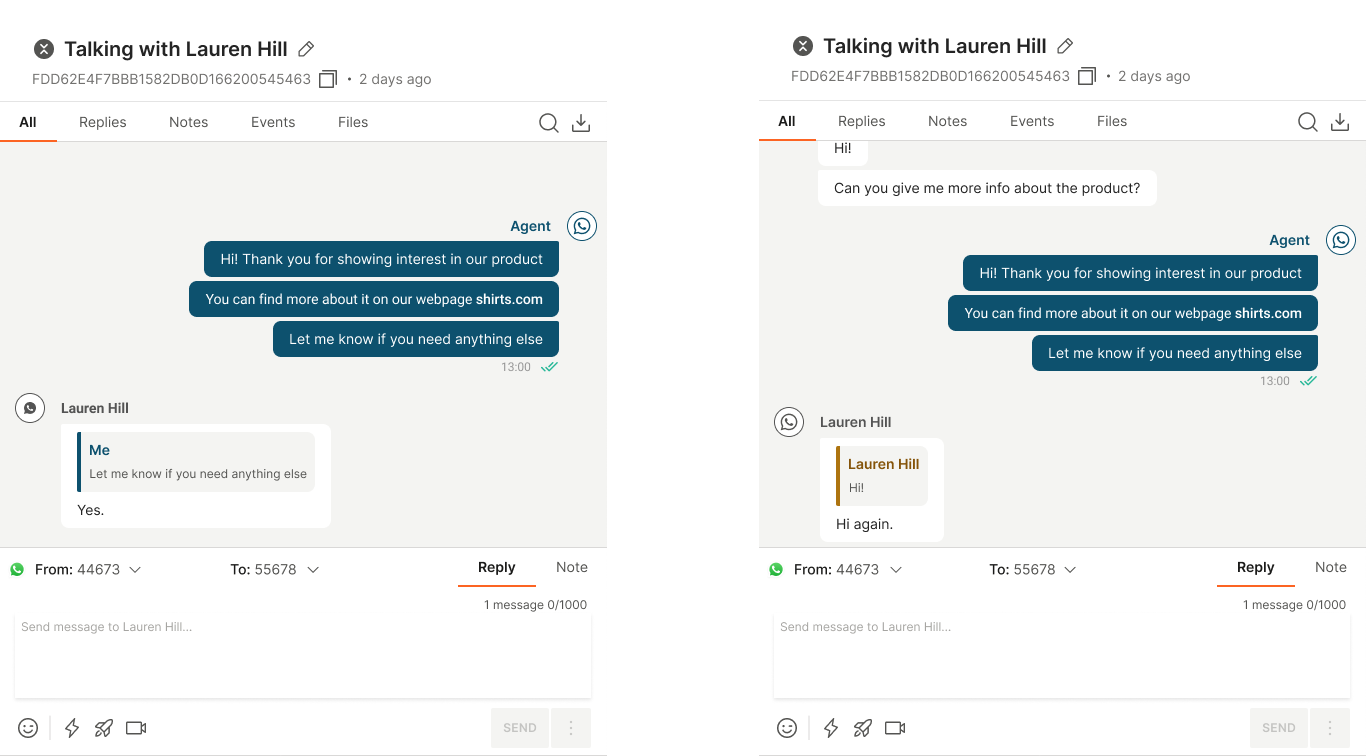
Quoting messages is a feature available to customers, enabling agents to view referenced messages directly in customer replies for greater clarity and accuracy.
Customers can choose to quote either their own or the agent's previous message, which will appear alongside their new message in the conversation, giving the agent immediate context. Agents can preview the quoted message, as well as the actual message sent by the customer.
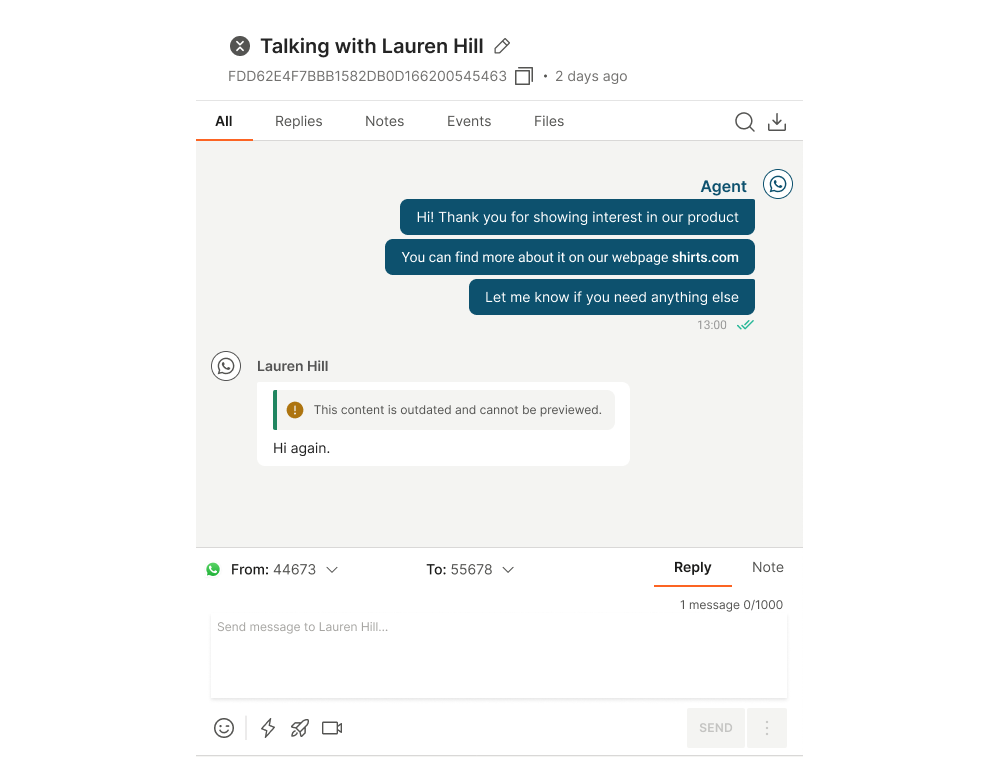
Messages older than 30 days will not be available for preview.
Supported content
The following WhatsApp content types are supported for quoting:
- Text
- Template, media template
- Image
- Document
- Location
- Video
- Voice
- Audio
- Contact, WhatsApp contact
- Button
- Sticker
- Interactive button reply
- Interactive list reply
- Product, multi product
- Order
- Text with additional data
Stickers
Agents can use stickers to send (over API) or receive messages to/from customers over the WhatsApp channel.
Use Email in Conversations and let your contact center agents reply to customer emails directly from the agent panel. Email is also available in the Conversations mobile app.
Getting started
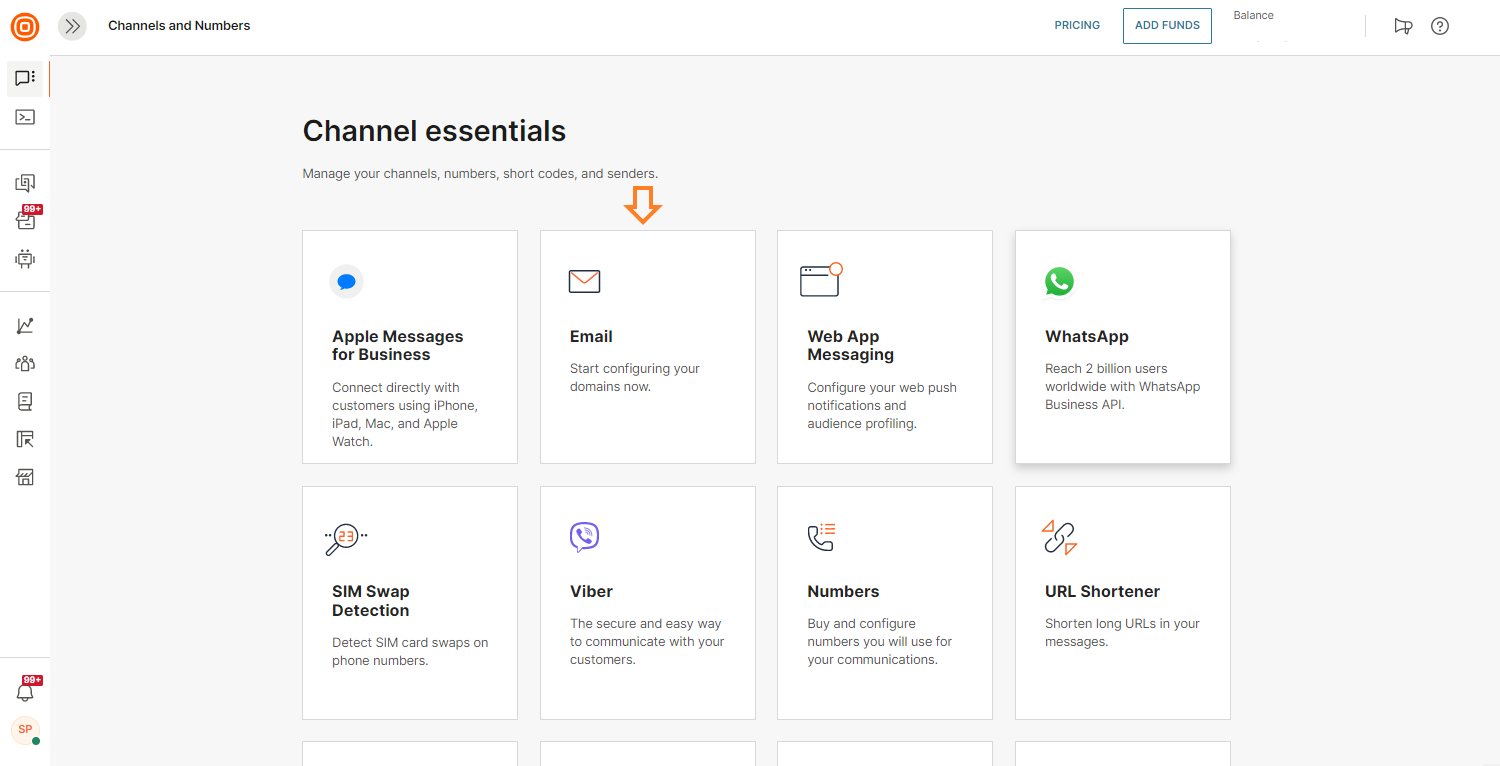
In the web interface, navigate to the Channels and Numbers section → locate and click on the Email card.
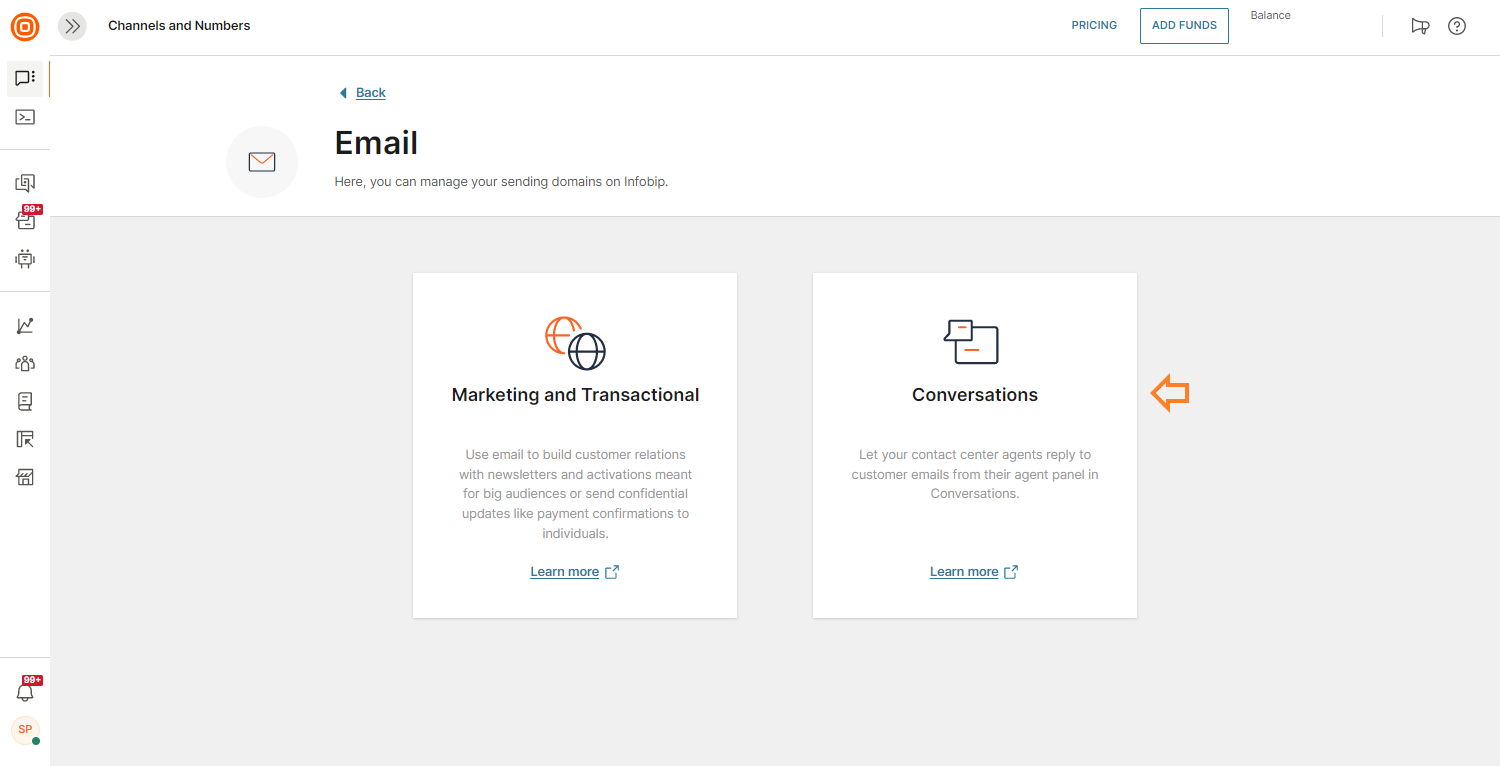
In this window, you have two options: Marketing and Transactional, and Conversations. Choose Conversations.
Here you can configure your email setup to enable your contact center agents to email customers directly from the agent panel or to configure the possibility to add previous messages, including threads, into replies.
You can choose between:
- Custom sender
- Infobip sender
- Other settings
To use the Custom senders option, you need to own the domain that will be used to register senders to.
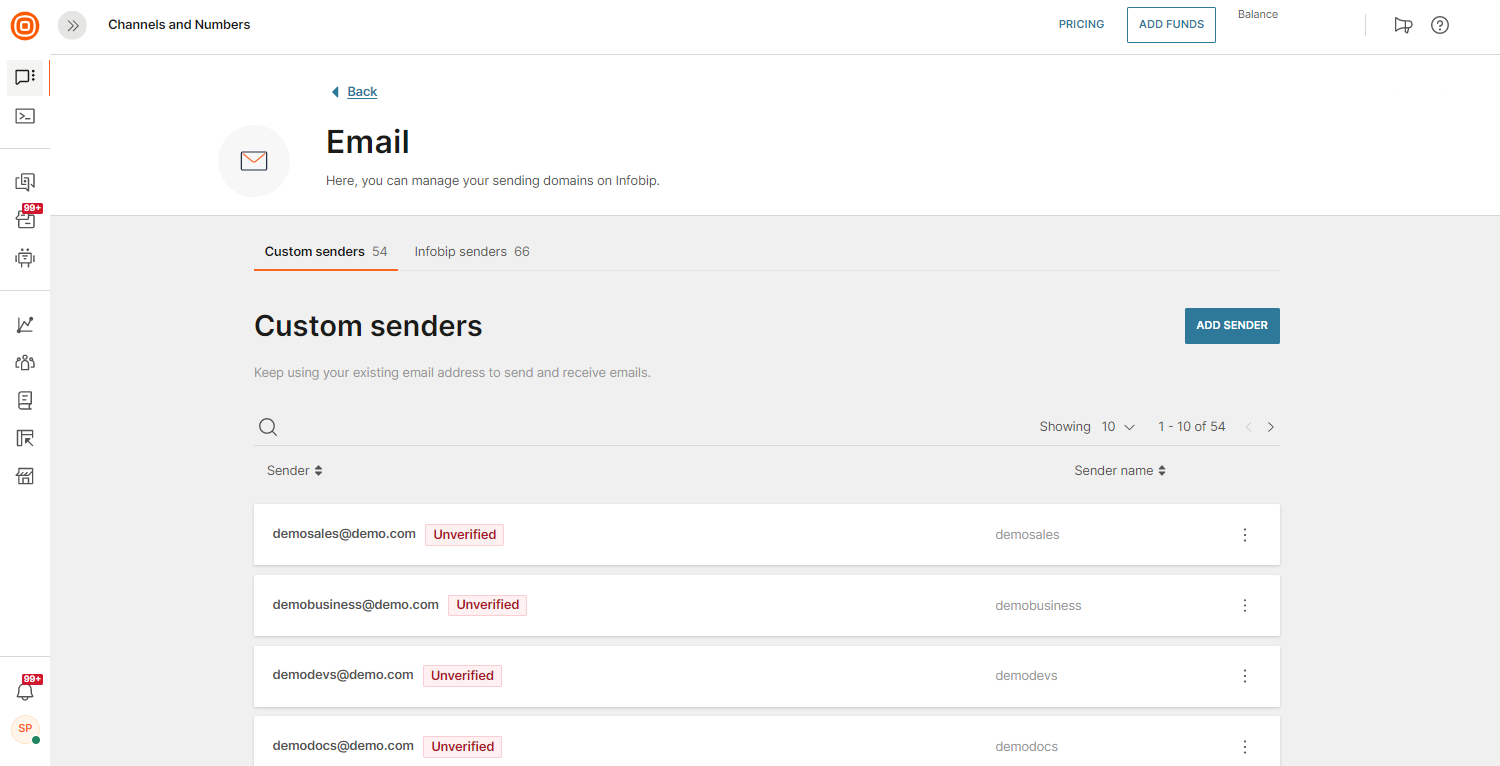
If you do not have your own domain, you will need to purchase and register it from a domain provider before adding senders or go back and choose to use Infobip senders instead.
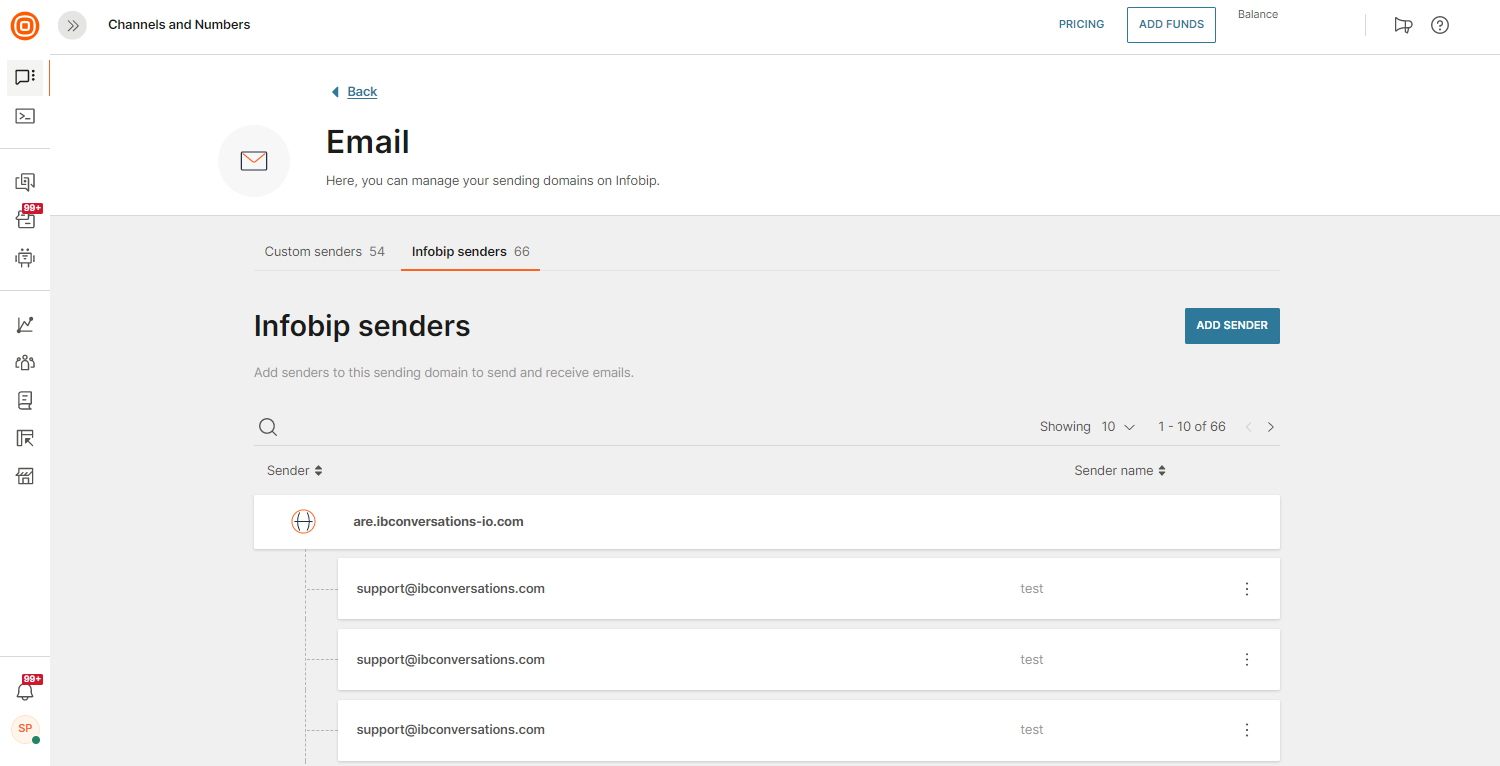
Alternatively, you can use Infobip domain to register a new subdomain, and then you can add senders (unlimited) to that domain.
Note that the main domain is always ibconversations.com and your register a new subdomain which could be something like acmesupport.ibconversations.com
As mentioned earlier, to add a custom sender, you need to own the domain that will be used to register senders to.
If you already own such a domain, click on the Add Sender button on the far right.
If you do not own a domain or do not want to use this type of sender, go back and choose to use Infobip sender instead. If you want to use more formal communication, use the ''Replies will include the sender's name'' option and enter your brand name as the sender.
Enter the name of your custom sender domain. You can choose to use either the sender name in all emails or use the agent's name. This means that the agent's real name is displayed for every outbound email they send to customers, for example, "David Smith".
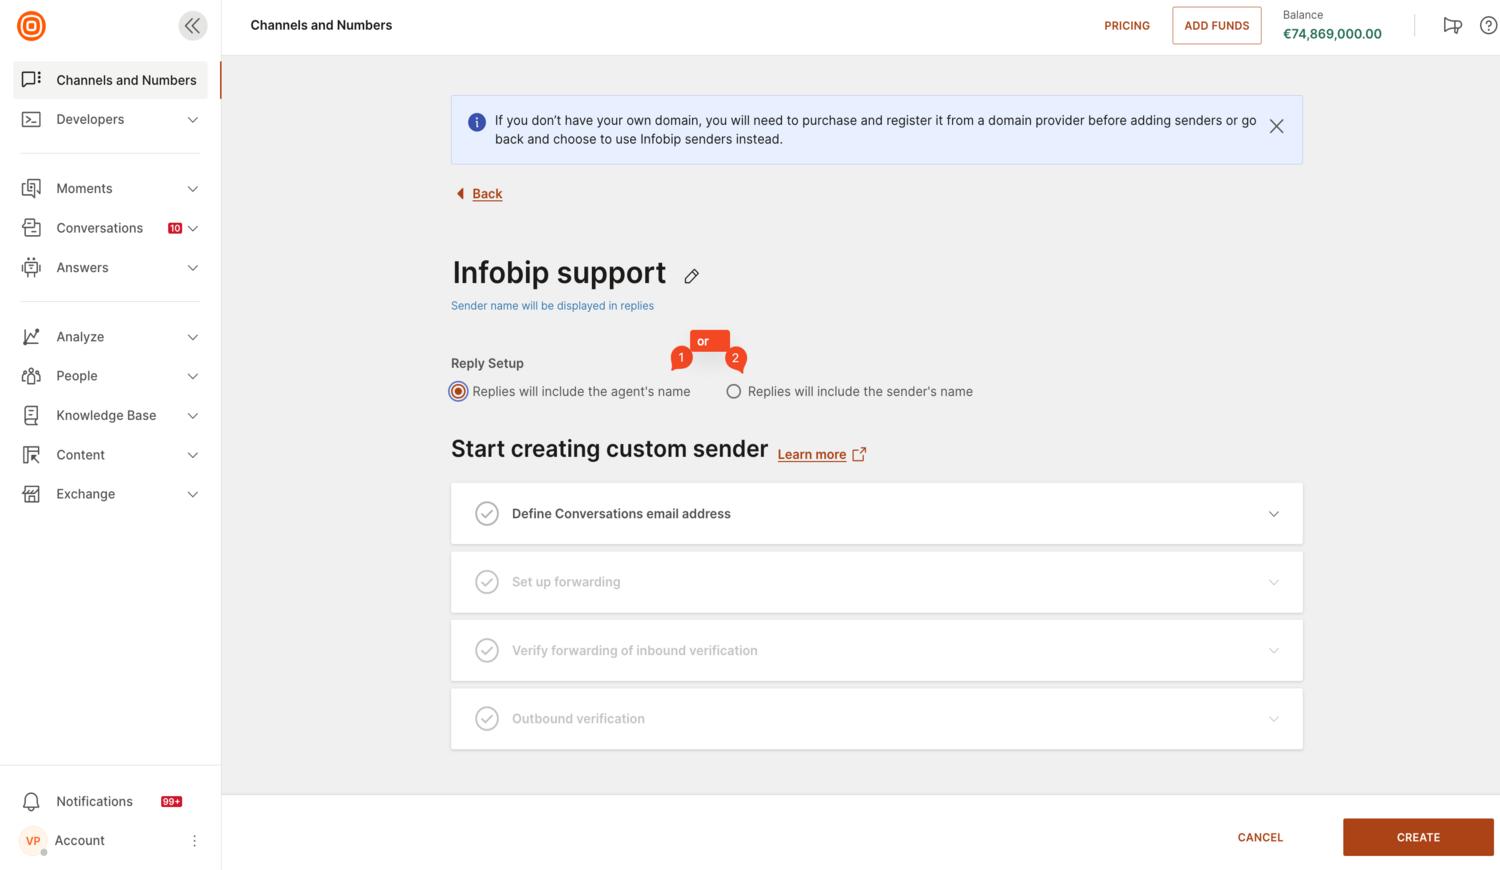
If you want to use more formal communication, use the ''Replies will include the sender's name'' option and enter your brand name as the sender.
Using agents' real names strengthens the personal communication between agents and your customers.
What follows is an intuitive sender creation process and you will see a checkmark next to each completed item as you go through the list.
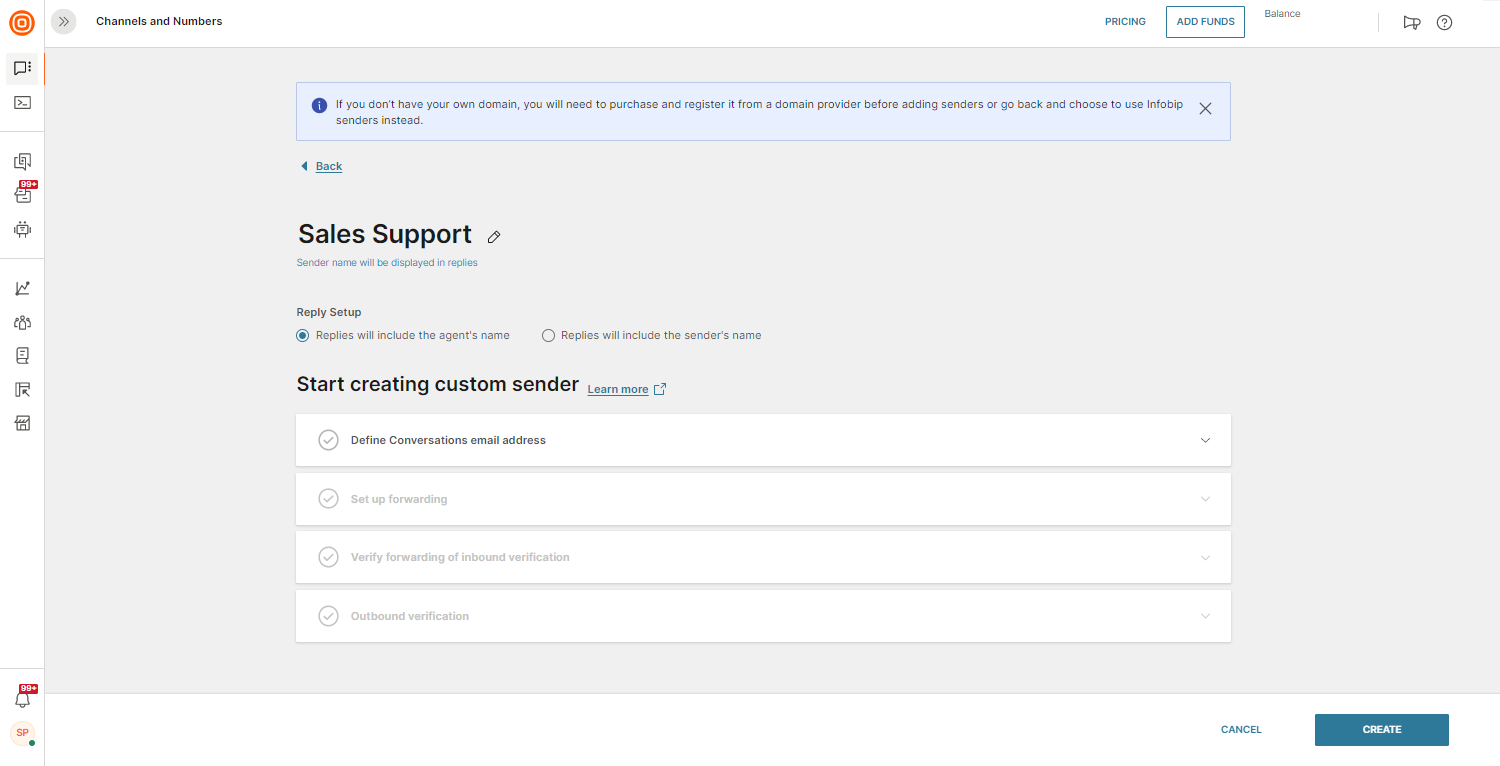
- Enter your sender name which will be displayed in replies.
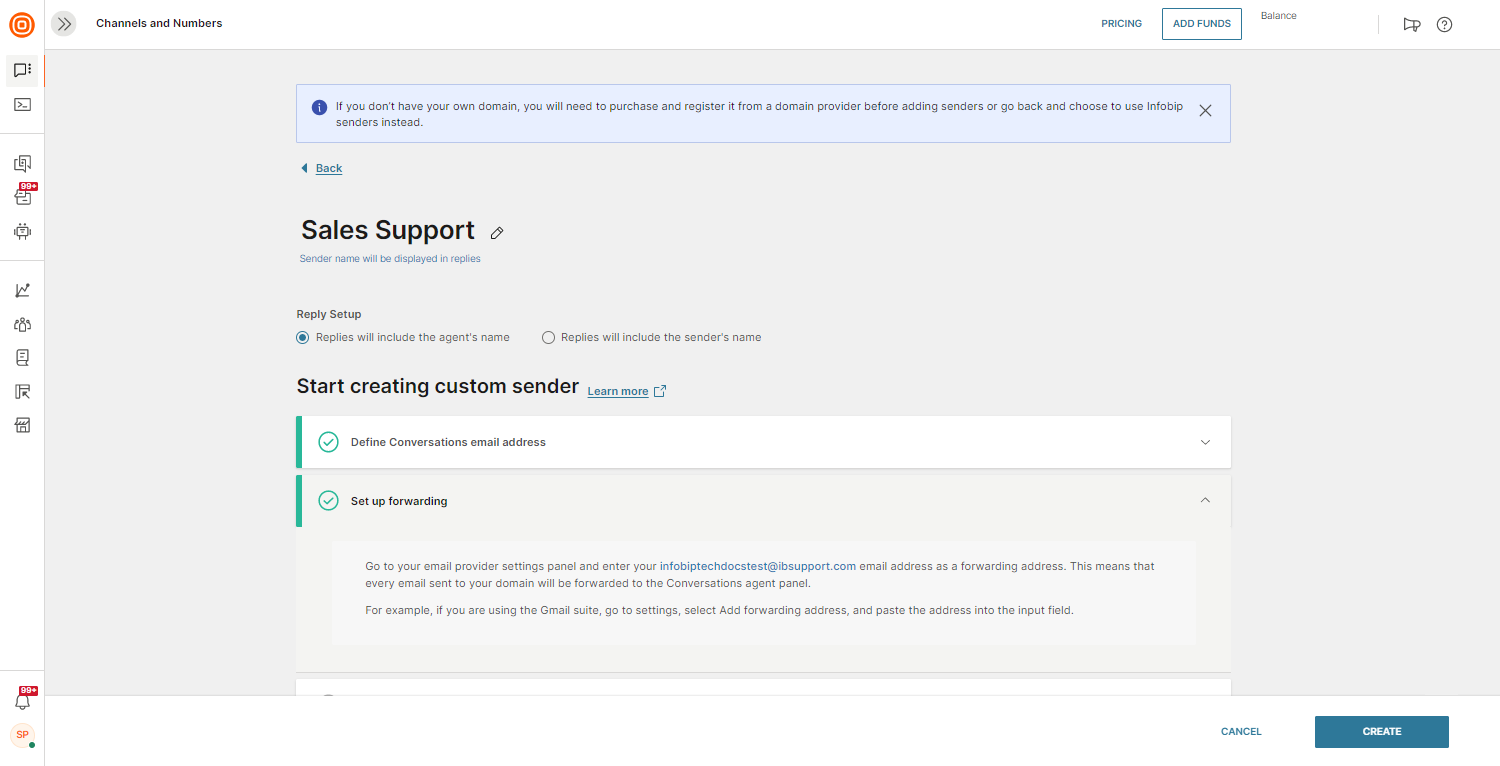
- Define Conversations email address - this email address will be used for receiving emails on Conversations from your domain. This email will not be used in communications. Your default domain is
@fwd.ibconversations.com - Set up forwarding - go to your email provider settings panel and enter the Conversations email address you created in the previous step as a forwarding address. This means that every email sent to your domain will be forwarded to the Conversations agent panel. For example, if you are using the Gmail suite, go to settings, select Add forwarding address, and paste the address into the input field.
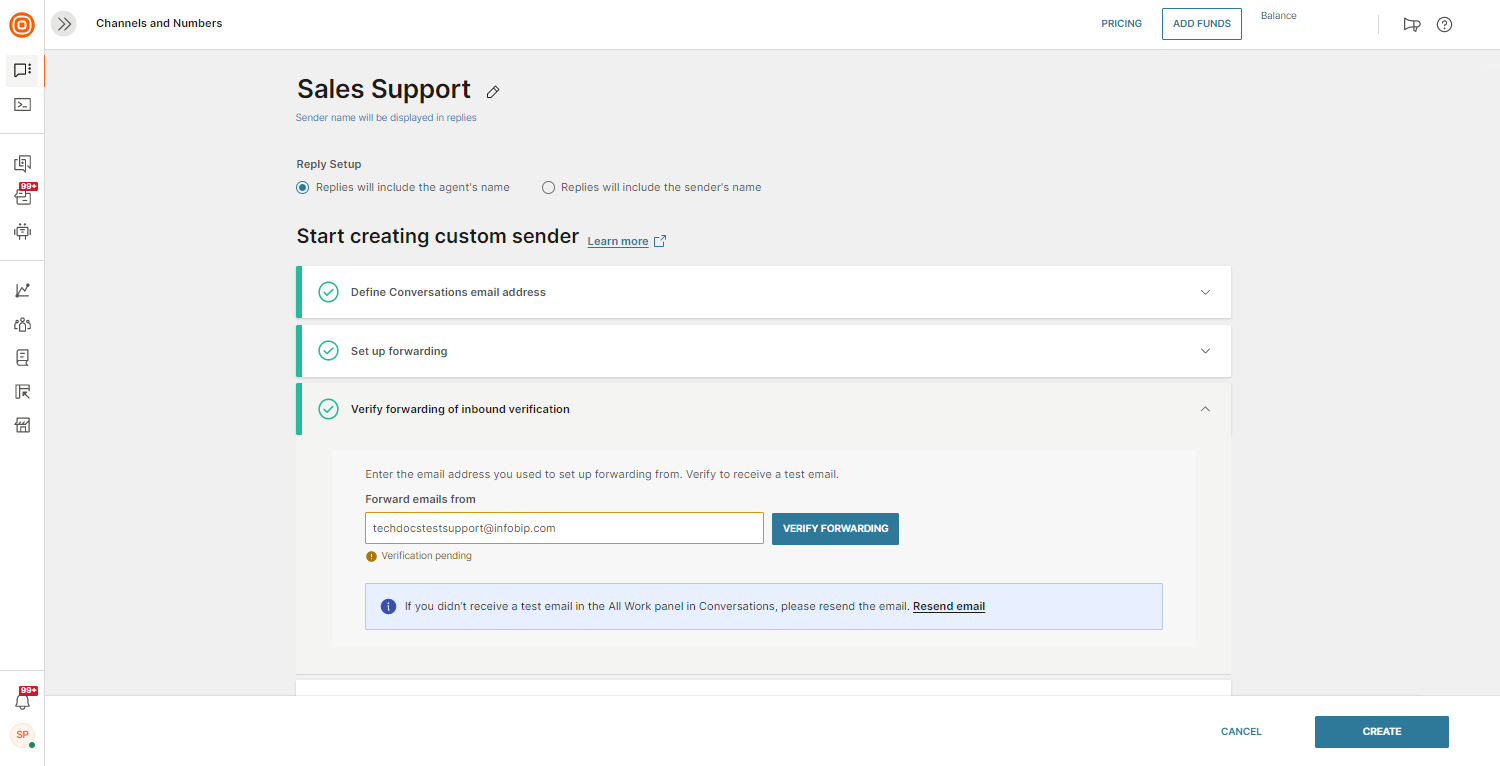
- Verify forwarding of incoming verification - Enter the email address you used to set up forwarding from. Click on the Verify Forwarding button to receive a test email. The test email is sent to the agent panel in Conversations.
- Outbound verification - to be able to send outbound emails, you need to confirm the domain ownership by creating a TXT record and then entering it into your domain’s DNS settings. Enter your domain and click the Create Record button.
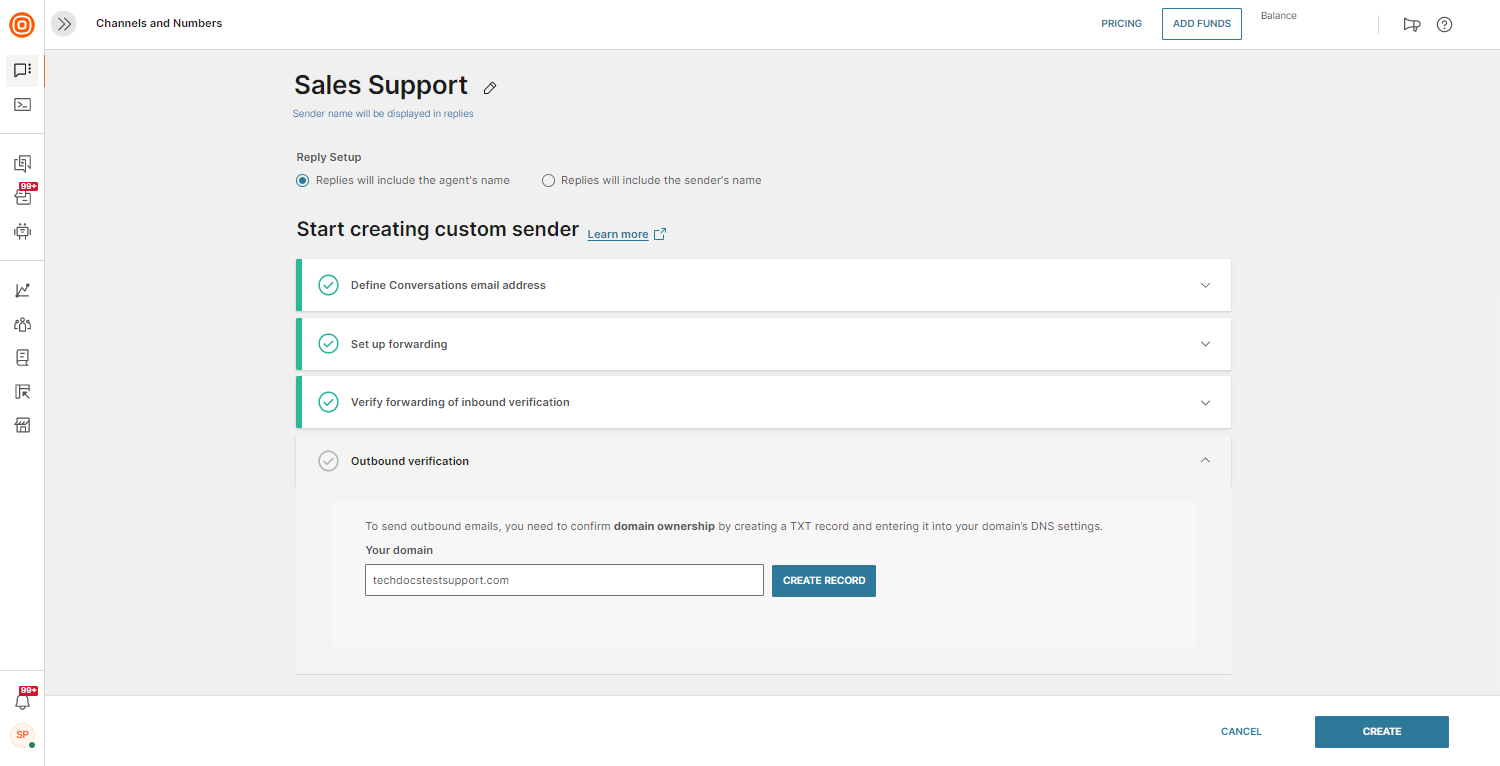
Once the DNS records have been generated, click the Export Records button to export these. Then, proceed by adding them to your domain settings. When done, come back to the Infobip web interface and click the Verify button to verify the DNS records. Note that it can take up to 48 hours for these to be verified.
Read more on how to manage DNS records (opens in a new tab).
Also, the Custom senders list will show the status of your senders:
- Verified (green) - Inbound and outbound verification done
- Unverified (red) - Inbound and outbound verification still pending
-
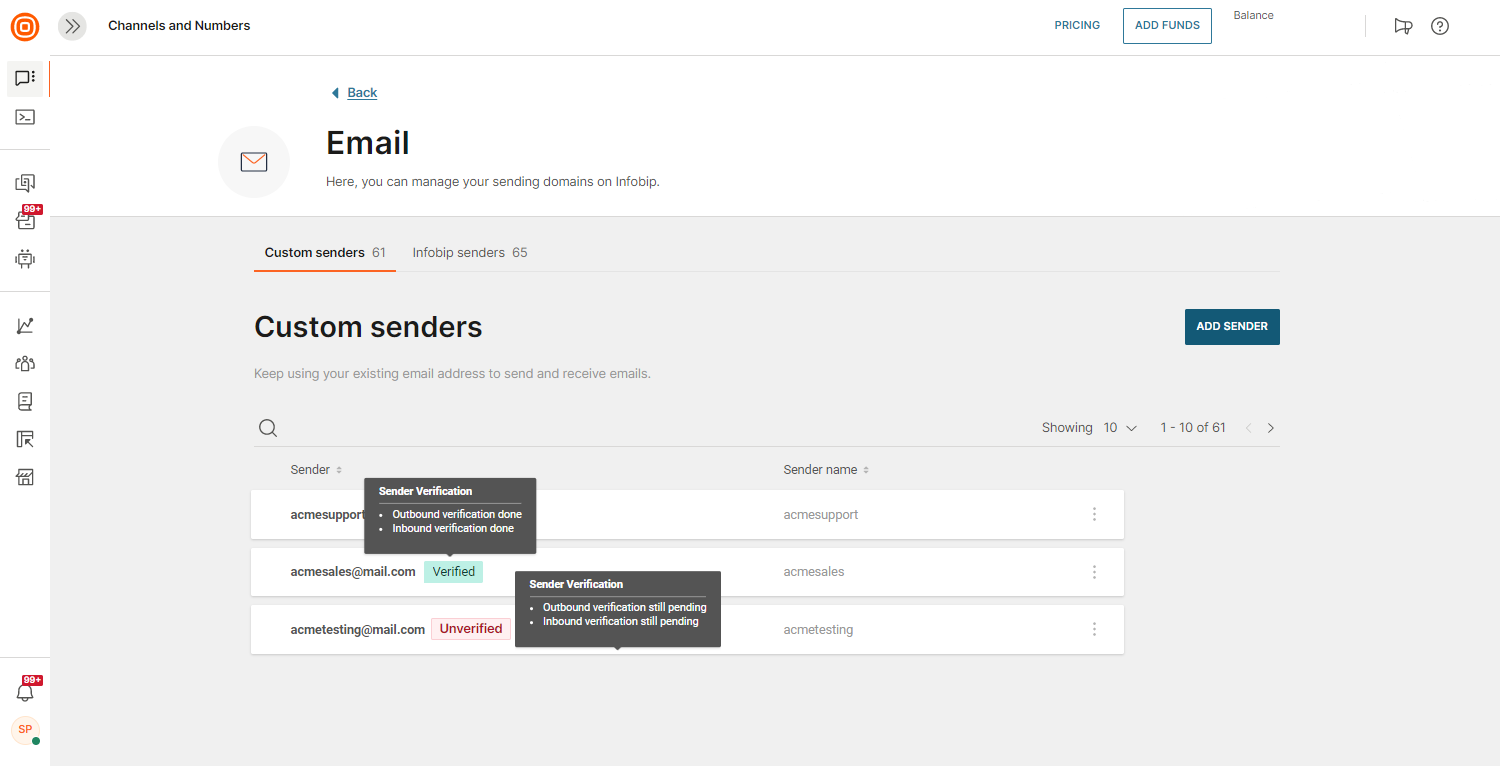
If your sender status is still pending, click on the sender name, and in the verification window, you can try resending the test email and check the All Work panel for that email to verify your sender. These statuses apply to custom senders only.
In the Other settings options, you can enable adding previous messages, including threads, into replies. If you enable this setting, the history in replies will include the previous email in the current conversation reply, and you can choose between two options:
- Yes, include whole previous message in reply - the complete previous message, to which the agent is replying to, including previous threads, will be sent as a part of the new message body.
- Manageable by an agent - available only if the previous option is enabled.
Usage
Two-way email communication is now available in Conversations. Both customers and agents can initiate an email conversation.
Emails within any conversation contain the following information:
- Sender's name
- Sender's email address
- Email subject
- Email body
- Email attachments
- Day of the week, date, and time the email is received/sent
Additionally, agents can use these actions when handling emails:
- Reply to email – use it to send a reply
- Forward email – use this to forward the existing email to another recipient
- Show original email – hidden behind the ellipsis, providing an overview of the email in HTML, TEXT, and SOURCE
Moreover, an option to expand and contract an email card in conversation history is available and visible with an arrow icon.
Send email
Agents can send emails in two ways:
- When an agent wants to initiate a new conversation and send an email to the customer, they should use the Start a Conversation button.
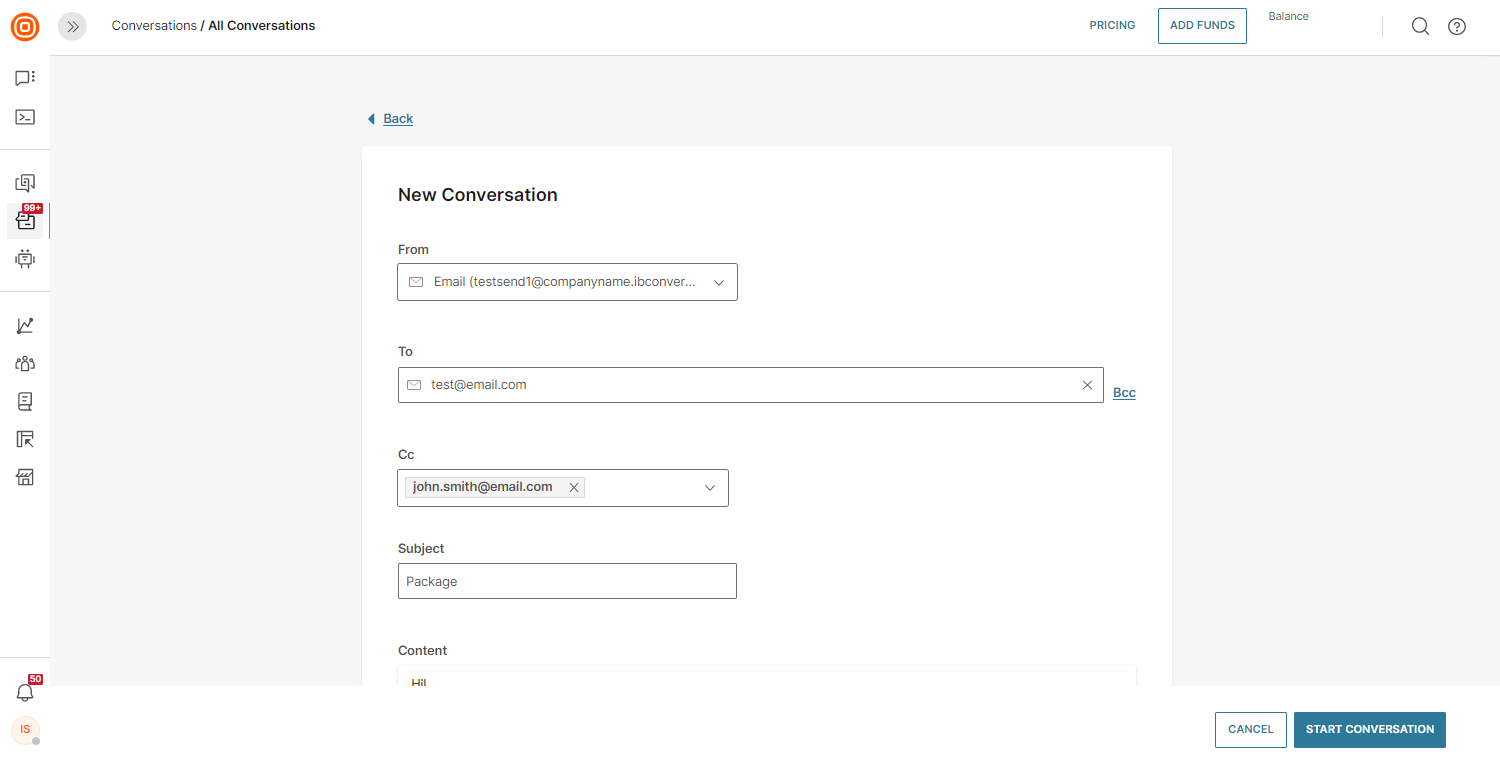
- When sending an email from an existing conversation, they need to click either reply or forward or use the New Email button at the bottom of the page.
The maximum character limit for the email subject is 1000 characters.
Common editing options are available while writing an email, along with the ability to send attachments up to 20MB.
To make reading and writing emails easier, the right-hand pane containing context cards can be contracted to a narrower size, thus providing extra space for managing emails. Agents can also take over emails by clicking the take-over icon.
When sending an email, agents can choose the sender's email address and the recipient. Also, common options like CC and BCC are available.
If an agent gets distracted from writing an email because they are working on different tasks, a draft will be stored in the Email drafts tab. They can access it from the top of the conversations history section.
When a BCC recipient replies to an email in a conversation, a new conversation will be started. The reason behind this is that, until now, agents could send an email to multiple clients using BCC (clients are not aware of one another), and if they replied, handling all those replies in one conversation could impose security and privacy risks.
Similar is valid for the Forward option. Each time an agent forwards an email, a new conversation will be created to separate the existing communication from the new one.
Emails are always ordered from newest to oldest: the latest email is shown at the top of the agent panel but you can view the older threads by clicking the arrow next to the three-dot menu on the right.
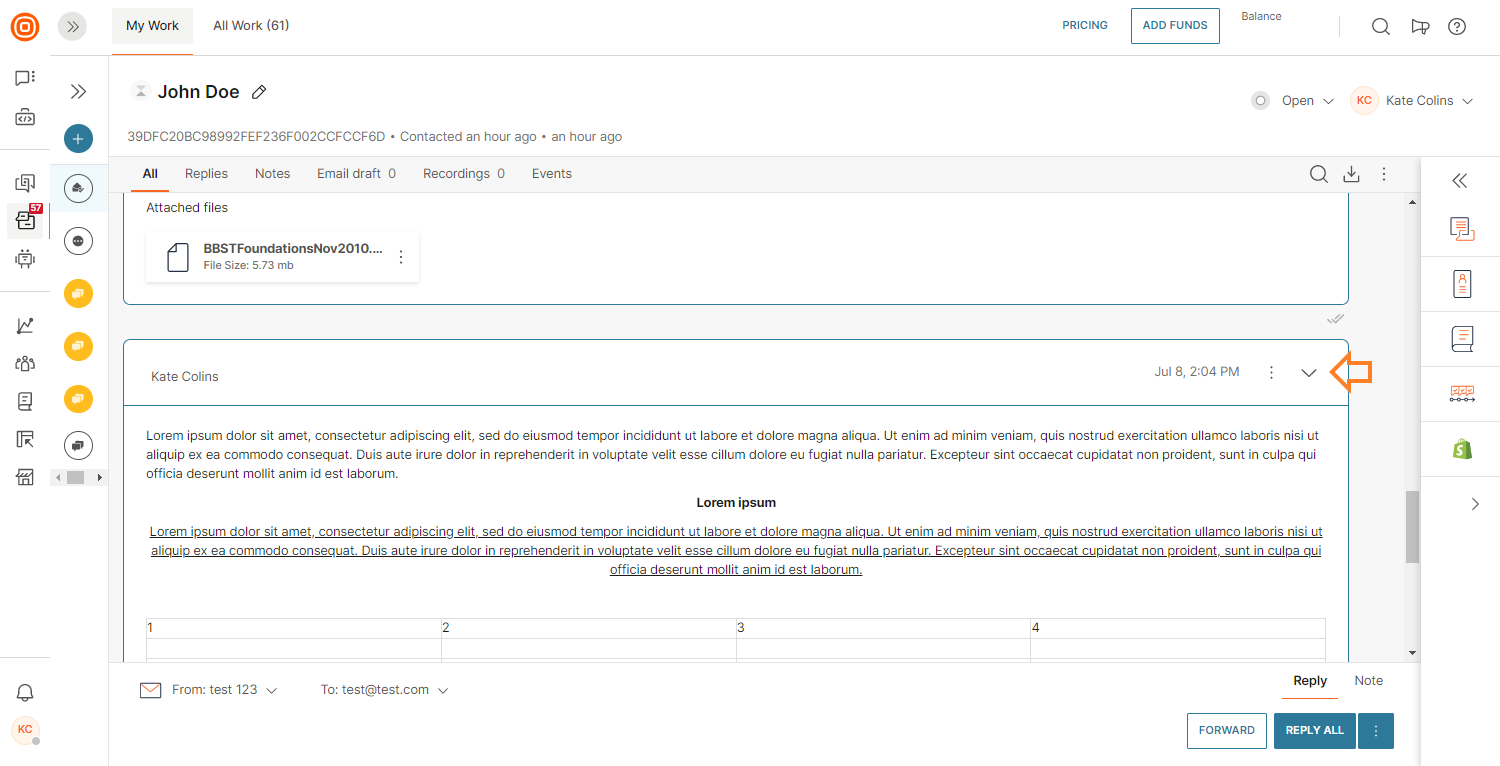
Also, you can make use of the draft option while forwarding an email. This option was previously available for replies only. During forwarding, simply click on the Edit draft button to edit your email.
Supported attachments and templates
In the Email channel, the agent can send the following templates and attachments:
| File type |
|---|
| video/avi |
| application/xml - |
| image/jpeg - |
| image/bmp - |
| image/gif - |
| video/x-msvideo |
| audio/wav |
| text/plain |
| application/vnd.oasis.opendocument.spreadsheet |
| application/vnd.oasis.opendocument.graphics |
| application/x-gzip |
| image/png |
| application/octet-stream |
| application/pdf |
| application/msword |
| audio/mpeg |
| audio/ogg |
| text/html |
| application/vnd.oasis.opendocument.text |
| video/mpeg |
| image/tiff |
| application/zip |
| video/quicktime |
| video/mp4 |
| audio/mp3 |
| image/Icon |
| application/json |
| application/SVG |
| Application/WEBP |
| application/WEBM |
| .HEIC |
| .pcap |
| 7-ZIP |
| EDB |
| EML |
| EMLX |
| ICS |
| MBOX |
| MSG |
| OFT |
| OLM |
| OST |
| P7S |
| PST |
| RPMSG |
| TNEF |
| VCF |
| PEM |
Formatting
You have the flexibility to utilize a variety of formatting options, encompassing text formatting, bullet points, and inline images, enabling you to create professional and visually appealing email responses.
Once you start typing an email message, you will see the following rich formatting options:
- Strikethrough
- Subscript
- Superscript
- Font Size
- Text color
- Background color
- Clear formatting
- Order list
- Default
- Lower Greek
- Lower Roman
- Upper Alpha
- Upper Roman
- Unordered list
- Default
- Circle
- Disc
- Square
- Paragraph
- Align left
- Align right
- Align centre
- Quotes
- Increase indent
- Decrease indent
- Insert link
- Insert image

Merge conversations
You can merge conversations from different customers into a single conversation based on, for example, a common topic. Merging two email conversations will combine their references, ensuring that any further replies are automatically mapped to the remaining conversation.
When using the Reply to All option in a conversation with merged messages, the recipients will only match the last message or the message the agent is replying to. Recipients are not populated from all messages in the conversation. To make sure the message reaches all participants, you will need to add them as recipients before sending the reply.
- To merge conversations, first choose one conversation as the primary thread where all information will be consolidated.
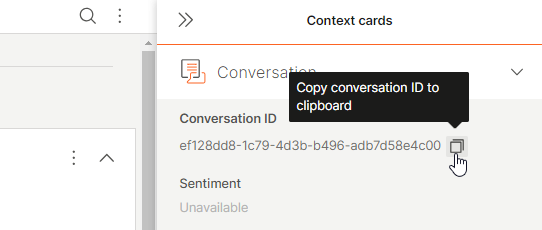
- Copy the Conversation ID of the conversation you want to merge with the main one. Keep in mind that you need to copy the conversation ID from the Conversation context card, not the Short ID.
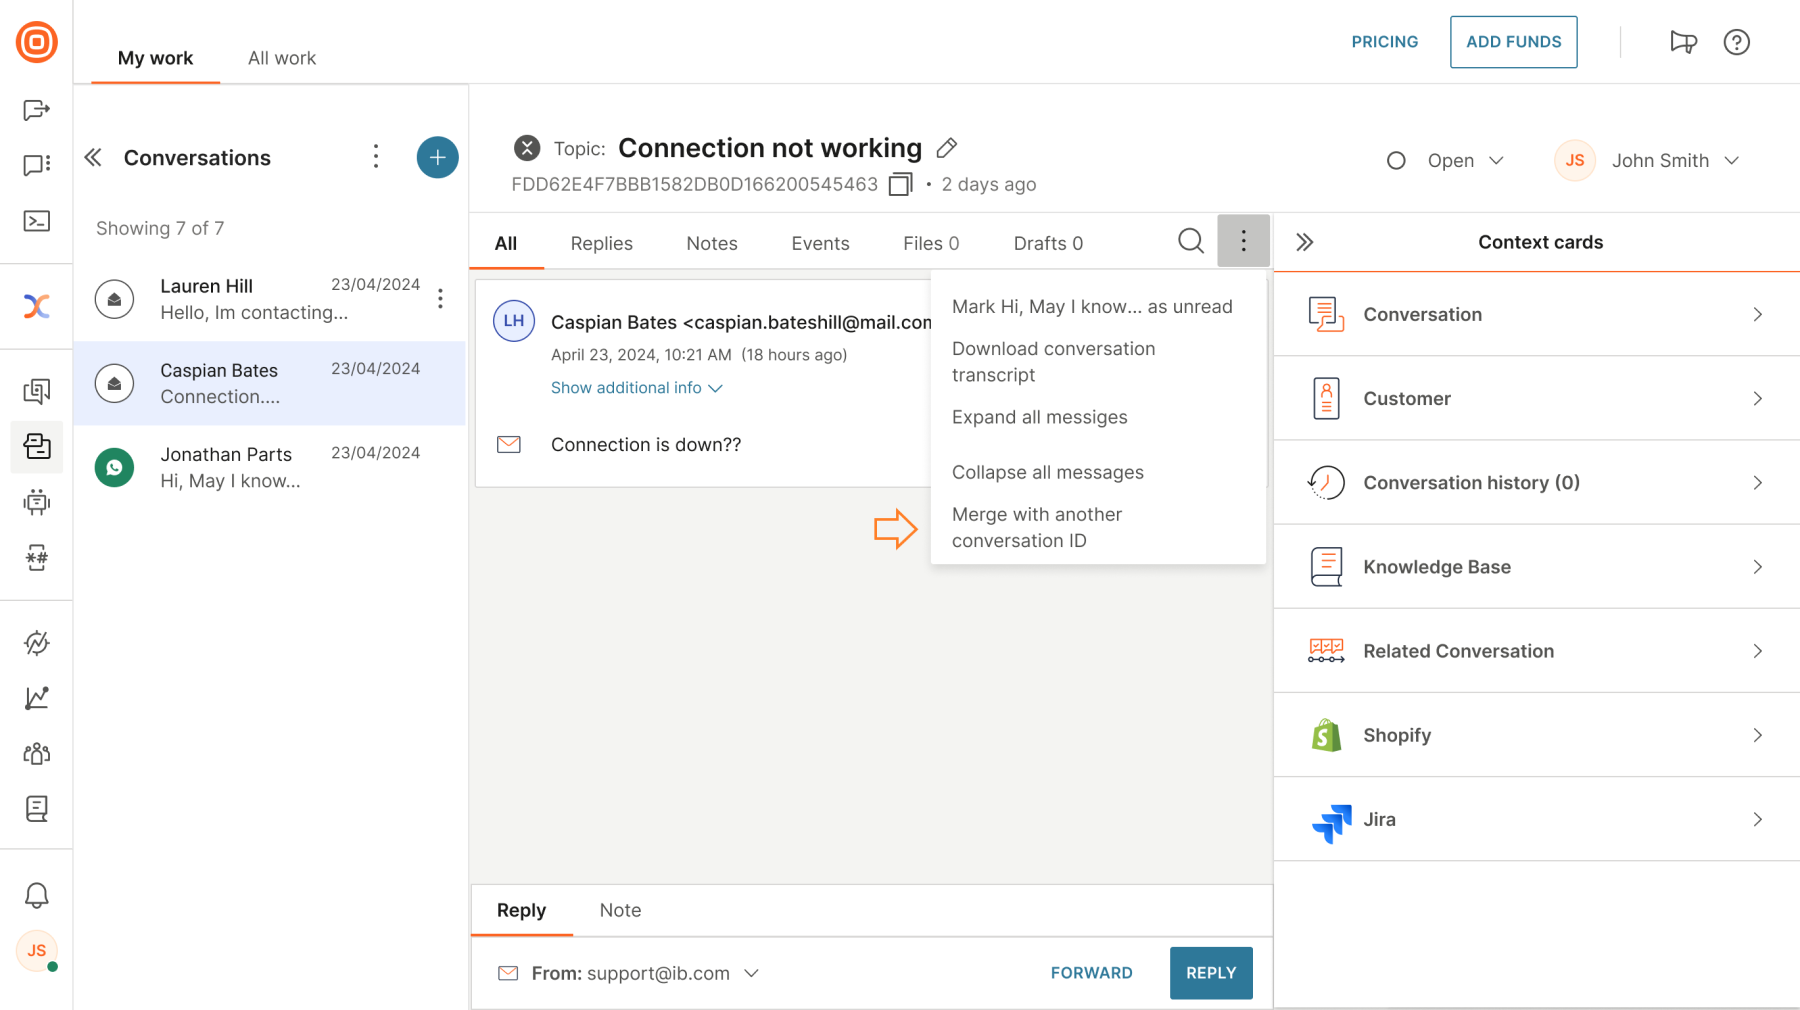
- Go to the main conversation, click the three dots in the upper right corner, and select Merge with another conversation ID.
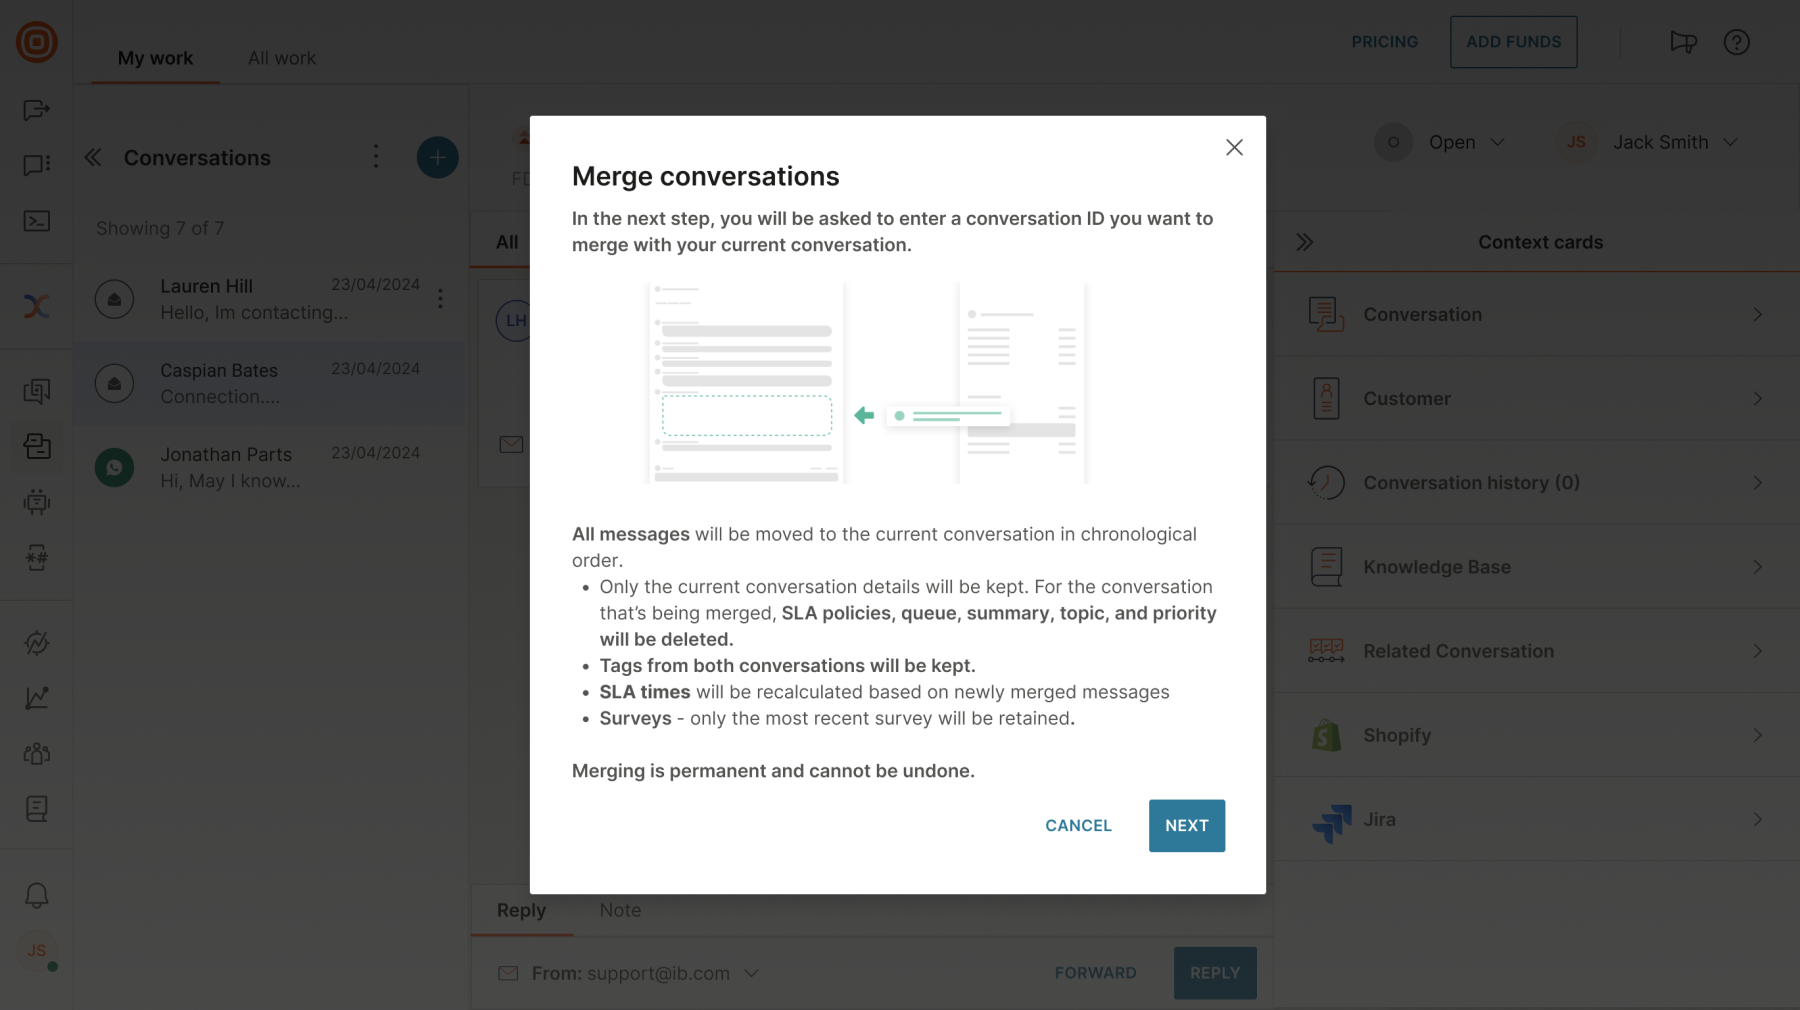
- Click Next after reading the explanation of what will happen if the conversations are merged.
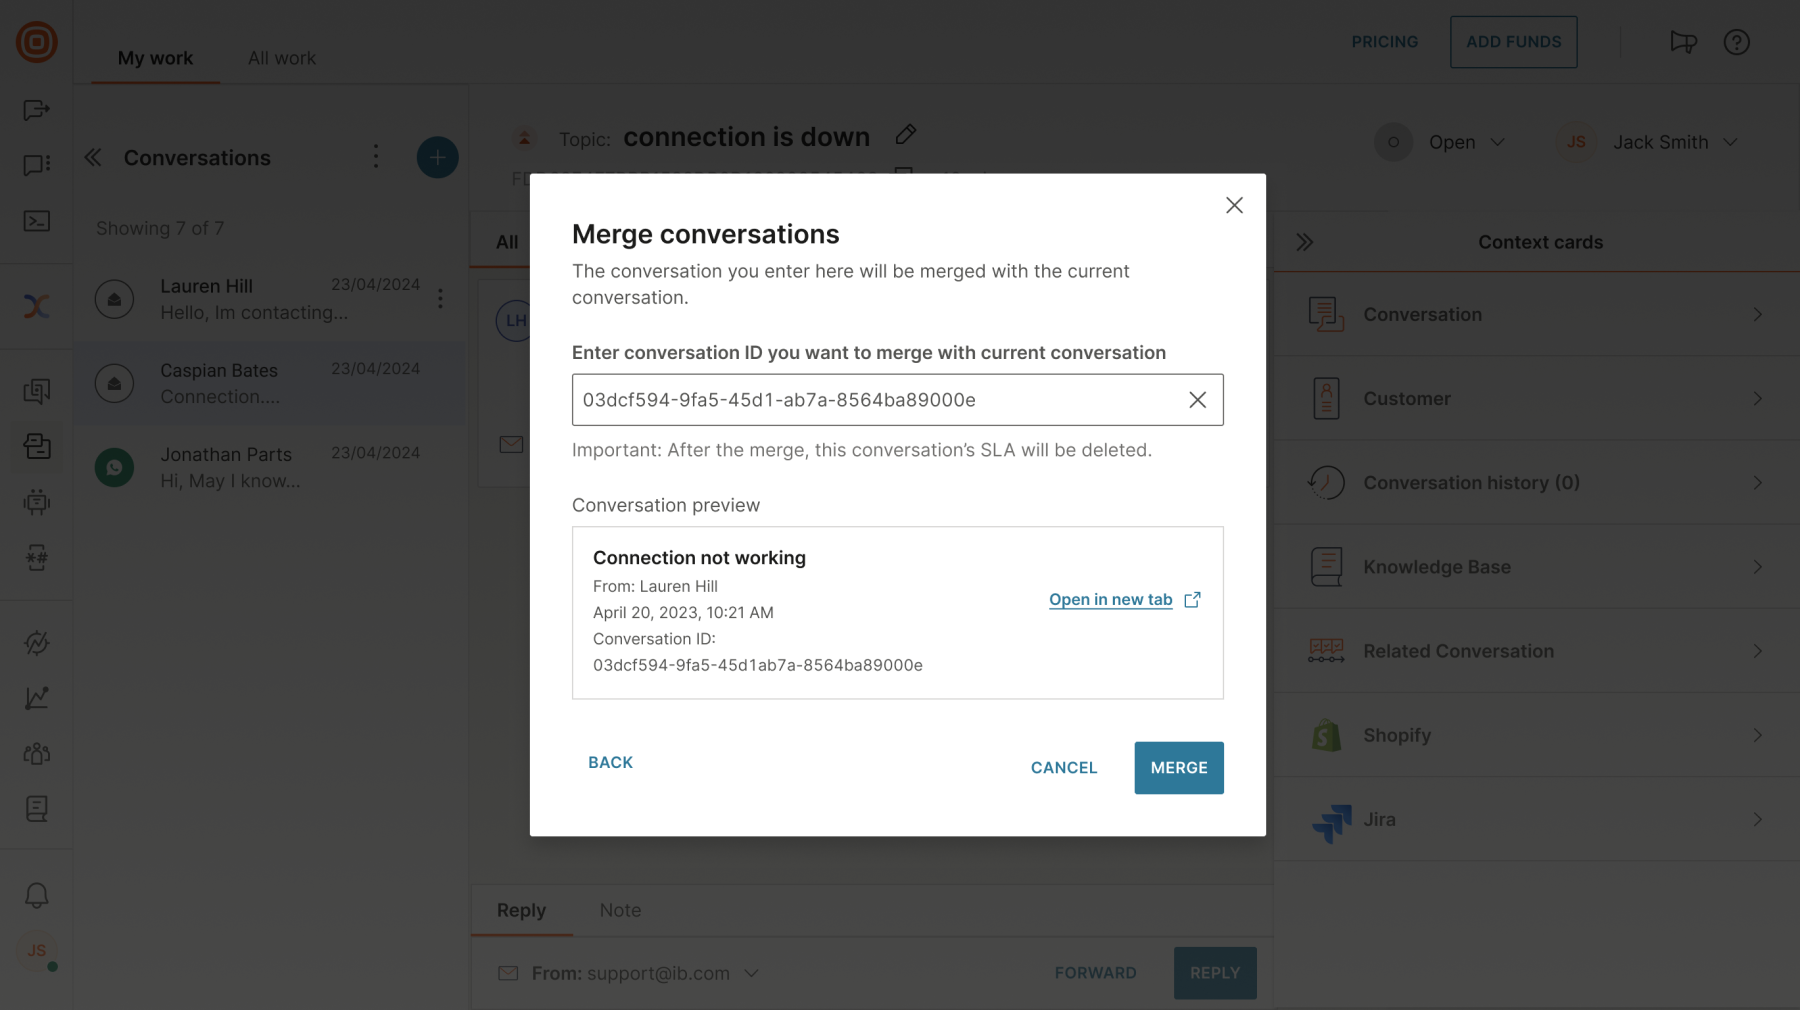
- Then, enter the conversation ID you want to merge with the current conversation.
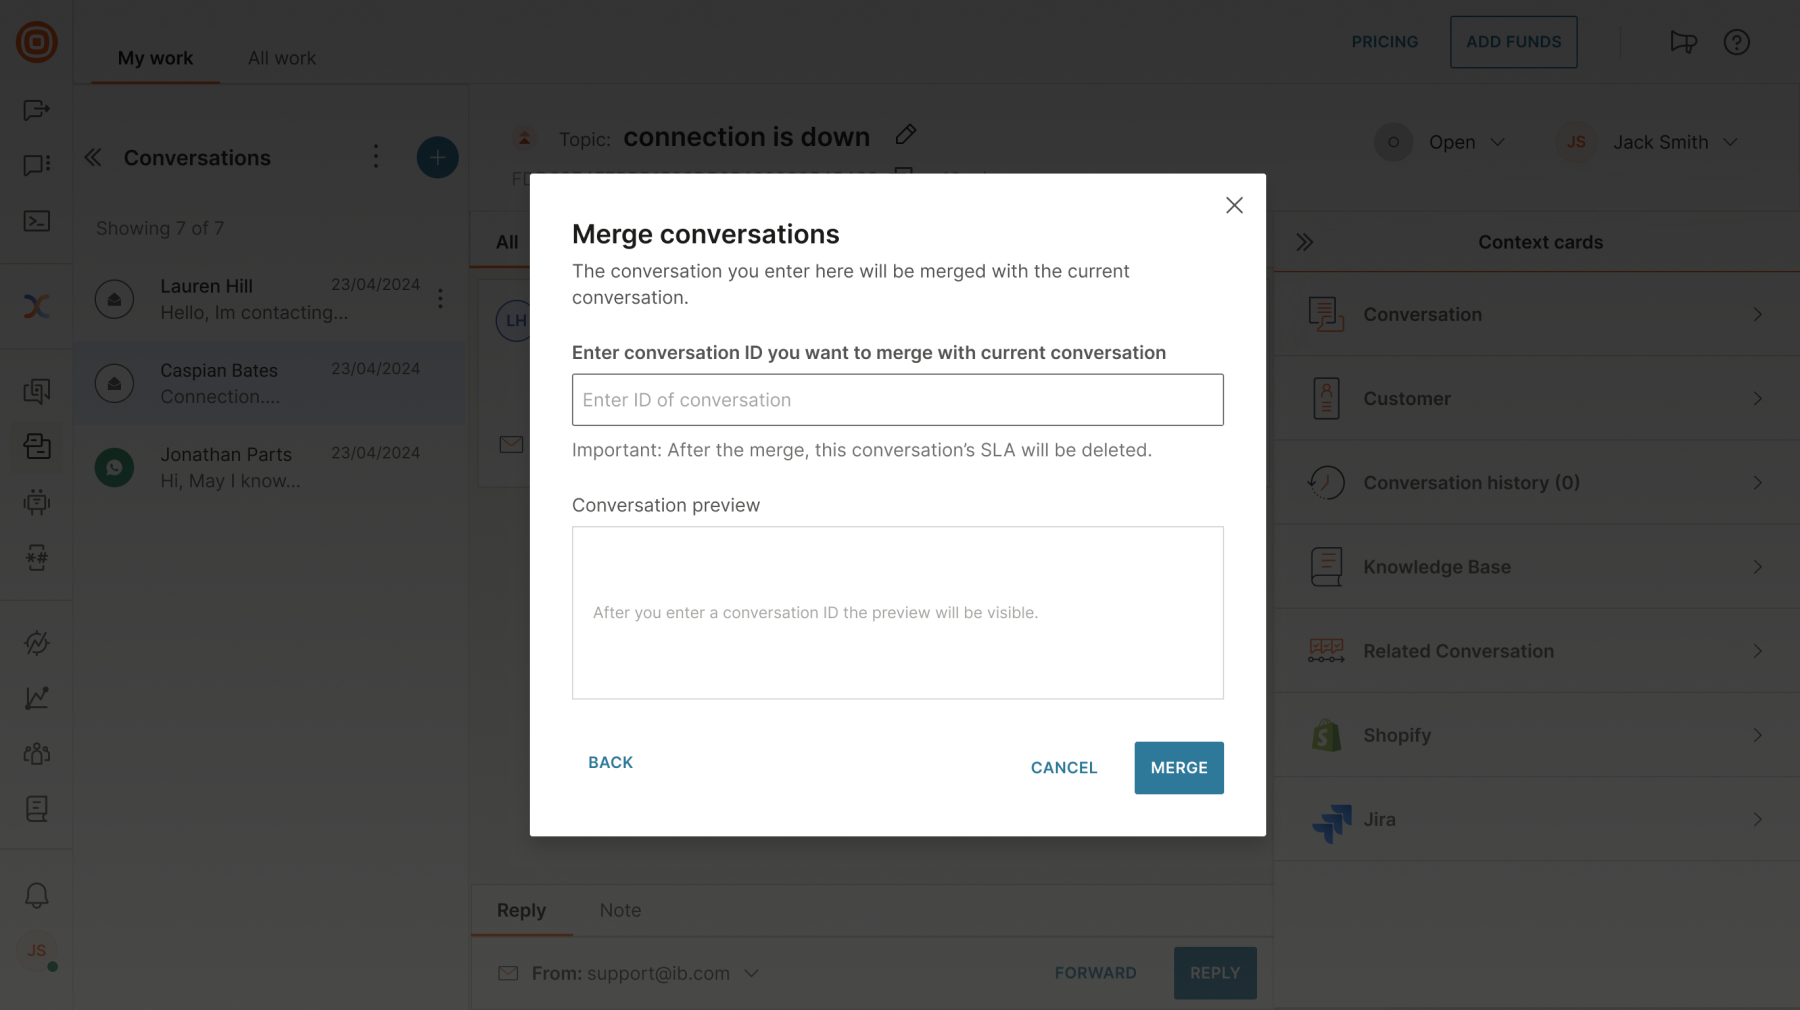 6. Once you enter the conversation ID, you will see the conversation preview below with the option to open it in a new tab. If everything is correct, click Merge.
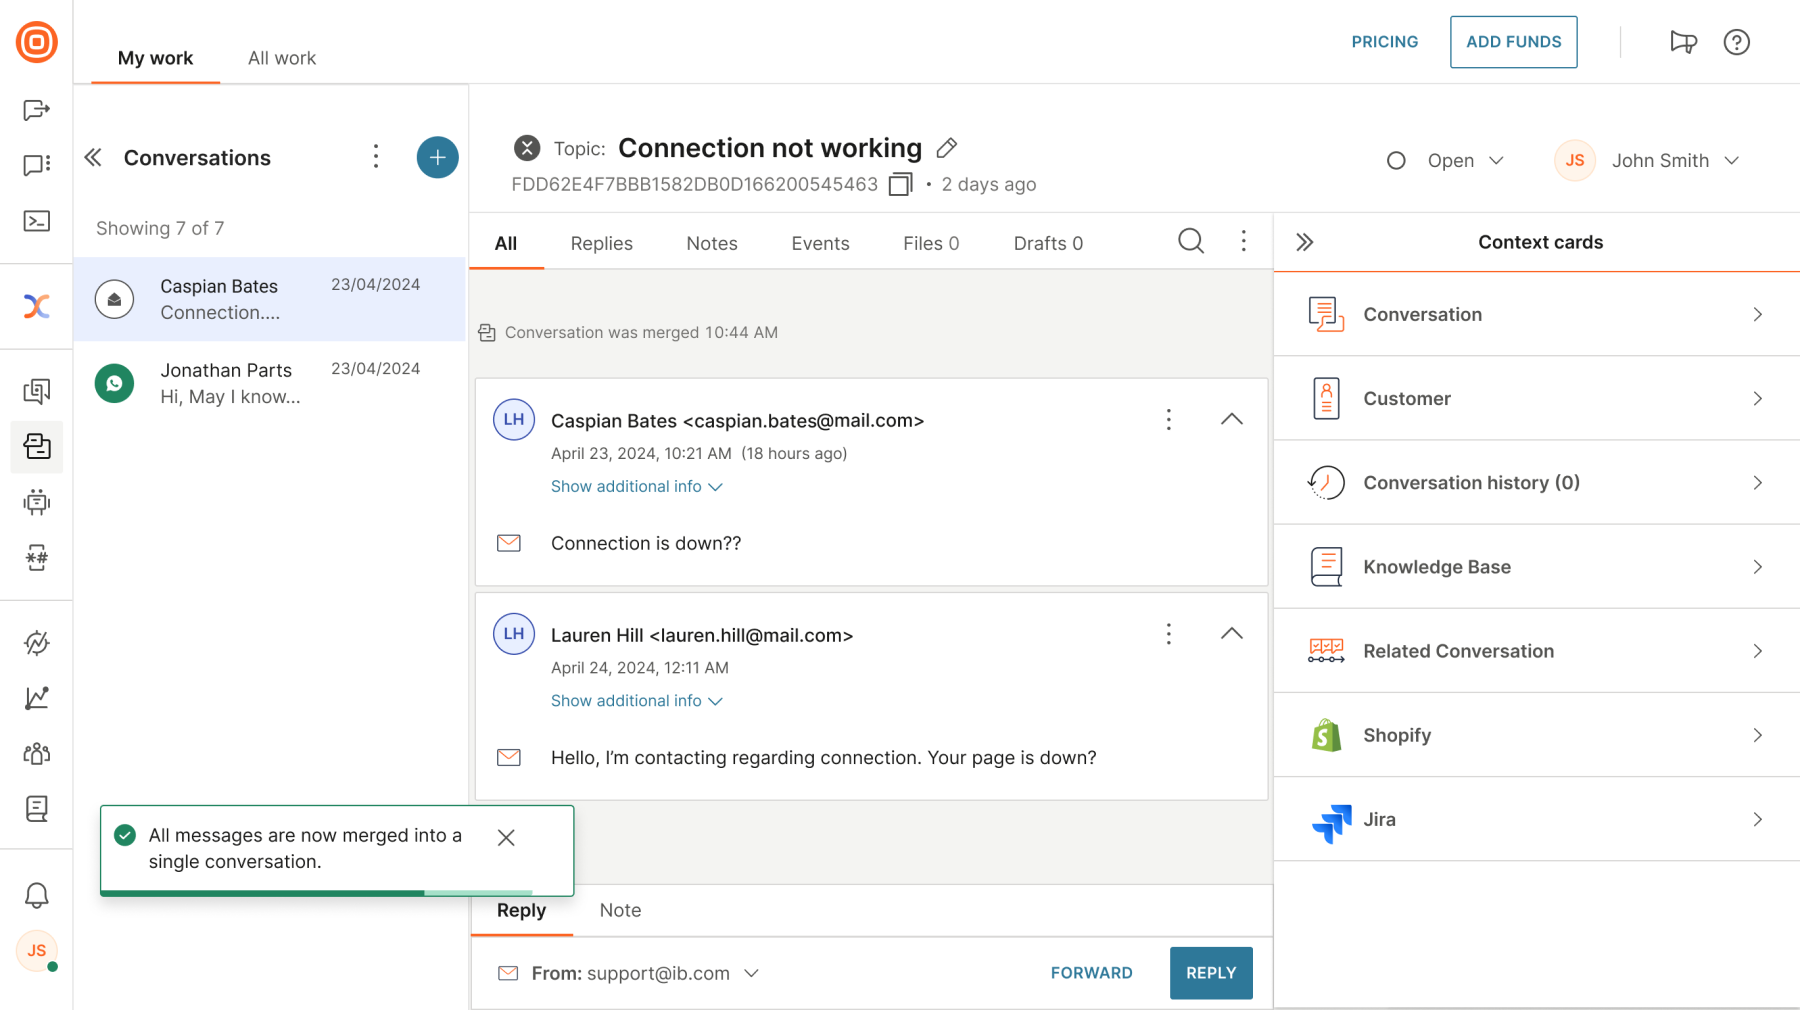
- After a successful merge, you will see the All messages are now merged into a single conversation. message. Any further communication from the merged conversations will automatically come into the primary conversation. The secondary conversation is deleted by the merge action.
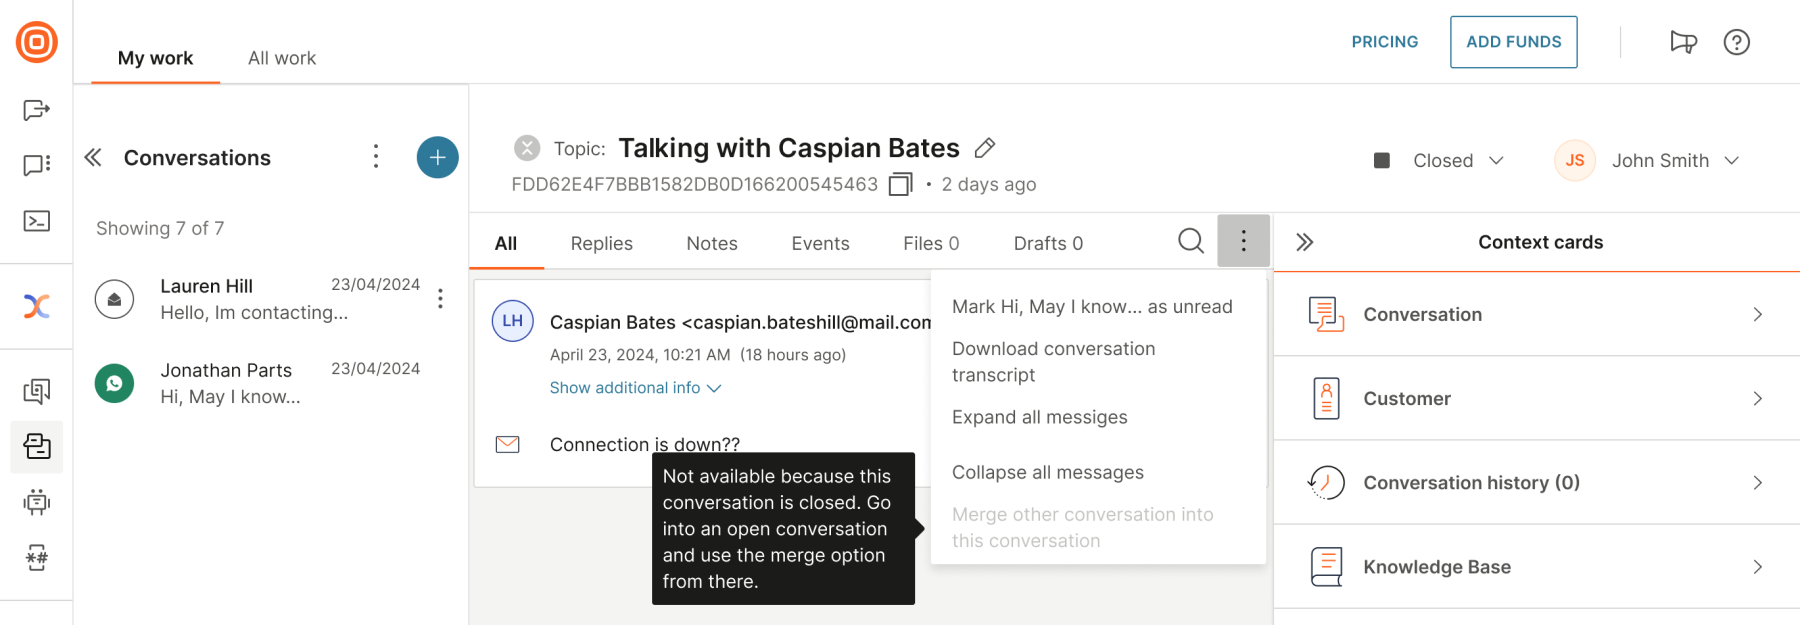
The Merge option will be unavailable if the conversation is closed. To use the merge option, find an open conversation.
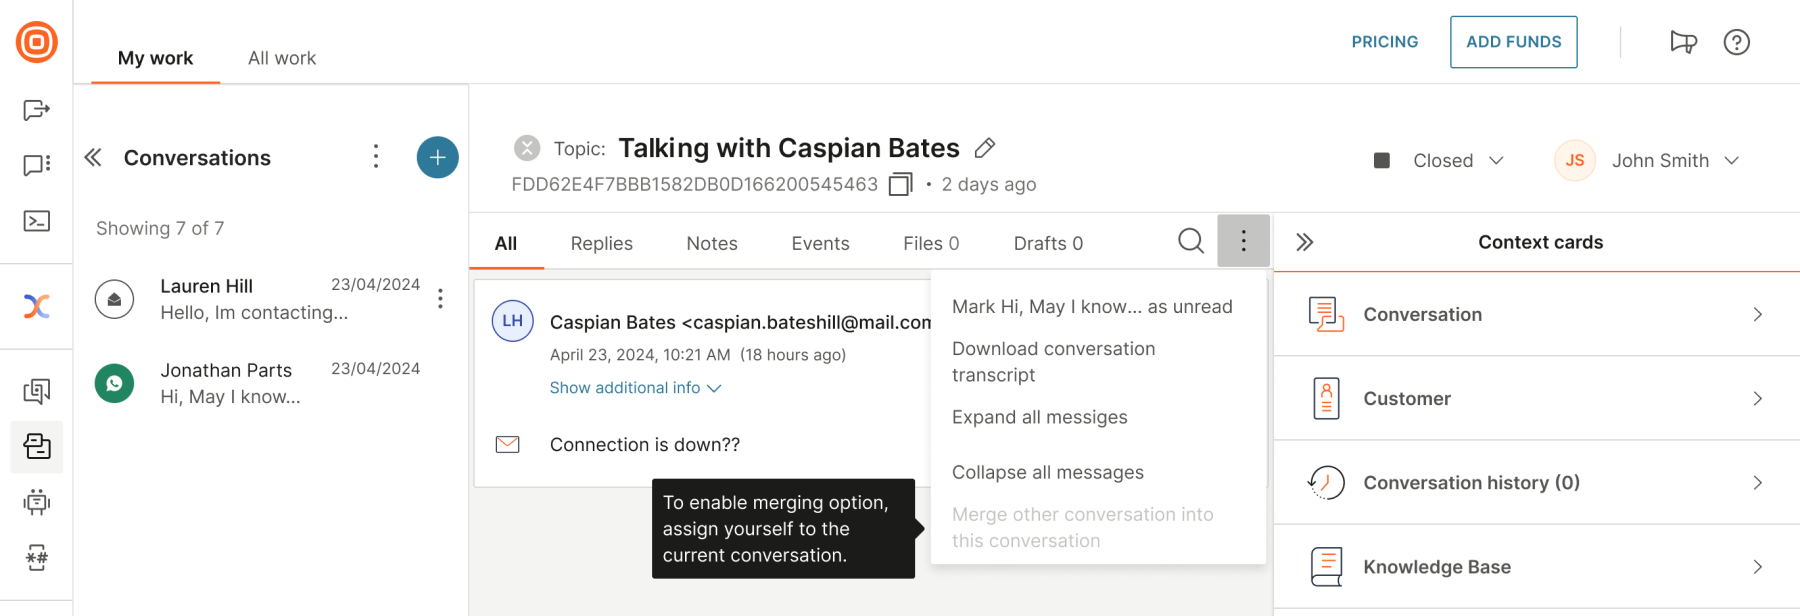
Additionally, if the conversation is not assigned to you, the merge option will be disabled.
Message delivery report
Message delivery reports facilitate agents in tracking delivery statuses for every communication participant accurately. In other words, agents see precise information regarding the status of each message sent through our platform.
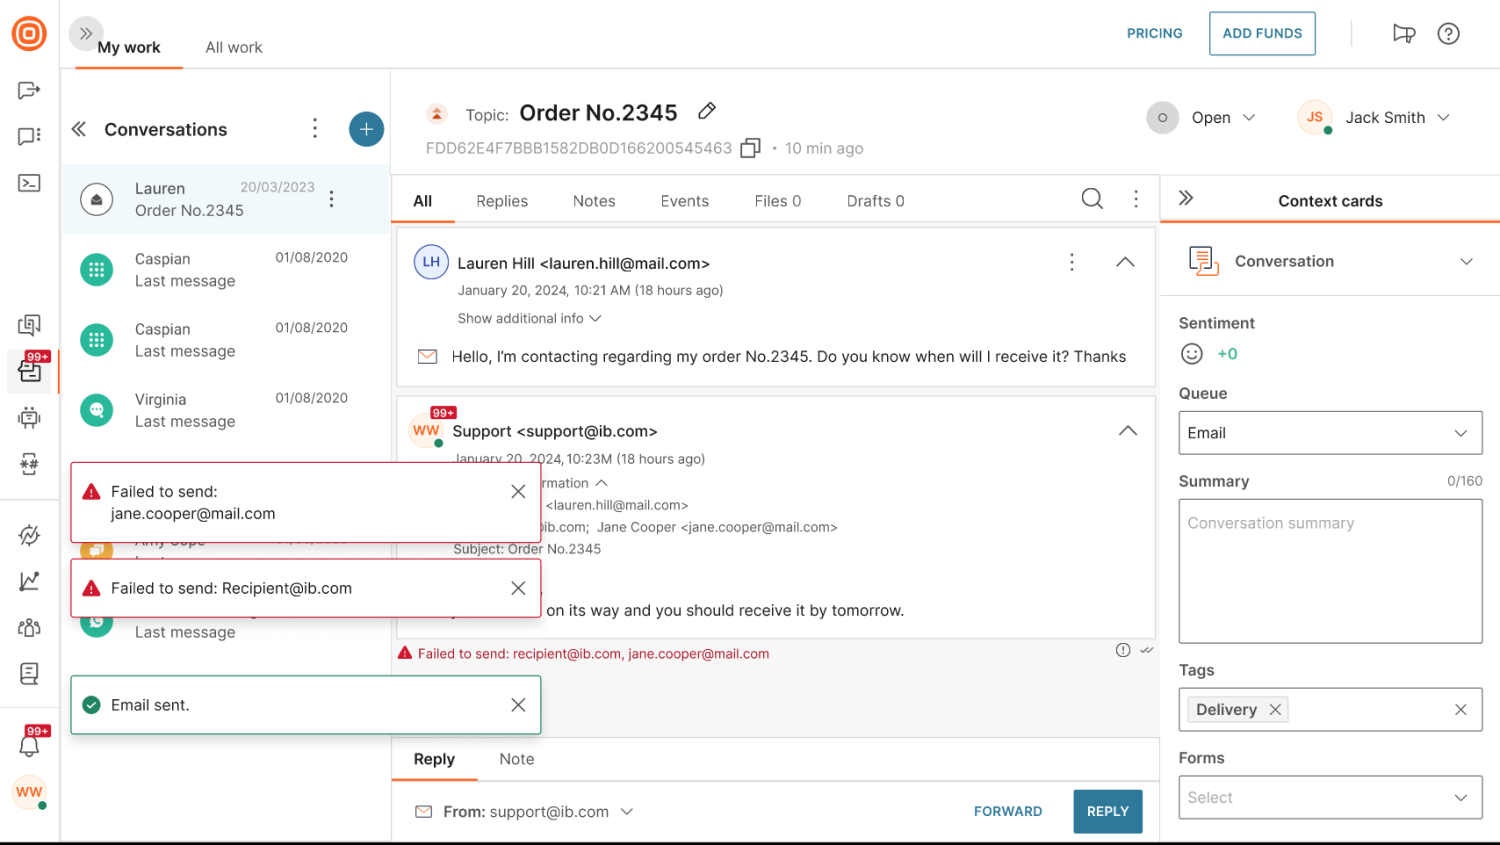
For every sent message, agents receive a tooltip with the message delivery status for each recipient ("Failed to send" or "Email sent"). This feature lets them quickly see if the message was successfully sent or failed, eliminating any uncertainty regarding message delivery. This feature ensures agents can quickly identify and address delivery issues, enhancing overall efficiency and customer satisfaction.
Threading
When an inbound email is received, the system checks if that email belongs to an existing thread. Different behaviors of different email servers and email clients used by customers impact the parameters that are sent along with each inbound email.
To bypass those limitations, you can incorporate email threading by using these four parameters:
- Reference ID stored in the header of the email
- Reference ID stored in the email body
- Recipient list
- Email subject with prefixes such as “Re:”, “Fw:” and their localized version stripped
The system checks these parameters and if at least two are a match, the inbound email is considered as a continuation of an already existing thread.
Outbound emails
You can enrich outbound emails with placeholders and simple templating language. Every outbound email can use a template that is applied before the email is sent to the end user.
To access this feature, go to Conversations → Settings → Channels → Email.
Outbound email components
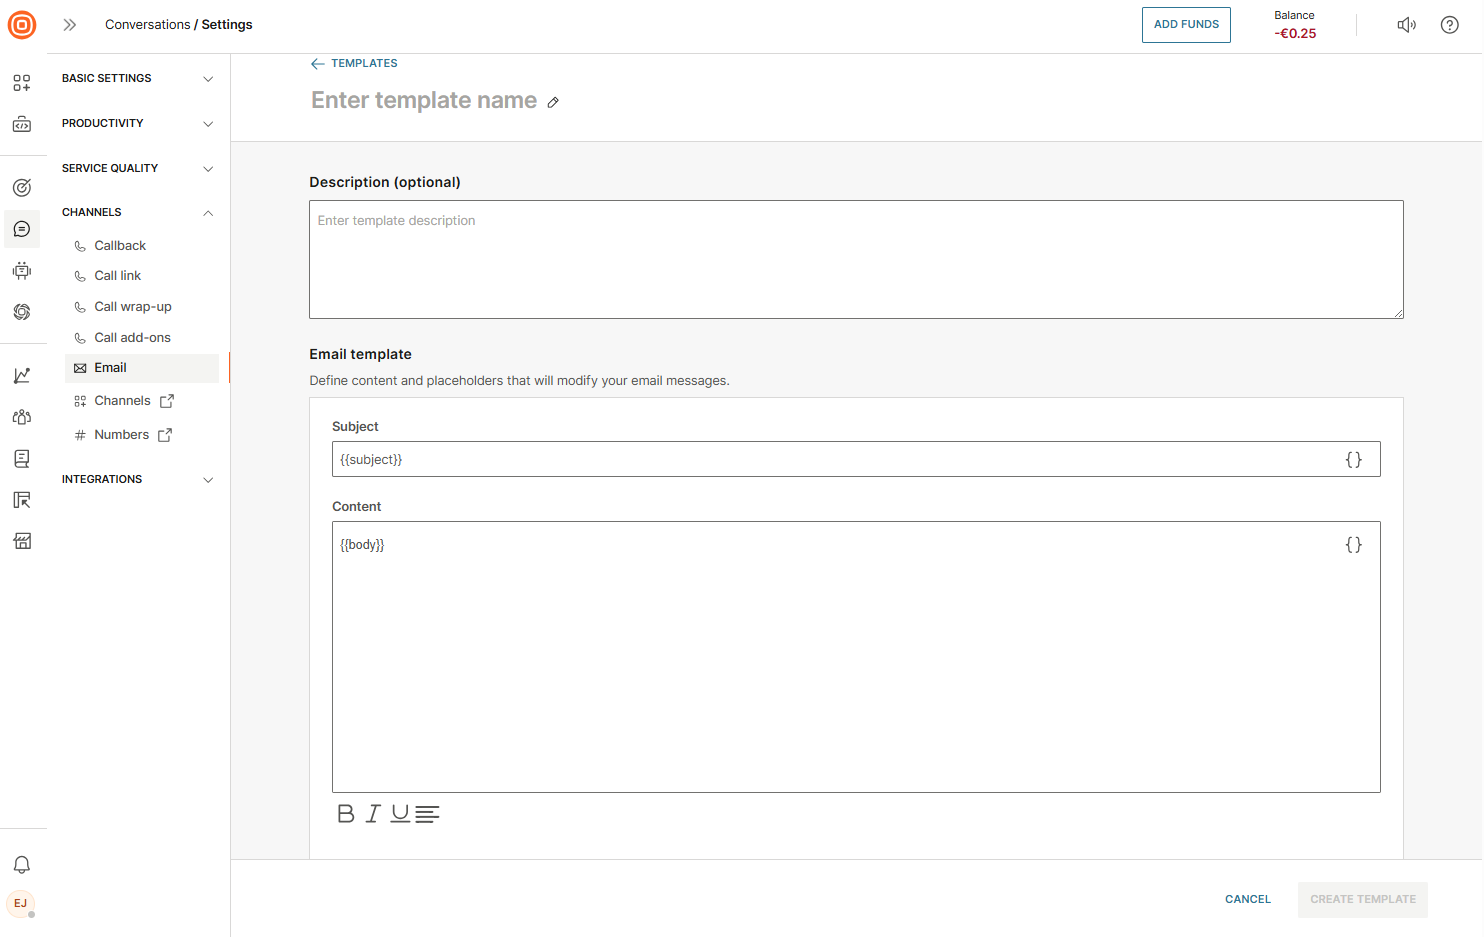
- Templates
- To create and manage multiple templates, go to Conversations → Settings → Channels → Email → Templates.
- Select Create email template.
- Each template requires a name (and optional description).
- Templates include a subject and content.
- Agents can edit these fields and insert placeholders from the standard placeholder picker used throughout Conversations.
- Common use case: defining an email signature that is automatically applied.
- Templates can be saved, edited, deleted, or searched in the template list.
- Conditions
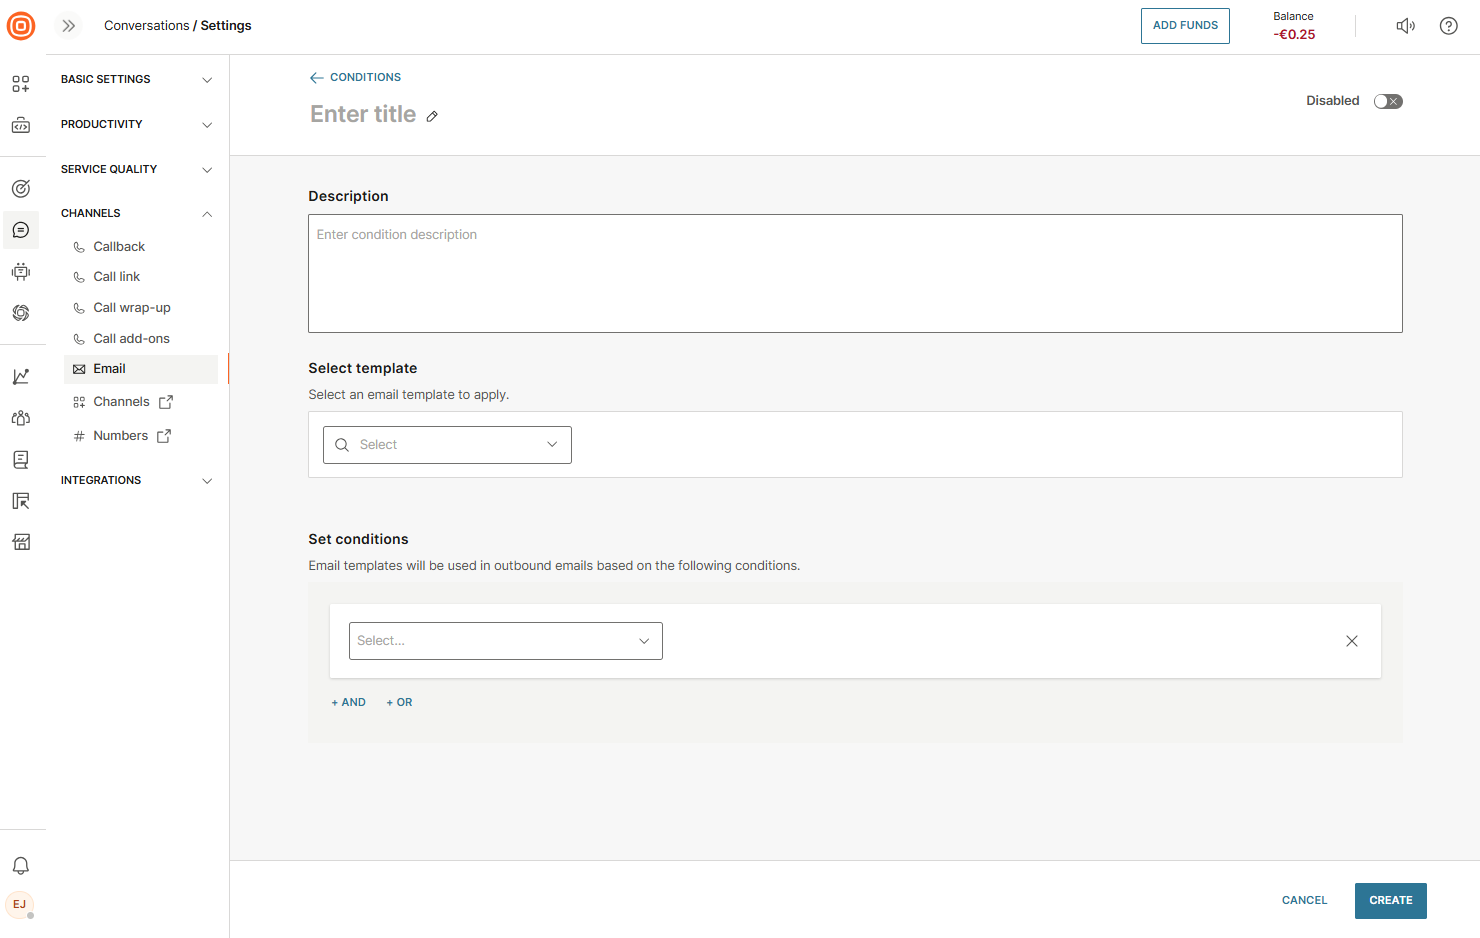
- To create and manage multiple conditions, go to Conversations → Settings → Channels → Email → Conditions.
- Select Create condition.
- Each condition includes a title, optional description, a linked template, and logical operators (AND/OR) for rule building.
- Conditions can be enabled or disabled using the toggle at the top right.
- Example: The Sender condition applies templates based on the sender email set in a specific queue. Any new emails added to that queue will automatically follow the same automation and routing logic.
- Created conditions appear in the conditions list, where they can be edited or deleted.
- Threading
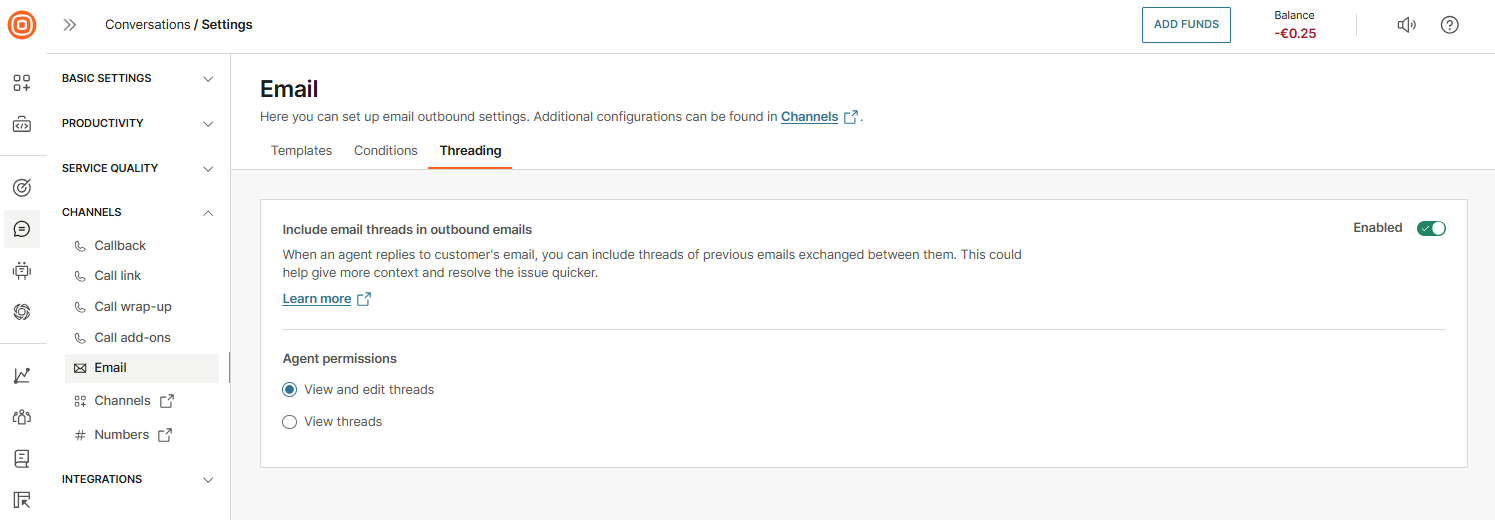
- To create and manage email threading, go to Conversations → Settings → Channels → Email → Conditions.
- When agents reply to a customer’s email, they can include previous messages in the thread for context. Agent permissions can be configured to:
- View and edit threads
- View threads
- Threading ensures transparency and continuity. Anyone added to the conversation later will see the full email history, helping resolve issues more efficiently.
Social media
You can use Infobip Social Media channels to resolve customer inquiries over some of the most popular social media sites, such as Facebook Posts and Instagram Posts.