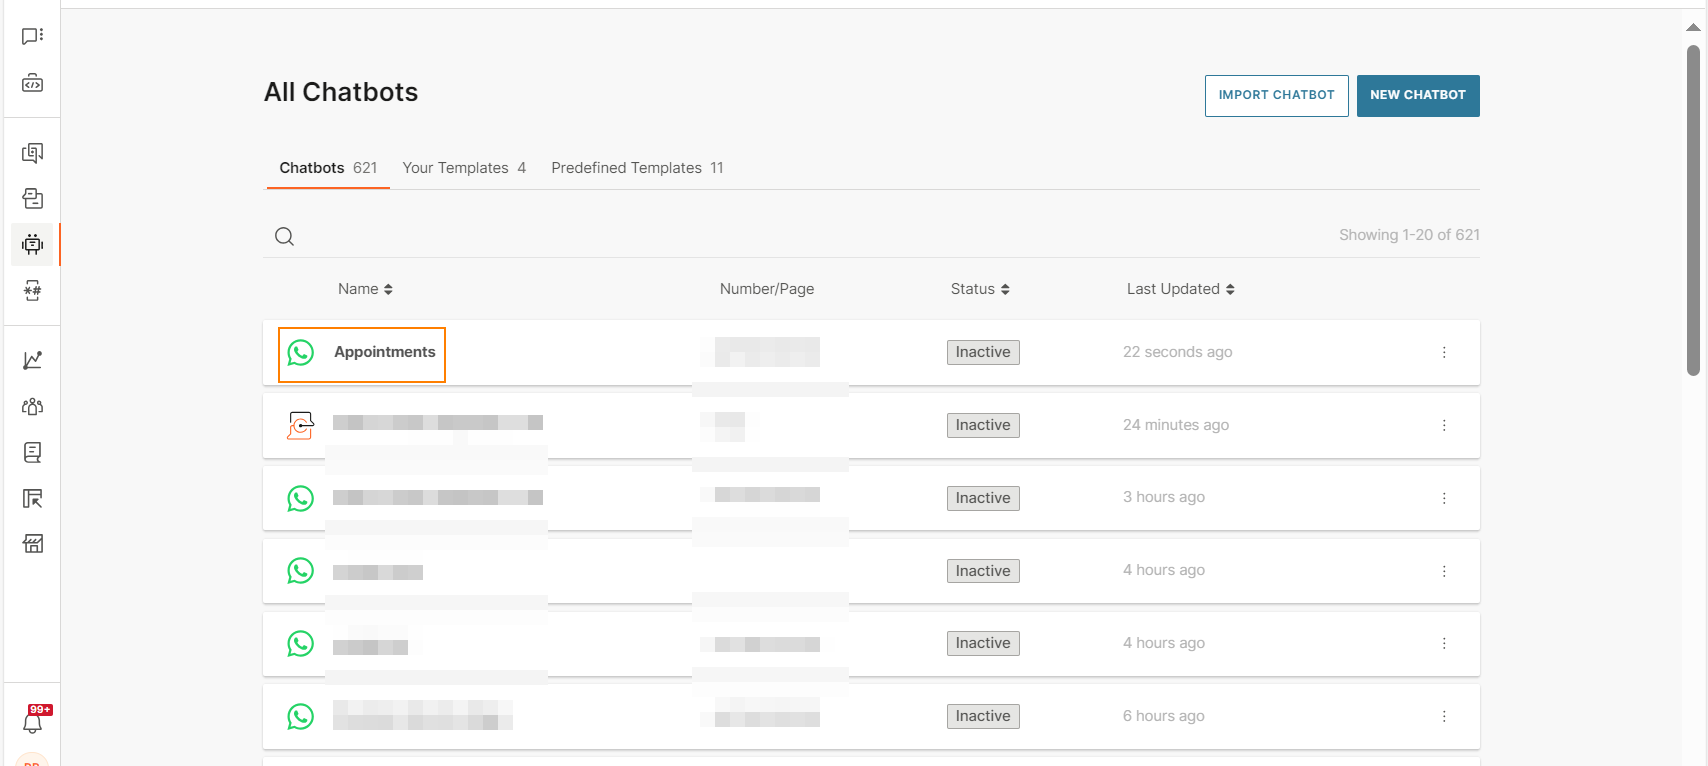
Create a chatbot from a template
A chatbot template is a preconfigured chatbot that you can use and customize to create a new chatbot. It uses example content, configuration, and integrations to simulate real-life chatbots. A template can consist either of an entire chatbot flow or can consist only of commonly-used dialogs.
Advantages of templates
- Consistency: Templates ensure consistency in chatbot design and messaging across all your chatbots. This leads to a consistent end user experience.
- Quality control: Use standardized, high-quality chatbot templates. This ensures that all chatbots that are built from these templates also have the same high quality.
- Knowledge sharing: Use templates that are built based on successful chatbot implementations. Other users in your organization can learn about chatbot design and use from these templates.
How to use chatbot templates
Use chatbot templates in the following ways:
- Use it as it is for testing and learning. You can activate the template immediately.
- Use it as a base to build a new chatbot. Instead of creating a chatbot from scratch, you can create a chatbot from a template. You can then customize the chatbot for your use case and requirements, and use it in a live environment.
- Use it as a base to build advanced chatbots to use in a live environment.
- Import it within an existing chatbot to add functionality to the chatbot.
For information about how to create a chatbot from a template, refer to the Create the Chatbot section.
Types of templates
- Predefined templates: These are templates that are created by Infobip.
- Custom templates. These are templates that you can create.
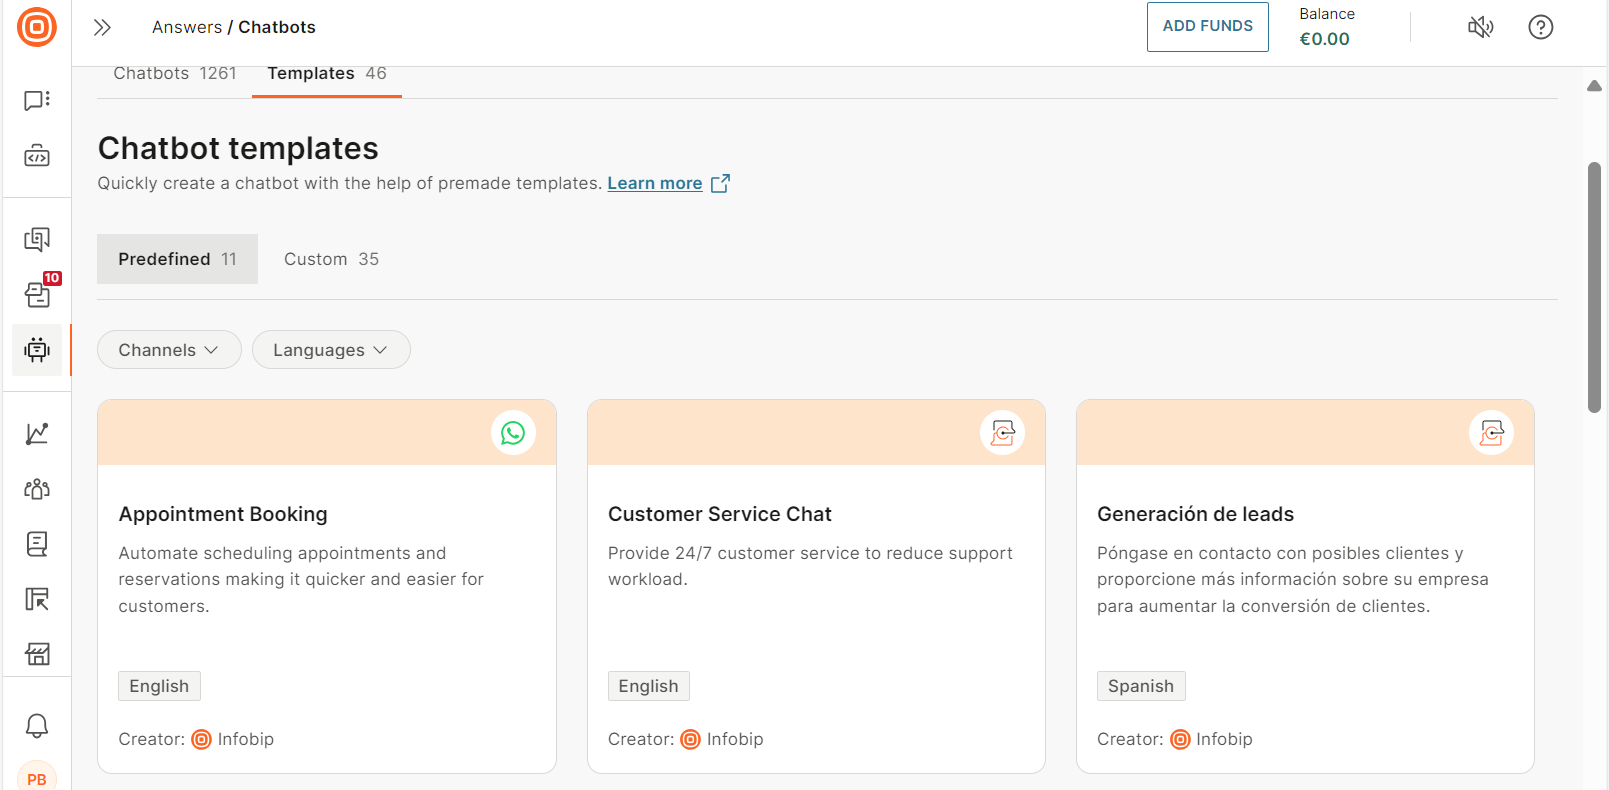
Predefined templates
Predefined templates are the templates that are created by Infobip and are available for use in your Infobip account.
Predefined templates are present in the Chatbots > Templates tab > Predefined tab.
You cannot create, edit, or delete predefined templates.
Available predefined templates
The table in this section shows a list of all the predefined templates that are available in Answers. In your Infobip account, only the predefined templates that are available for your Answers plan are listed.
Each predefined template is for a specific channel and language.
Template | Purpose | Sample use case | Channel | Language | Answers plan | Chatbot type | |
|---|---|---|---|---|---|---|---|
| Customer Service | Automate handling frequent customer inquiries. | Answer FAQs Resolve simple issues Share information about your company and services Collect end user's contact information Collect product inquiries | English Spanish Portuguese | Start | Rule-based | ||
| Live Chat | English | ||||||
| Advanced Customer Service | Automate handling frequent customer inquiries. | Enable end users to make reservations Connect with an agent to provide additional support Answer FAQs Resolve simple issues Collect end user's contact information Collect product inquiries | English | Grow | Rule-based Integrated | ||
| Lead generation | Contact potential customers and provide information about your company and services. | Present your products and services Collect end user's contact information Collect product inquiries | Live Chat | English Spanish Portuguese | Start | Rule-based | |
| Appointment Booking | Automate scheduling appointments and reservations. | Collect end users' interest in your product and services Enable end users to choose a preferred timeslot Send a confirmation for a reservation | English | Grow | Rule-based Integrated | ||
| Retail chatbot | Automate common product inquiries and provide information about your company and services. | Enable end users to order products Show product suggestions Enable end users to return products Answer FAQs Show order information and order history | English | Grow | Rule-based Integrated | ||
Custom templates
Create standardized, high-quality chatbot templates that meet your requirements, incorporate your organization's best practices and branding guidelines, and comply with your organization's policies. Example: You can create a template that contains frequently used chatbot building blocks, messages, dialogues, and dialog groups.
Custom templates are available only within your organization. So, any sensitive data or proprietary chatbot building blocks within these templates are secure.
Custom templates are present in the Chatbots > Templates tab > Custom tab.
Templates dashboard
To view templates, in the Infobip web interface (opens in a new tab), go to Answers > Chatbots > Templates tab.
Each template is for a specific channel and language.
You can do the following:
- View a list of predefined and custom templates in the Predefined and Custom tabs. In the Predefined tab, only the templates that are available for your Answers plan are listed.
- Filter templates by language, channel, industry, and template creator.
- Search for a template by either its name or its description. Use the search box.
- View information about the template.
- (Predefined templates only) Simulate the conversation in the template.
- Create a chatbot from a template.
- Delete a template.
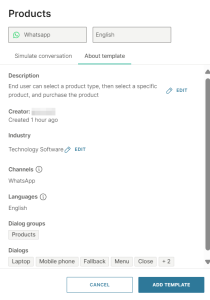
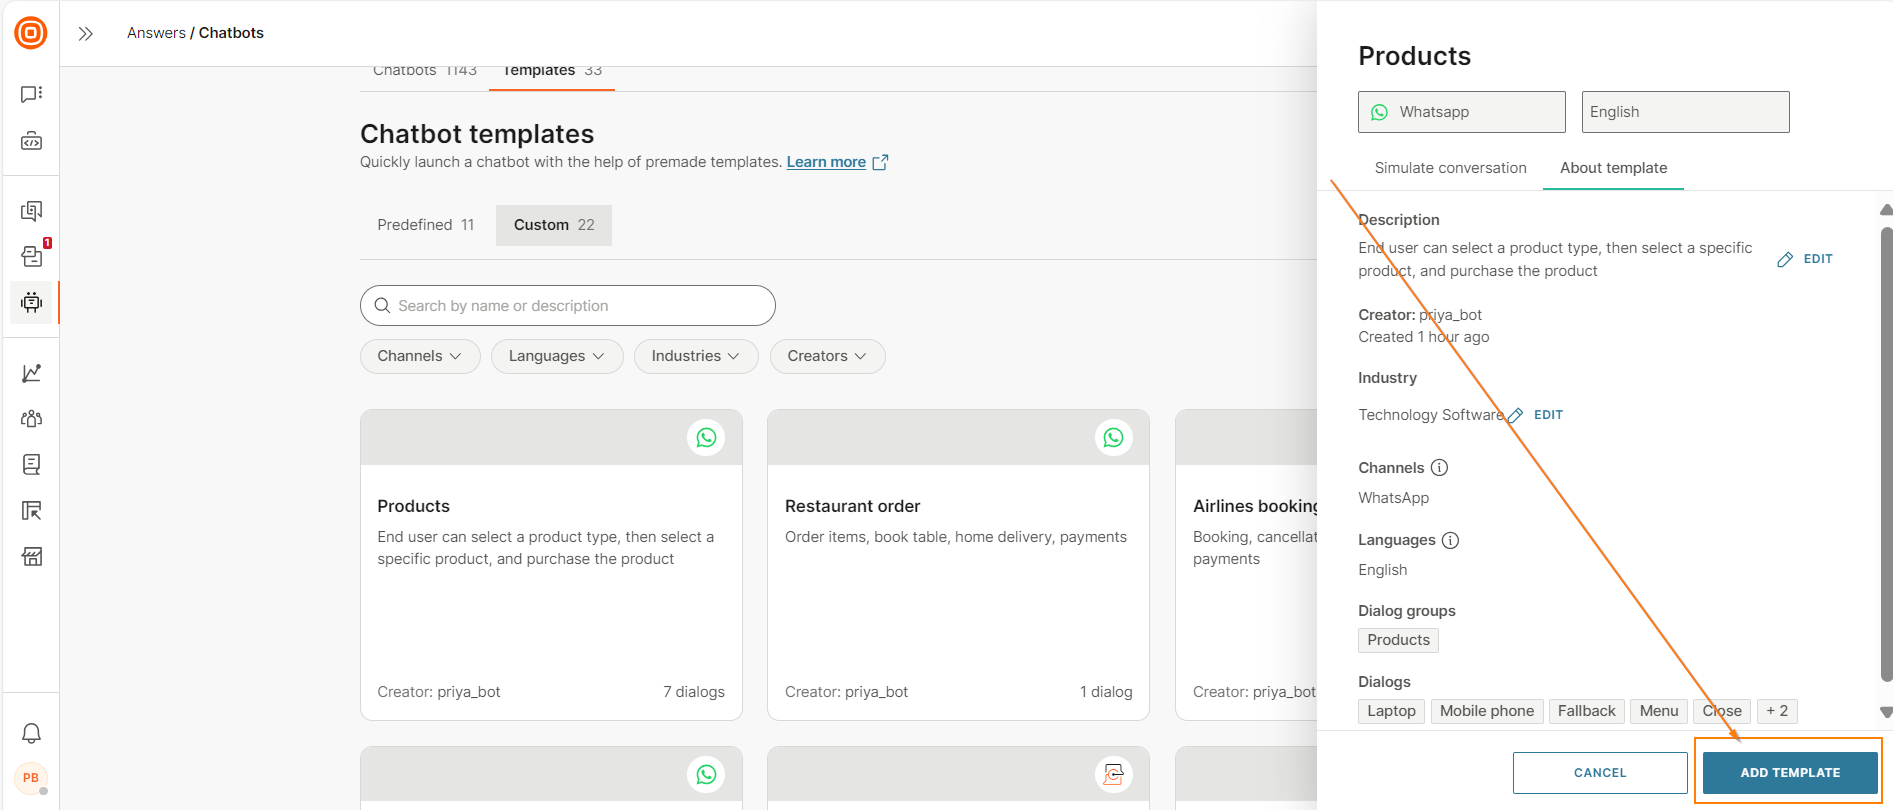
View information about a template
View details about the templates to identify the one that is suitable for your use case.
Do the following.
- On the Infobip web interface (opens in a new tab), go to Answers > Chatbots > Templates tab.
- Go to either the Predefined or Custom tab as required.
- Hover over a template and select Preview.
- Go to the About template tab.
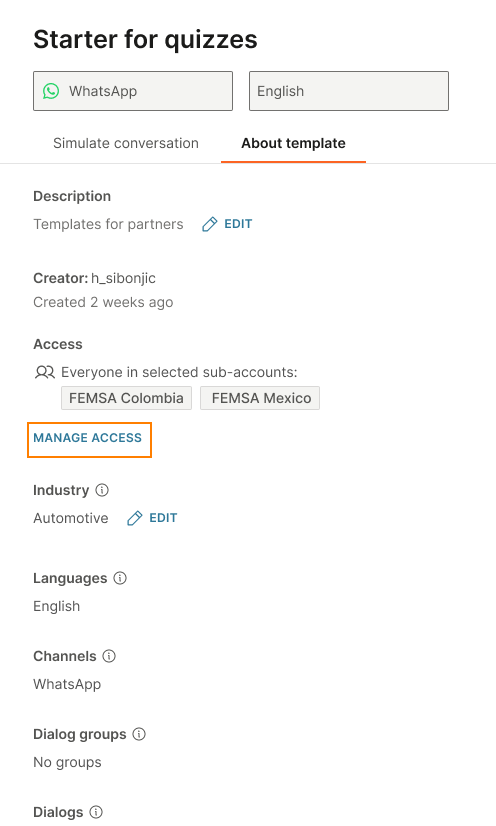
You can view the following information.
- Description of the template
- (Predefined templates only) Use cases
- Creator
- Industry
- Languages
- Channels
- Dialog groups in the template
- Dialogs in the template
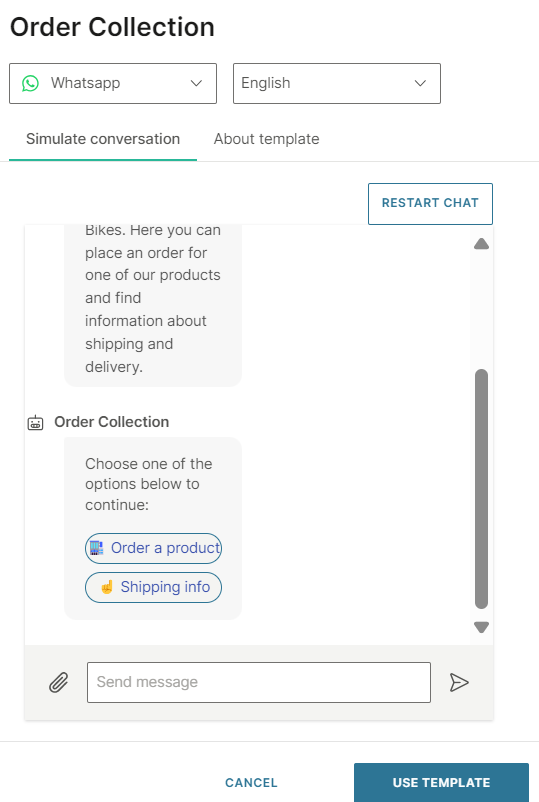
Simulate the conversation in a predefined template
You can simulate the conversation only for predefined templates.
Simulate the conversation in a predefined template to see whether it is suitable for your requirements.
Do the following.
- On the Infobip web interface (opens in a new tab), go to Answers > Chatbots > Templates tab > Predefined tab.
- Hover over a template and select Preview.
- Go to the Simulate conversation tab.
- Select Start the chat.
You can interact with the chatbot to understand the flow and features.
Create a custom template
You can create a template in the following ways.
- Save the entire chatbot as a custom template.
- Create a custom template from selected dialogs or dialog groups in a chatbot.
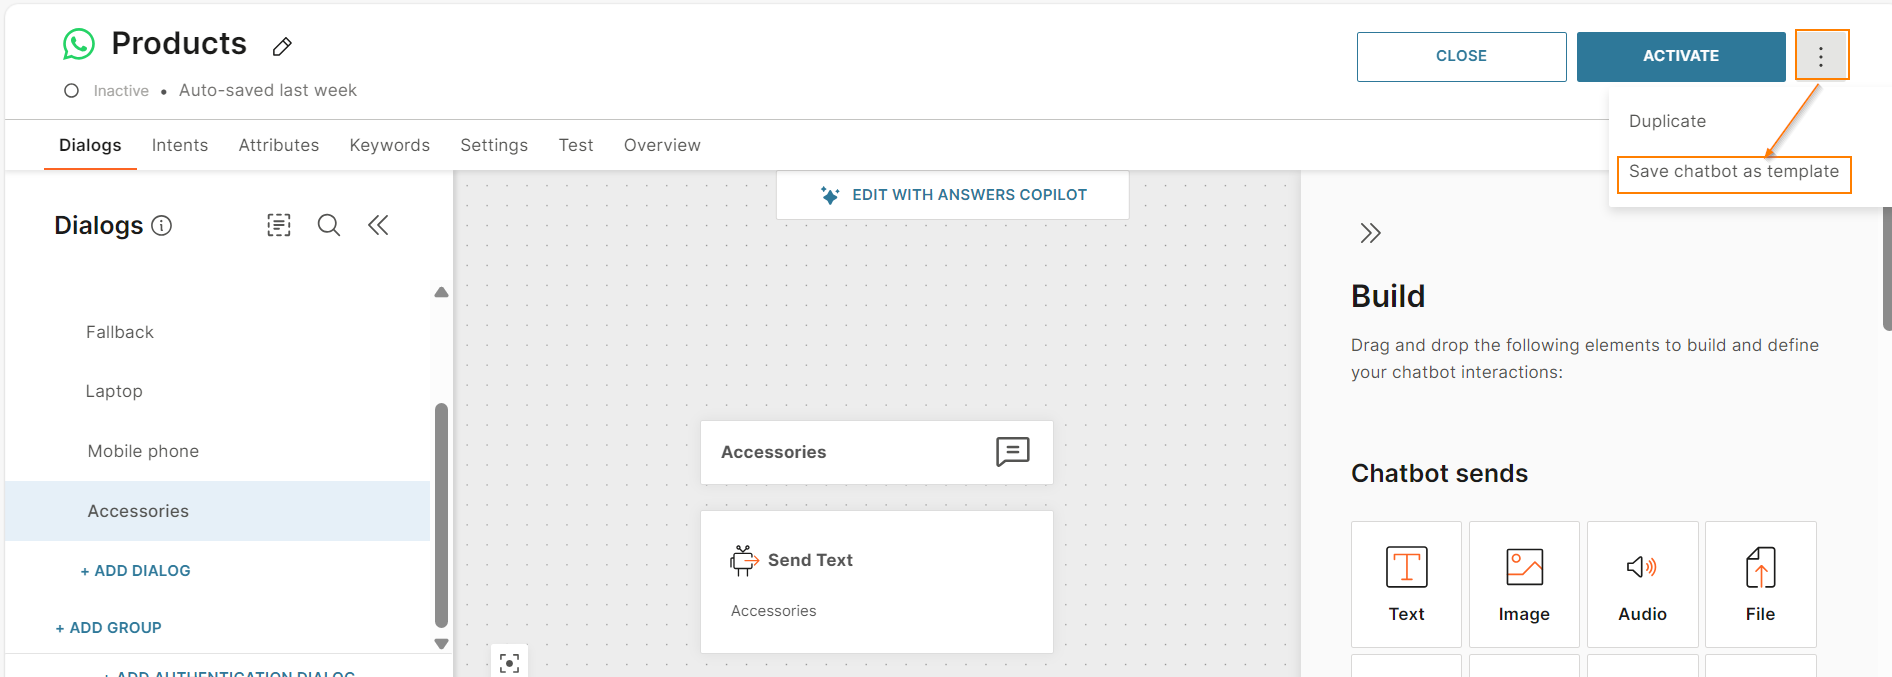
Save a chatbot as a custom template
This section explains how to save the entire chatbot as a template.
The chatbot can be in any state.
- It can be active or inactive.
- It can be functional or non-functional. Example: The chatbot design might be incomplete.
What is included in the template
The template contains the following building blocks from the source chatbot.
-
All dialogs and dialog groups, which includes the chatbot elements in the dialogs
-
The following are included if they are used in the dialogs. Any chatbot building blocks that are not used are not added to the template. Example: If you create an attribute but do not use it in a dialog, the attribute is not included in the template.
- Intents
- Keywords and synonyms
- Attributes
- NER attributes and custom data types
-
Chatbot settings
Create the template
Do the following:
-
In the chatbot, select the three dots at the right and select Save chatbot as template.
-
In the Create template screen, complete the following fields.
- Name your template: Enter a name for the template. Follow these guidelines.
- The name must not contain any special characters.
- The name must not begin with a number.
- (Optional) Specify a unique name so that you can identify the template.
- Describe template (Optional): Add a description to help other users identify the most relevant template for their use. You can add a maximum of 500 characters.
- Industry (Optional): Select an industry.
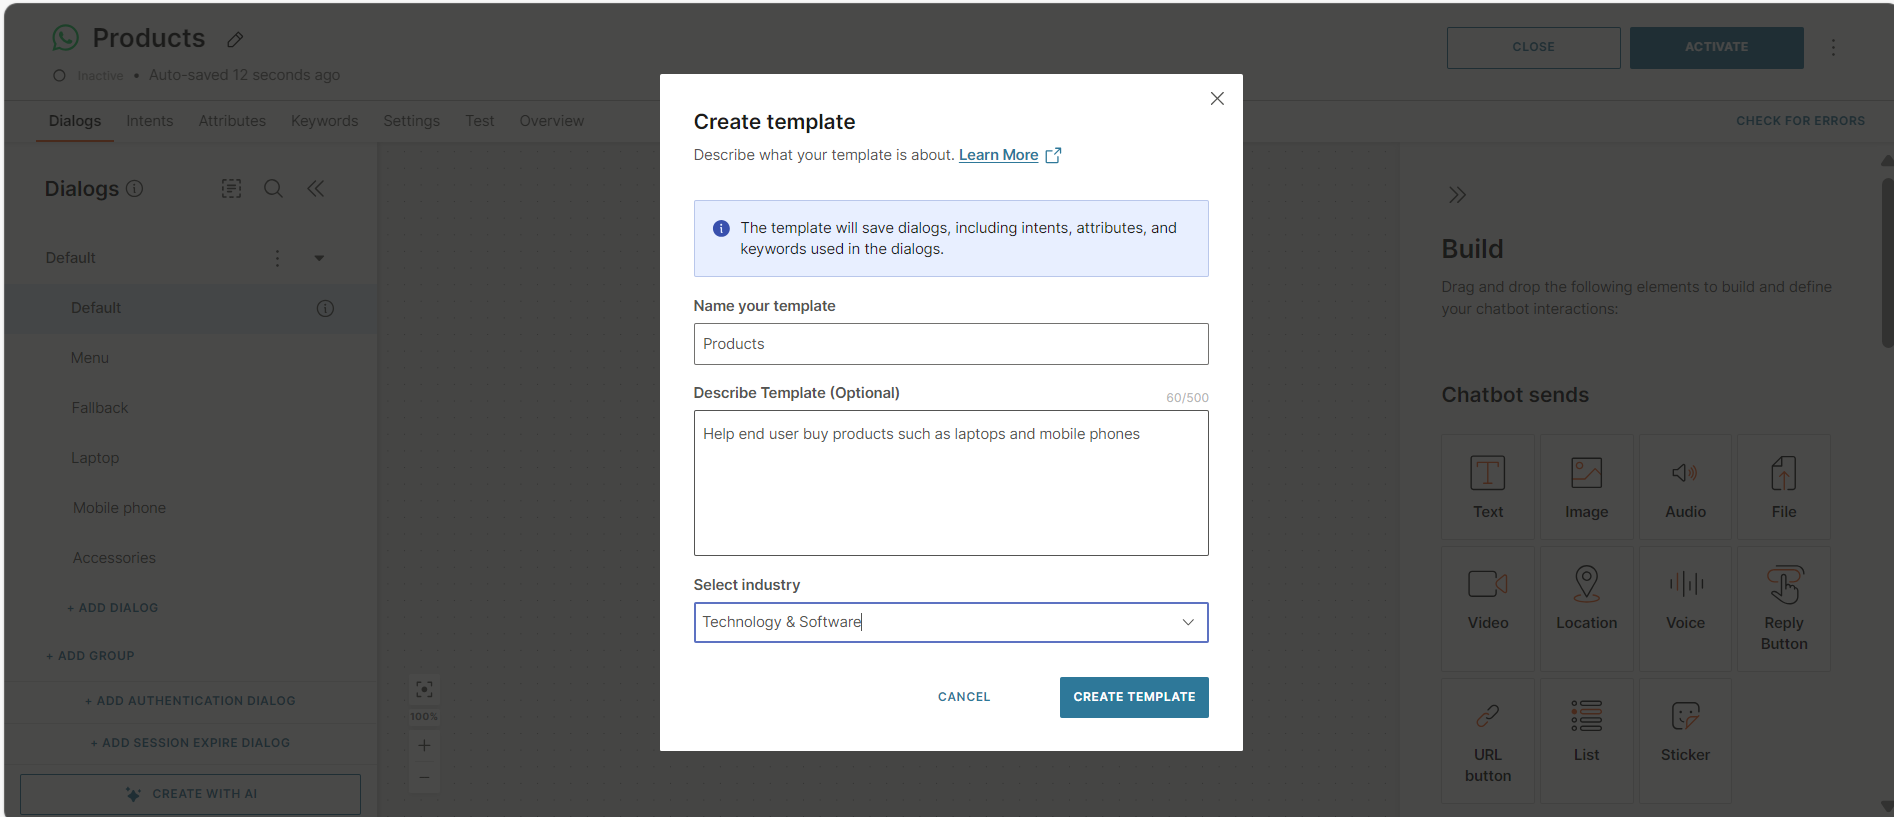
- Name your template: Enter a name for the template. Follow these guidelines.
-
Select Create template.
The chatbot is saved as a template.
Create a custom template from sections of a chatbot
You can create a template from specific dialogs and dialog groups in your chatbot.
What is included in the template
The template contains the following chatbot building blocks from the source chatbot.
- The dialogs and dialog groups that you select
- The following are included if they are used in the selected dialogs. Any chatbot building blocks that are not used in these dialogs are not added to the template.
- Intents
- Keywords and synonyms
- Attributes
- NER attributes and custom data types
- Chatbot settings
Create the template
Do the following:
-
In your chatbot, select the dialogs and dialog groups that you want to add to the new template. To select all dialogs and dialog groups, use Select all.
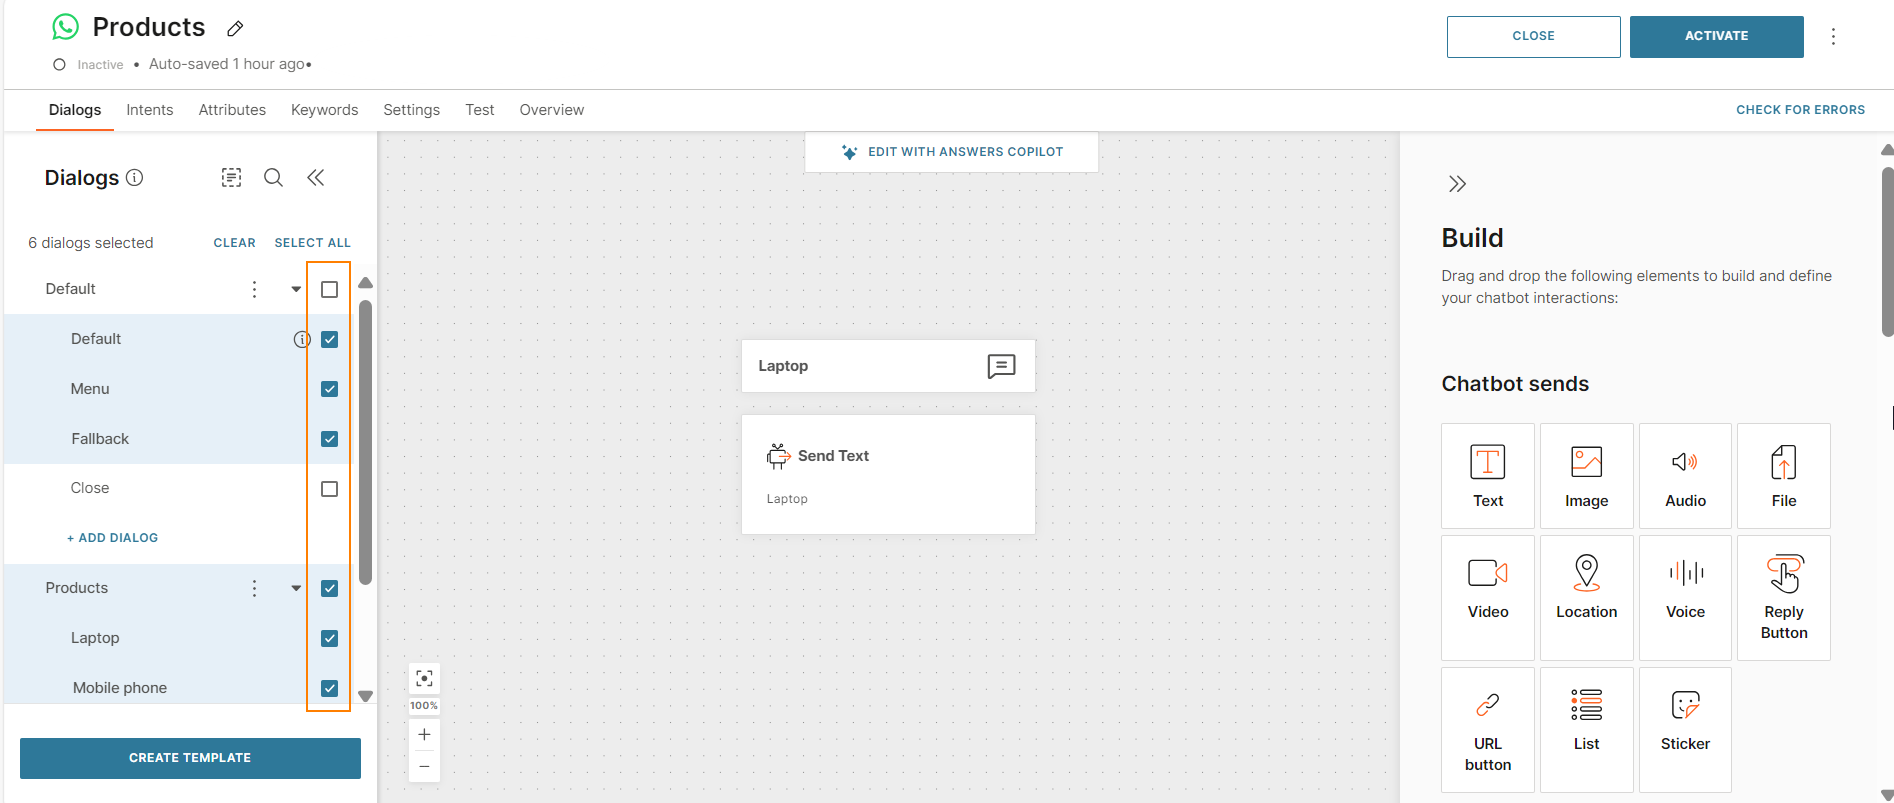
-
Select Create template.
-
In the Create template screen, complete the following fields.
- Name your template: Enter a name for the template. Follow these guidelines.
- The name must not contain any special characters.
- The name must not begin with a number.
- (Optional) Specify a unique name so that you can identify the template.
- Describe template (Optional): Add a description to help other users identify the most relevant template for their use. You can add a maximum of 500 characters.
- Industry (Optional): Select an industry.
You can view the list of the dialogs and dialog groups that will be added to the template.
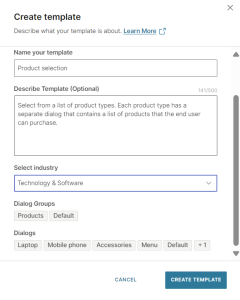
- Name your template: Enter a name for the template. Follow these guidelines.
-
Select Create template.
The selected dialogs and dialog groups from the chatbot are saved as a template.
Create a new chatbot from a template
Create a new chatbot that is a duplicate of a template. You can then customize the new chatbot to meet your requirements.
The new chatbot uses the same channel as the template.
To create a new chatbot from a template, you must have the associated channel enabled in your account. If you do not have the channel enabled, you can only preview the template and simulate the conversation. You cannot create a chatbot from the template. To enable a channel, view the instructions in the documentation for that channel.
What is included in the chatbot
The new chatbot contains the following from the template.
- Dialogs and dialog groups, which include the chatbot elements.
- Intents
- Keywords and synonyms
- Attributes
- NER attributes and custom data types
- Chatbot settings
Create the chatbot
- On the Infobip web interface (opens in a new tab), go to Answers > Chatbots > Templates tab.
- Go to either the Predefined or Custom tab as required.
- Do one of the following.
- Hover over the template that you need and select Add.

- Hover over the template that you need and select Preview > Add template.
- Hover over the template that you need and select Add.
- Select the required channel and language.
- Select Add template.
A new chatbot, which is a duplicate of the template, is created.
Next steps
- In the new chatbot, make the changes that are required for your use case. Refer to the Guidelines and best practices and Customize the Chatbot sections.
- In the Settings tab, update the sender if required.
- In the Test tab, test the chatbot.
- To use the chatbot in a live environment, select Activate.
Import a template into an existing chatbot
Use this section when you want to import a template into an existing chatbot.
You can import only custom templates into a chatbot.
You can import only templates that use the same channel as the chatbot. Example: In a WhatsApp chatbot, you can import only WhatsApp templates.
What is imported
The following are imported from the template.
- Dialogs and dialog groups, which include the chatbot elements. The default dialog from the template is imported as a regular dialog into the chatbot.
- Intents
- Attributes
- NER attributes and custom data types
- Keywords and synonyms
- Chatbot settings
The imported chatbot building blocks have the template name as the suffix. This suffix helps you identify which building blocks are from your chatbot and which ones are from the template.
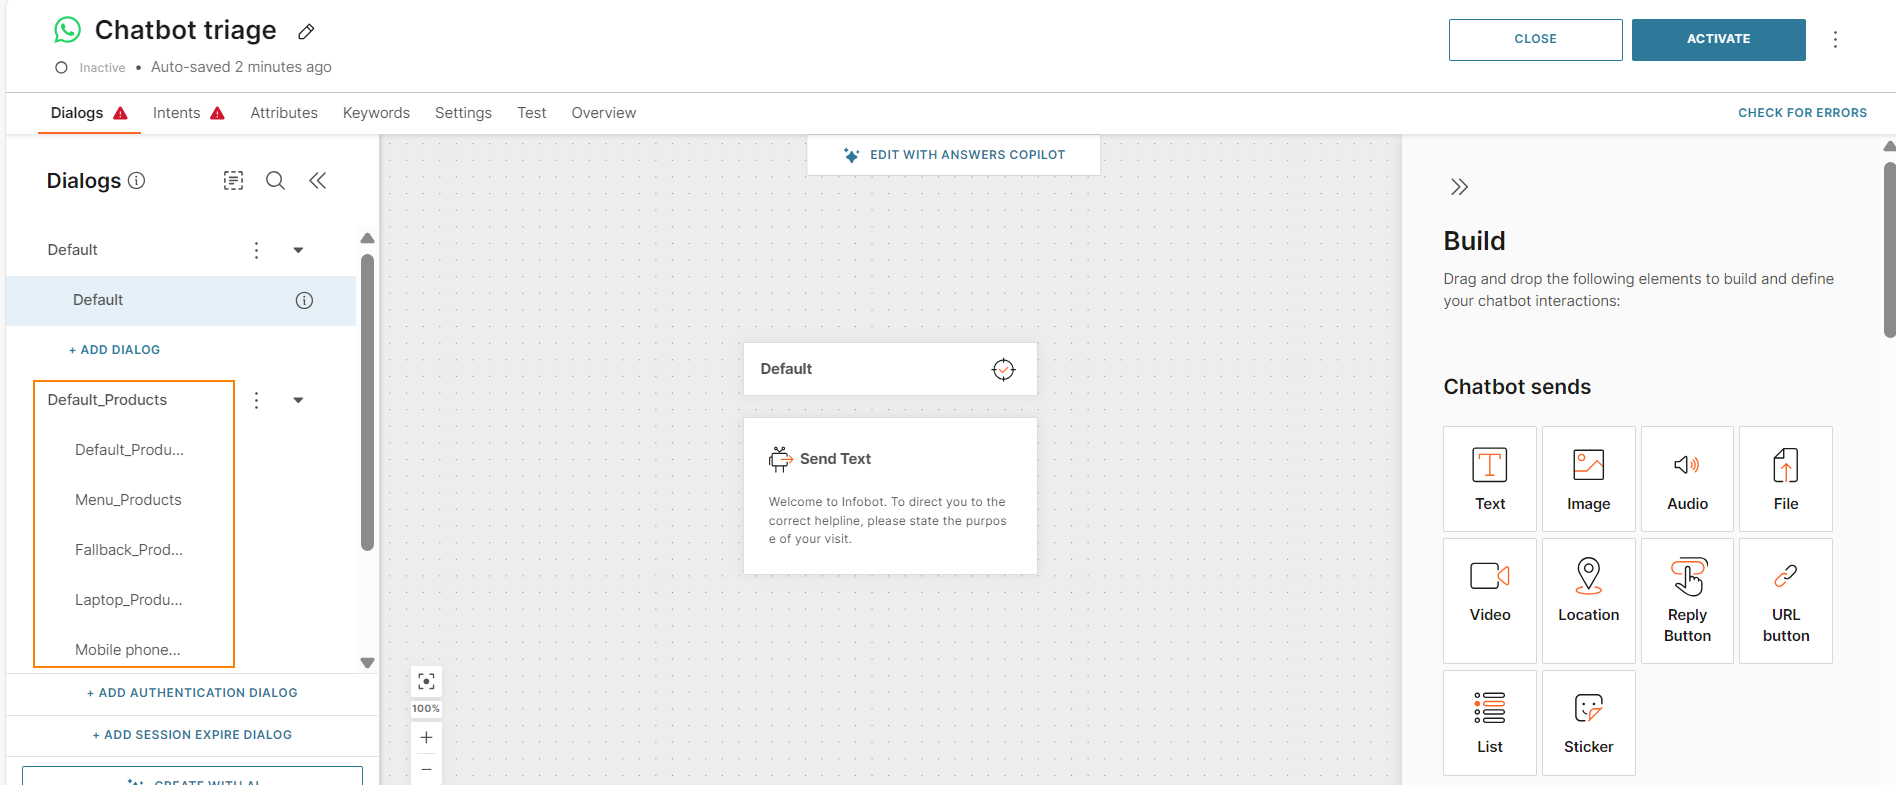
Example: When you import the Products template into the Chatbot triage chatbot, the imported dialogs have the _Products suffix.
Import the template
-
In your chatbot, select the Add from library icon.
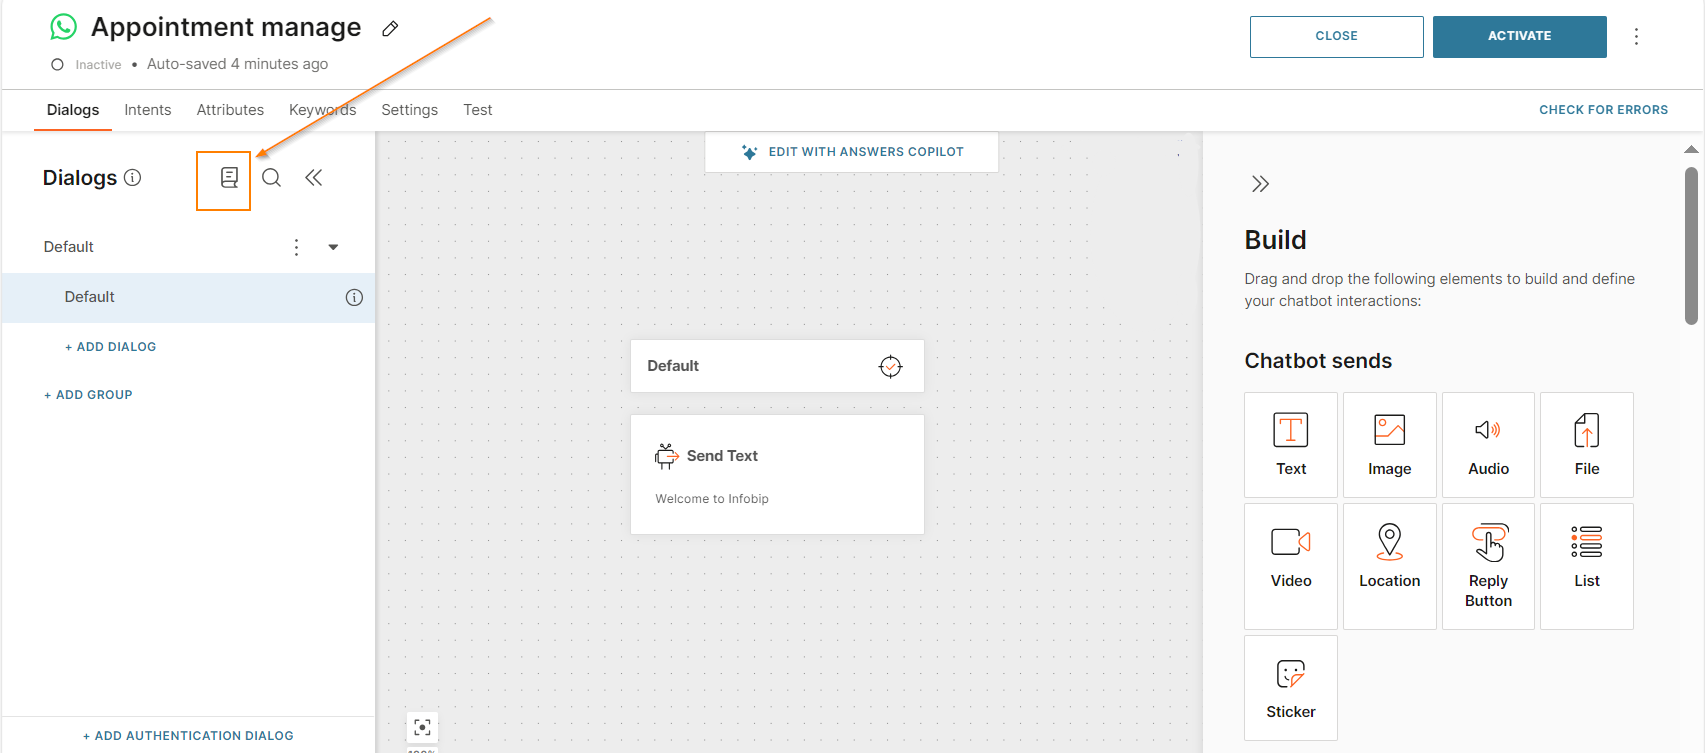
-
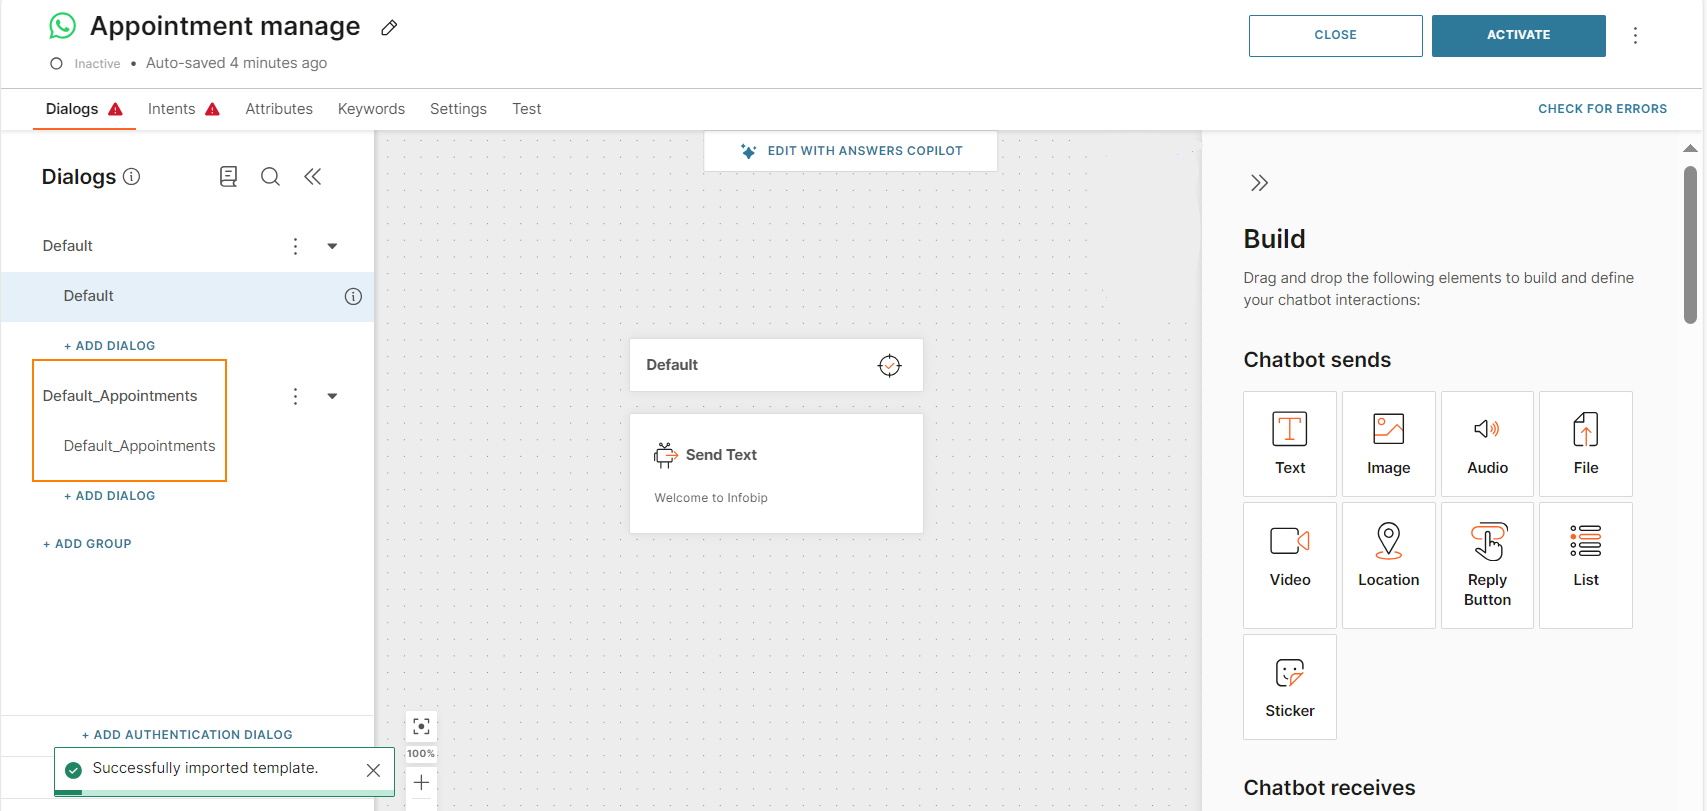
Hover over the template that you want to add and select Add.
All dialogs from the template are added to your chatbot as a new dialog group.
-
Continue to configure the chatbot.
Next steps
- For the imported chatbot building blocks, make the changes that are required for your use case. Refer to the Guidelines and best practices and Customize the Chatbot sections.
- Rename the imported dialogs if required.
- If the imported default intent does not have any training phrases, do one of the following.
- Add training phrases to the intent.
- Delete the intent.
- In the Settings tab, update the sender if required.
- In the Test tab, test the chatbot.
- To use the chatbot in a live environment, select Activate.
Customize the Chatbot
Templates contain sample content, configuration, and integration. If you want to create a chatbot from a template and use it in a live environment, you must customize the sample content in the chatbot and use content that is required for your use case.
This section shows some common ways in which you can customize a chatbot.
The customization examples in this section are only for reference. When you create a chatbot from a template, you will need to make changes that are suitable for your use case.
You do not need to make all of the changes that are suggested in this section.
This section does not show a complete list of the changes that you can make to the chatbot. Depending on your use case, you will need to make additional changes.
In this section, we will customize the Advanced Customer Service template to create a chatbot for Infobip users.
After we create a chatbot from a template, we will do the following:
Rename the Chatbot
When you create a chatbot from a template, the name of the new chatbot is similar to the name of the template.
Rename the chatbot such that it reflects your use case and business.
In this example, we will rename Duplicate of Advanced Customer Service toCustomer Service - Infobip.
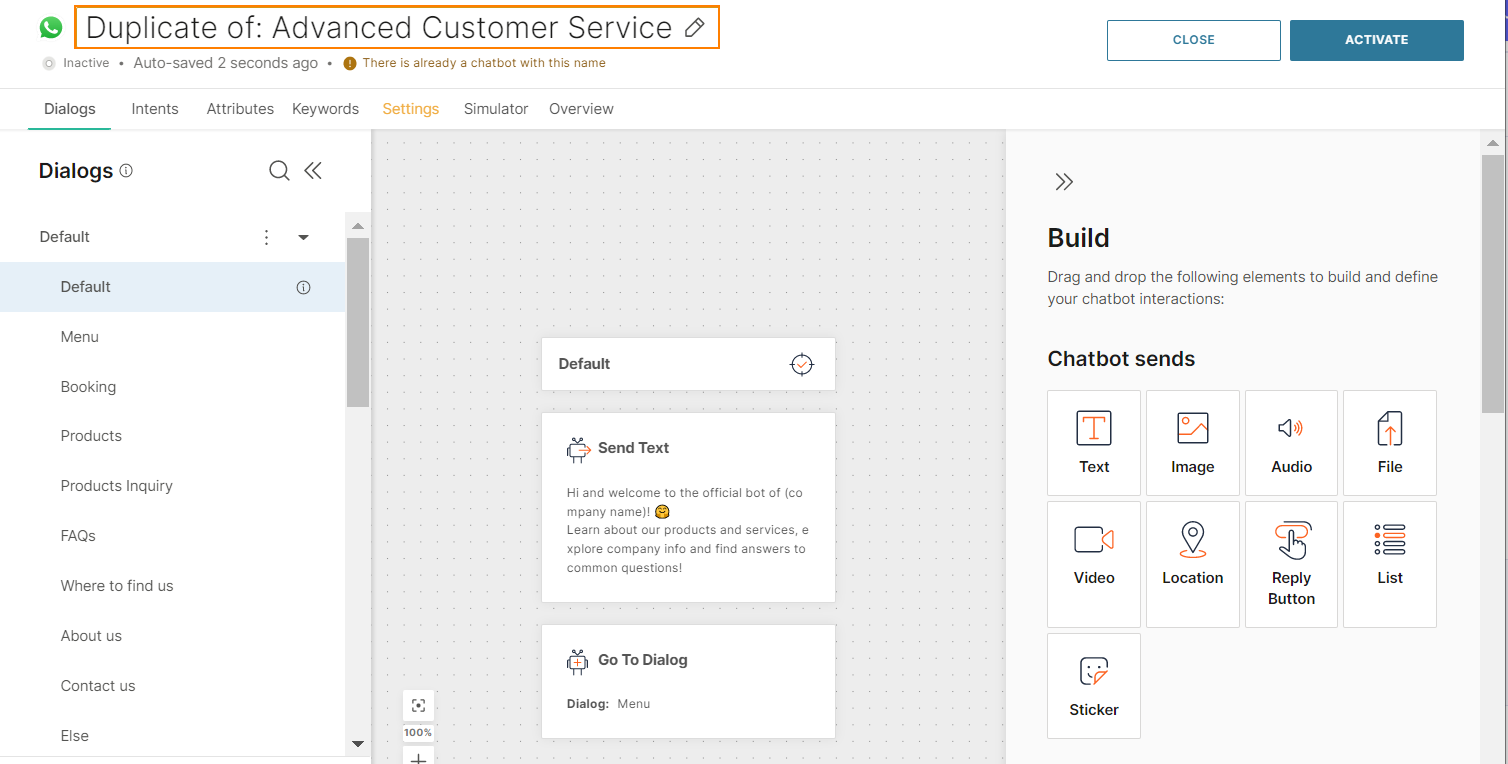

Modify Text Content
In the template, the elements contain sample text. Change the text to suit your use case, business, and communication style.
Example:
- In the Default dialog > Text element, update the welcome message to represent your business.
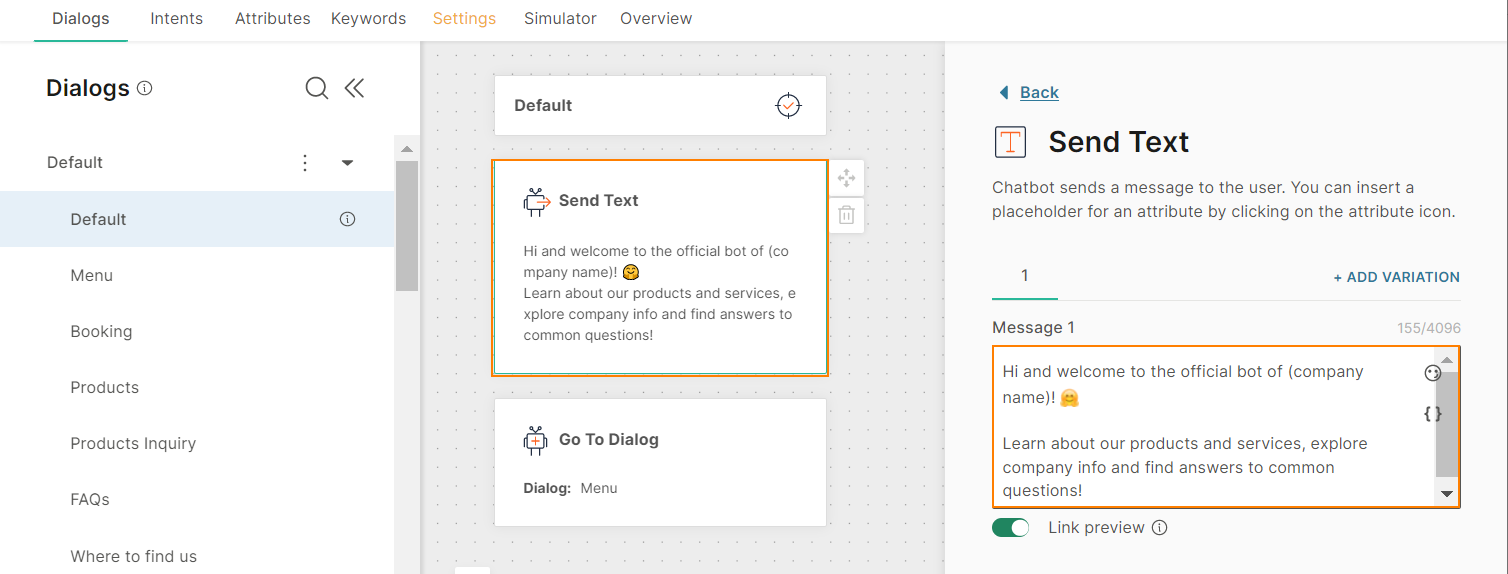

- In the Menu dialog > List element, update the text to match the communication style of your business.

- In other dialogs, add information that is relevant to your use case. Example: Update the Text element in the FAQs.

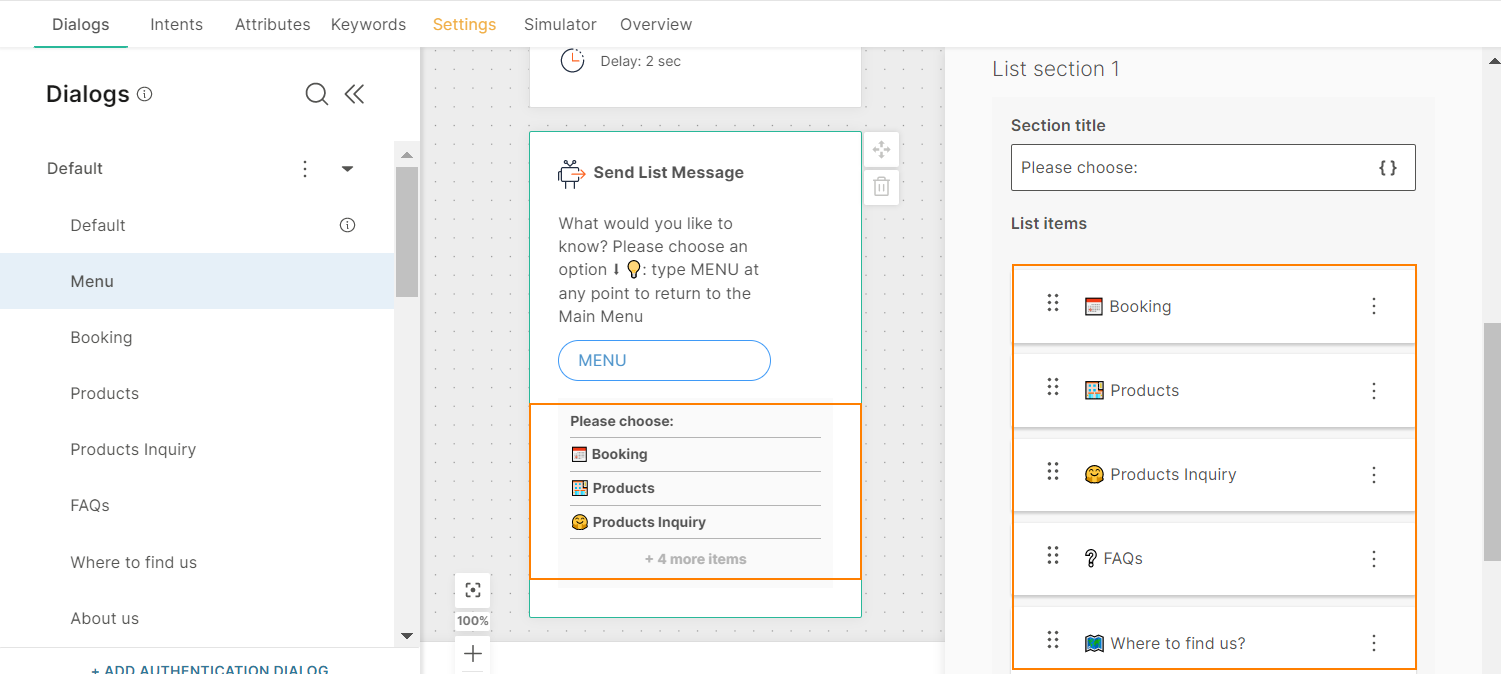
Update Menu Items
Menus in the templates contain sample menu items. Update these menus to meet your use case.
In this example, we will change the menu item 'Products' to 'SaaS Products'.
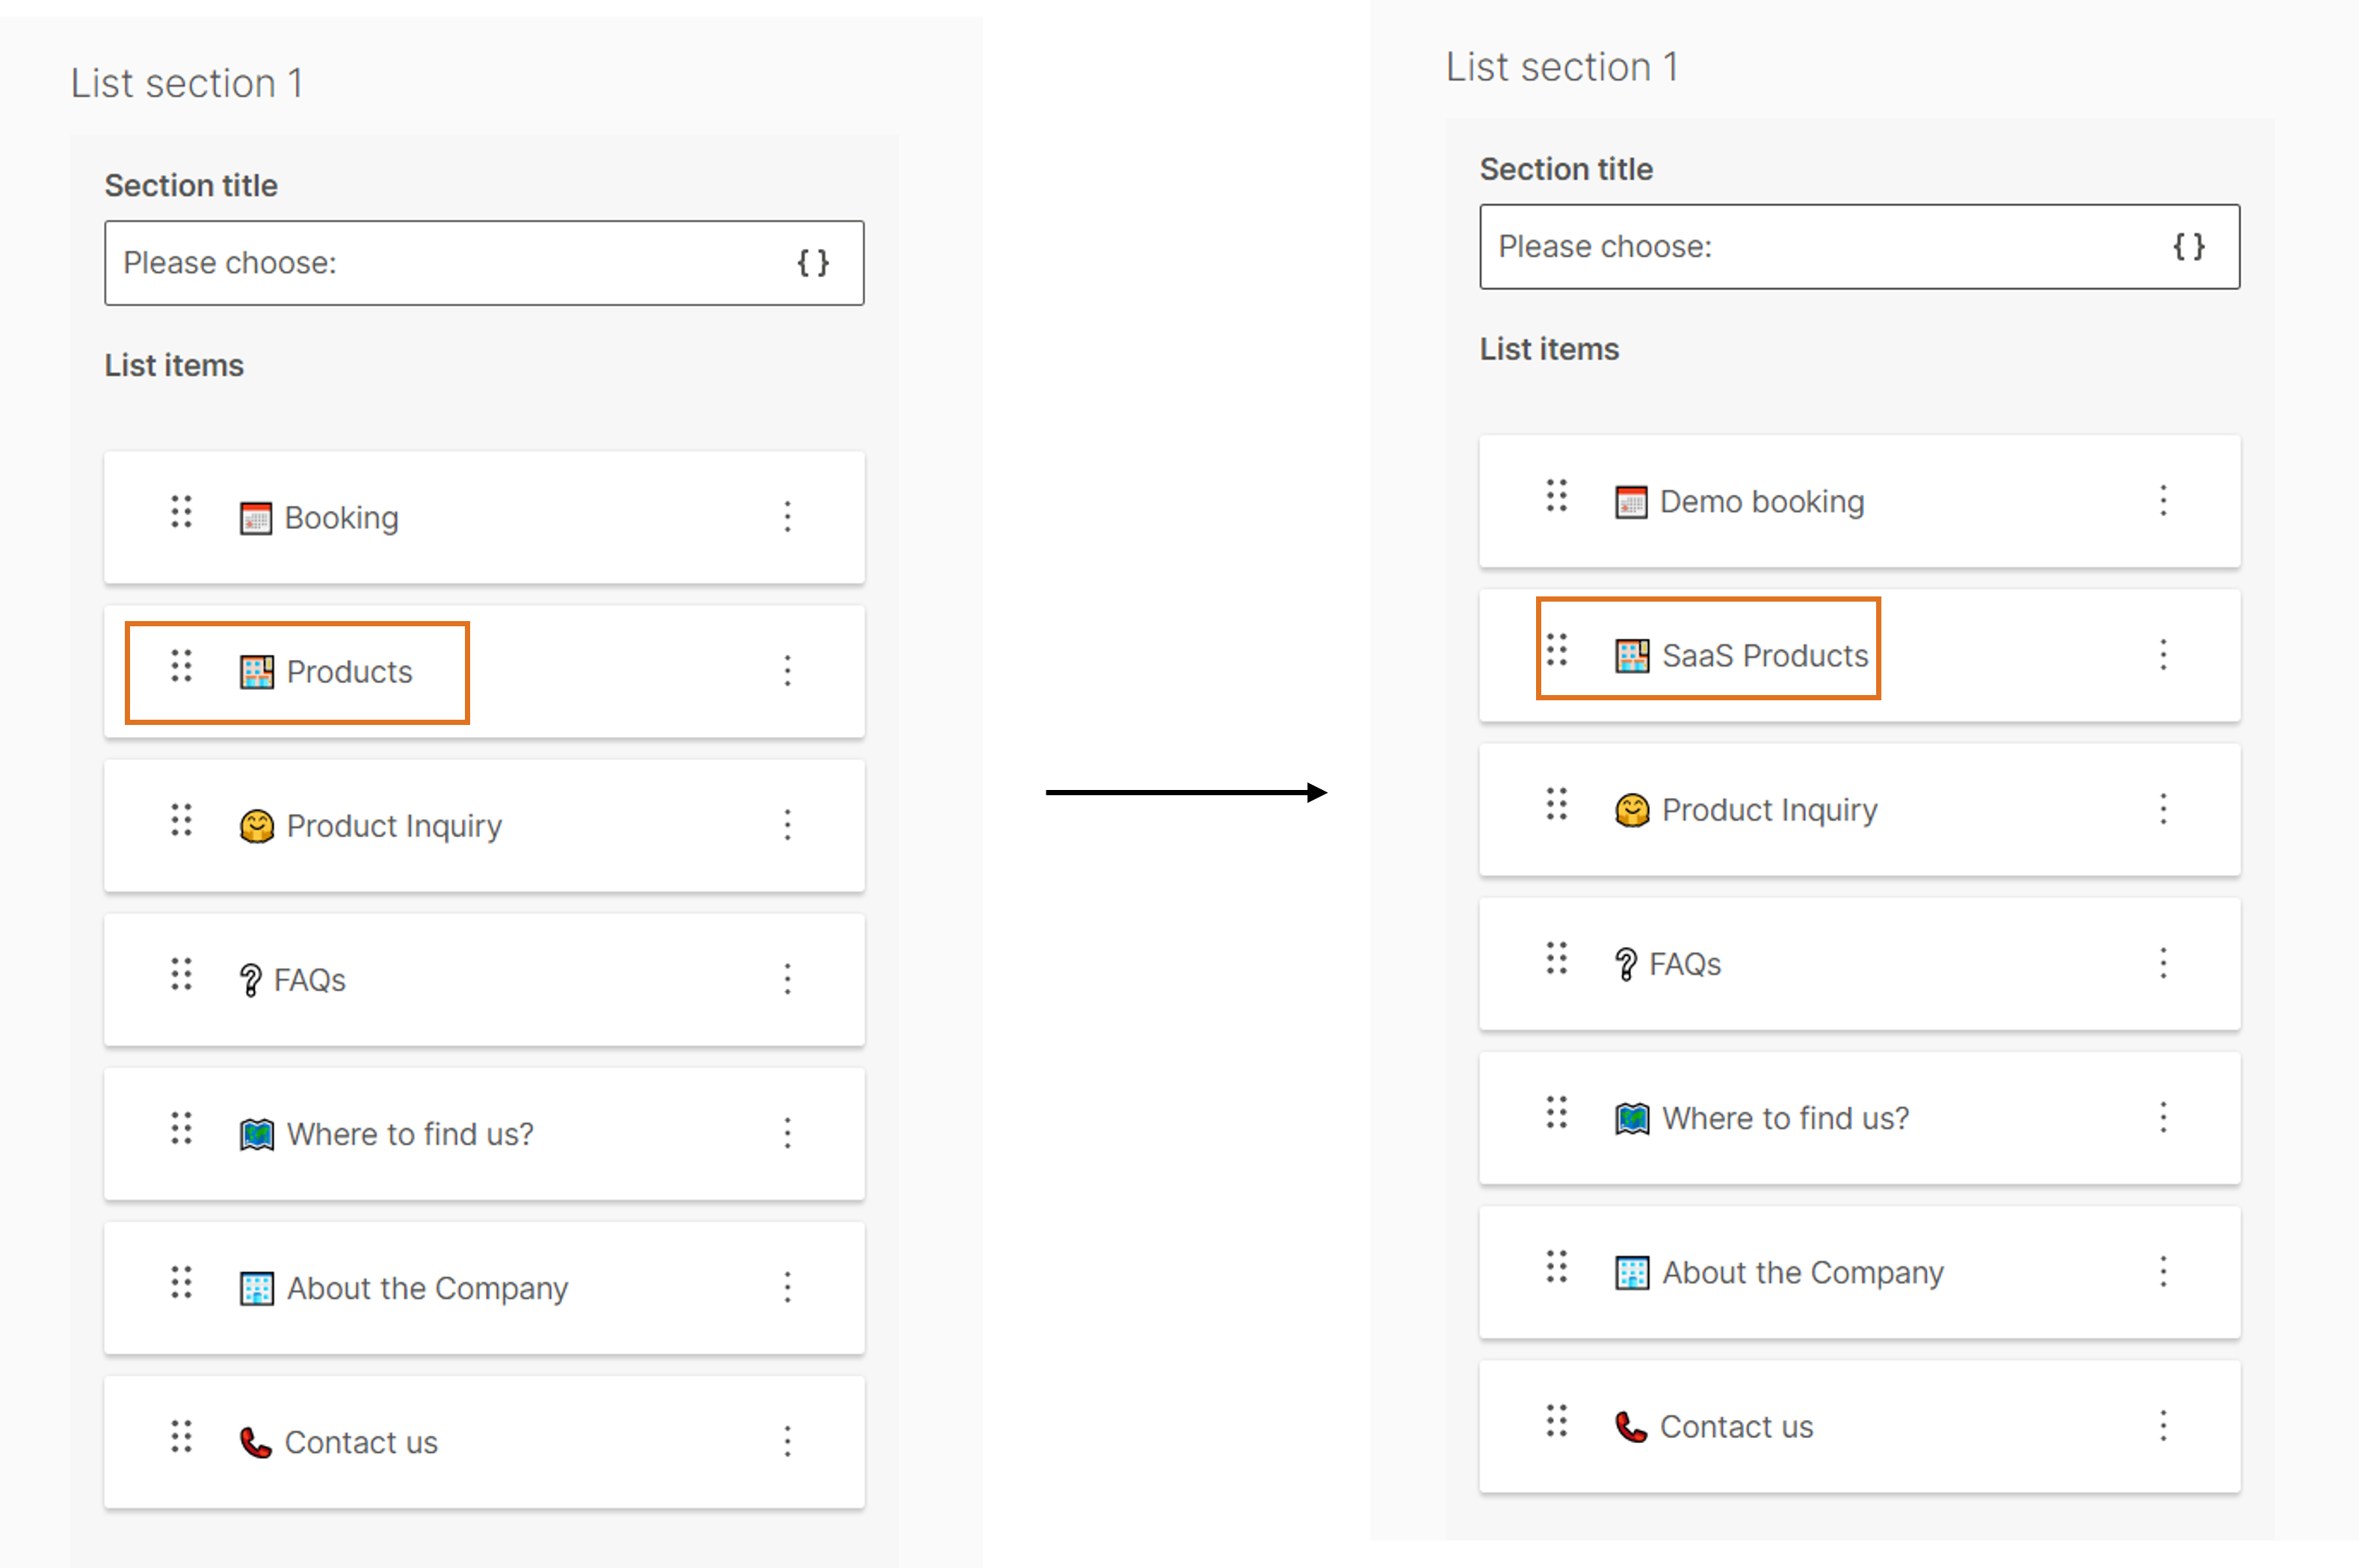
If you add or modify an element, you need to add or modify other associated elements, if applicable.
Test all changes in the simulator. You can also test an activated chatbot over a live channel.
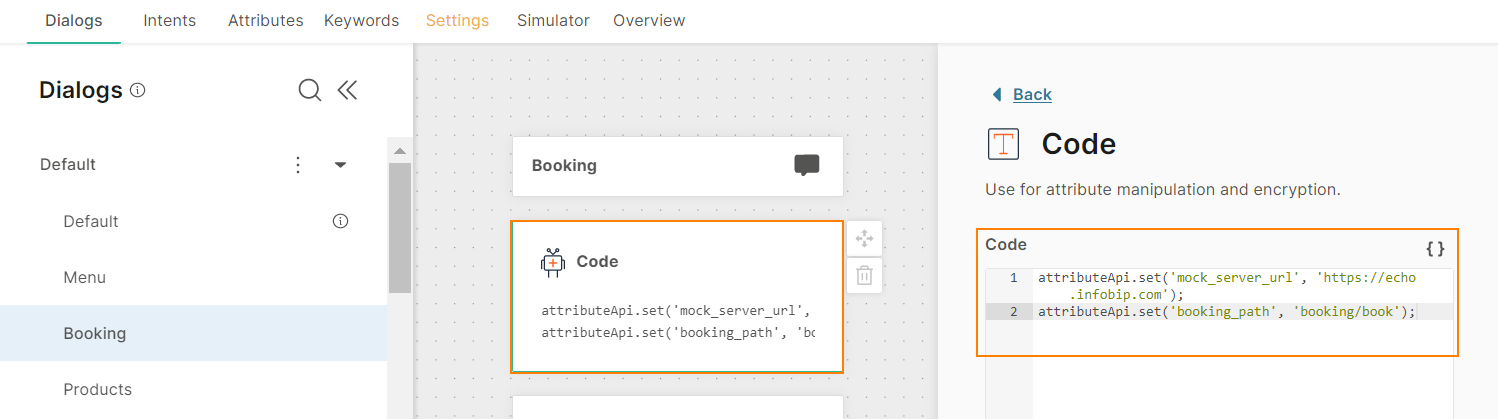
Modify Configuration for Call API
In this example, we will update the API element to connect to a third-party service.
The changes in this example are only for reference and are not for a live connection. You must customize the API element to meet the requirements of your use case and the API to which you want to connect.
Attributes that manage input and output information are important because they transfer information to and from the third-party system. So, configure all relevant attributes correctly.
APIs need specific inputs and produce specific outputs. So, most of the configuration, data preparation, and data manipulation is done in Code elements.
In the template and in this example, we use placeholders {{placeholder}} in API elements. If you do not want to use placeholders, you can directly enter your API URL, variables, and other data that you need for API configuration.
In the Booking dialog, we do the following.
Configure the Request
- In this example, we will create a new attribute 'base_url' in the Attributes tab, and delete the 'mock_server_url' attribute. We create this new attribute only as an example of the changes that you can make. You do not necessarily need to create new attributes and can use the ones in the template instead.
- In the first Code element, change the base URL and path. Also, because we created a new attribute, we need to update the attribute name as well.

- In the API element > Request tab, you can configure the following items.
- Method
- URL
- Content type
- Request headers
- Request body
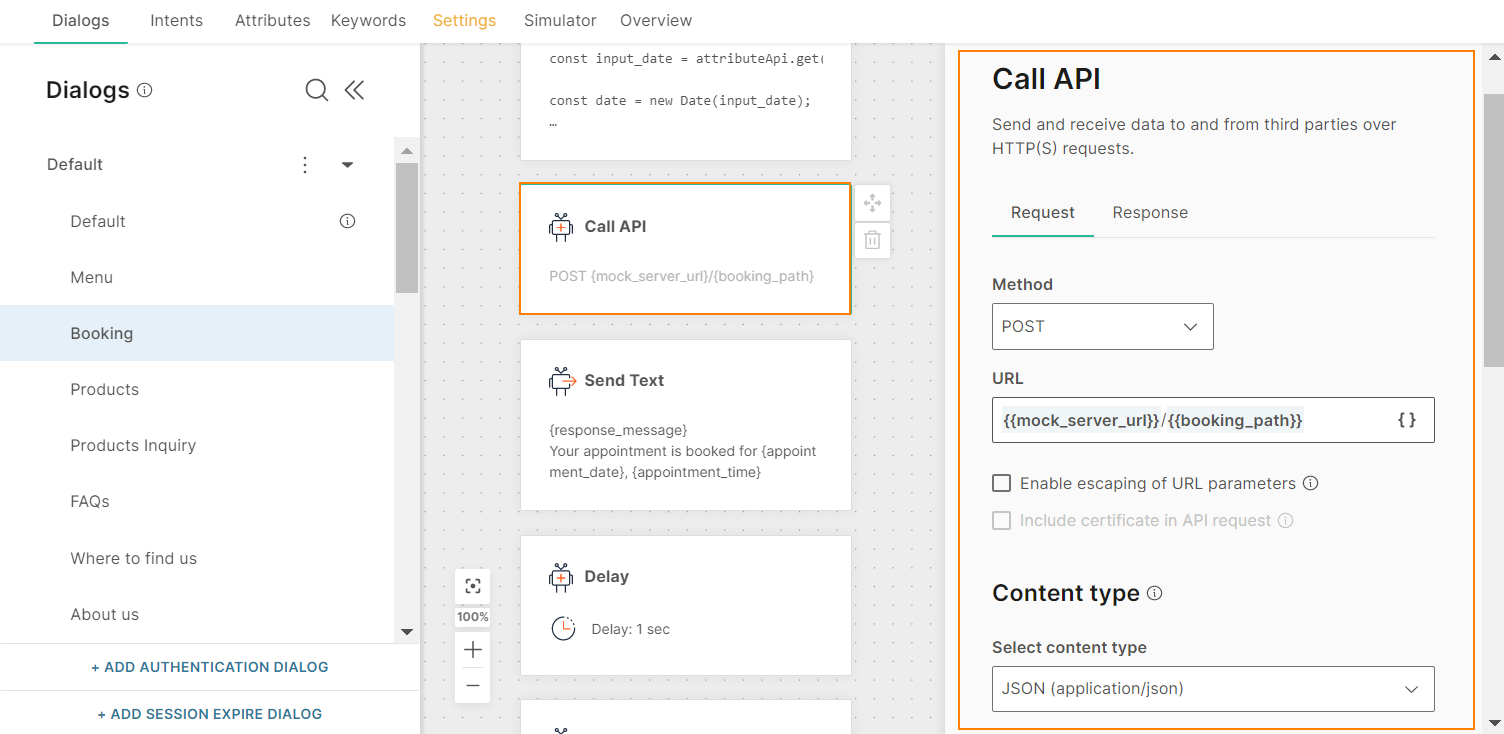
In this example, we will make the following changes:
- In the URL field, change 'mock_server_url' to 'base_url' by using the placeholder {}.

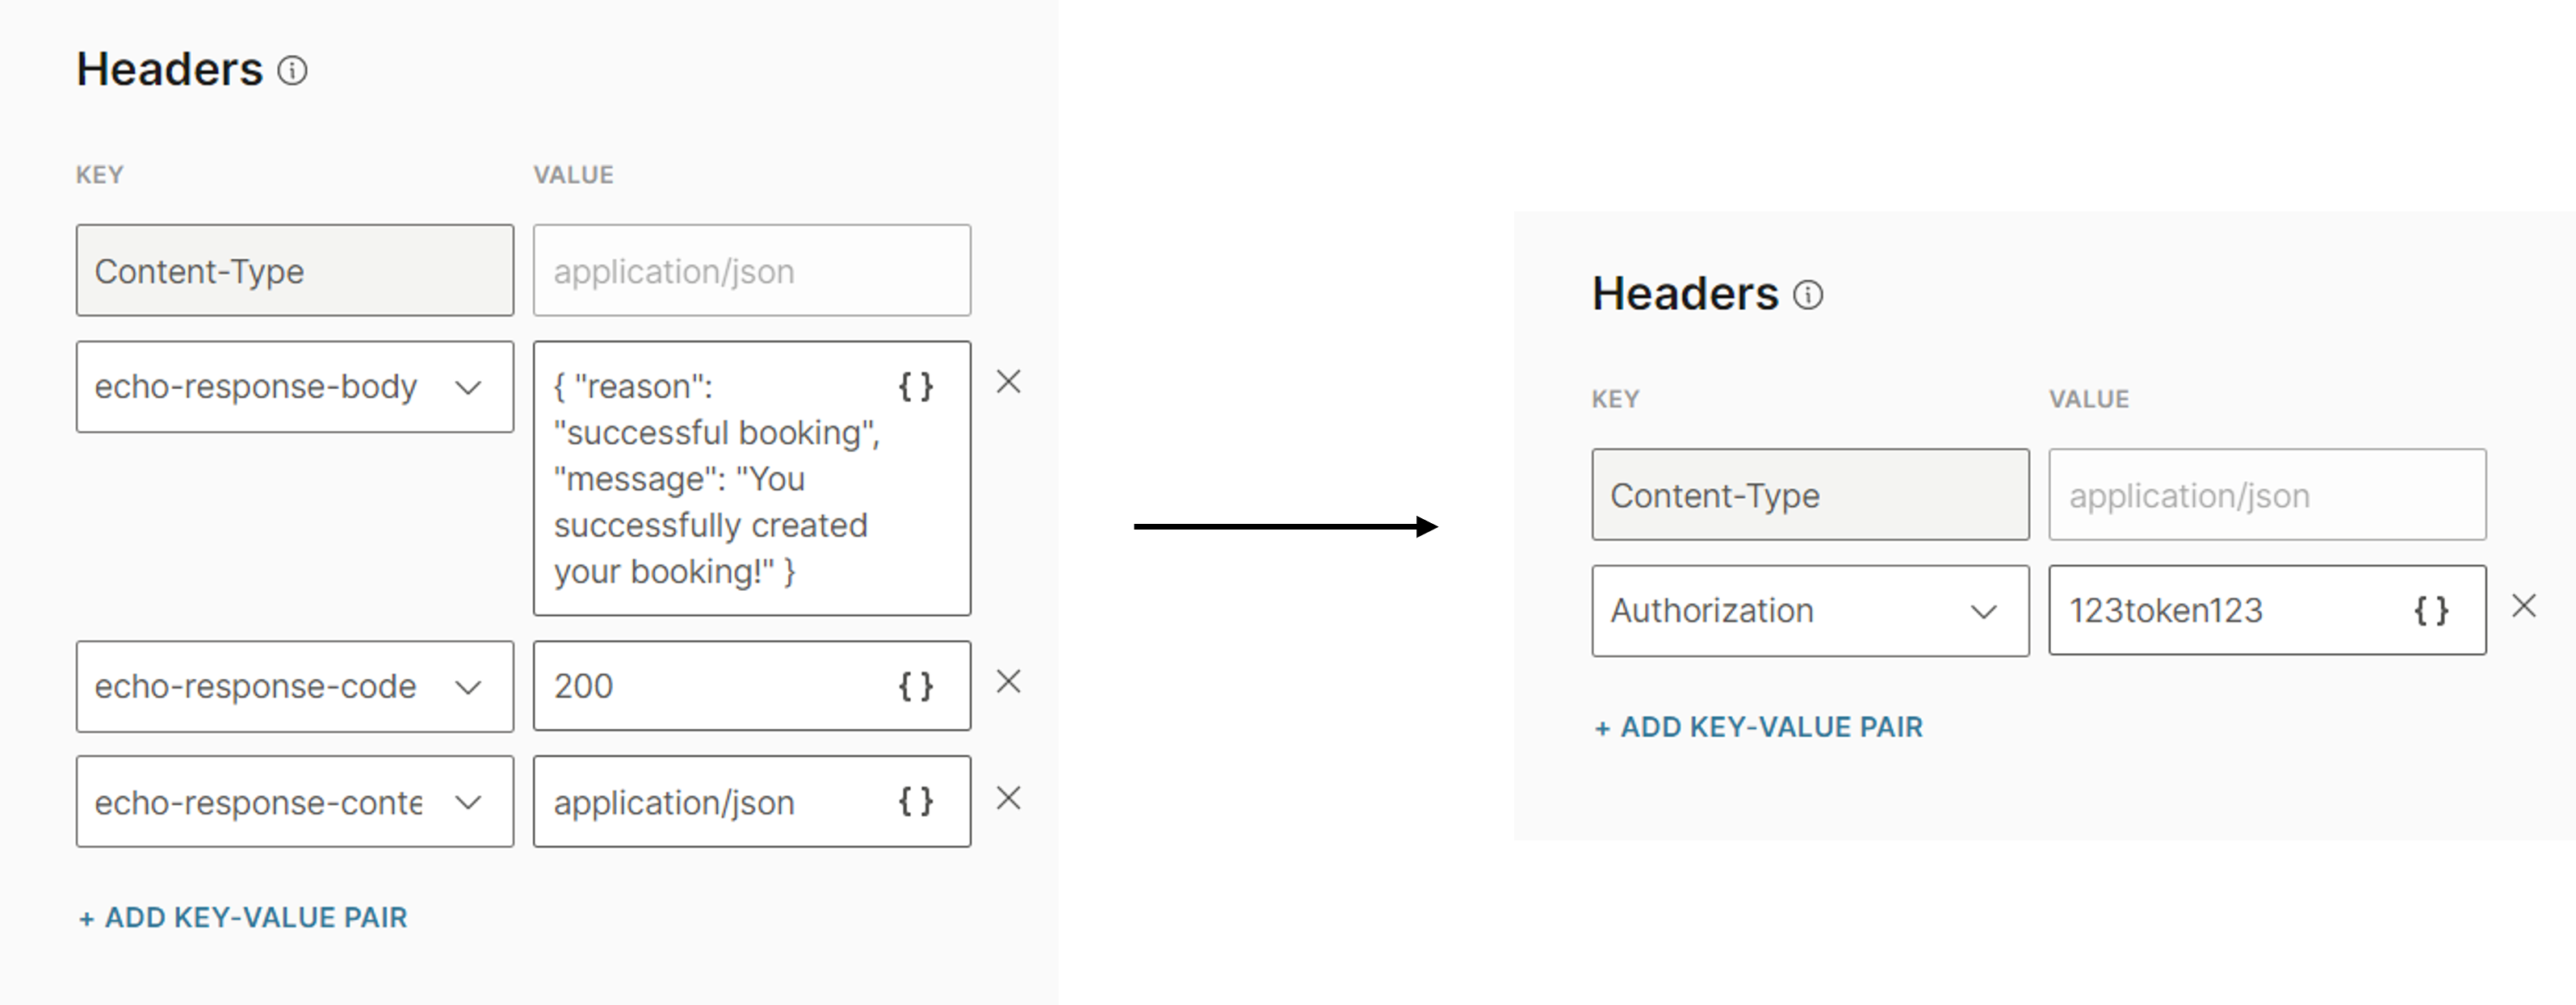
- The API elements in templates use echo API that contain sample request headers. So, instead of modifying header values, we will remove the existing headers and add new ones. In the Headers section, remove all existing request headers. Add an Authorization header with the authentication token.
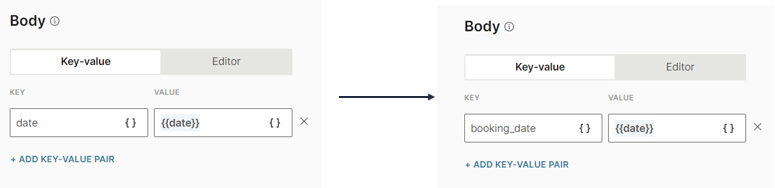
- You might need to modify existing parameters to meet the requirements of the third-party API. In this example, the third-party API uses the booking_date parameter. So, in the Body section > key-value fields, change 'date' parameter to 'booking_date'. You can change this change either by using the editor or the key-value pairs.
All changes for the input data are done through the 'date' attribute. The 'date' attribute is managed in the Code element, which is before the API element.
Configure the Response
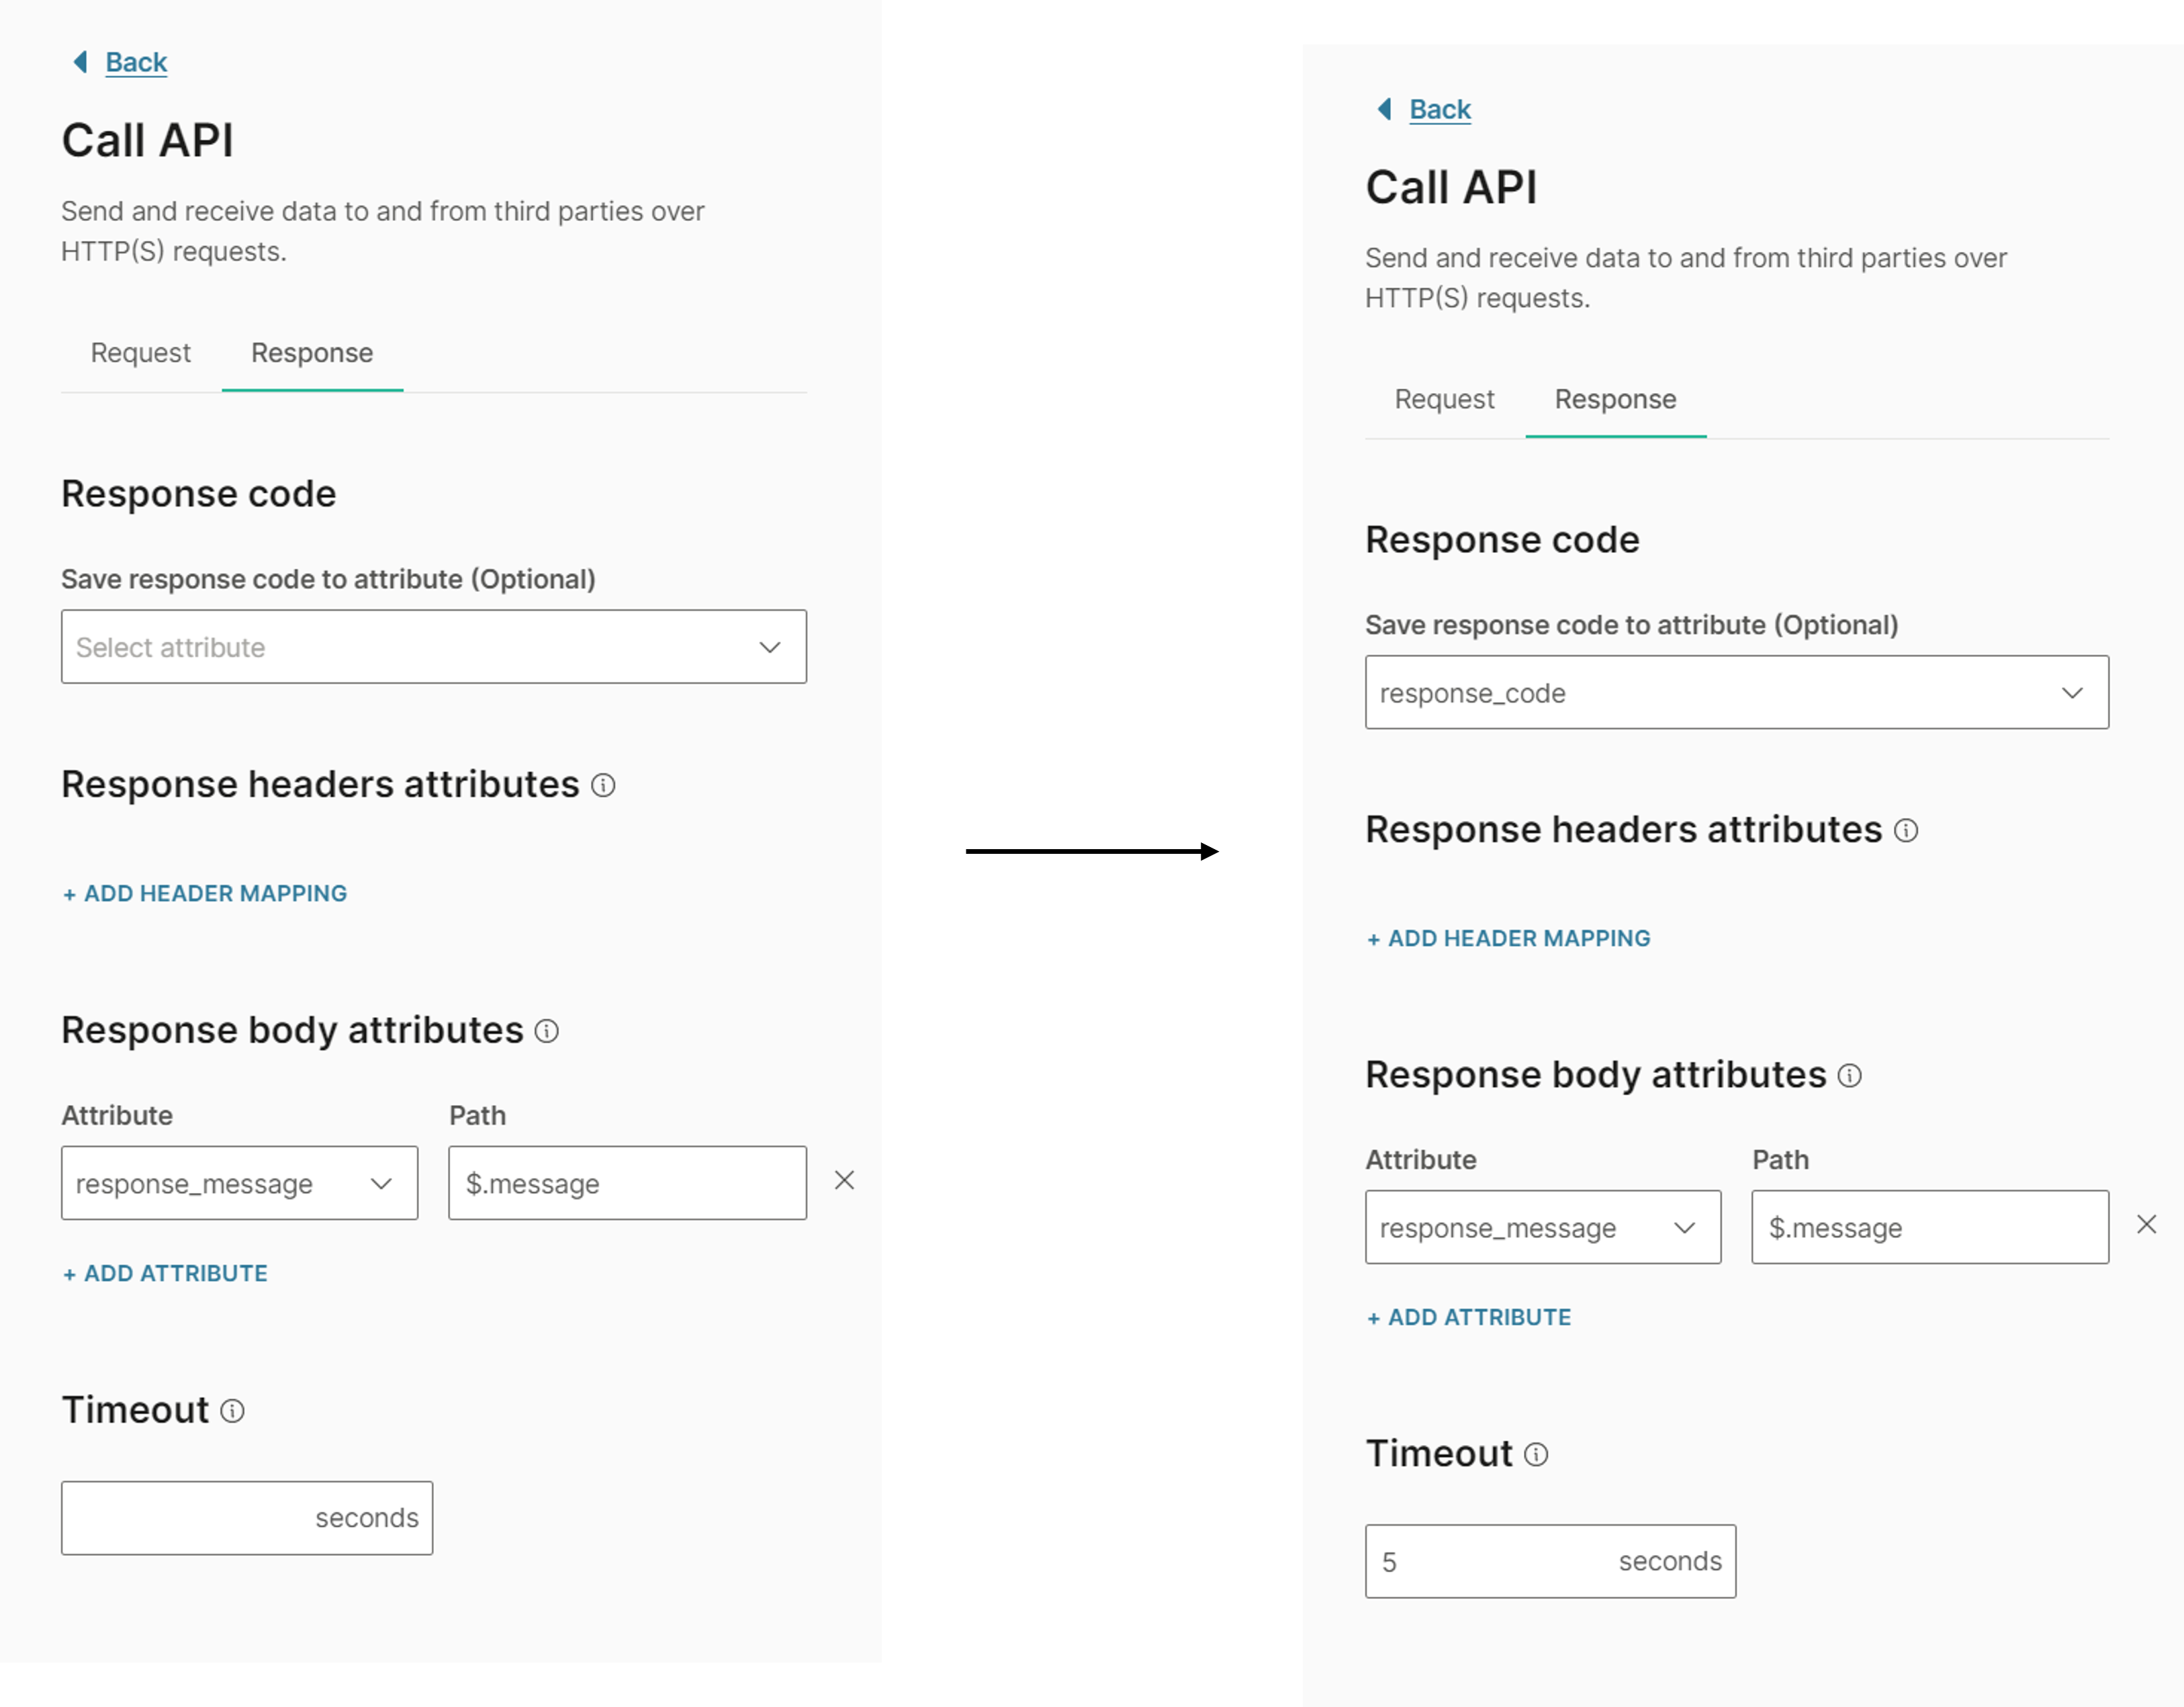
In the API element > Response tab, you can do the following.
- Save response code
- Save response header attributes
- Save response body
- Set an API timeout
In this example, we will not remove anything. We will add the option to save the Response code to the 'response_code' attribute and add a timeout.
- In the Attributes tab, create a new attribute, response_code.
- In the Response codefield, choose the attribute, response_code.
- In the Timeout field, choose 5 seconds.
Add a Dialog
If you add a new dialog, you need to create or modify associated elements.
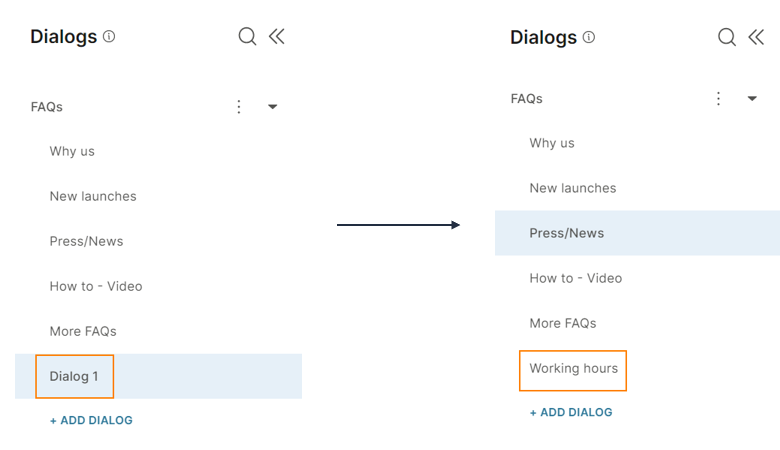
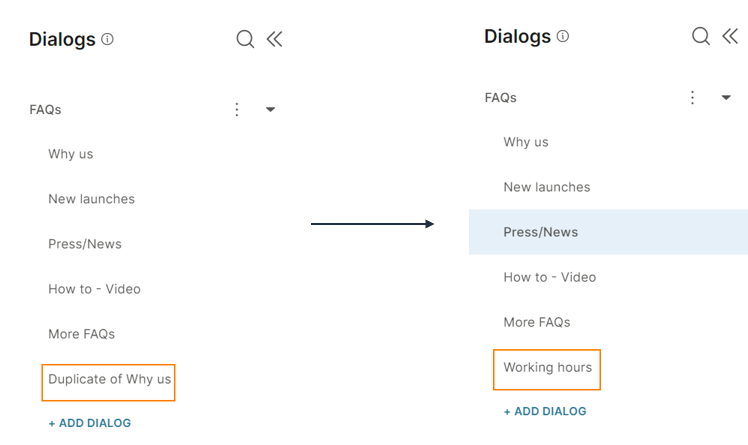
In this example, we will add an FAQ dialog to show the working hours of the business.
- To create the 'Working hours' dialog, do one of the following:
- Create a new dialog: Create a new dialog and configure it from scratch.
- Duplicate an existing dialog: Because the chatbot already contains FAQ dialogs, you can reuse the structure of these dialogs. Duplicate an existing dialog and make minor changes to create a new FAQ dialog.
- Create a new dialog: Create a new dialog and configure it from scratch.
- To keep the dialogs organized, move the new 'Working hours' dialog to the FAQ dialog group.
- Integrate the new dialog with the rest of the chatbot.
-
In the Default group > FAQs dialog, which contains the FAQ menu, we need to add an option for the new FAQ. In the List element, add a new list item, Working hours.
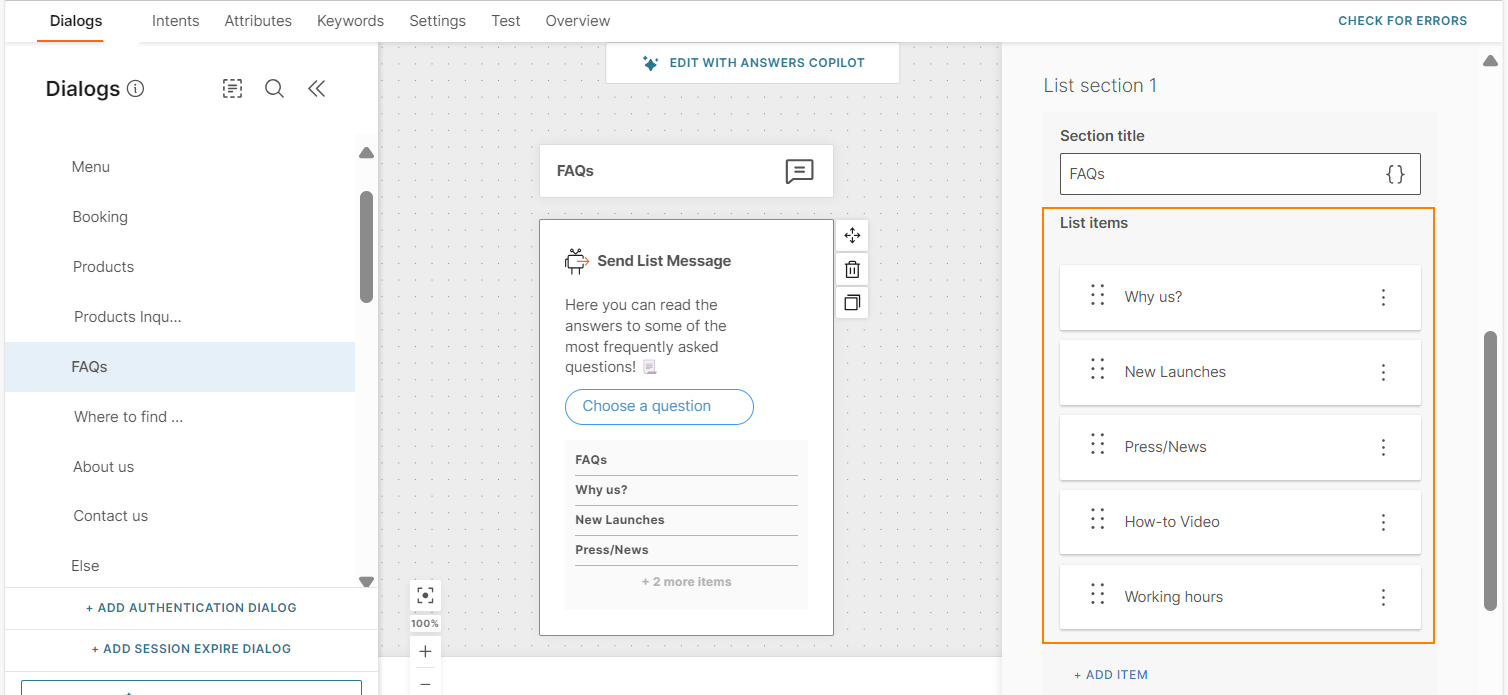
-
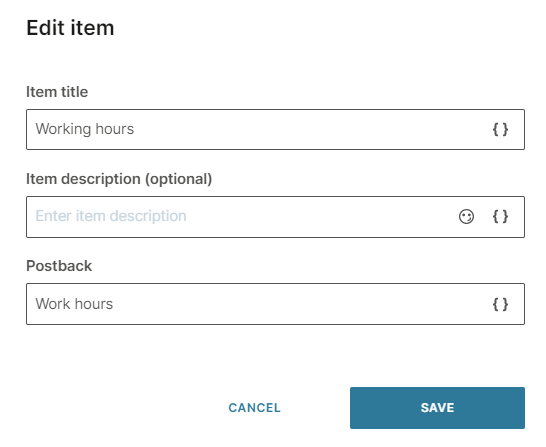
In the 'Working hours' list element, define the payload, Work hours, to pass to the User response element.
-
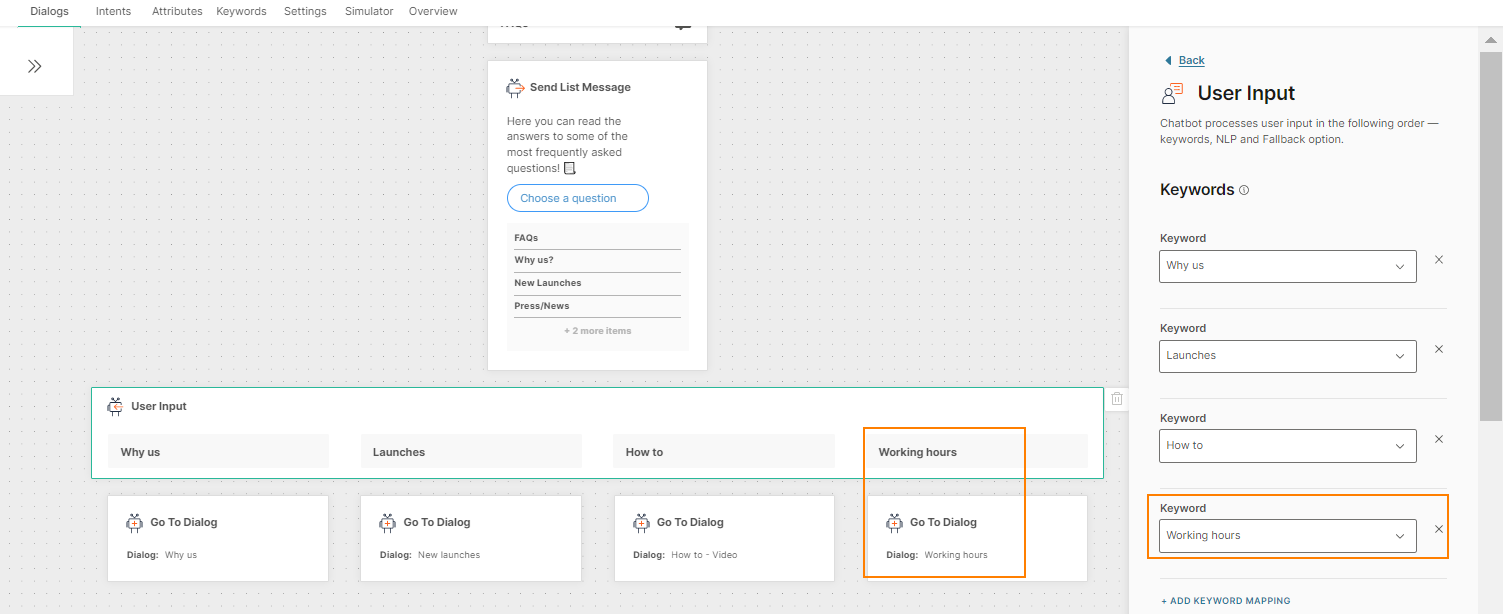
In the Keywords tab, create a new keyword, Working hours, and add synonyms to it. Make sure that you add the payload, which you created in the earlier step.
-
To direct the flow to the new dialog, in the FAQs dialog > User response element, add the new keyword.
-
Add the To dialogelement. Choose the new dialog, Working hours.
-
Delete a Dialog
Delete the dialogs that you do not need.
Example:
- If you do not want a specific functionality in your chatbot.
- If you do have a use case for the dialog.
- If you do not want to reuse the dialog for a different use case.
If you delete a dialog, you need to delete or modify associated elements.
In this example, we will delete the Press/News dialog.
-
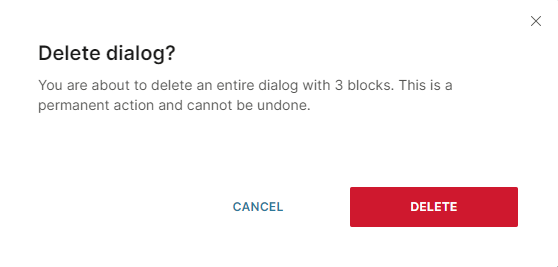
In the FAQs dialog group, delete the Press/News dialog.
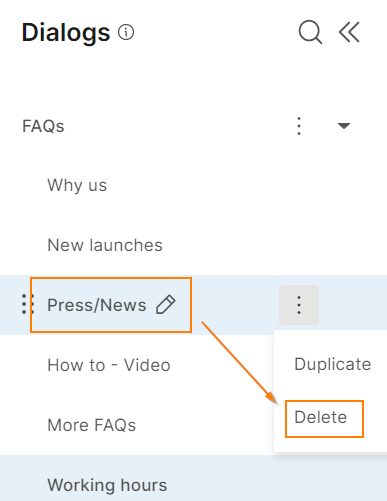
When you remove a dialog, there is a warning that this action cannot be reverted.
-
When you remove a dialog, make sure that its reference is removed from other places so that end users are not stuck in a dead end. Do the following.
-
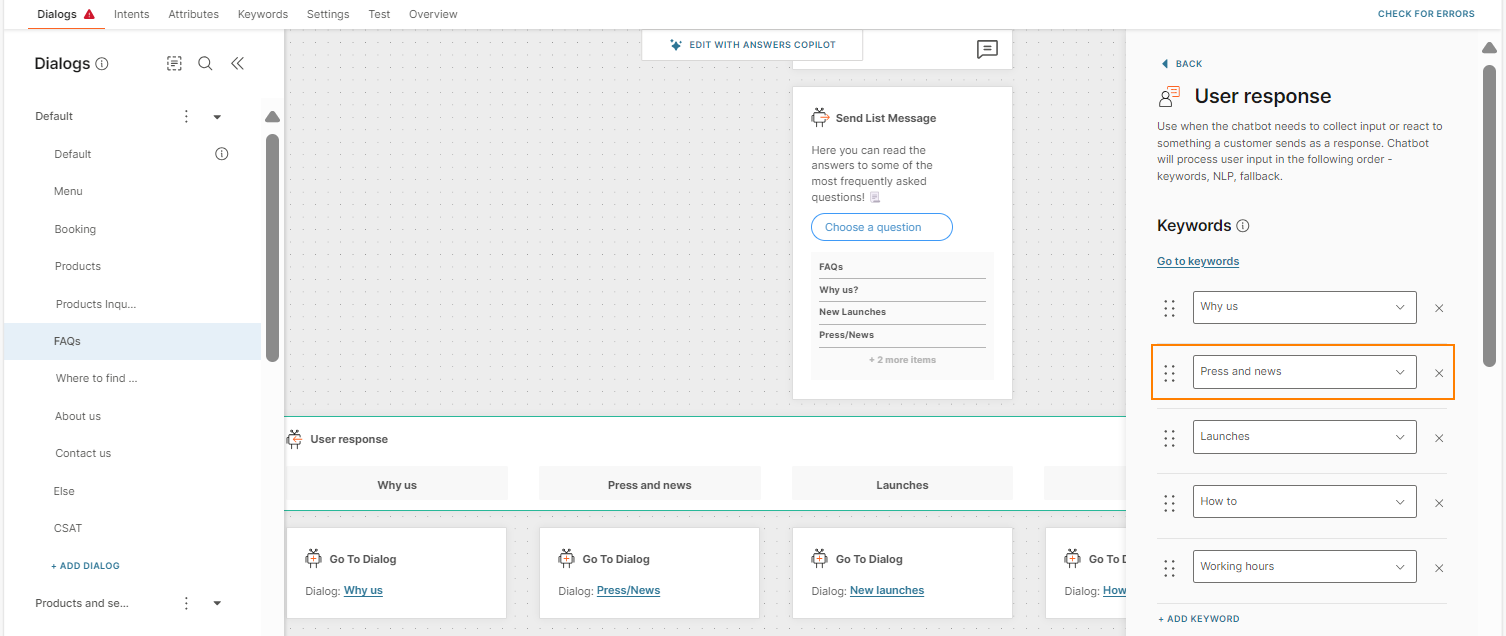
In the Default dialog group > FAQs dialog > List element, delete the Press/News list item.

-
In the User response element, delete the keyword, Press and news.
 Note
NoteTest all changes in the simulator. Make changes until the chatbot works as expected. You can also test an activated chatbot over a live channel.
You can explore chatbot templates in your Infobip account (opens in a new tab).
-
Guidelines and Best Practices
The following guidelines are specific to customizing the template to use in a live environment. For information about designing the chatbot flow, using entry points, and designing conversations, refer to the chatbot guidelines section.
- Rename the chatbot.
- Customize the content to suit your use case and business. Example: In the Welcome message, mention your business name. In menu items, add products and services that are relevant to your business.
- Any changes that you make must fit into the existing configuration.
- If you add or modify an element, make sure that it is similar to the existing elements. Example: In a List element, if existing list items have icons, add icons to new list items as well.
- If you add or modify an element, add or modify other associated elements, if applicable. Example: If you add a list item to a List element, create a new branch for that item in the User response element, and create an associated dialog.
- If you delete an element or a field within an element, modify or delete other associated elements, if applicable. The associated elements could be in other dialogs. Example: If you delete a list item in a List element, delete the associated branch in the User response element, and delete the associated dialog.
- If you delete a dialog, either modify or delete all references to the dialog. Example: If there are menu items in other dialogs that direct the flow to the deleted dialog, either delete those menu items or redirect the flow to a different dialog.
- If you change the chatbot language, modify the content in the Dialogs tab to match the new language.
- Test all changes in the simulator. Make changes until the chatbot works as expected. After you activate a chatbot, you can also test it over a live channel.
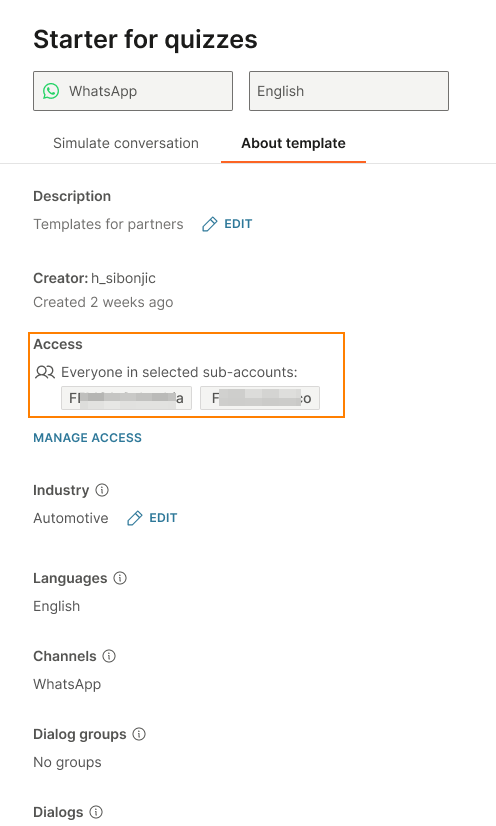
Share a custom template between accounts
If you have subaccounts in your main Infobip account, you can share custom templates from the main account to the subaccounts. Thus, you can reuse a template across multiple accounts instead of recreating the template in each account.
Guidelines
- Share a template: Only the main account can share custom templates.
- Delete a template: Only the main account can delete shared custom templates.
Share a custom template
This section is applicable only for templates that are not shared.
Follow these steps to start sharing.
-
On the Infobip Infobip web interface (opens in a new tab), go to Answers > Chatbots > Templates tab > Custom tab.
-
On the required template, select Preview.
-
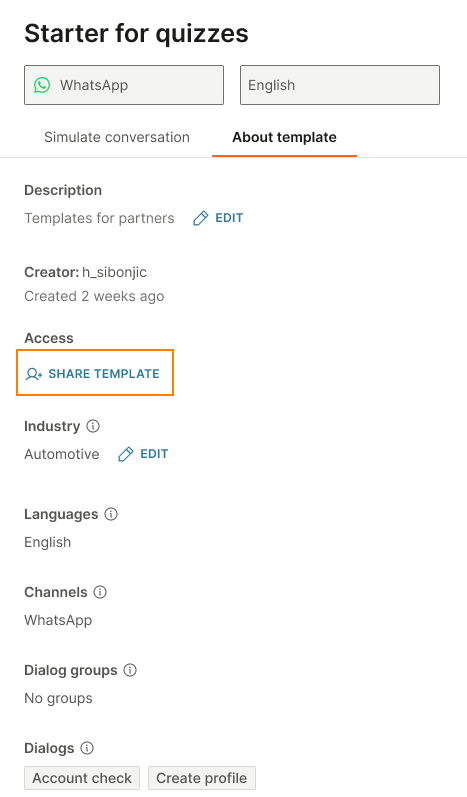
In the About template tab > Access section, select Share template.
-
Select one or more subaccounts with which you want to share the template.
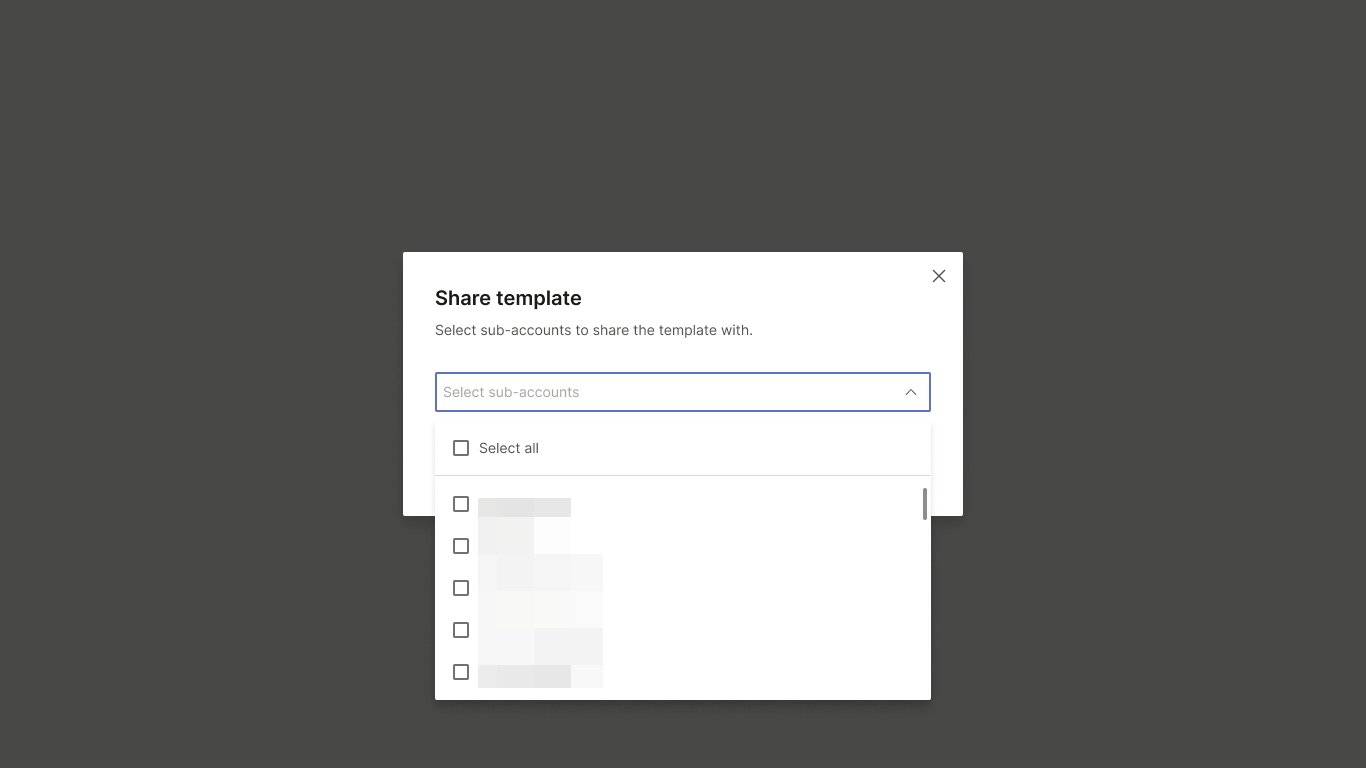
-
Select Share.
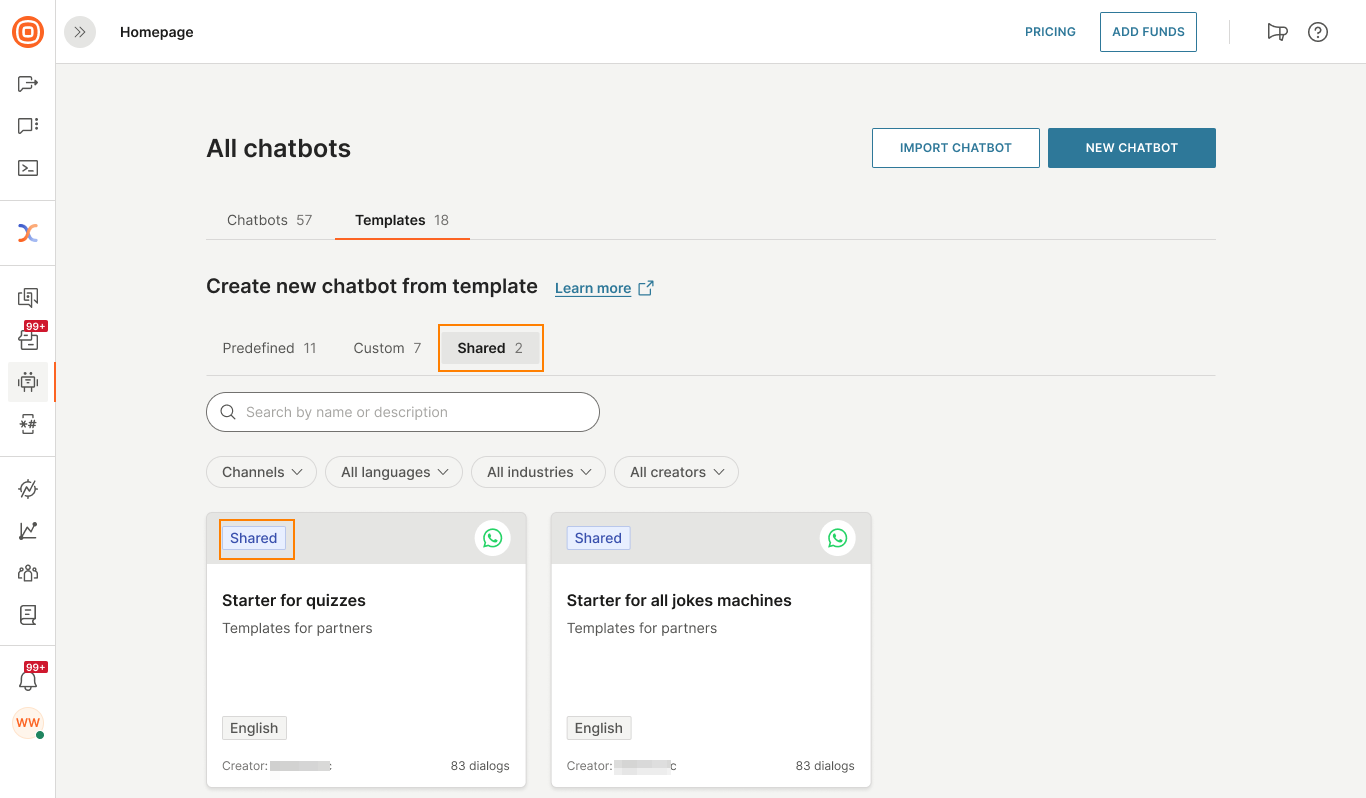
The template is now shared with the selected subaccounts. The template has an indicator that shows that it is shared. The template is also listed in the Shared tab.
Add or remove sharing from a template
This section is applicable for templates that are shared with one or more subaccounts.
Follow these steps to add or remove sharing from a template.
-
On the Infobip Infobip web interface (opens in a new tab), go to Answers > Chatbots > Templates tab > Custom tab.
-
On the required template, select Preview.
-
In the About template tab > Access section, select Manage access.
-
Do the following.
- To remove a subaccount, select the x mark next to the subaccount.
- To add a subaccount, select the subaccount from the list.
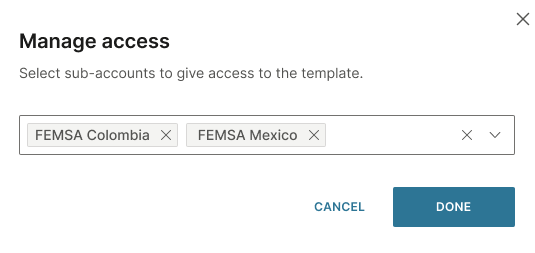
-
Select Done.
View sharing information for a template
All shared templates are present in the Shared tab. To view the sharing information for a template, do the following.
-
On the Infobip Infobip web interface (opens in a new tab), go to Answers > Chatbots > Templates tab > Shared tab.
-
On the required template, select Preview.
-
In the About template tab > Access section, you can view the accounts with which the template is shared.
Edit the details of a custom template
- On the Infobip web interface (opens in a new tab), go to Answers > Chatbots > Templates tab > Custom tab.
- Hover over a template and select Preview.
- Go to the About template tab.
- Edit the fields in the template.
- Select Save for each field that you edit.
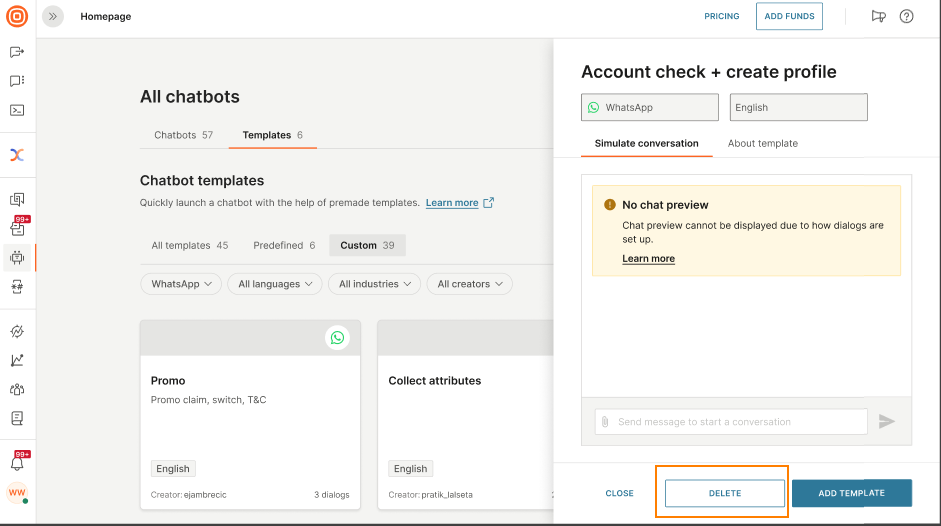
Delete a custom template
You can delete only custom templates. You cannot delete predefined templates.
-
On the Infobip web interface (opens in a new tab), go to Answers > Chatbots > Templates tab > Custom tab.
-
Do one of the following.
-
From the Templates page: Hover over the template that you want to delete and select Delete.
-
From within a template: In the template that you want to delete, select Delete.
-
Audit logs
For information about the template events that you can view in audit logs, refer to the Audit log documentation.