IVR
Interactive voice response (IVR) is a two-way call system that uses voice and dual-tone multi-frequency (DTMF) tone input to communicate with end users. Play recorded voice messages to end users and receive the responses that they type on their keypad. Depending on the response, branch the flow to take the required action. Example: Play recorded messages to guide end users through interactive menus - Press 1 for English, press 2 for Spanish. You can also record calls and forward calls to an agent.
You can use IVR for both inbound and outbound calls.
In an outbound IVR call, you can contact end users to get or share information. Example:
- Ask feedback.
- Send appointment reminders.
- Send promotional information about your new product.
In an inbound IVR call, end users can call your phone number to get information or do tasks. Example:
- Check account balance.
- Manage bookings.
- Track order status.
For an example of how to use IVR to send a survey, refer to the Use IVR to get survey responses tutorial.
Prerequisites to use IVR in a flow
-
You must have a phone number that is registered with Infobip. If you do not have a registered phone number, go to the web interface (opens in a new tab) > Numbers section to get your Voice number.
In an IVR element, if there are no phone numbers available for you to select, it indicates that you do not have a registered phone number.
-
You must enable the Voice channel in your Infobip account. For more information, contact your Infobip account manager.
End users are charged by their phone network operator for calling your phone number.
Depending on the market, you might be charged for inbound traffic to your phone number.
If you forward inbound calls to another phone number, you must pay for the outbound part of the call.
Features of IVR
The following are some of the features of IVR in Flow and the situations where you can use IVR.
No-code IVR editor
The no-code flow IVR editor enables you to design and manage IVR systems without the need for coding experience or technical skills. The intuitive visual interface makes it easy to create call flows to launch effective voice applications.
Integrate with Conversations
If you have both Moments and our contact center solution, Conversations, use a native integration to do the following.
- Connect agents to the call directly from a flow.
- Use IVR as the communication trigger to provide helpful information before the conversation with an agent starts.
- Use IVR to manage outbound contact center campaigns.
Use data from customer data platforms
Use profile data from customer data platforms (CDP) in your IVR flow to personalize end user interactions. You can personalize responses and route the flow based on the needs, preferences, and history of end users.
Use rich personalization in every session
In addition to using data from CDP to personalize communication, use flow variables and expressions to collect and personalize responses from end users, and to manipulate data input. Also, use Exchange integrations or powerful Call API capabilities to use or update data from other platforms during the IVR session.
Design the flow
All voice communication in a flow takes place within a call session. A call session is a portion of a flow that lasts from the beginning of the call to the end of the call. A call session can be either inbound or outbound.
Use IVR elements to design a call session.
- You can add IVR elements only within the call session. If the call has not started or has finished, you cannot add IVR elements.
- You can add only specific non-IVR elements within a call session. Other non-IVR elements can be used only outside the call session.
You can add a maximum of 100 elements to a flow.
Start a call session
To start a call session in your flow, do the following.
-
Inbound calls: Use the Start incoming call trigger element as the entry point. This entry point starts the call session.
NoteThe Start outgoing call element is not available within an inbound call session.
-
Outbound calls: Use the Start outgoing call element to start the call session.
End a call session
A call session can end because of multiple reasons - end user hangs up, system ends the call because the task is complete, or technical issues such as network failure.
- Use the Hang up element to end a call session.
- For cases where the end user hangs up or there is a technical issue, use the Call ended branch in the IVR elements to manage the flow.
Edit a call session
If you want to update an active flow, create a new version of the flow and make the changes in the new version. Example: You want to update the sender or the call session logic.
Retry a call if initial attempt fails
The Call retry field in the Start outgoing call element enables you to retry a call after a short period, such as a few minutes.
If you want to reestablish a call after a longer interval, such as the next day or the next week, or after a specific condition, such as Wait for an event happens, do one of the following.
- Add another Start outgoing call element. Use the Pause element to add a delay between the two Start outgoing call elements. Example: Call the end user the next day or the next Monday.
- Loop the flow back to try to start the call again after a specific interval. Use the Pause element to add a delay between two retries.
- Build a recurring flow. For more information, refer to the example.
To avoid spamming the end user, make sure that you do not retry the call more than 3 times.
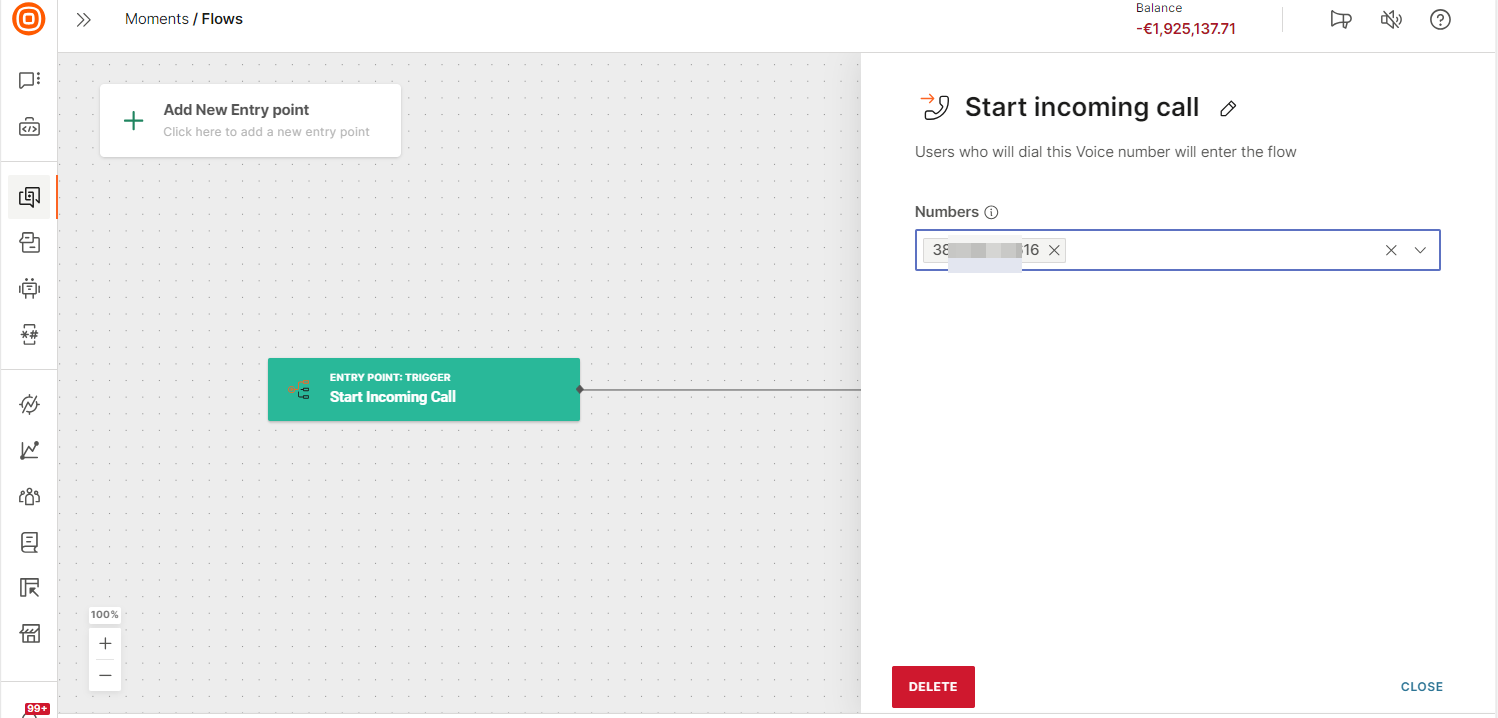
Start incoming call
When end users call your phone number, you can add them to the flow by using the Start incoming call entry point. This element starts an inbound call session.
Configure the phone number in the side panel of the entry point. If you want to use more than one phone number for incoming calls, use a separate Start incoming call element for each phone number.
After you configure the element, configure the next steps. Example: Add a Play element to send a welcome message.
Start outgoing call
Use the Start outgoing call element to call the end user. This element starts an outbound call session.
This element is available only for outbound call sessions.
Configure the element and use the branches in the element to specify the next steps in the flow.
Configure the element
Configure the following fields in the element.
From
Select the phone number from which you want to call the end user. This number is displayed on the end user's device when you call them.
Record call (Optional)
Select this option if you want to record the call.
The recording feature has additional charges.
Depending on the market, there might be legal requirements to use this feature.
Delivery time window (Optional)
Set the days, time, and time zone during which the flow calls the end users. Example: Call end users only on weekdays or during your business hours.
Complete the fields in the Delivery time window section.
You can also enable the flow to determine the best time to call end users. For more information, refer to the send-time optimization documentation.
Tracking and reporting (Optional)
Track end users' actions and generate reports.
Enable delivery reports over API pull: Select this option to identify the number of successful calls.
Data payload: Specify one or more data that you want to store for the call. Example: the first name or country from the end user's profile. This information is not shared with the end user and is used in analytics. You can view this data in Voice reports.
Advanced settings (Optional)
Calling speed (Optional)
Configure the number of outbound calls that you want to make within a specified period.
Example: You configure to make 1,000 outbound calls in 1 day. After you set the limit and Infobip receives the first call, the 24-hour period starts regardless of when the daily limit has been met - in the first few hours or later. After the 24-hour period, another 1,000 outbound calls will be made.
Use this setting if you want to limit the number of outbound calls. Example: Your flow is for a promo campaign that encourages end users to place orders through your call center. If you call all the audience at the same time, your call center might get high call volumes, which can result in long call wait times for end users. To avoid this situation, call only as many end users as your call center can manage.
To configure this option, in the Calling speed section, specify the number of calls and select the unit as per minute, per hour, or per day.
Validity Period (Optional)
If a call was not established because of internal unidentified errors, the system tries to reestablish the call. The Validity period is the period during which the system periodically tries to call the end user. If the system is unable to establish the call before this period ends, the call ends.
The default and maximum validity periods are 48 hours.
To set a shorter period, specify the Period and select the unit as Hours or Minutes.
The validity period is not applicable if the call was not established because of known reasons. Example: Network errors, Unreachable, No answer, Busy, or Declined. To retry the call in such cases, use the Call retry field.
Call retry (Optional)
When a call fails for known reasons, the flow can try to reestablish the call. Example: Network errors, Unreachable, No answer, Busy, or Declined.
To use this feature, enable the Call retry field and specify the following information.
Minimum retry period (minutes): The minimum number of minutes between two call attempts.
Maximum retry period (minutes): The maximum number of minutes between two call attempts.
Number of retries: The number of times the flow can try to call the end user.
The Call retry feature is not applicable if the call was not established because of internal unidentified reasons. For more information, refer to the Validity period documentation.
Condition (Optional)
Use conditions to manage different scenarios.
To add a condition, select Condition and select an option from the list. For each condition that you select, a branch is added to the element. Configure the next steps for each branch.
The following table shows a list of conditions.
| Condition | Call session status | Next steps |
|---|---|---|
| Call answered The end user answered the call. | Call session continues | |
| Voicemail | Call session ends | The Voicemail feature has additional charges. If the Voicemail feature is not available in your flow, contact your Infobip account manager. For more information, refer to the Answering machine detection documentation. |
| No answer (Optional) | Call session ends | Try calling the end user again |
| Busy (Optional) | Call session ends | Try calling the end user again |
| Declined by user (Optional) | Call session ends | Try calling the end user again |
| Call ended | Call session ends |
Play
Use the Play element to play an audio message to the end user.
The following are some use cases of how to use this element.
- Play an informative message. Example: Inform the end user about their account balance.
- Build an IVR menu to create an interactive communication. Use the Play element followed by the Collect element. Example: In the Play element, provide a list of options to the end user. Then, in the Collect element, collect the response that the end user enters on their device keypad.
Configure the element and use the branches in the element to specify the next steps in the flow.
Configure the element
Configure the following fields in the element.
Choose audio source
You can play a message in one of the following ways.
- Use a text message (Text to speech). The flow converts the text message into speech and then plays it to the end user.
- Use an audio file.
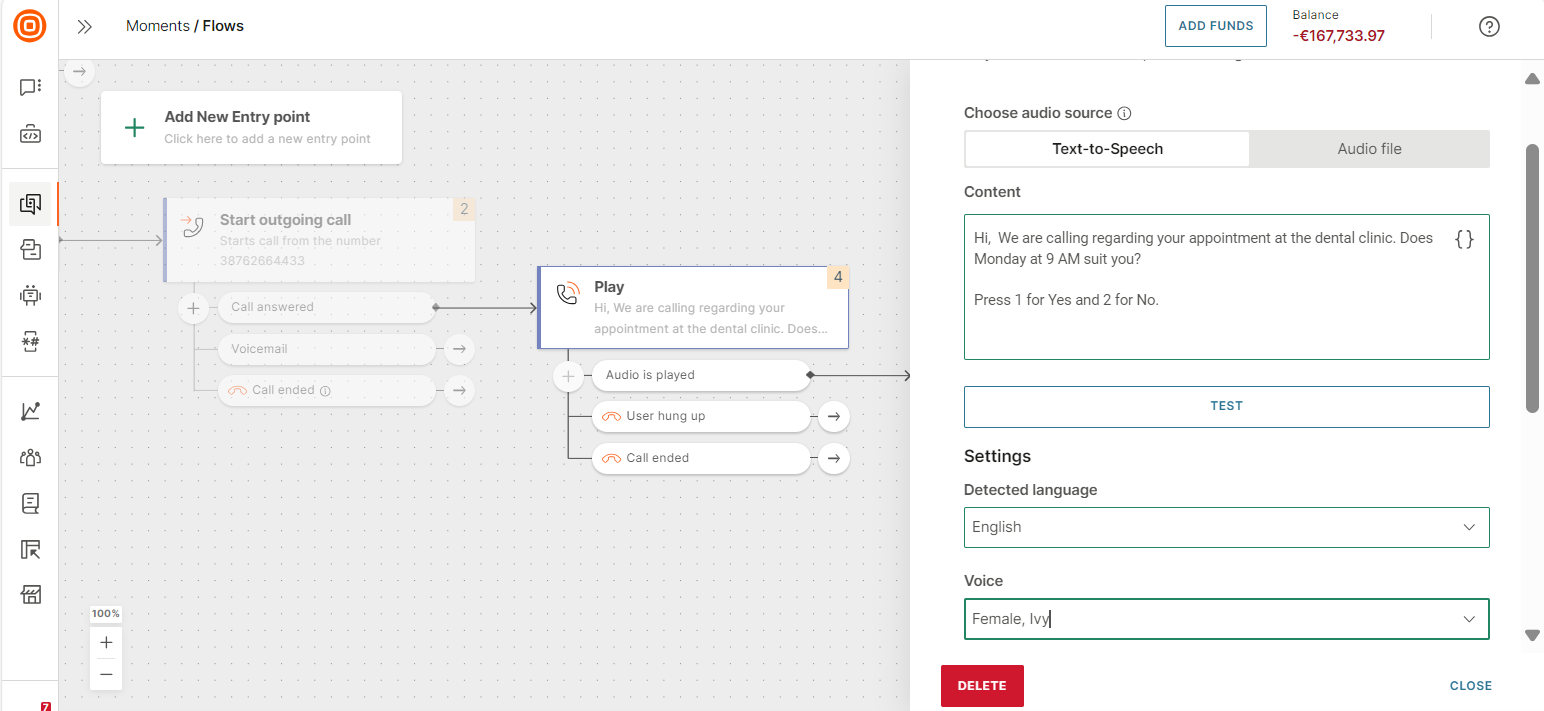
Text to Speech
Content
Enter the text message. You can add a maximum of 160 characters.
You can add placeholders for personalization. Example: first name.
Test (Optional)
Select Test to hear the message in the Content field. To stop the playback, select Stop.
Detected language (Optional)
The flow automatically detects the language that is used in the Content field and populates the Detected language field. You can select a different language if required.
Voice
Select the male or female voice for the message. Voices that are marked as neural have a more natural, human-like speech.
Neural voices have additional charges.
If neural voices are not available for your account, contact your Infobip account manager.
Speech rate (Optional)
Modify the speed at which the message in the Content field is played.
Audio File
Play an audio file to the end user.
Supported file types are .mp3 and .wav. The maximum file size is 4 MB.
You can add a file in one of the following ways.
- File upload: Upload a prerecorded audio file from your device. Select Test to hear the file. To stop the playback, select Stop.
- File URL: Enter the publicly-accessible URL that contains the audio file.
- Voicemail: Use this option to play a voicemail that was recorded in the flow. Select an audio file from the list.
Duration of pause (Optional)
This option adds a pause (silence) before playing the audio file.
Enter the duration of the pause. You can select a minimum of 0 seconds and a maximum of 5 seconds.
Loop count (times) (Optional)
Configure this field if you want to repeat the message in the Play element. Specify the number of time that the message is played.
The Duration of pause field is applicable only the first time the message is played.
Audio interruption (Optional)
Select this option to enable end users to enter a response before the message has played completely.
This field is useful when you present a list of options for the end user to select. If the end user finds the option that they need, they can select that option and do not need to listen to the remaining options. Example: The audio message is Select 1 for Sales, select 2 for Support, select 3 for New account. If the end user is looking for support, they can select 2 without waiting to hear the remaining options.
This feature is triggered only if you add a Collect element in the Audio is played branch of the Play element.
Next steps
Use the branches in the Play element to manage the next steps after playing the audio message.
The element has the following branches.
-
Audio is played: Use this branch if the audio is played.
If this branch has a Collect element, the following happens.
- If Audio interruption is enabled in the Play element, the end user can either press a key to go to the Collect element before the audio finishes playing or wait for the audio to finish playing.
- If Audio interruption is not enabled, the end user can go to the Collect element only after the audio finishes playing.
-
User hung up: The end user ended the call.
-
Call ended: Call was ended by the flow or because of technical issues.
Collect
Use the Collect element to collect and store responses that end users enter on their device keypad. Example: Offer a list of options to end users - Press 1 for English, press 2 for Spanish. If the end user selects 1, collect this response through the Collect element.
The # key cannot be collected. It is reserved for the user input termination. The flow automatically stops collecting the end user's response if they enter the # key.
Configure the element and use the branches in the element to specify the next steps in the flow.
Configure the element
Configure the following fields in the element.
Element name (Optional)
Customize the name of the element. This name is used as the identifier in reports and events.
Example: You have a Collect element to save the language preferences of end users. Rename the element as Language choice.
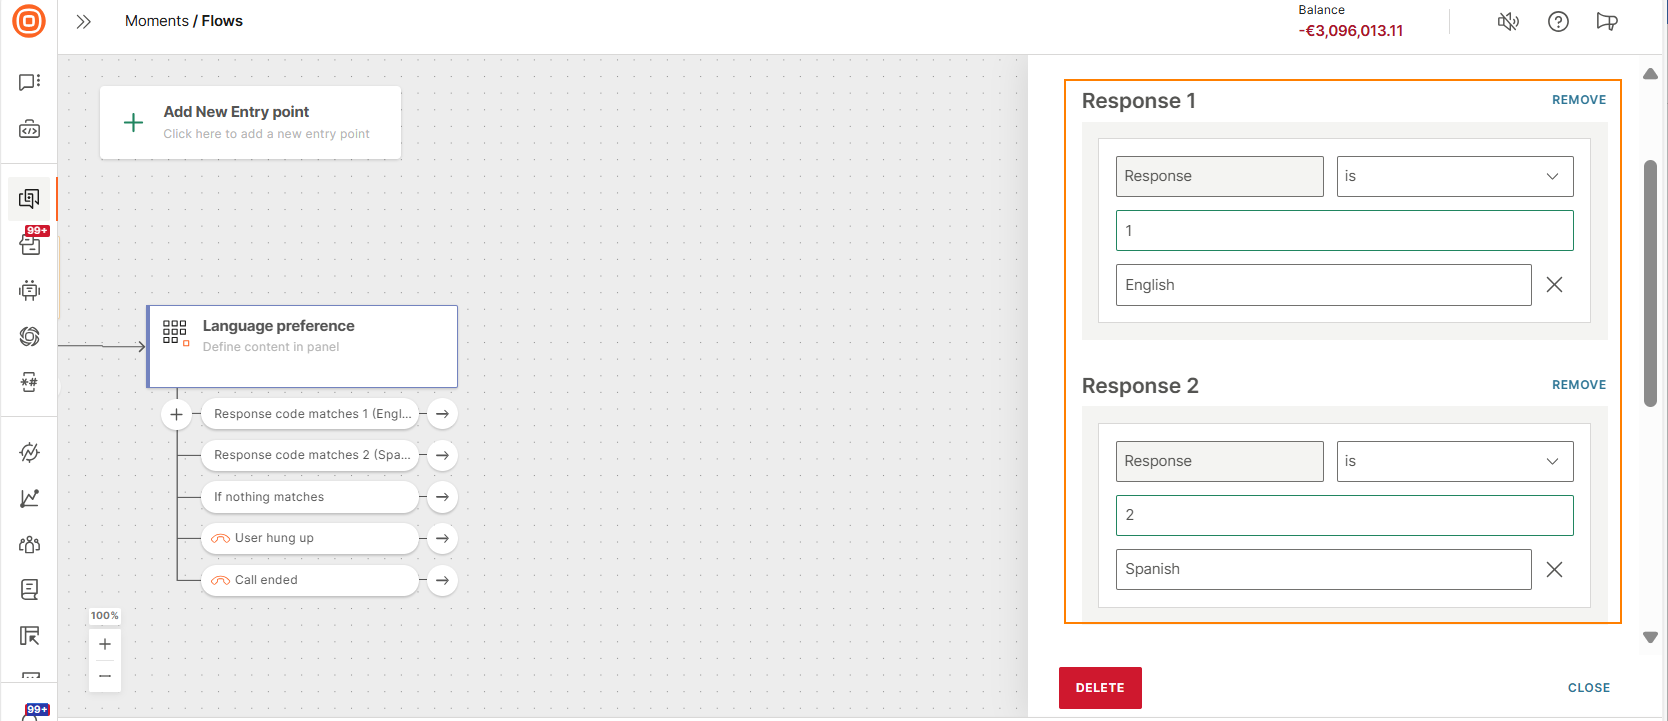
Response
For each input that you expect from the end users, add a response. Select Add response and enter the expected value. A branch is added to the element for each response.
Example: If you ask end users to press 1 for English and 2 for Spanish, add the responses 1 and 2.
Response meaning (Optional)
In each response, add a meaning to identify the response easily. Example: For the response 1, add the meaning English. For the response 2, add the meaning Spanish.
To add the meaning, select Add response meaning.
You can save the meanings in Flow variables and use them later in the flow. For examples of using response meanings, refer to the Where to use response and meaning section.
Response settings
The flow considers the end user's response to be complete when one of the following happens.
- The number of characters in the response reaches the value specified in the Maximum number of digits field.
- The end user enters the response terminator (#).
- The time limit specified in the Waiting time field is reached.
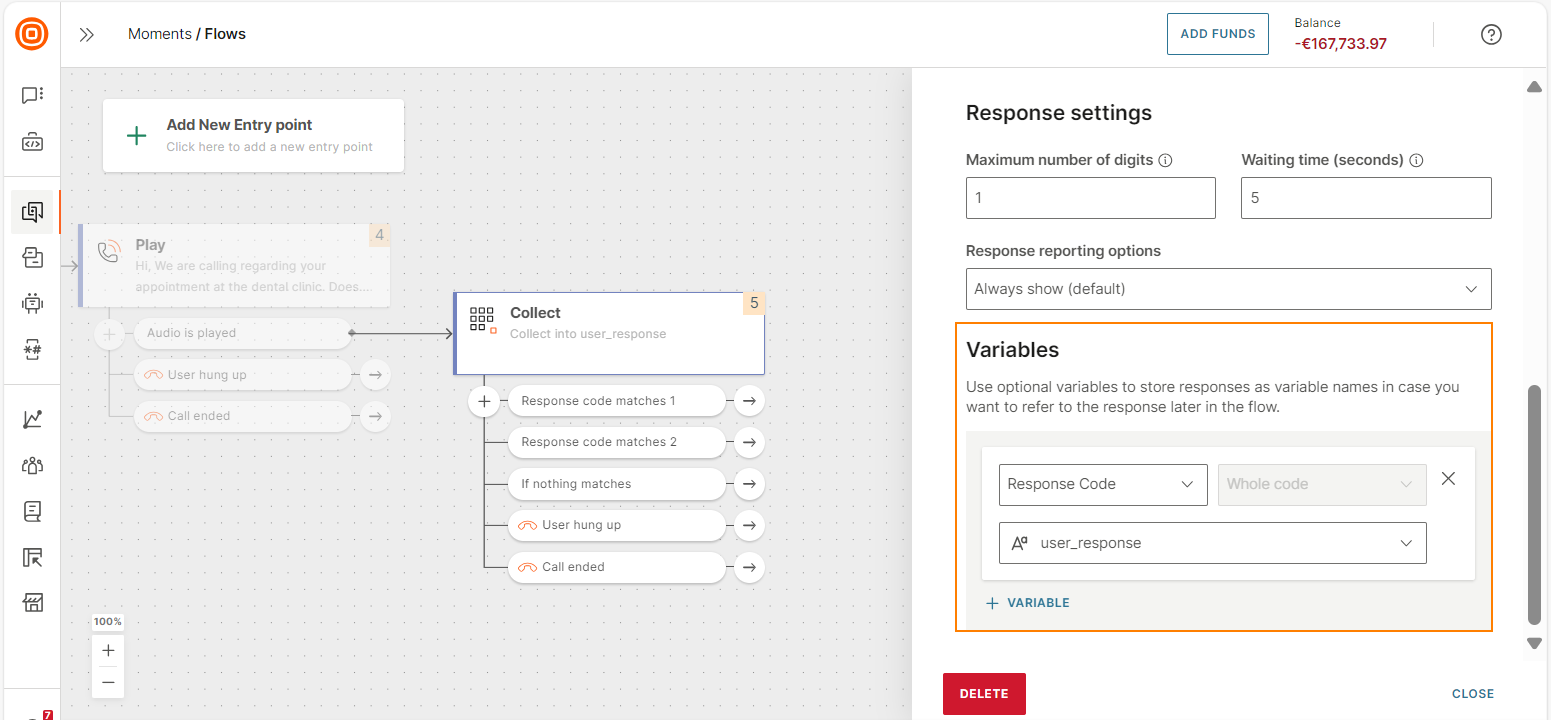
Maximum number of digits
Specify the maximum number of digits that the end user's response should contain.
Example: If the phone number can be either 7 or 8 digits, specify 8. For credit card numbers that have 16 digits, specify 16.
When this limit is reached, the flow moves to the next step.
Waiting time
Specify the maximum number of seconds that the flow needs to wait for the end user to press the first key. When this limit is reached, the flow moves to the next step.
Response reporting options
Select whether you want response codes to be displayed in Voice reports and logs.
The following options are available.
- Always show (default): Response codes are displayed.
- Show masked: Response codes are displayed as a masked value (xxxx).
- Don’t show: Response codes are not displayed.
Variables (Optional)
Save the end user's response in flow variables. You can use this information later in the flow.
Either select an existing variable or create a new variable.
Next steps
Use the branches in the Collect element to manage the next steps after you collect the response.
The element has the following branches.
- Responses that you configure in the Response field.
- If nothing matches: The end user's responses do not match anything that you configure in the Response field.
- User hung up: User hung up: The end user ended the call.
- Call ended: Call was ended by the flow or because of technical issues.
The following are some use cases of what you can do after you collect the response from the end user.
- Depending on the response, direct the end user to the relevant branch in the flow. Example: Offer a list of options to end users - Press 1 for English, press 2 for Spanish. If the end user selects 1, direct the end user to the English branch.
- Validate the response against their person profile in People. Example: Ask the end users to enter their account number. Verify the account number in People for authorization.
- Validate the response against a flow variable. Example: Save an API input in a flow variable. Validate the end user's response against this variable.
- Save the response in a flow variable and use it later in the flow. Example: Collect the input for a customer satisfaction survey and save it in a flow variable. Later in the flow, send them a promotional code if the survey score is low.
Where to use response and meaning
The following are some examples of where you can use the response and meaning.
Analytics
The response meaning is displayed in reports in Analyze.
Audience segments in People
You can use response values and meanings to define the criteria for segments in People.
When you create a segment, in the Events section, add either the Response or Response meaning property.

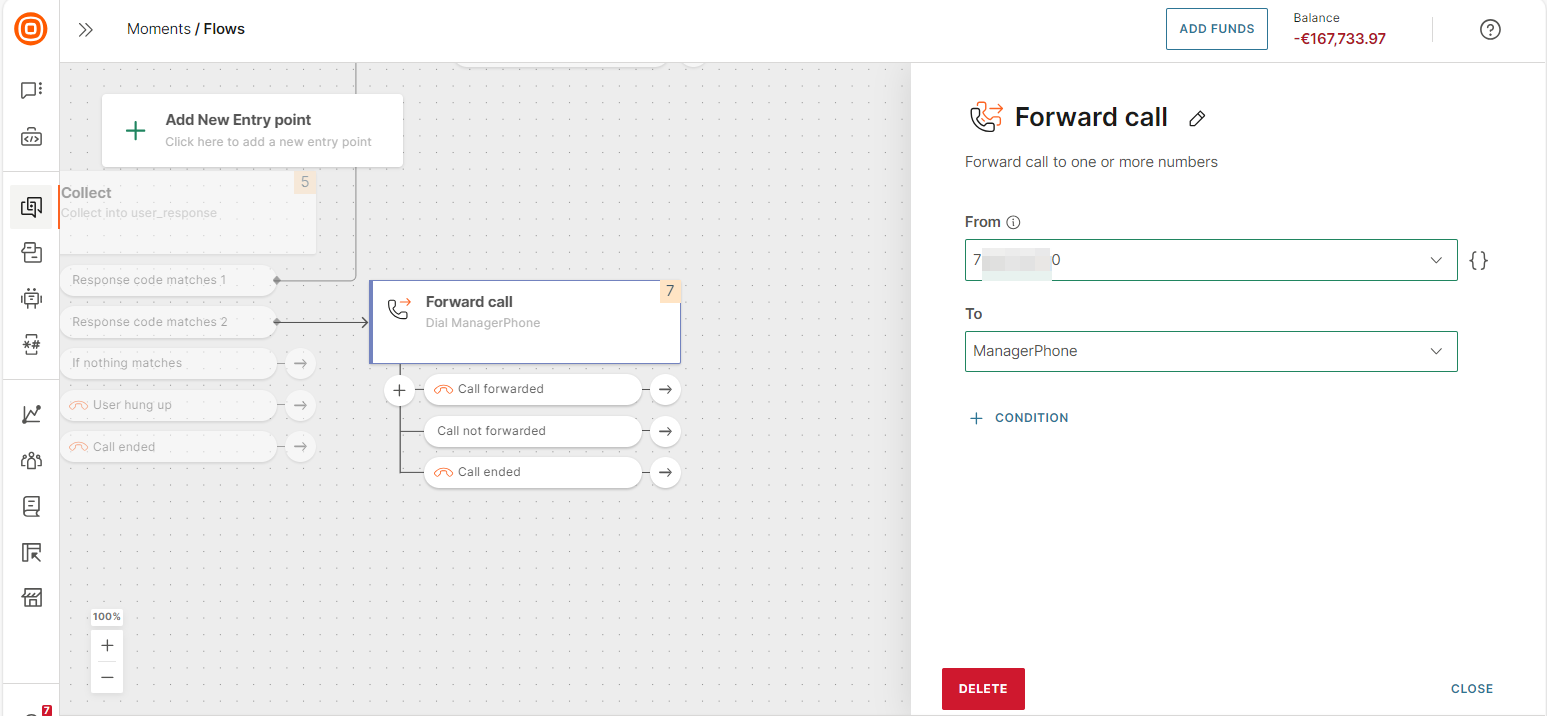
Forward Call
Use the Forward call element to forward a call to a different phone number.
Example: An end user calls a 1-800 number. You can forward the call to one of your local offices, to a manager, or to your contact center.
You can also call webRTC users or forward the call over a SIP trunk.
Configure the element and use the branches in the element to specify the next steps in the flow.
Configure the element
Configure the following fields in the element.
From
Select the sender that forwards the call. This number is displayed on the end user's device.
You can use only numeric senders. The call delivery depends on the CLI route.
You can do one of the following.
- Enter the sender.
- Select a registered sender from the list.
- Select an attribute that contains the sender.
To
Select the sender to which the call needs to be forwarded.
In this field, you can do one of the following.
-
Enter the sender.
-
Select an attribute that contains the sender. Example: For VIP customers, you can store the phone number of the VIP manager in the end user's profile in People. You can forward the call to this phone number.
Another example: An end user makes an online order from a restaurant and then calls your phone number. You can fetch the restaurant's phone number from Catalogs and forward the call to the restaurant.
Condition (Optional)
Use conditions to manage different scenarios.
To add a condition, select Condition and select an option from the list. For each condition that you select, a branch is added to the element. Configure the next steps for each branch.
The following table shows a list of conditions.
| Condition | Call session status |
|---|---|
| Call forwarded | Call was forwarded and a call session was successfully established between the end user and the destination. The flow exited the call session. |
| Call not forwarded | The flow was unable to forward the call and a call session was not established between the end user and the destination. The call session continues between the end user and the flow. |
| No answer | There was no answer from the number to which the flow tried to forward the call. The call session continues between the end user and the flow. |
| Busy | The number to which the flow tried to forward the call was busy. The call session continues between the end user and the flow. |
| Declined | The number to which the flow tried to forward the call declined the call. The call session continues between the end user and the flow. |
| Call ended | Call was ended either by the end user or because of network issues, before it was forwarded. |
The Forward call element has the following default branches.
- Call forwarded
- Call not forwarded
- Call ended
In addition, you can add conditions to manage different scenarios.
To add a condition, select Condition and select an option from the list. For each condition that you select, a branch is added to the element.
You can add the following conditions.
- No answer
- Busy
- Declined
Configure the next steps for each branch in the element.
Transfer call to agent
Use the Transfer call to agent element to transfer the call to a live agent.
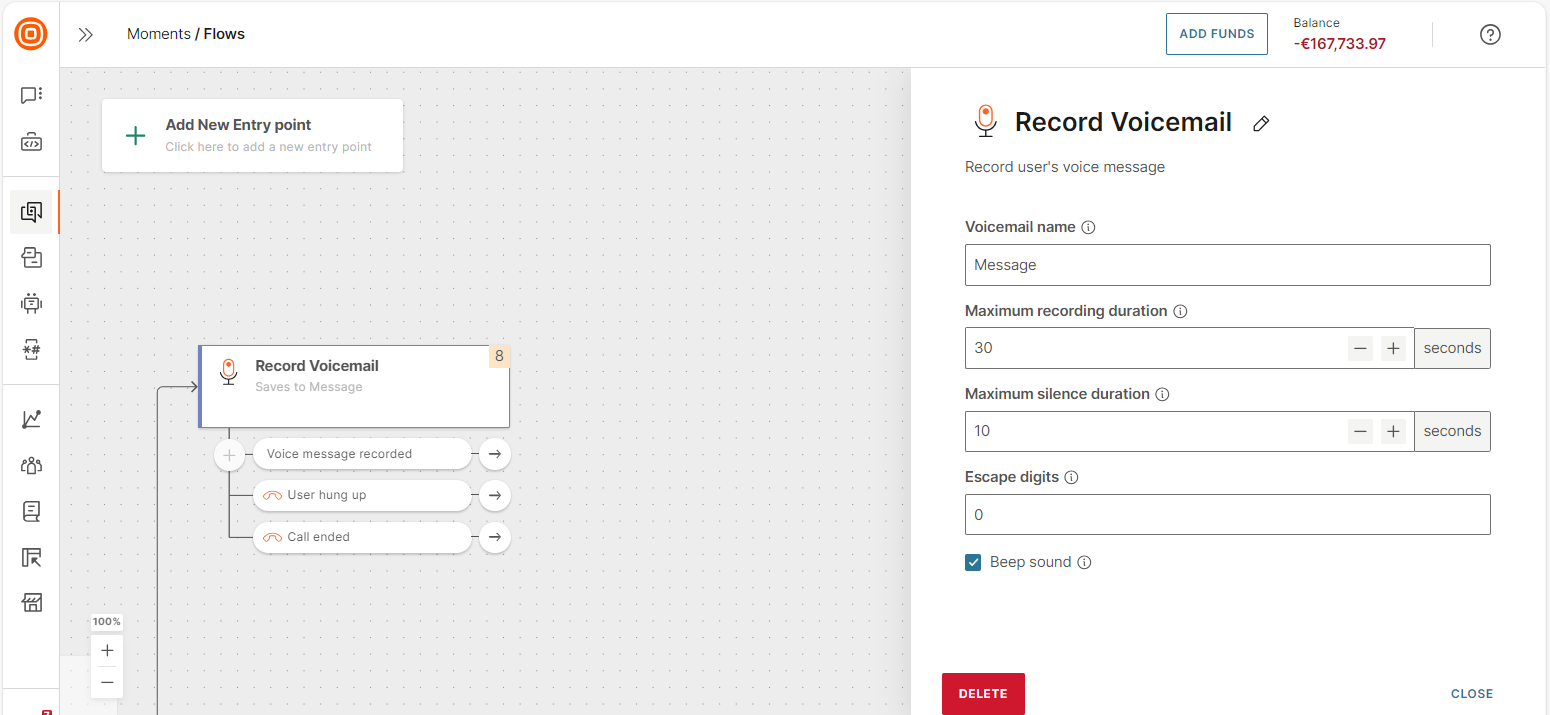
Record Voicemail
Use this element to record a part of the call. Example: Record the end user's opt-in information, their feedback, or their voice message.
Configure the element and use the branches in the element to specify the next steps in the flow.
Configure the element
Configure the following fields in the element.
Voicemail name
Select the file name that is used to save the recording.
Maximum recording duration
Select the maximum duration for which the call is recorded. Enter the value in seconds.
Maximum silence duration
Use this field to stop recording the call if there is a specific period of silence in the call. Select the maximum period of silence.
Escape digits
You can configure specific digits to stop the recording. When the end user finishes recording the voicemail, they can enter this digit on their keypad. Example: 0.
Beep sound
Select this option if you want to play a beep sound at the start of the recording.
Next steps
Use the branches in the Record voicemail element to manage the next steps.
The element has the following branches.
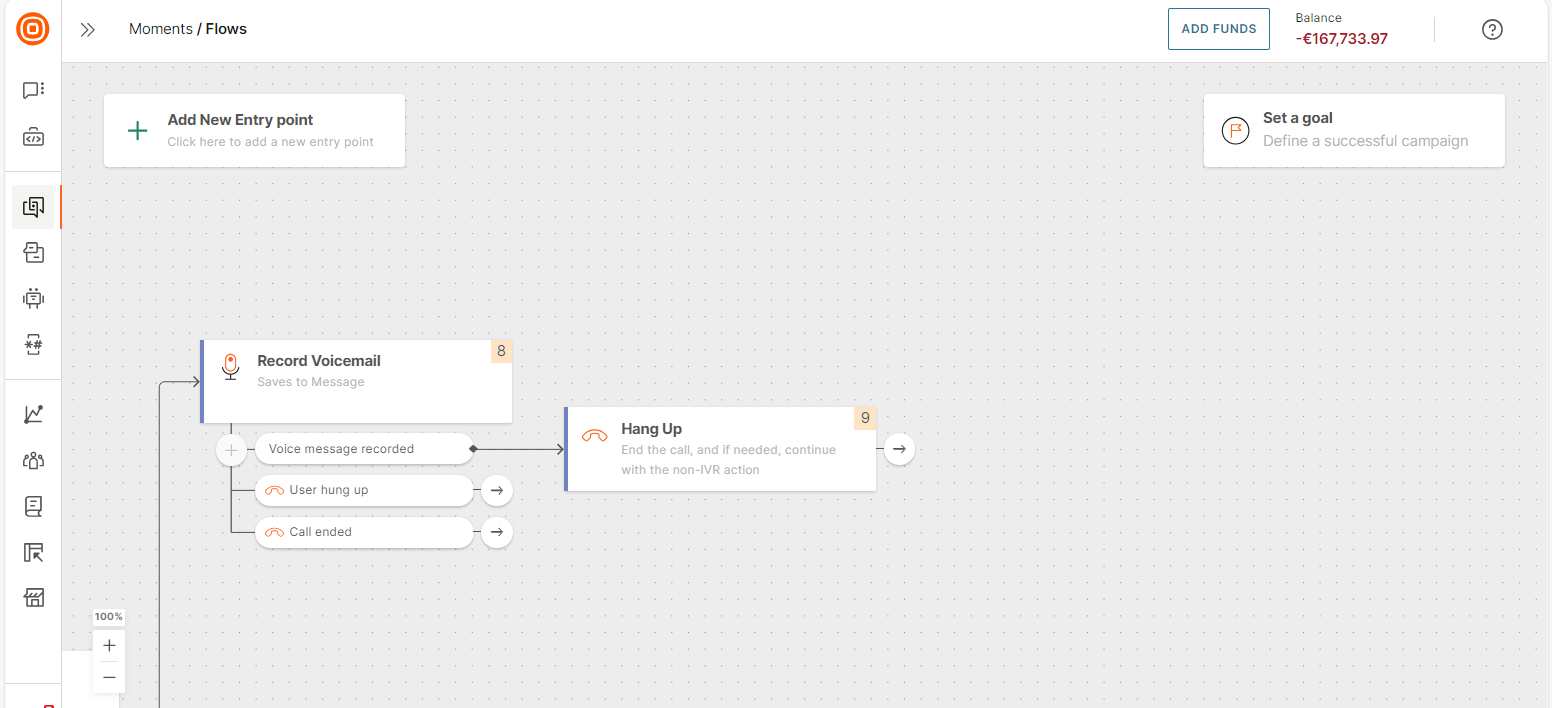
- Voicemail recorded: The voicemail from the end user was recorded.
- User hung up: The end user ended the call.
- Call ended: Call was ended by the flow or because of technical issues.
Retrieve a recording
To retrieve a recording, go to the Infobip web interface (opens in a new tab) >. The recordings are listed in the Channels and Numbers > Channels > Voice and WebRTC > Recordings tab > Calls API tab > Calls tab.
You can also download the file through the API (opens in a new tab).
Hang Up
Use the Hang up element to end the call session.
After you add this element to a branch in your flow, you can only use non–IVR actions in the branch or start a new call.
The Hang up element can be added in the following ways.
- Manually
- Automatically. When you validate a flow, Hang up elements are automatically added in the relevant branches to close the call session. Example: In the Start outgoing call element, if you have not ended the call session for the Voicemail branch, a Hang up element is automatically added to this branch.
Non-IVR actions within a call session
During a call session, you can use not only IVR actions but also non-IVR actions. Example: You can send a confirmation message through Push or SMS, update the end user's profile based on their response, or use Segments from People to segment audience based on attributes or events and then send the voice message to the relevant segment.
You can use the following actions within a call session.
- Send elements
- Failover
- Update variable
- Notify internal recipients
- Segment Audience
- Split audience
- Update Person Profile
- Add or Remove Tag
- Call API: Use to retrieve data from external systems and personalize the Play element. Example: Retrieve the end user's first name or information about the end user's order to personalize the message. Retrieve data to authorize the end user.
- Transfer chat to agent
- Catalog lookup
You cannot include the following within a call session.
- Wait for elements (Wait for an Event, Wait for Change in People Profile, and Wait for a Date). These elements might make the end user wait indefinitely during the call. You can use these elements either before or after the call session.
- Modular flows and Add to flow element.