Manage audience
This page is a quick tutorial explaining how to design audience segments, add tags to individual customers and groups, or how to filter audiences and add or remove people from a Do Not Contact list.
Segments
Audience segmentation is the process of organizing your audience into groups based on specific criteria. These groups are called segments.
To create a segment, you need to define the rules for the segment. All profiles that match these rules are added to the segment. You can then add the segment to a flow in Moments, and send customized communication to the segment. All the profiles in the segment receive the communication.
You can create segments based on one or more of the following:
- Attributes for a profile. Example: Based on the City attribute. In Moments, send a message that offers a discount to all the people in a specific city.
- Events associated with a profile. Example: Based on the Item viewed event. In Moments, send a follow up message to all the people who viewed a specific item.
You can use the same segment in multiple flows in Moments.
Segment types
Predefined segments
These segments are predefined and are listed in People > Segments. The following predefined segments are available in People.
- Active Mobile Users - Uses the App Launch event that has happened more than or equal to 1 time in the last 30 days.
- Inactive Mobile Users - Uses the App Launch event that has not happened more than or equal to 1 time in the last 30 days.
User-defined segments
Create segments based on the criteria that you specify. For more information, refer to the Create a segment section.
Working with segments
To access segments in People, on the Infobip web interface (opens in a new tab), go to People > Segments.
You can do the following.
- View a list of segments.
- Search for a segment: Use the Search option to find the required segment.
- Sort segments: You can sort segments by the columns on the Segments page.
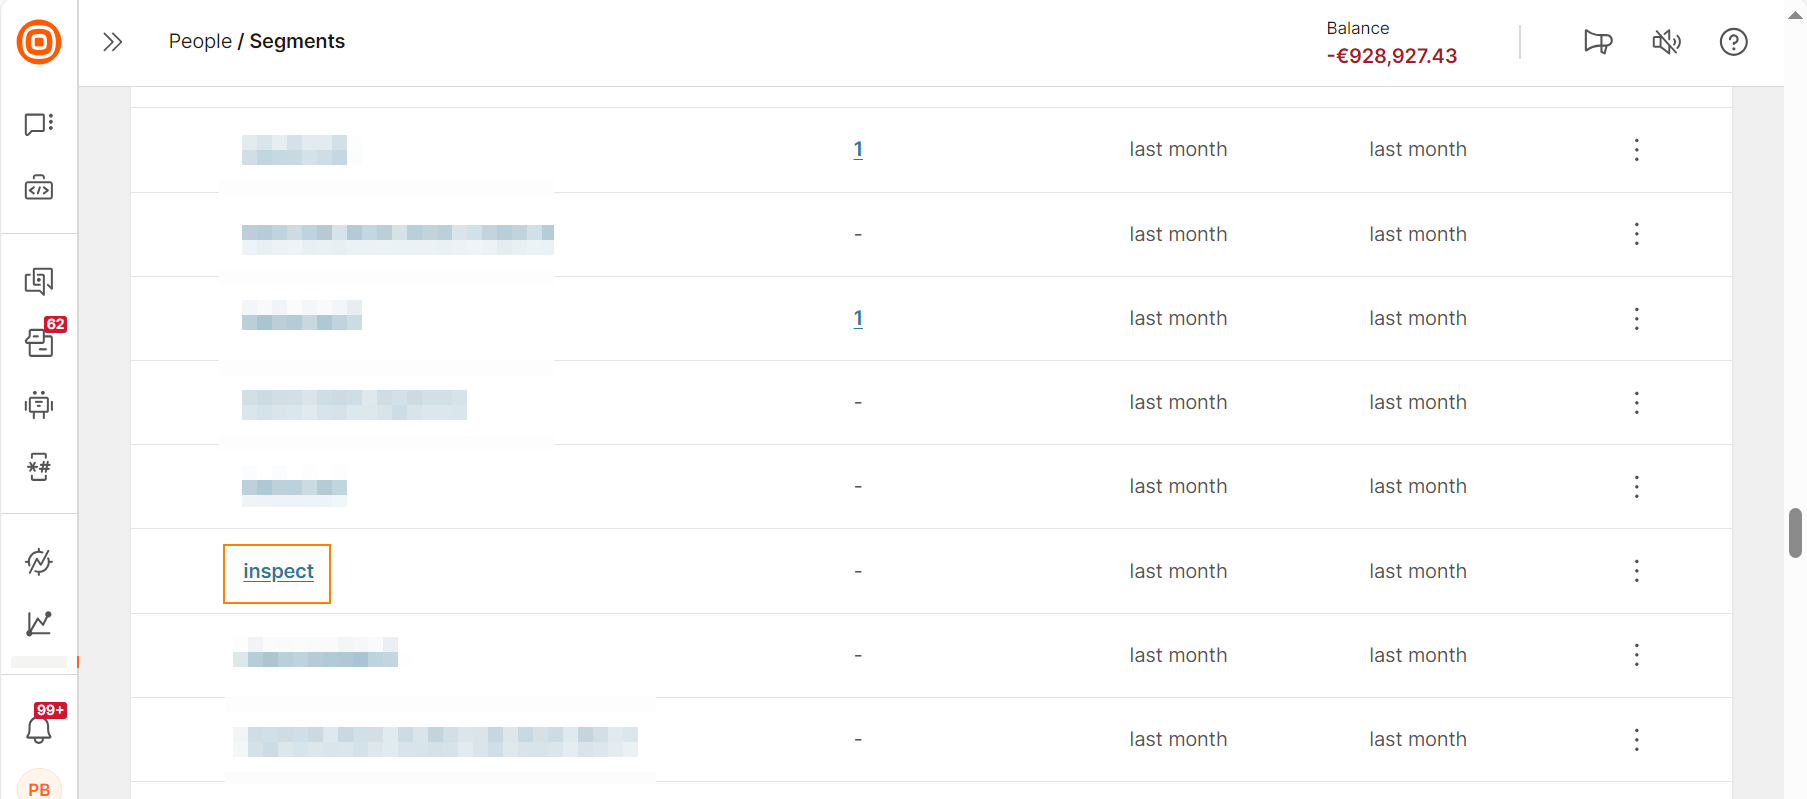
- View the profiles in a segment.
- Create a segment.
- Edit a segment.
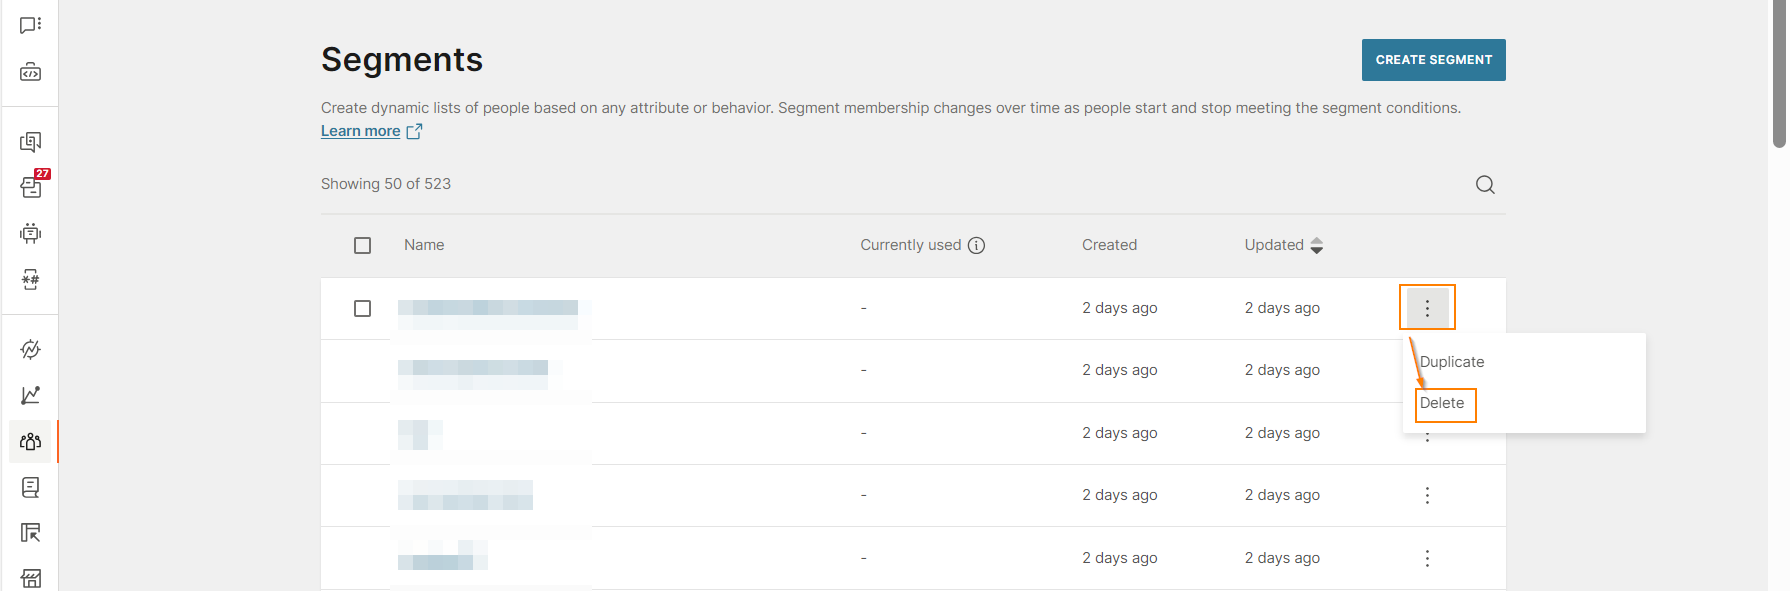
- Delete a segment.
- Duplicate a segment.
- Add a segment to a flow from People.
- Add a segment to a flow from Moments.
- Add a segment to a broadcast.
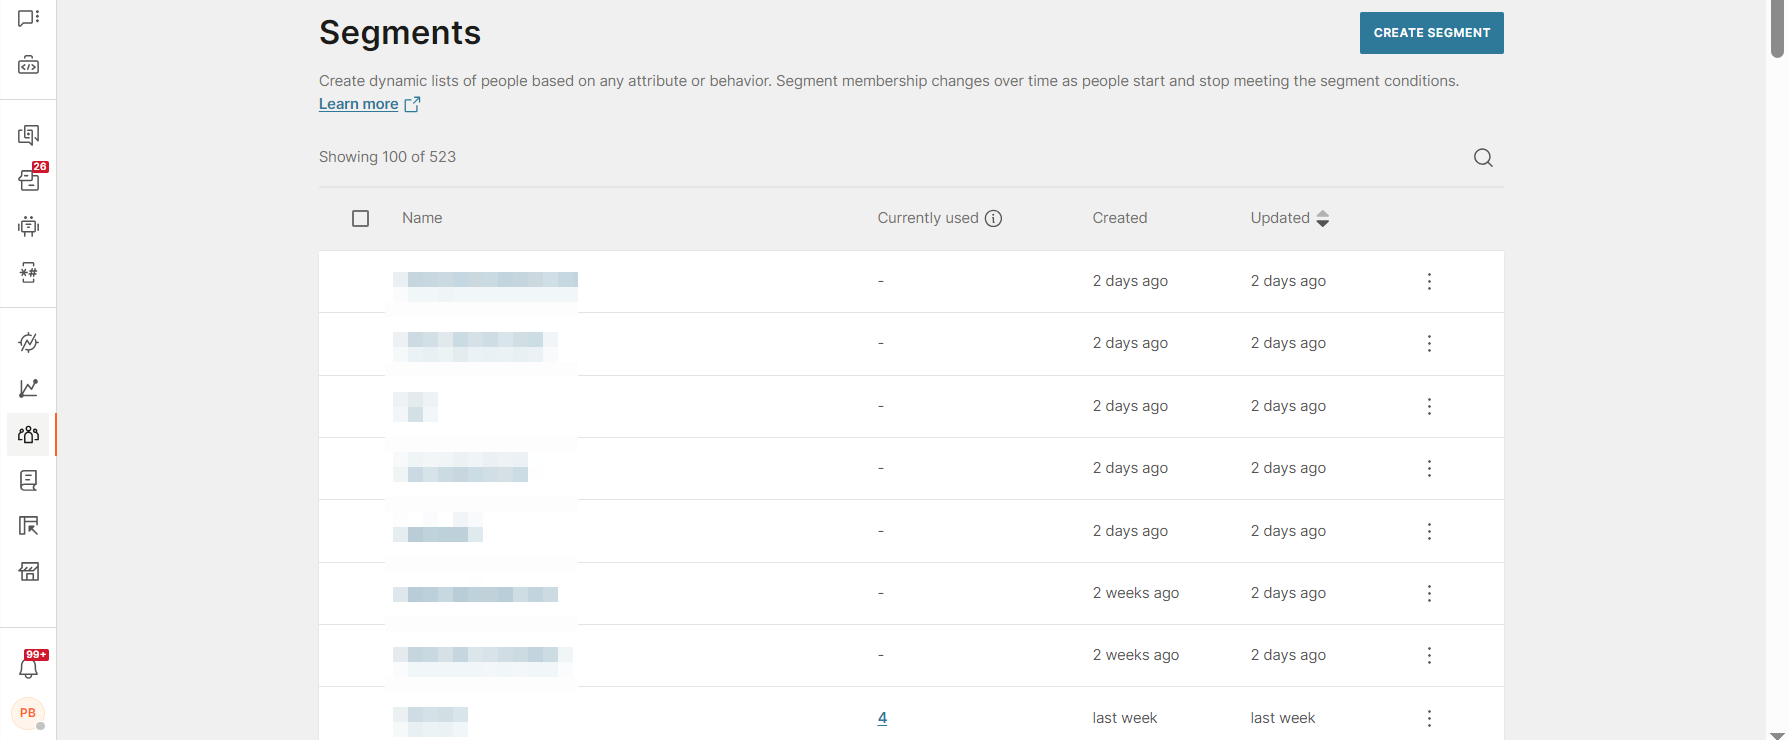
View a list of segments
On the Infobip web interface (opens in a new tab), go to People > Segments.
You can view the following information.
-
Name: Name of the segment.
-
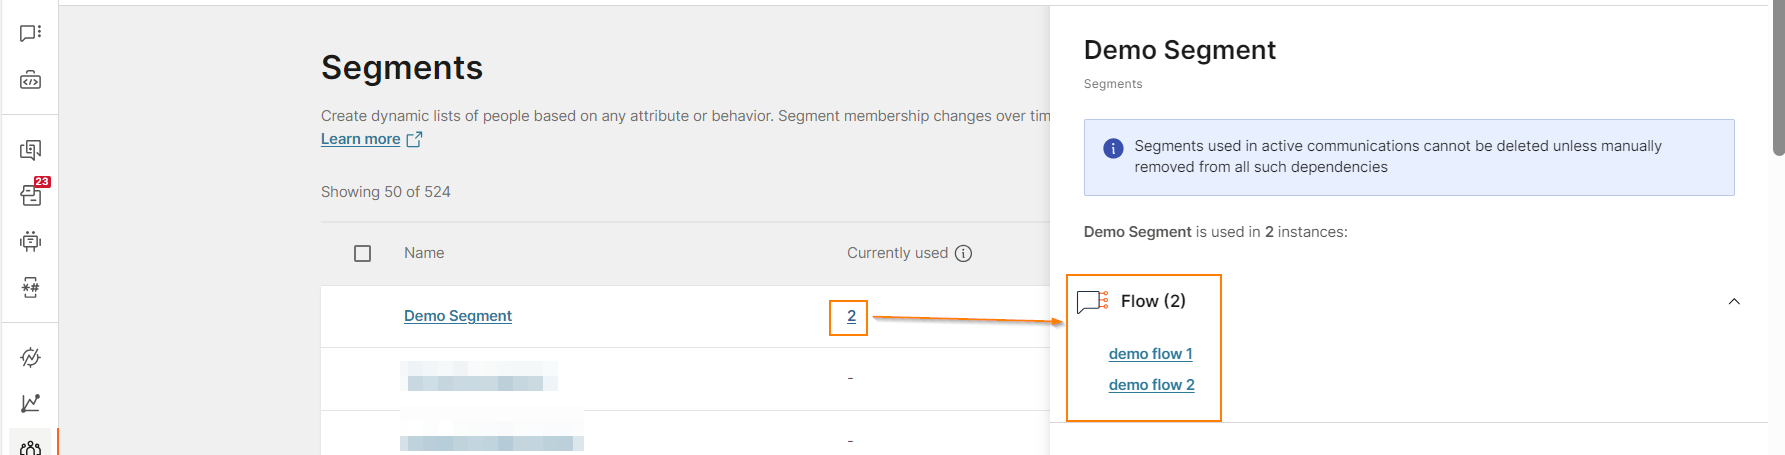
Currently used: Number of active communications in which the segment is used.
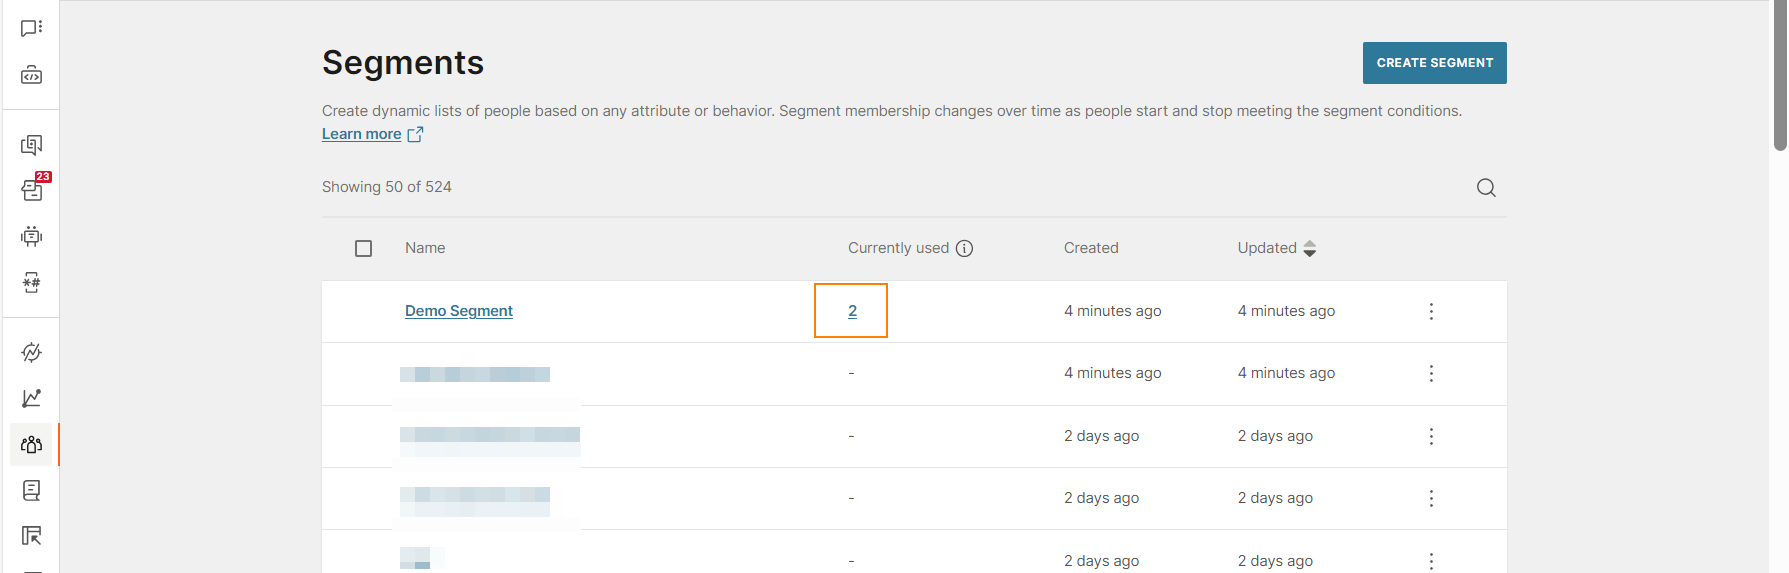
Select this field value to view the communications.
-
Created: When the segment was created.
-
Updated: When the segment was last updated.
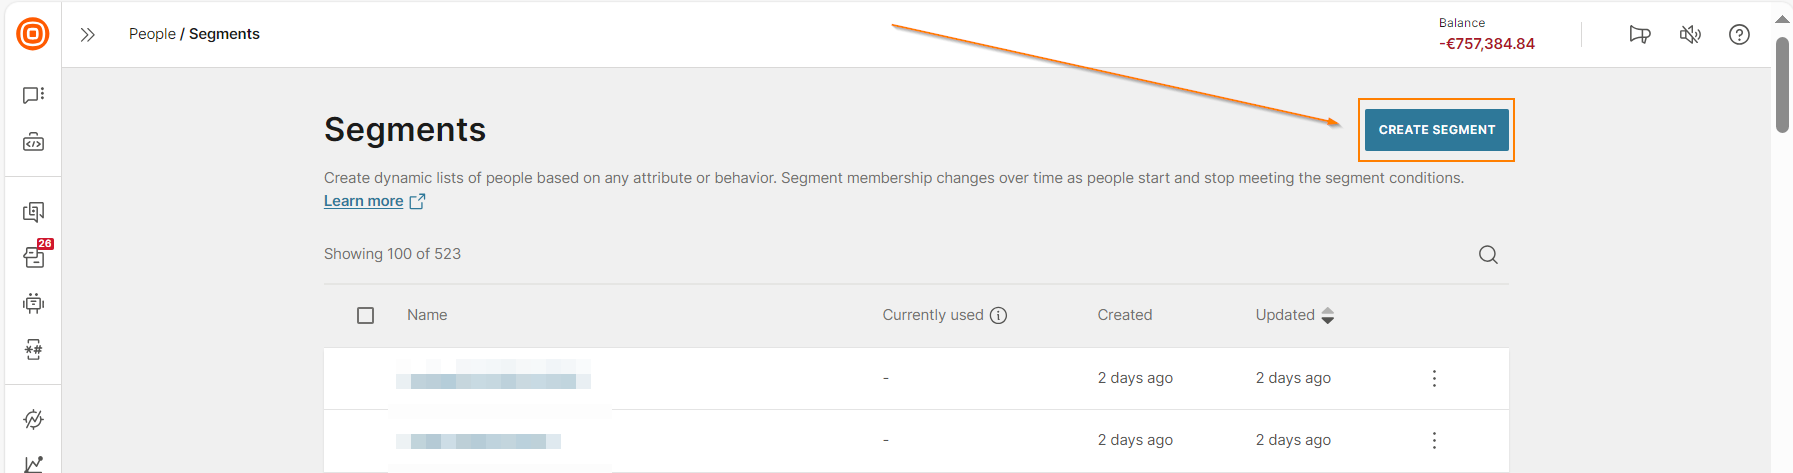
Create a segment
You can create segments in one of the following ways.
- Manually
- Using AI
Create a segment manually
-
On the Infobip web interface (opens in a new tab), go to People > Segments.
-
Select Create Segment.

-
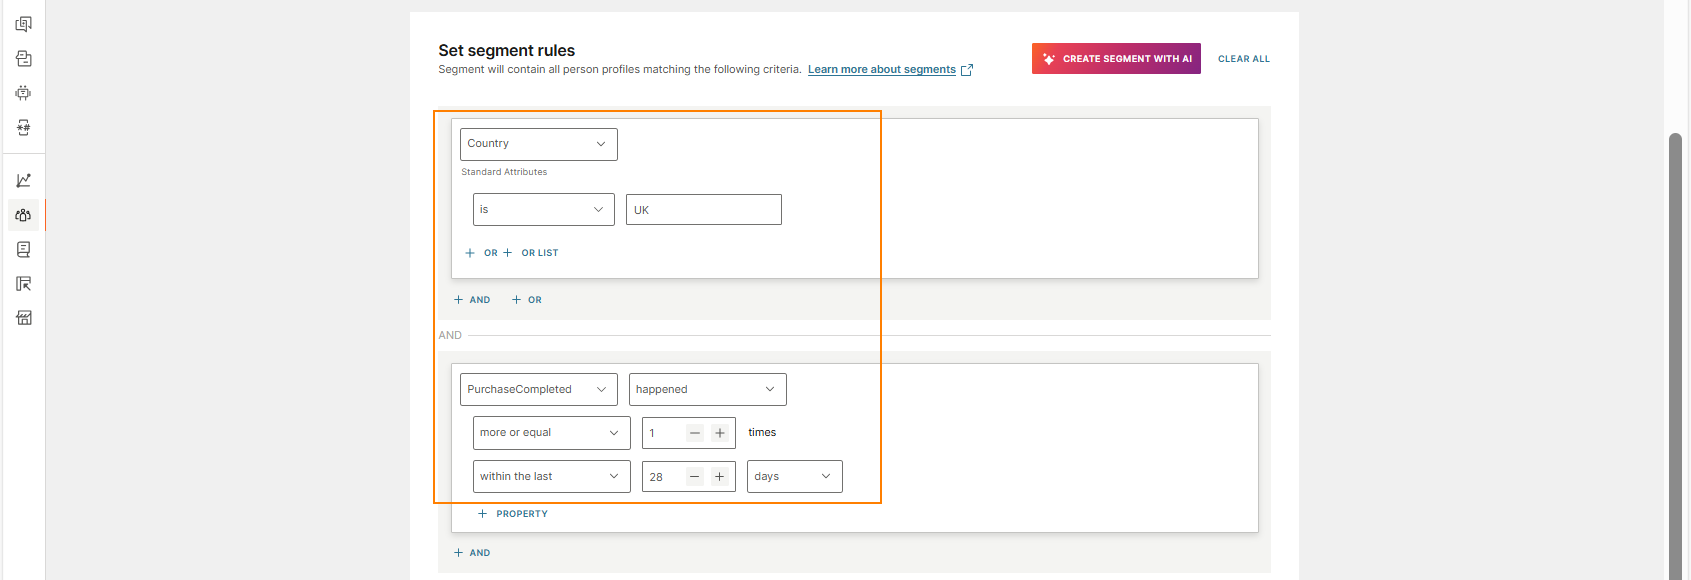
In the Set segment rules section, define the criteria for the profiles that need to be added to the segment. You can specify attributes, events, or both.
-
Attribute: Add the attribute, the relevant attribute operator and the attribute value. To add multiple values for an attribute, use the OR and OR LIST operators. To add multiple attributes, use the AND and OR operators.
You can add a maximum of 25 clauses for attributes.
If you use list attributes: You can control how the segment rules apply to list attributes. Refer to the Filter list items documentation.
-
Event: Add the event, the relevant event operators, event values, and properties. To add multiple events, use the AND operator.
You can add a maximum of 5 clauses for events.
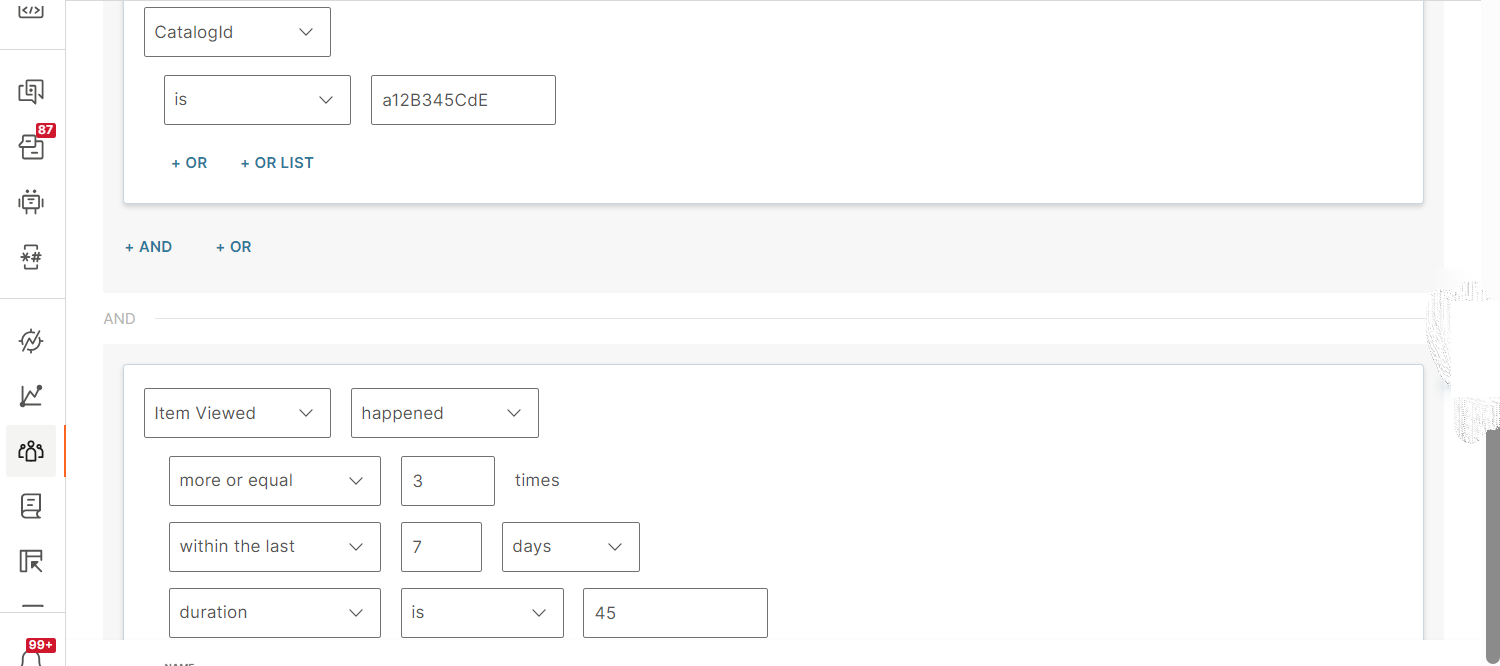
You can search for attributes and events, or use filters.
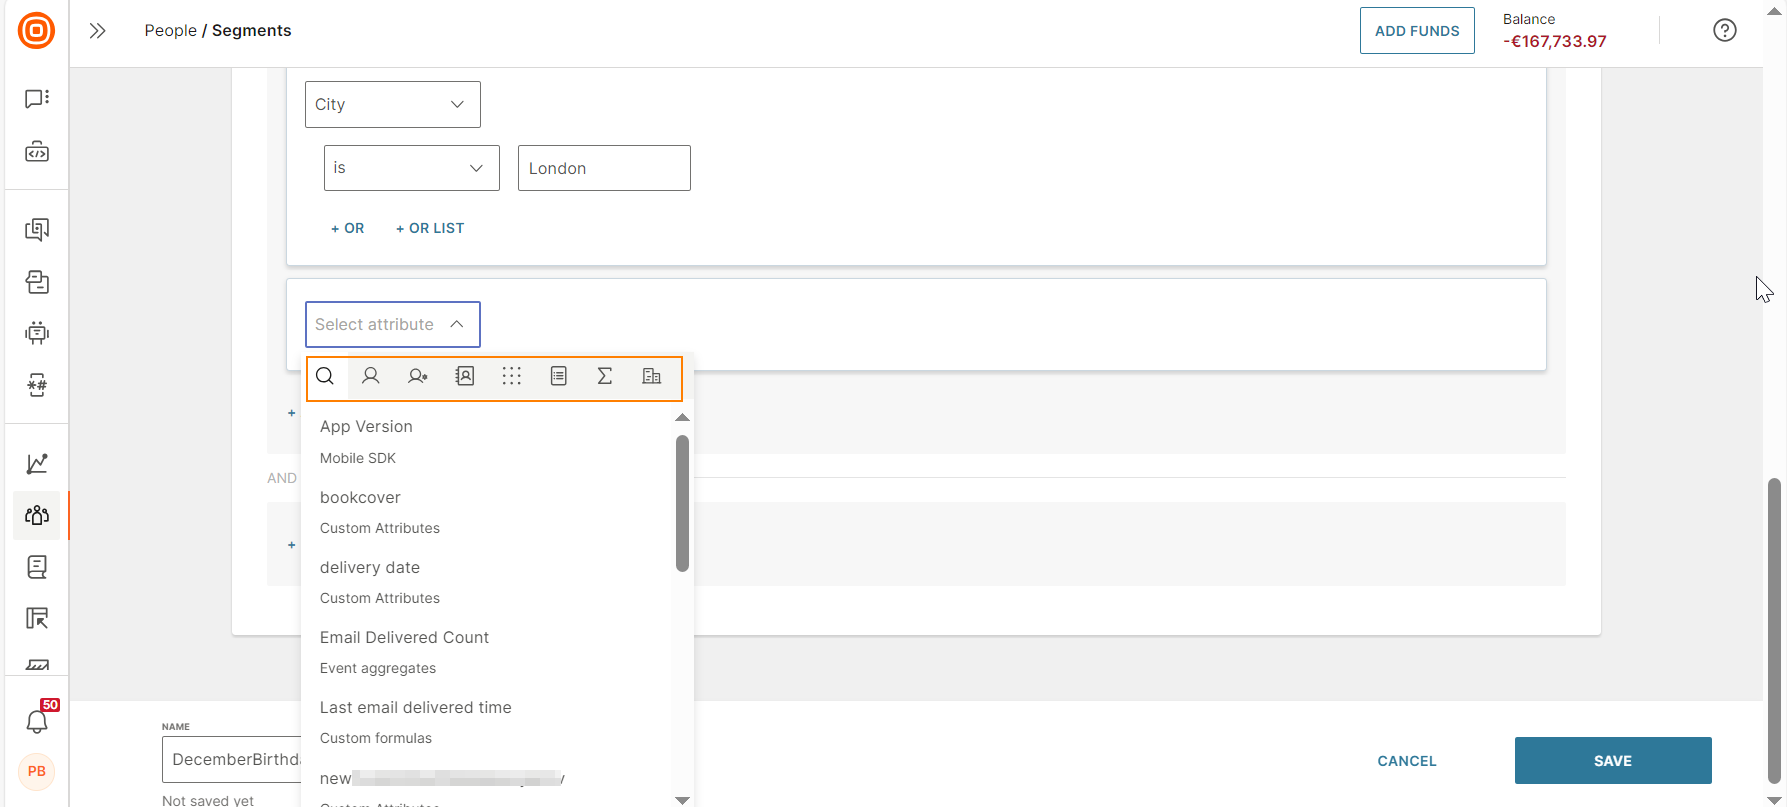
At the top of the page, you can now see an overview of the profiles that match the criteria. If required, you can add more criteria to refine the segment.
-
-
Add a name for the segment.
-
In the Segment summary section, add a description for the segment.
Example: Target all end users who have made a purchase in the last 4 weeks and who live in the UK.
Alternatively, you can generate the summary by using AI. Select Generate AI summary. The AI uses the segment rules to generate the description.
-
Select Save.
Create a segment by using AI
-
On the Infobip web interface (opens in a new tab), go to People > Segments.
-
Select Create Segment.
-
In the Set segment rules section, select Create segment with AI.
-
In the Create segment with AI screen, enter the criteria for the segment.
Example: Target all end users who have made a purchase in the last 4 weeks and who live in the UK.
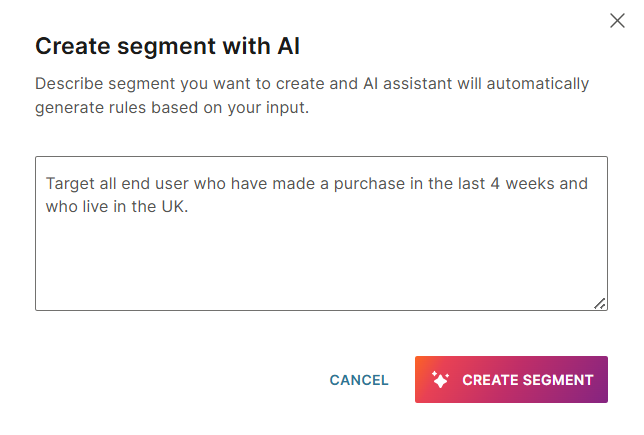
-
Select Create segment.
The segment rules are generated.
The Segment summary is also automatically updated based on the segment rules.
Edit a segment
You can edit a segment only if it is not used in an active flow in Moments.
To edit a segment, do the following:
- On the Infobip web interface (opens in a new tab), go to People > Segments.
- Select the segment that you want to edit.
- Make the relevant changes.
- Select Save.
Delete a segment
You can delete a segment only if it is not used in an active flow in Moments.
You can delete segments in the following ways.
Delete segments individually
-
On the Infobip web interface (opens in a new tab), go to People > Segments.
-
Select the three dots next to the segment and select Delete.
Delete one or more segments
-
On the Infobip web interface (opens in a new tab), go to People > Segments.
-
Select the segments that you want to delete.

-
Select Delete.
Duplicate a segment
-
On the Infobip web interface (opens in a new tab), go to People > Segments.
-
Select the three dots next to the segment and select Duplicate.

View profiles in a segment
- On the Infobip web interface (opens in a new tab), go to People > Segments.
- Select the required segment.
- Select View profiles.
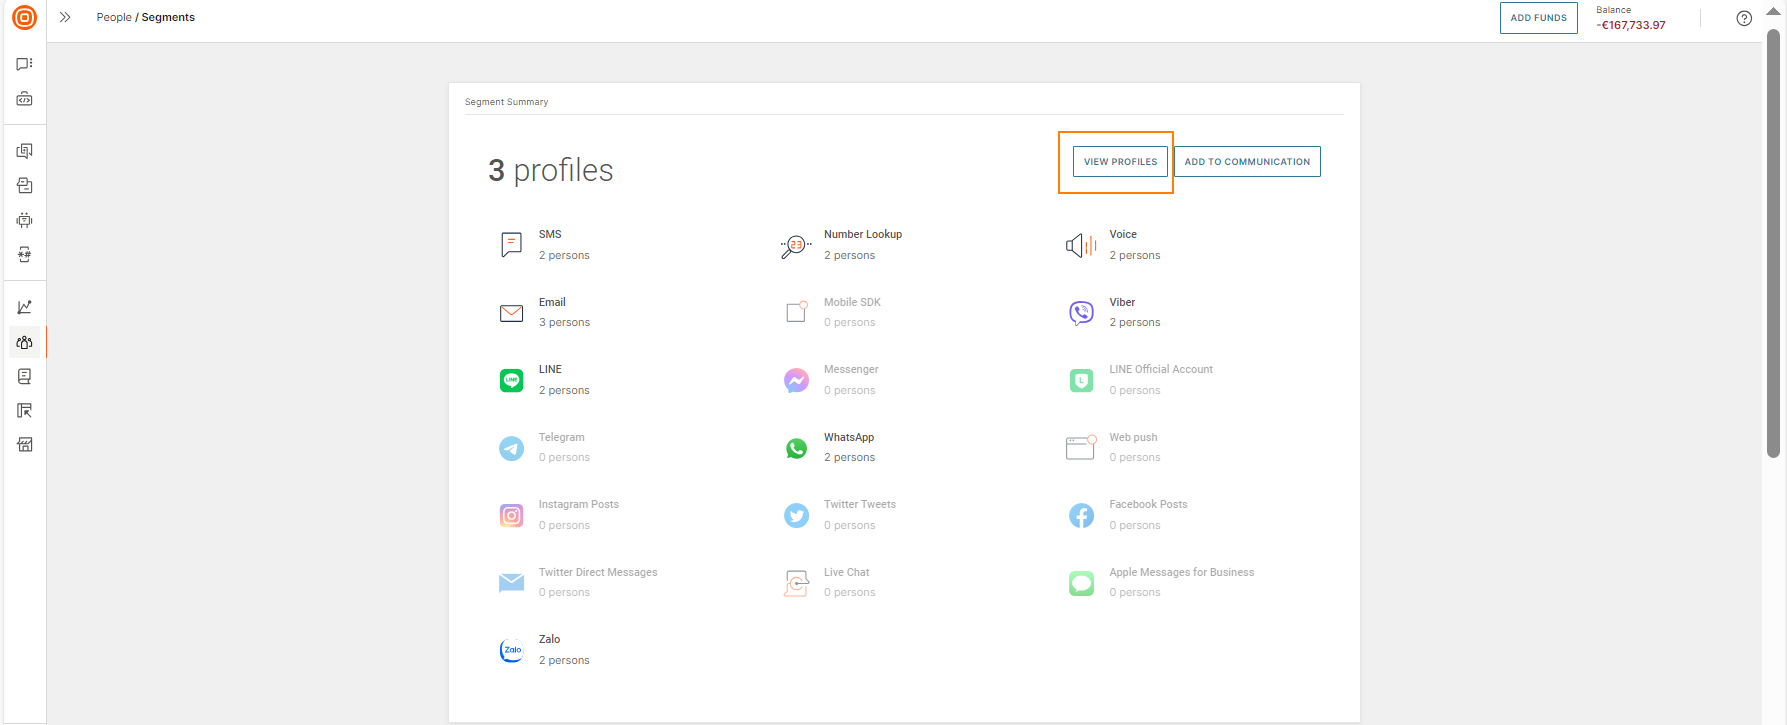
The profiles in the segment are listed.
You can view the segment criteria in the left pane.
Add a segment to a flow from Moments
Use segments with a Predefined Audience entry point.
Manage segments over People API
You can do the following in the People API (opens in a new tab).
| Endpoint | Details |
|---|---|
| Create a segment (opens in a new tab) | Create a new segment. |
| Get a segment (opens in a new tab) | Get the details of a segment by the segment ID. |
| Get a list of segments (opens in a new tab) | Get a list of all the segments in your account. |
| Update a segment (opens in a new tab) | Update the name of the segment and the segment rules. You can do this only if the segment is not used in an active flow. |
| Delete a segment (opens in a new tab) | Delete a segment by the segment name. You can do this only if the segment is not used in an active flow. |
Attribute Operators
These operators help define the audience segments with some very specific instructions:
| Operator | Description | Example |
|---|---|---|
| Is | The exact value | Use this operator when reaching out to customers who have spent a specific amount of money on purchases. |
| Is Not | Everything except the specific value | Use it to send a message to customers who have spent more or less than the specified amount. |
| Less Than | Anything below a specific value | For customers who still have a way to go before spending a certain amount. |
| Less or equal | The value is lower or equal to your defined value | For messages to customers who spent this same amount of money or less. |
| Greater or equal | The value is higher or equal to your defined value | You want to target customers whose purchases reached a certain threshold or went over it. |
| Greater than | The value is higher than the defined value | When targeting customers who spent over a certain threshold. |
| Is empty | The attribute is empty | Include profiles where City attribute is empty. |
| Is not empty | The attribute is not empty | Include profiles where Favorite Color attribute is not empty. |
The attribute operators may be different depending on the type of attribute you select. Here are some more string and time operators you will likely meet as you are filtering and adapting your segment rules:
String Operators
| String Operator | Description | Example |
|---|---|---|
| Starts with | Filter attribute starting with text | Filter City attribute starting with 'Lo' to show profiles where the city starts with 'Lo'. Example returns, London and Los Angeles. |
| Ends with | Filter attribute ending with text | Filter City attribute ending with 'on' to show profiles where the city ends with 'on'. Example returns, Lisbon and London. |
| Contains | Filter attribute containing text | Filter First Name attribute containing the letters 'da' to show profiles with First Name containing 'da'. Example returns, Adam or Aida, or Danielle. |
| Not contains | Filter attribute does not contain text | Filter First Name attribute not containing the letters 'da' to show profiles with First Name that do not contain 'da'. Example returns, Ben, or Luka, or Maria. |
Date / Time Operators
| Date / Time Operator | Description | Example |
|---|---|---|
| Will be in | Date / time attribute will be in x days, weeks, or months | Filter profiles where Renewal Date will be in 5 days' time. |
| Will be within | Date / time attribute will be within x days, weeks, or months from today | Filter where Renewal Date will be within the next 7 days from today. This would include all days between today and the date/time specified. |
| Will be more than | Date / time attribute will be more than x days, weeks, or months from today | Filter where Renewal Date will be more than 7 days from today. |
| Was | Date / time attribute was x days, weeks, or months ago | Filter profiles where Renewal Date was 5 days ago. |
| Was within | Date / time attribute was within x days, weeks, or months before today | Filter profiles where Renewal Date was within the past 5 days including today. |
| Was more than | Date / time attribute was more than x days, weeks, or months before today | Filter profiles where Renewal Date was more than 1 week before today. |
| Before | For date attributes that occur before a date | Filter profiles where Purchase Date is before and not including 10/10/2021. |
| Until | For date attributes that occur before and including the specified date | Filter profiles where Purchase Date is before and including 10/10/2021. |
| Since | For date attributes that have happened since the specified date | Filter profiles where Purchase Date is since and including 10/10/2021. |
| After | When date attribute happens after the specified date. | Filter profiles where Purchase Date is after and not including 10/10/2021. |
When evaluating relative conditions such as will be in, was within and others for datetime attributes, only the date part of the attribute value is used while the time is ignored.
Event Operators
The event you are using to create a segment will include both the occurrence and timeframe: how many times the purchase happened during the specific time period. Connect the occurrence and time operators and you will have a very refined campaign.
Occurrence:
| Operator | Example |
|---|---|
| Equals | The exact number of times the customer made a purchase. |
| Less than | For the number of purchases that's smaller than a specific number that you will define. For instance, less than 3 purchases. |
| Less or equal | When targeting customers who made the number of purchases that is either smaller or equal to the value that you have set. |
| More or equal | Reach out to customers who made the exact number of purchases as the defined value or more than the defined value. |
| More than | For customers who made more than a specific number of purchases. For example, when you want to award those who bought more than 5 products. |
Time:
| Operator | Example |
|---|---|
| Any time | It does not matter when exactly the purchase occurred. |
| Within the last | It occurred inside the specific timeframe, during the past “x” days, hours, minutes. |
| Before the last | The purchase happened before the last “x” days, hours, minutes. |
| Between the last | The event may have happened between the last “x” and “y” days, hours, or minutes. |
| After | The event happened after the specified date and time. |
| Before | The event happened before the specified date and time. |
| Between | The event happened between the two dates and times that you specify |
Tags
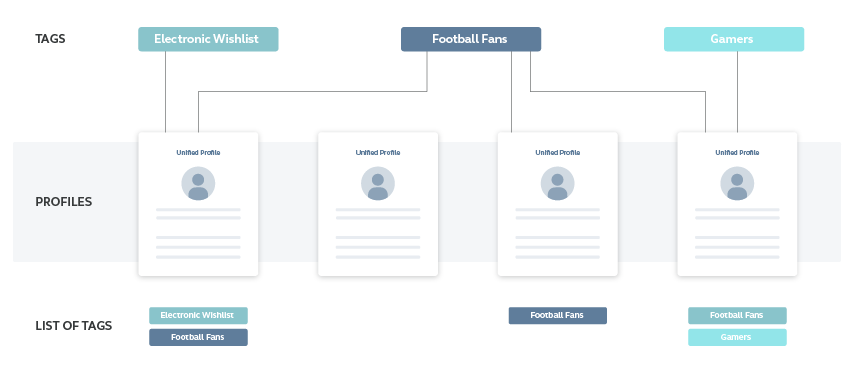
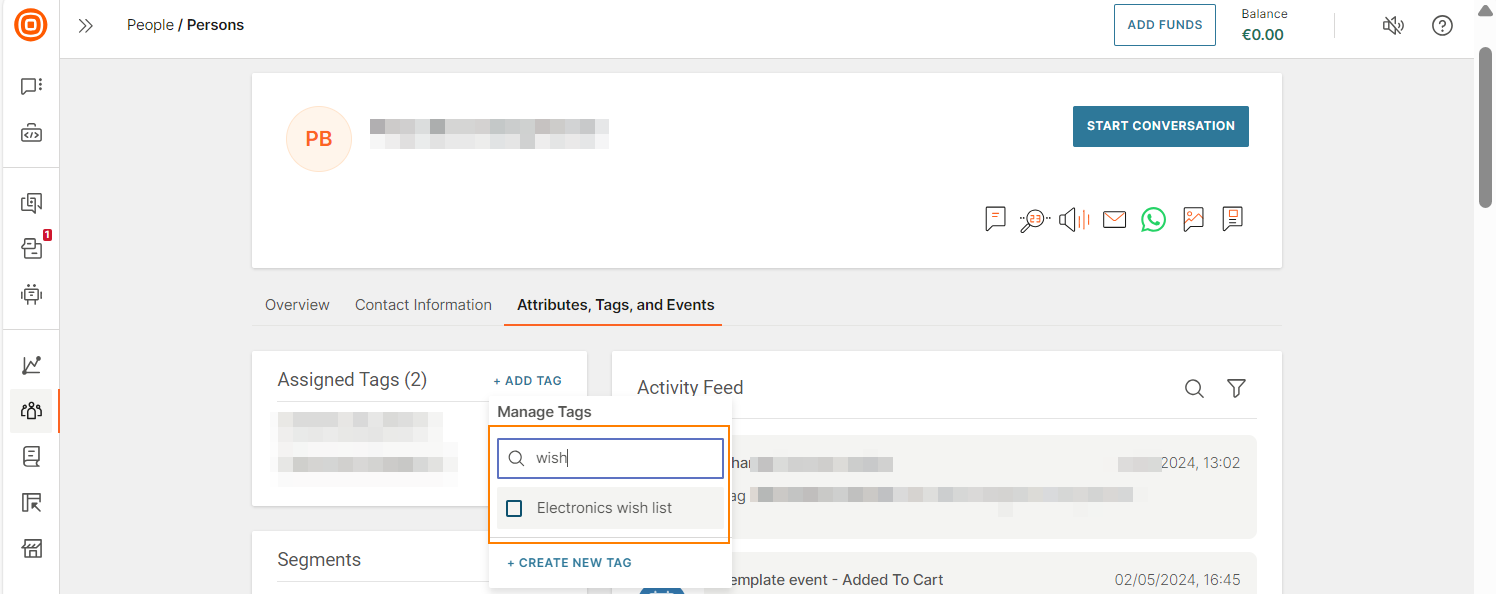
A tag is a label that is used to add specific information about a profile.
Example: On your shopping website, an end user adds items from the Electronics category to their wish list. You can add a tag Electronics wish list to their Person profile in People. You can then use this tag in a flow in Moments to send them special offers about electronics products.
You can add more than one tag to the same profile. You can add the same tag to multiple profiles.
The following are some examples of where you can use tags.
- Group profiles: You can group all profiles that have a specific tag. Example: You can send special offers to all end users whose profiles have the Electronics wish list tag.
- Collect data about end user interactions on your platforms: Use tags to collect data about user interactions, such as page viewed and link clicked.
- Trigger events: You can trigger events based on tag addition and removal. Example: When the Electronics wish list tag is added to an end user's profile, you can trigger a flow in Moments.
- Segment profiles: You can add tags to profiles to segment end users into categories. Example: On your shopping website, you can add tags to differentiate between end users who completed a purchase and those who did not. You can then send relevant messages to the two segments.
Working with tags
To access tags in People, on the Infobip web interface (opens in a new tab), go to People > Tags.
You can do the following.
- View a list of tags.
- Search for a tag: Use the Search box to find the required tag.
- Sort tags: You can sort tags by the columns on the Tags page. Select a column to sort the tags.
- Create a tag.
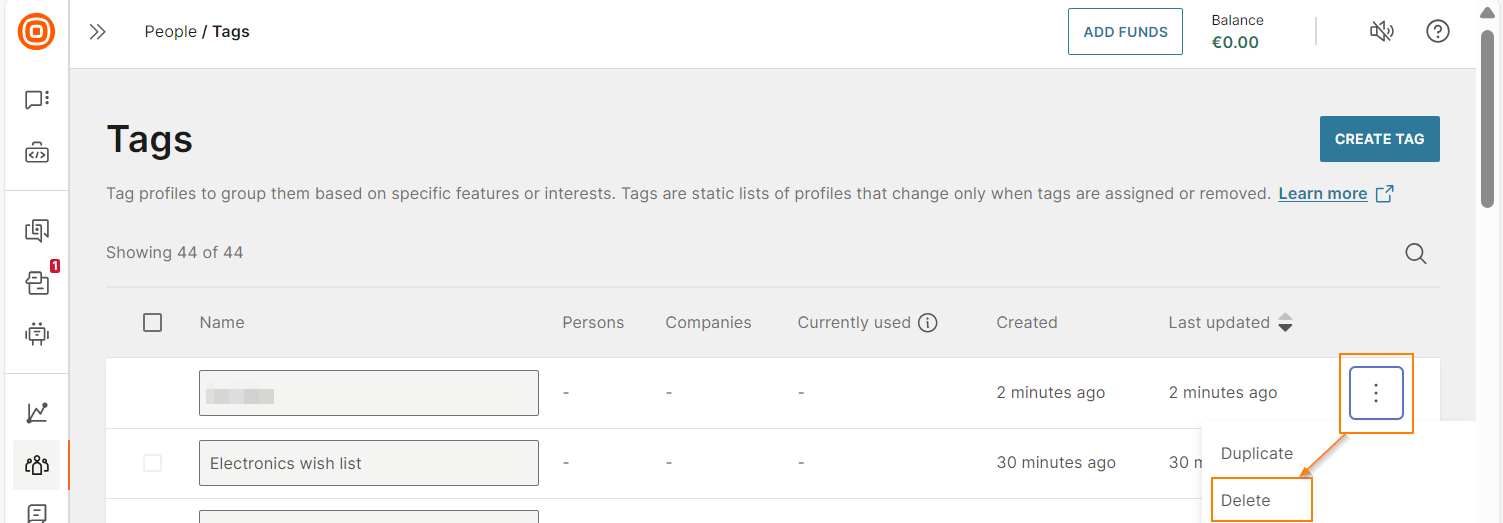
- Delete a tag.
- Duplicate a tag.
- View the profiles that contain a specific tag.
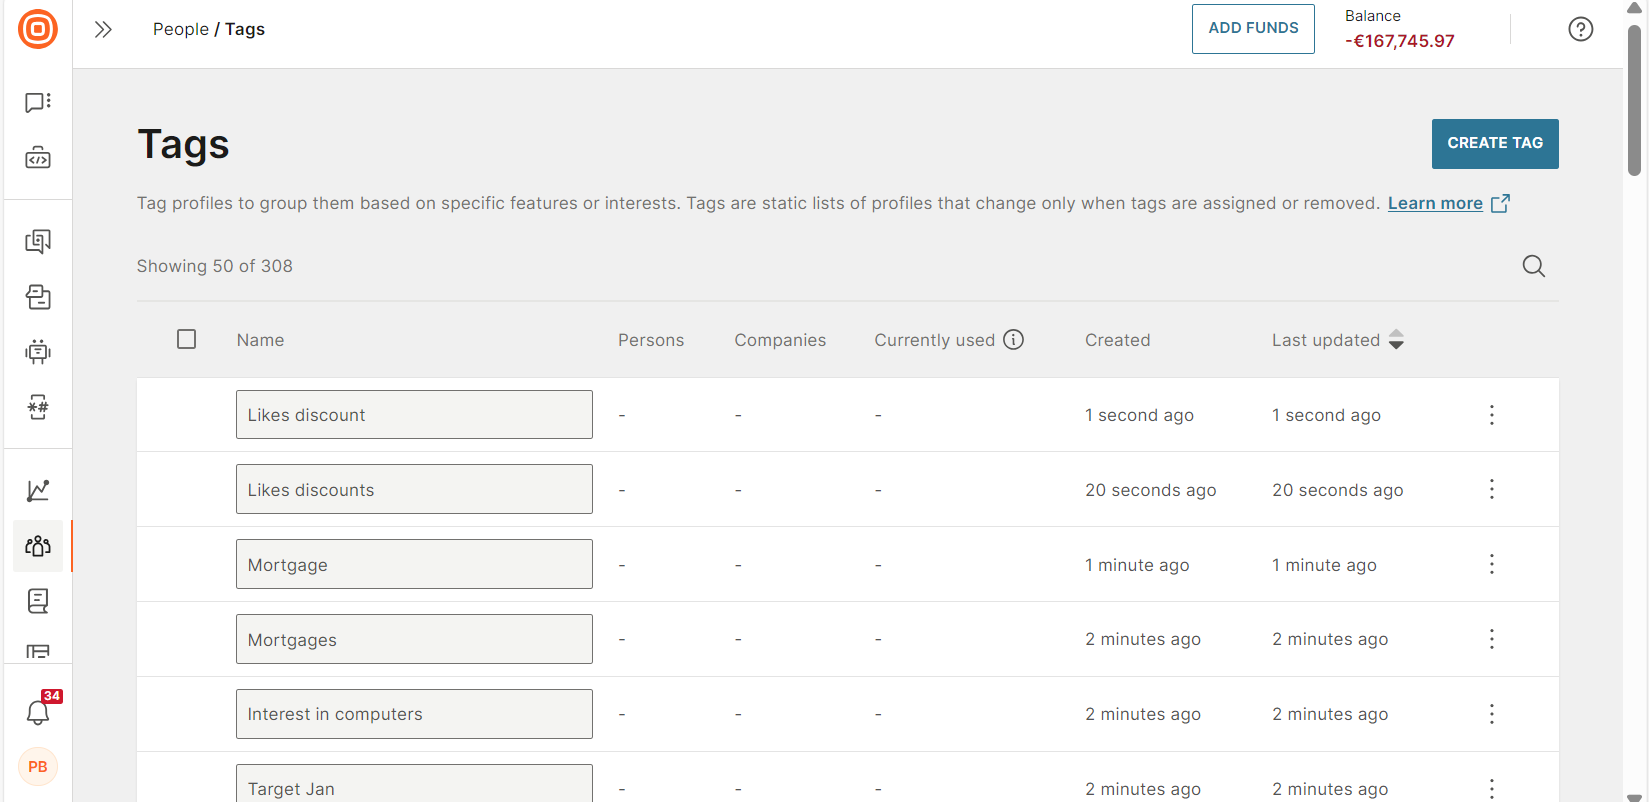
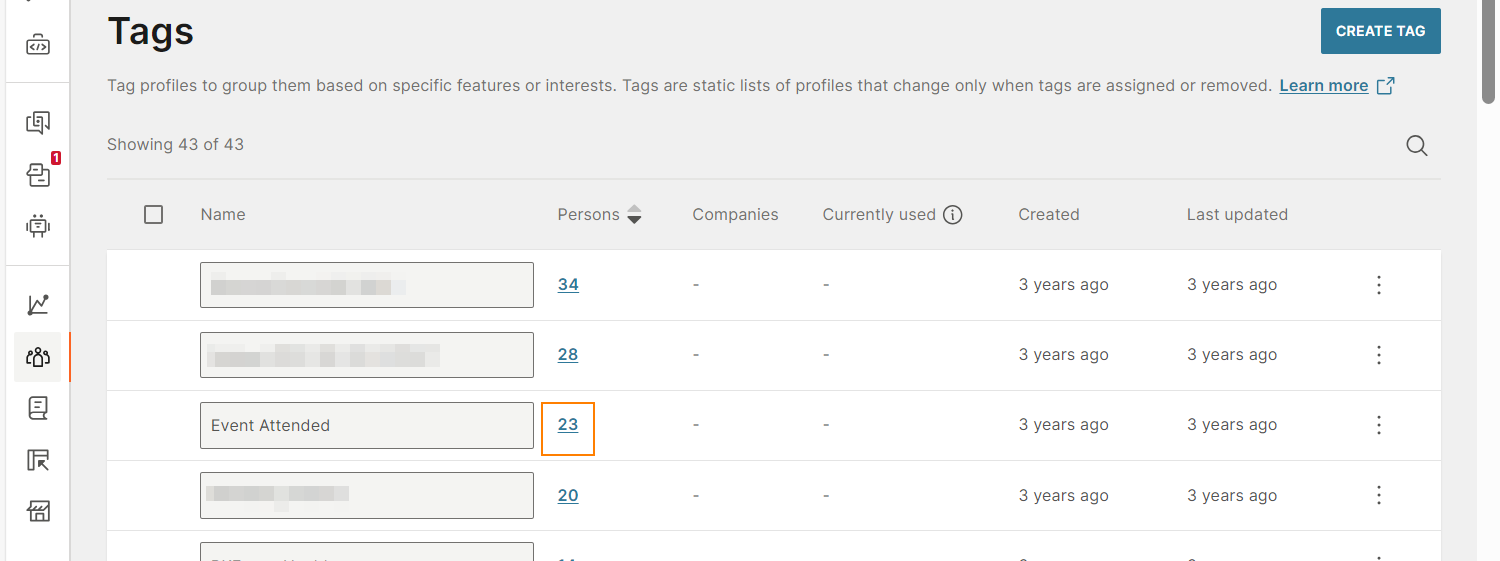
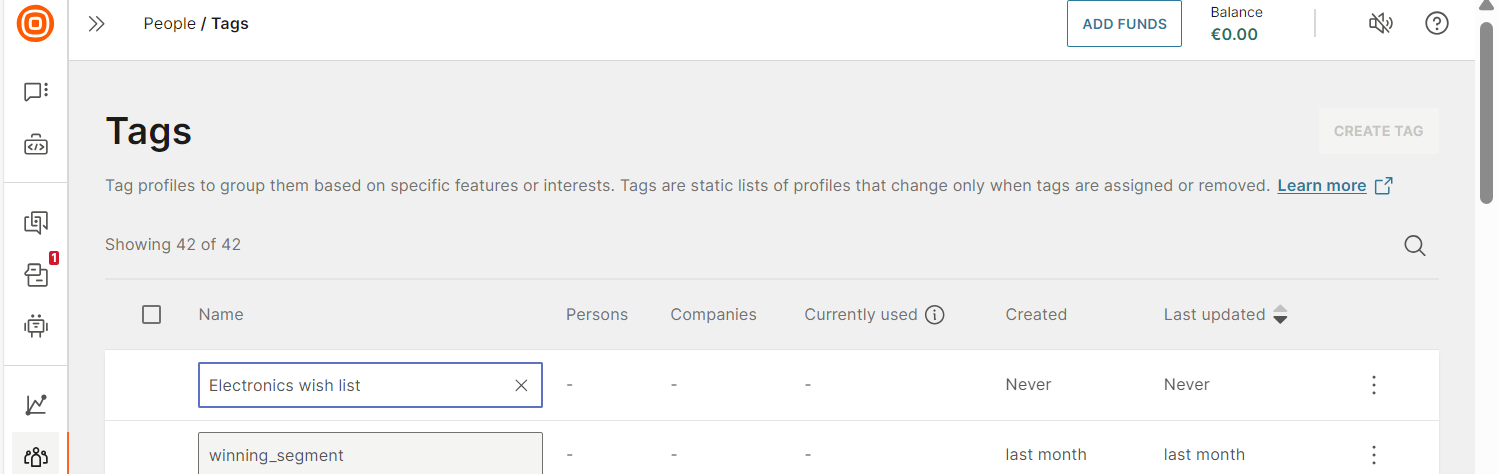
View a list of tags
On the Infobip web interface (opens in a new tab), go to People > Tags.
You can view the following information.
-
Name: Name of the tag.
-
Persons: Number of Person profiles in which the tag is used. Select this field value to view the profiles that contain this tag.
-
Companies: Number of Company profiles in which the tag is used. Select this field value to view the profiles that contain this tag.
-
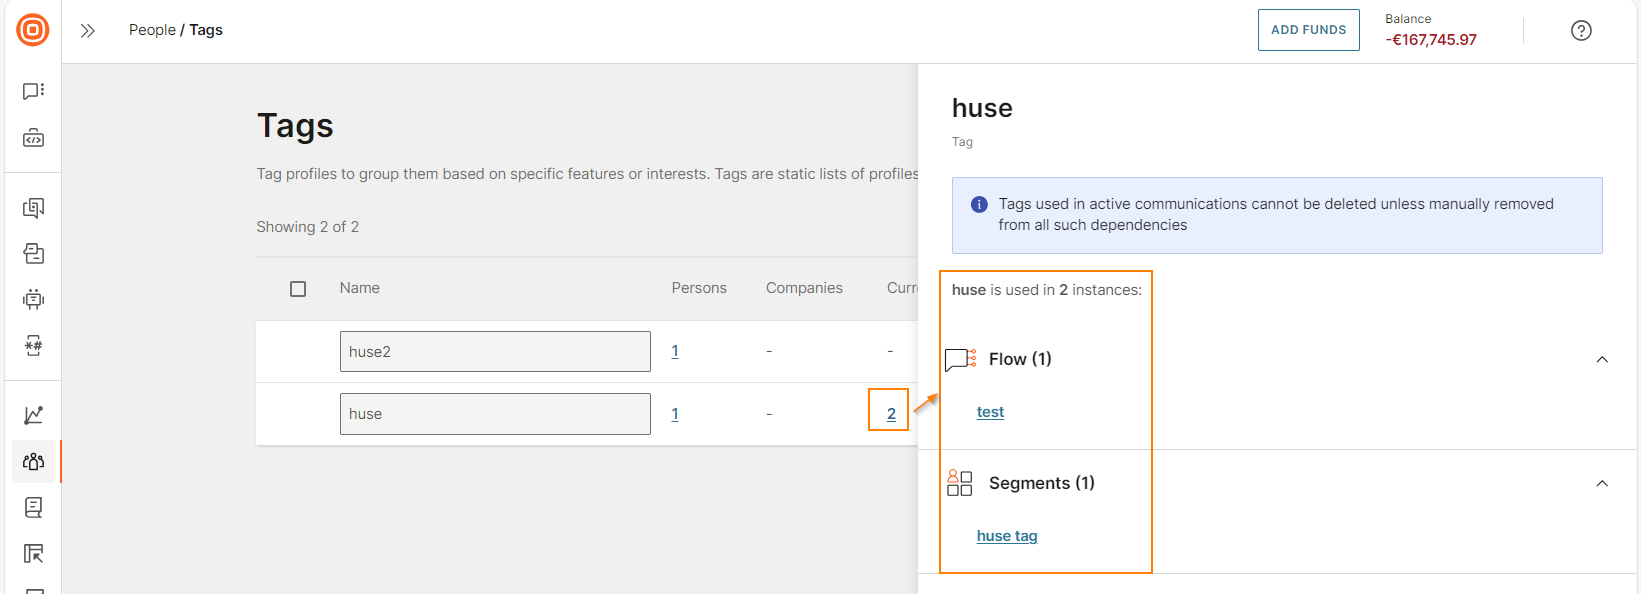
Currently used: The number of active flows and segments in which the tag is used. Select the number to view the details.
-
Created: When the tag was created.
-
Last updated: When the tag was last updated.
Create a tag
You can create a tag in the following ways.
- From the Tags page: Use this option to create a tag. This tag is not automatically assigned to a profile.
- From a person profile: Use this option to create a tag and assign it to a specific person profile.
Create a tag from the Tags page
Use this option to create a tag. This tag is not automatically assigned to a profile.
- Log on to the Infobip web interface (opens in a new tab).
- In the menu on the left, go to People > Tags.
- Select Create tag.
- Enter the name of the tag.
Create a tag from a Person profile
Use this option to create a tag and assign it to a specific person profile.
-
Log on to the Infobip web interface (opens in a new tab).
-
In the menu on the left, go to People > Persons.
-
Open the profile for which you want to create and add a tag.
-
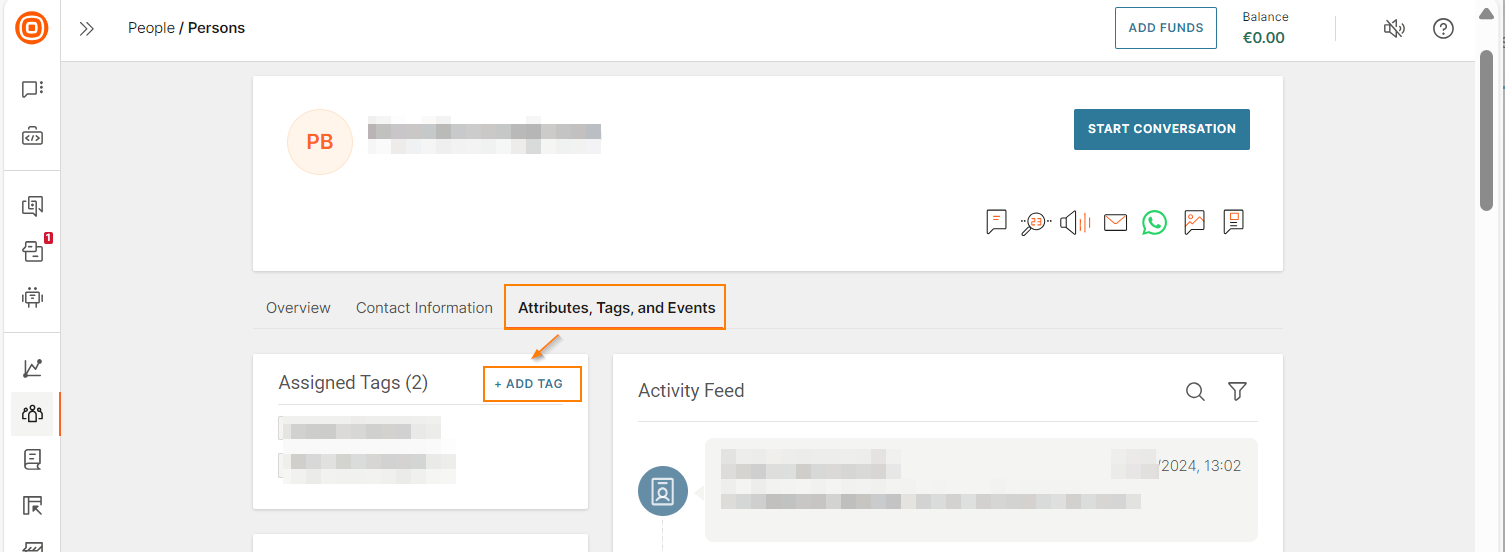
In the Attributes, tags, and events tab, select Add tag.
-
Select Create new tag.
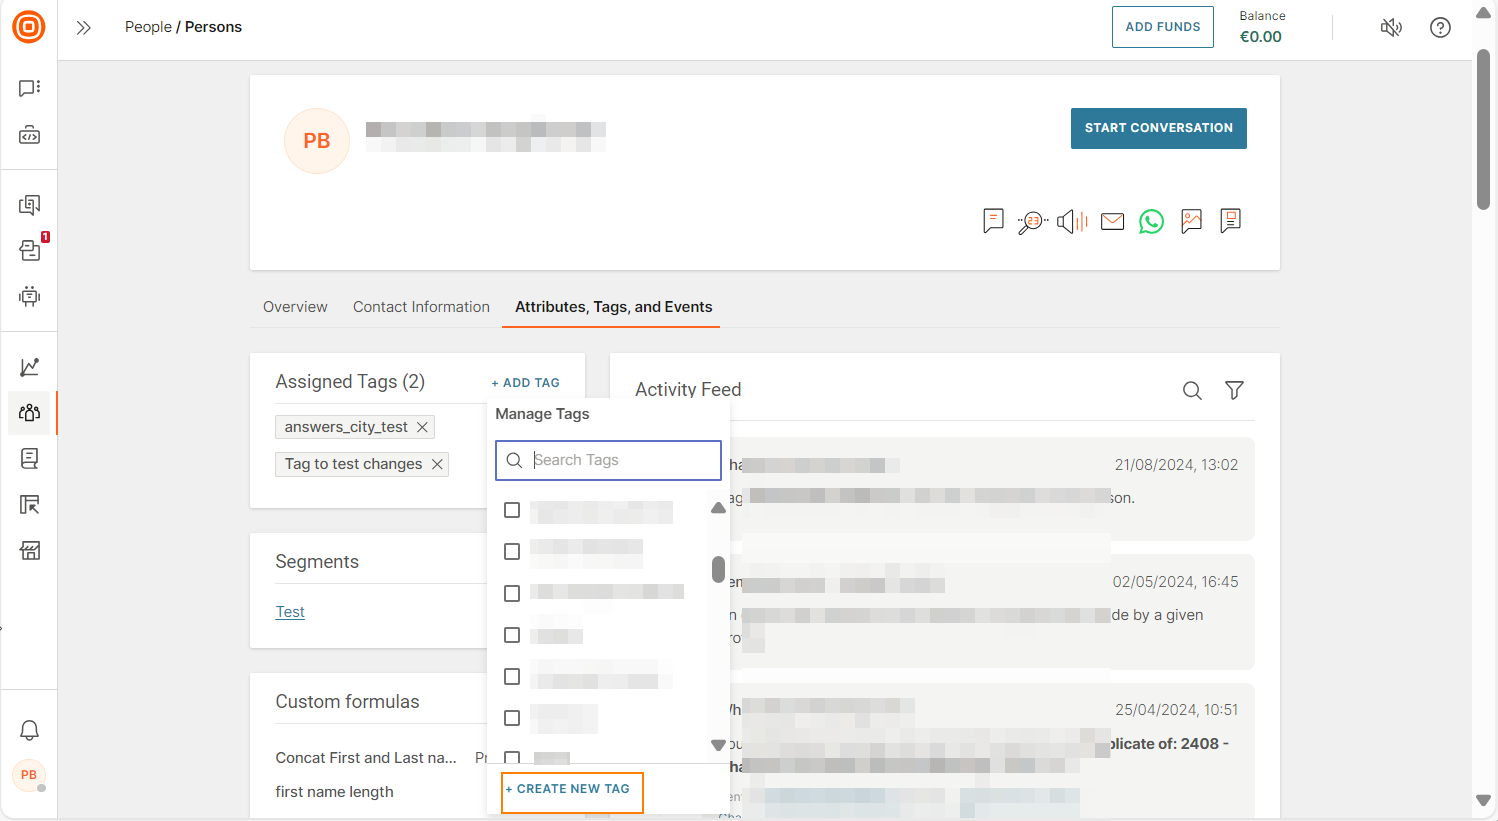
-
Enter the tag name and select the check mark.
-
In the confirmation window, select Create.
The tag is created and assigned to the person profile.
The tag is also displayed on the Tags page. You can now use this tag for other profiles.
Delete a tag
When you delete a tag, it is removed from the Tags page and from all the profiles that contain the tag.
You cannot delete a tag that is used in a Scheduled or Active flow.
You can delete tags in the following ways.
Delete a tag
- Log on to the Infobip web interface (opens in a new tab).
- In the menu on the left, go to People > Tags.
- Select the three dots next to the relevant tag and select Delete.
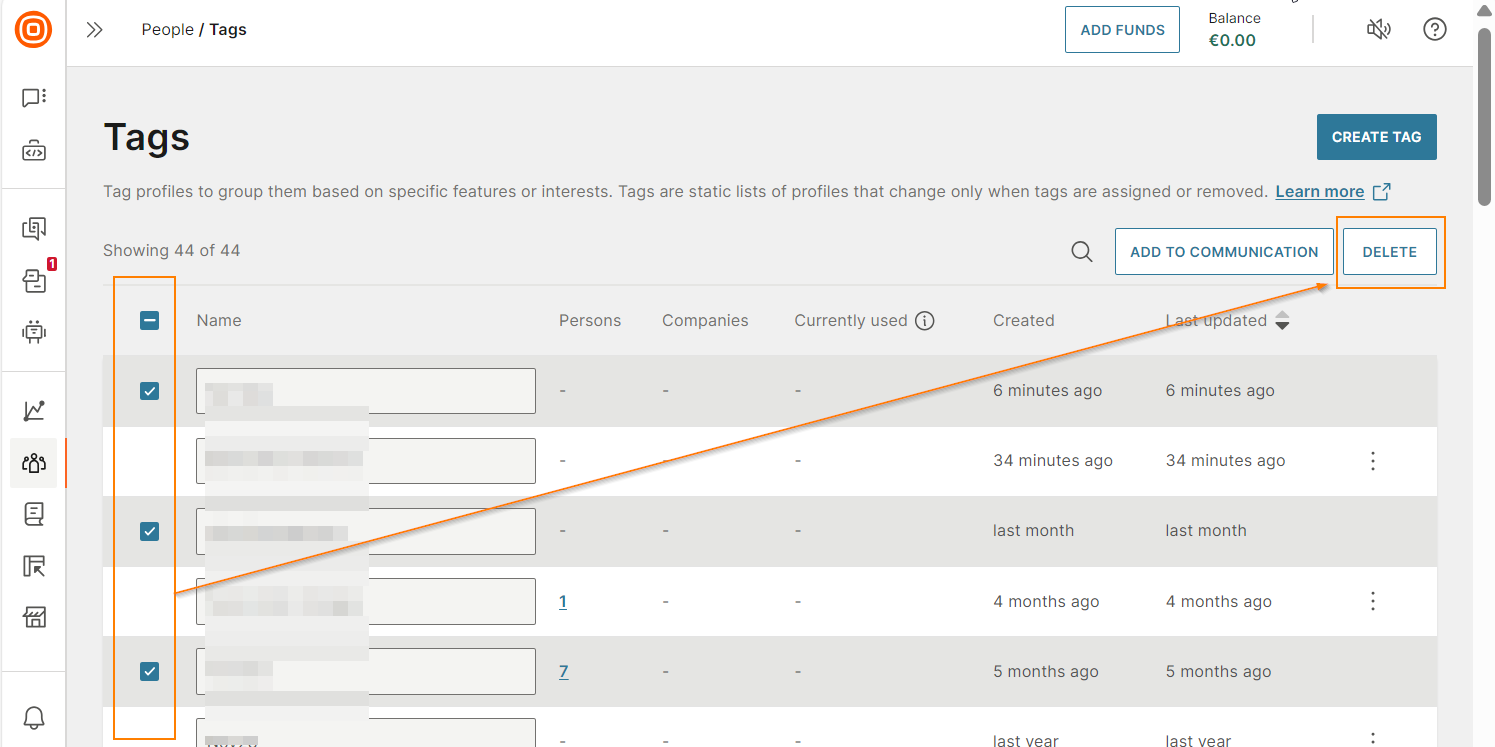
Delete multiple tags
- Log on to the Infobip web interface (opens in a new tab).
- In the menu on the left, go to People > Tags.
- Select the tags that you want to delete.
- Select Delete.
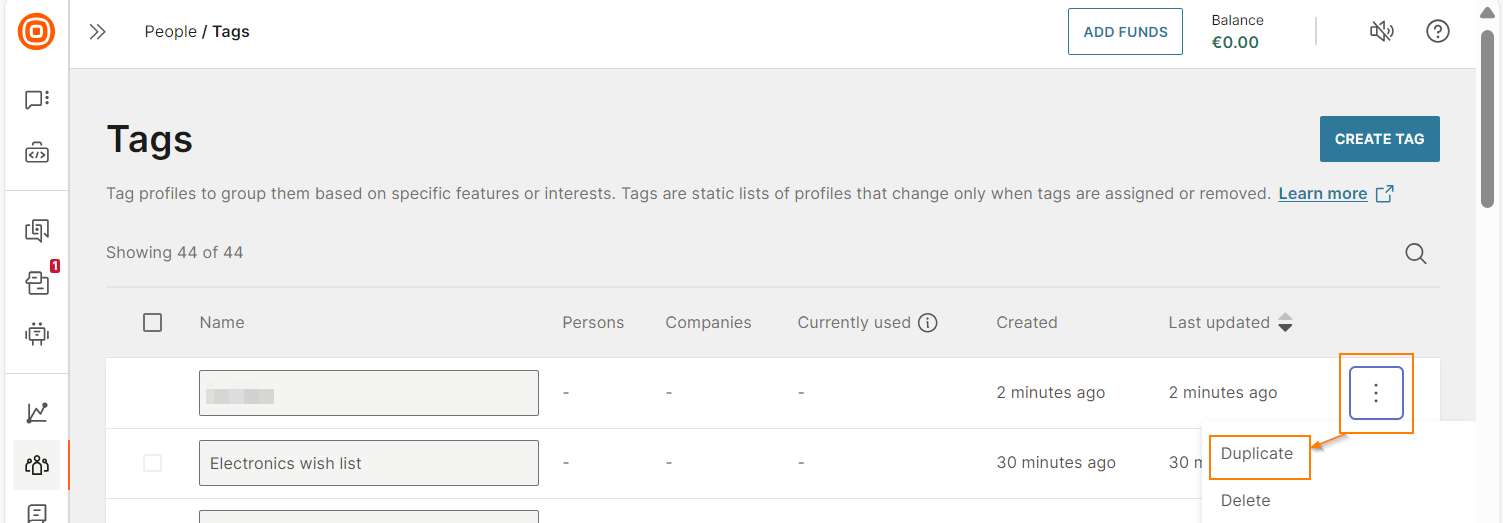
Duplicate a tag
- Log on to the Infobip web interface (opens in a new tab).
- In the menu on the left, go to People > Tags.
- Select the three dots next to the relevant tag and select Duplicate.
View profiles that contain a specific tag
You can view profiles that contain a specific tag in the following ways.
- From the Tags page: Use this option to get a list of all profiles that contain a specific tag.
- From a person profile: Use this option to get a list of all profiles that contain one or more specific tags.
View profiles from the Tags page
Use this option to get a list of all profiles that contain a specific tag.
-
Log on to the Infobip web interface (opens in a new tab).
-
In the menu on the left, go to People > Tags.
-
For the relevant tag, select the field value in the Persons column.
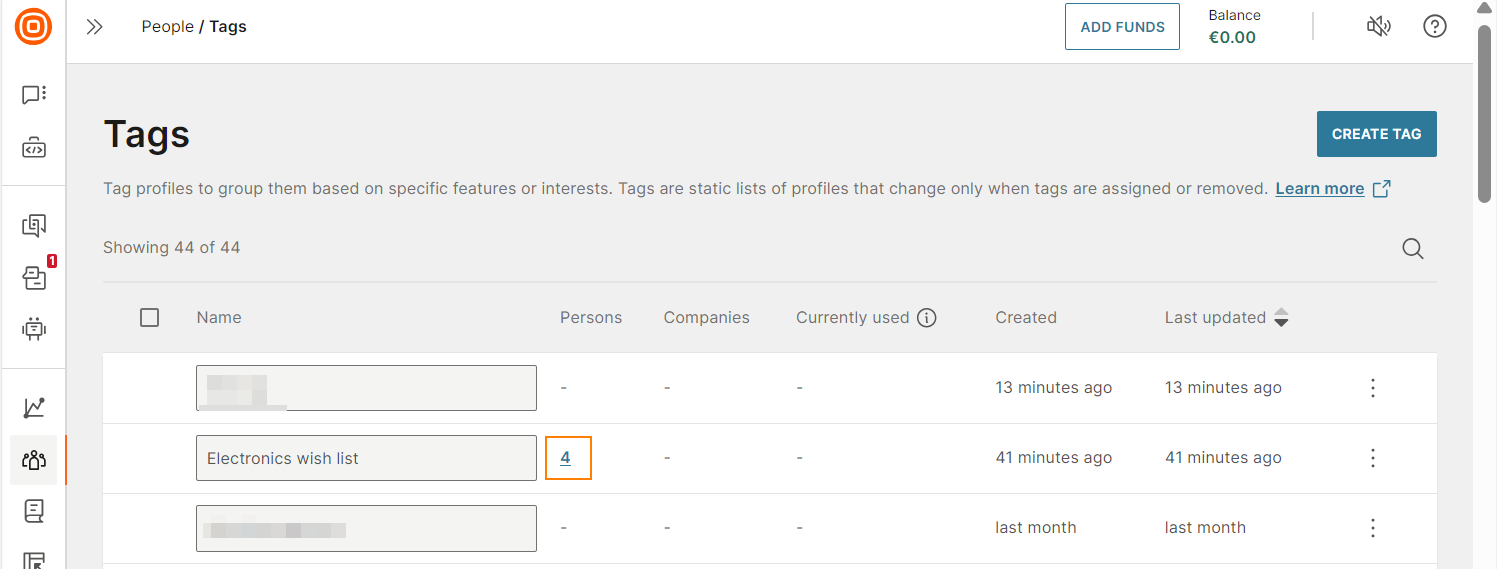
The profiles that contain this tag are listed.

The tag is also displayed in the Filters section in the left pane.

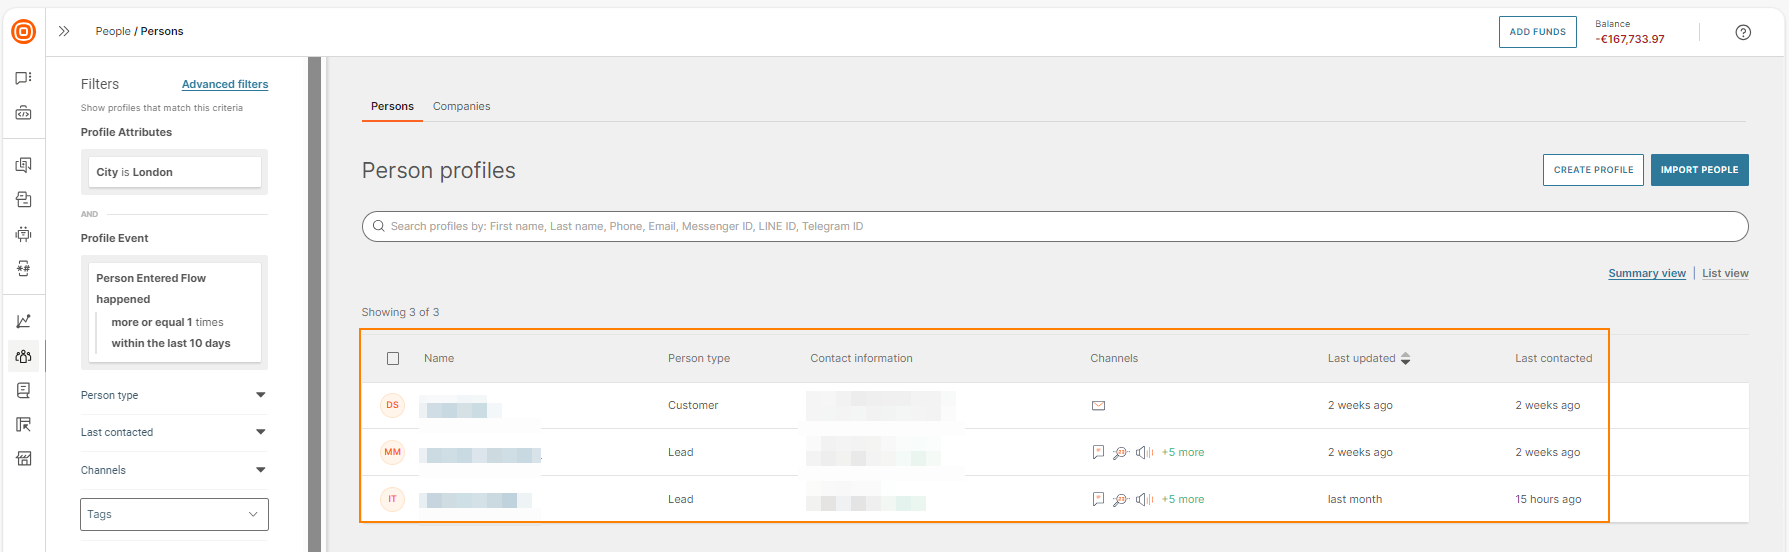
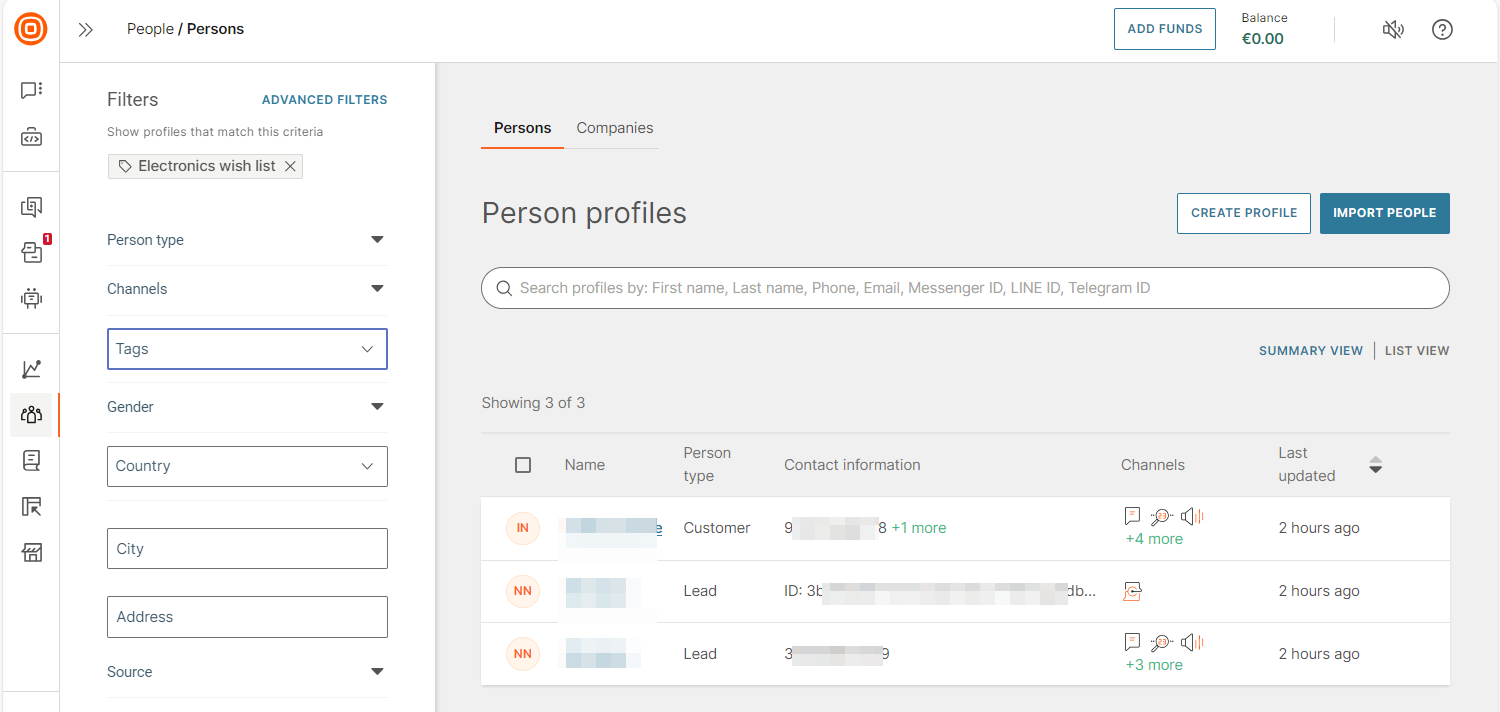
View profiles from the Persons page
Use this option to get a list of all profiles that contain one or more specific tags.
-
Log on to the Infobip web interface (opens in a new tab).
-
In the menu on the left, go to People > Persons.
-
In the left pane > Filters section > Tags field, select the required tag. You can select multiple tags, one at a time.
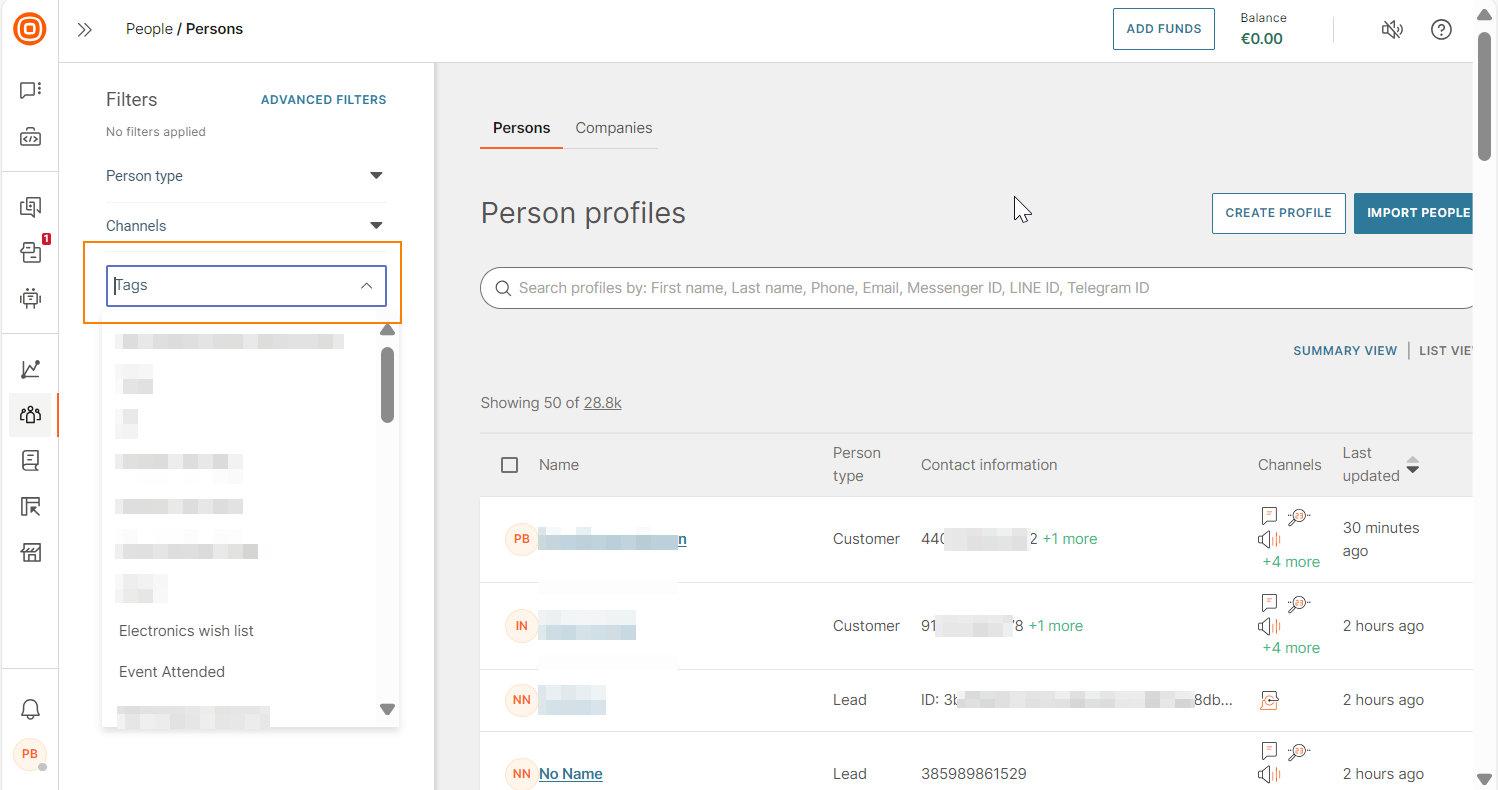
All the profiles that contain the selected tags are listed.
Add a tag to person profiles
You can add tags to profiles in the following ways.
- From the Persons page: Use this option to assign a tag to one or more profiles.
- From a person profile: Use this option to assign a tag to a profile.
You can add either an existing tag or create a new one.
Add a tag from the Persons page
Use this option to assign a tag to one or more profiles.
-
Log on to the Infobip web interface (opens in a new tab).
-
In the menu on the left, go to People > Persons.
-
Use search and filter options to get the required list of profiles. Select the profiles to which you want to add the tag.
-
Select Manage tags.

-
Either search for an existing tag or create a new one.
-
Confirm your selection in the confirmation window.
Add a tag from a person profile
Use this option to add a tag to a profile.
-
Log on to the Infobip web interface (opens in a new tab).
-
In the menu on the left, go to People > Persons.
-
Open the relevant profile.
-
In the Attributes, tags, and events tab, select Add tag.

-
Either search for an existing tag or create a new one.
-
Confirm your selection in the confirmation window.
Remove tags from person profiles
When you remove a tag from a profile, the tag is unassigned from the profile. The tag is not deleted from the Tags list.
Remove tags from a profile
To remove one or more tags from a profile, do the following.
-
Log on to the Infobip web interface (opens in a new tab).
-
In the menu on the left, go to People > Persons.
-
Open the profile from which you want to remove the tags.
-
In the Attributes, tags, and events tab > Assigned tags section, select the x mark for the tags that you want to remove.
-
In the confirmation screen, select Remove tag.
Remove tags from multiple profiles
To remove one or more tags from multiple profiles, do the following.
-
Log on to the Infobip web interface (opens in a new tab).
-
In the menu on the left, go to People > Persons.
-
In the left pane > Filters section > Tags field, select the tag that you want to remove. You can also select multiple tags, one at a time.
-
Select the profiles from which you want to remove the tags.
-
Select Manage tags.
-
In the list, deselect the tags that you want to remove.

-
In the confirmation screen, select Remove.
Add tags to imported profiles
When you import contacts to People, you can assign tags to track the profiles that are imported.
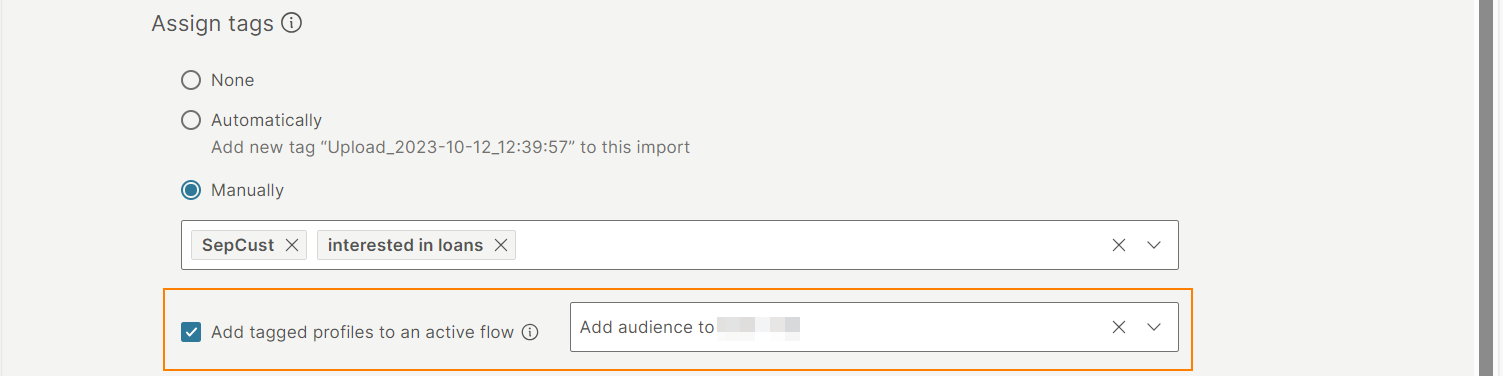
As part of the import process, after you select Analyze, select one of the following options:
- None - Tags are not applied to the imported profiles.
- Automatically- A default system tag is applied to the imported profiles. This tag contains the time and date of the import.
- Manually - Either create new tags or select existing tags to apply to the imported profiles. You can add more than one tag.
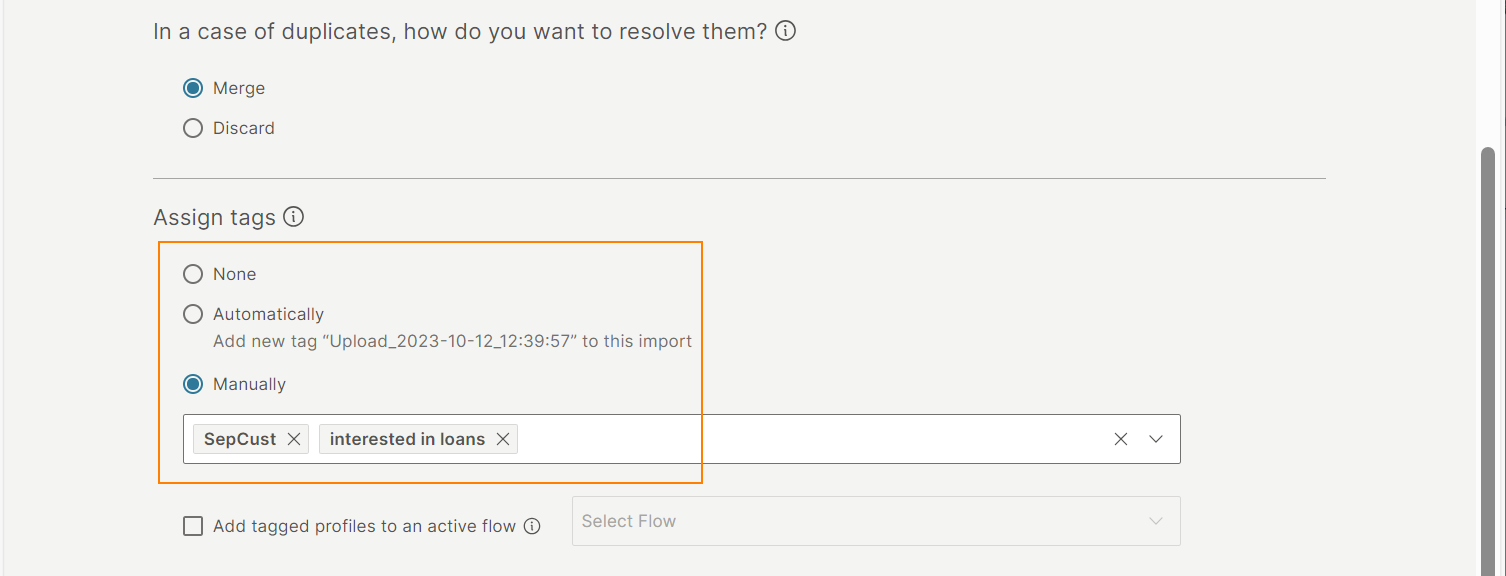
To include the tagged profiles in an existing active flow, enable Add tagged profiles to an active flow.
For detailed instructions, refer to the Import documentation.
Use tags in a flow in Moments
The following are examples of how you can use tags in Moments.
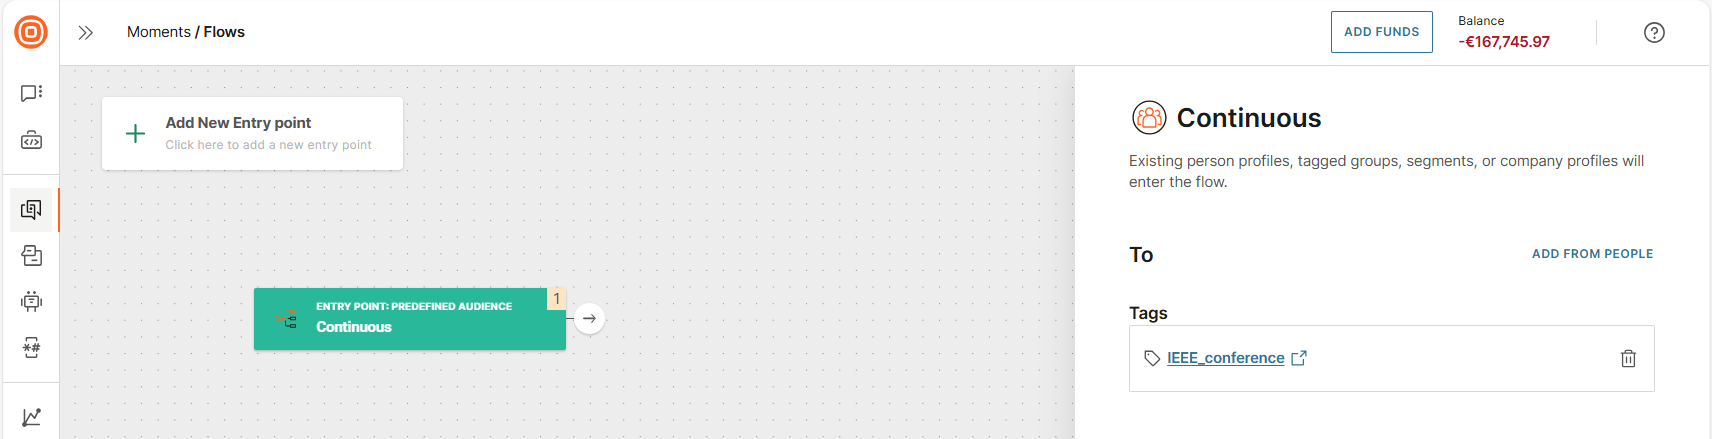
- Use a Predefined audience flow entry point to initiate two-way communications with end users who are assigned specific tags. Example: Send messages to all end users who attended a specific conference.
- In a communication flow, add tags based on end users' responses to your messages. You can then use this tag in future campaigns.
Use tags in Answers chatbots
Use tags to direct the chatbot flow in Answers. Example: The tag for an end user's profile is purchased mobile phone. When the end user contacts your chatbot, you can ask them if they want help with their mobile phone.
You can add or remove tags through the chatbot.
For more information, refer to the People tags documentation.
Use tags in the People API
To create and manage tags through People API, use the following methods:
- Create new tag (opens in a new tab)
- Get single tag (opens in a new tab)
- Get list of tags (opens in a new tab)
- Delete tag (opens in a new tab)
- Remove tag from people batch (opens in a new tab)
- Add tag to people batch (opens in a new tab)
Do Not Contact list
When end users do not want to be contacted by your communication campaigns, they can opt out or unsubscribe. Add the contact information of these end users to your Do not contact list so that the campaigns will not send them any more messages.
Use the Do not contact list to be compliant with personal data regulations.
Working with the Do not contact list
To access the Do not contact list, on the Infobip web interface (opens in a new tab), go to People > Configuration > Do Not Contact list tab.
You can do the following.
- View the list of contacts in the Do not contact list.
- Add contacts to the list.
- Remove contacts from the list.
- Import contacts into the list
- Export contacts from the list
- Track whether a person who wants to stop receiving your communications is present in your Do Not Contact list. You can also view how the opt out was received. Example: Message from the end user, campaign action, URL opt out, or manually added.

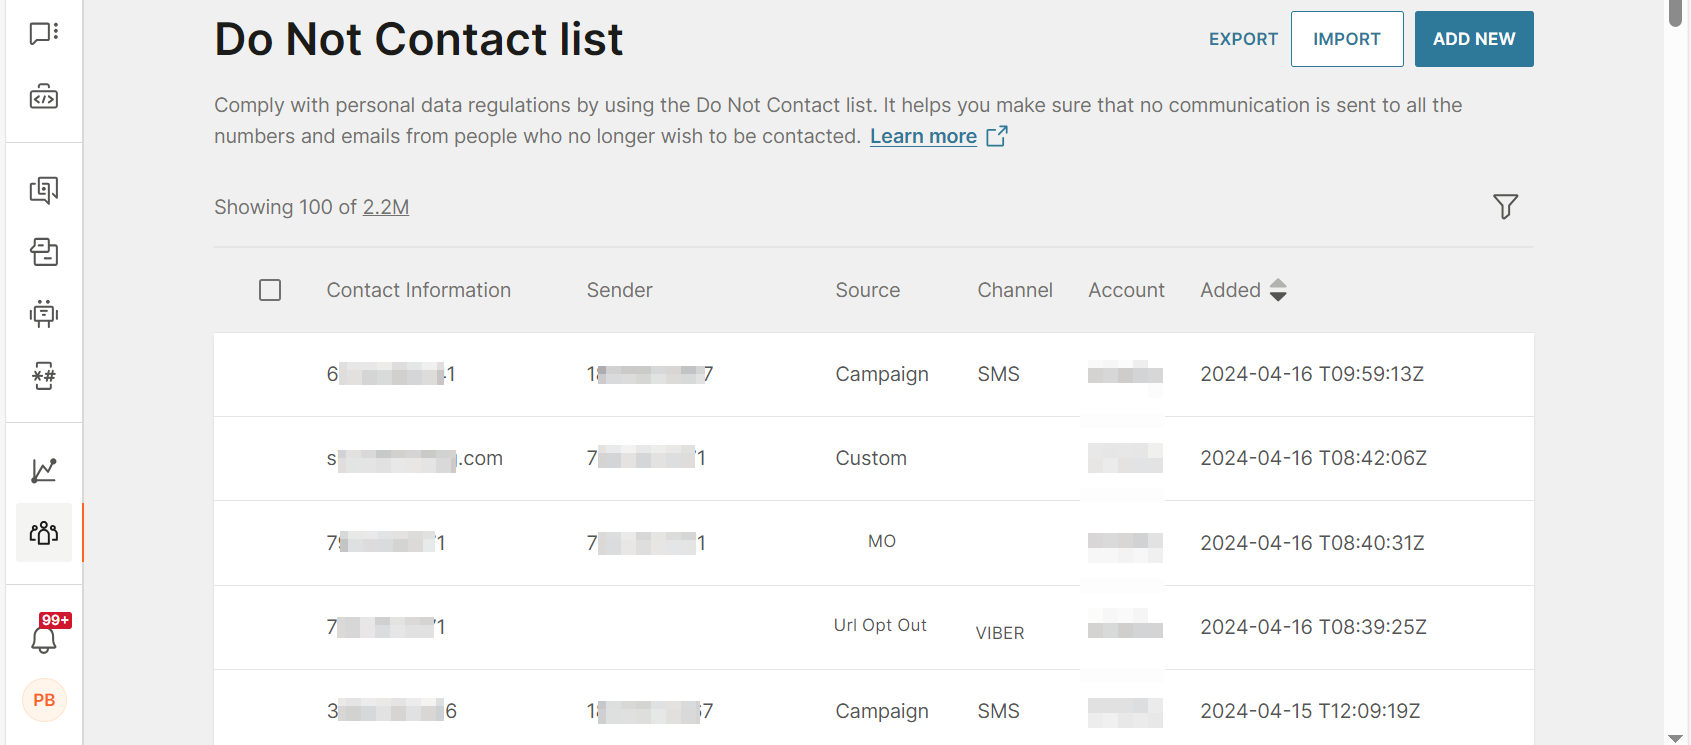
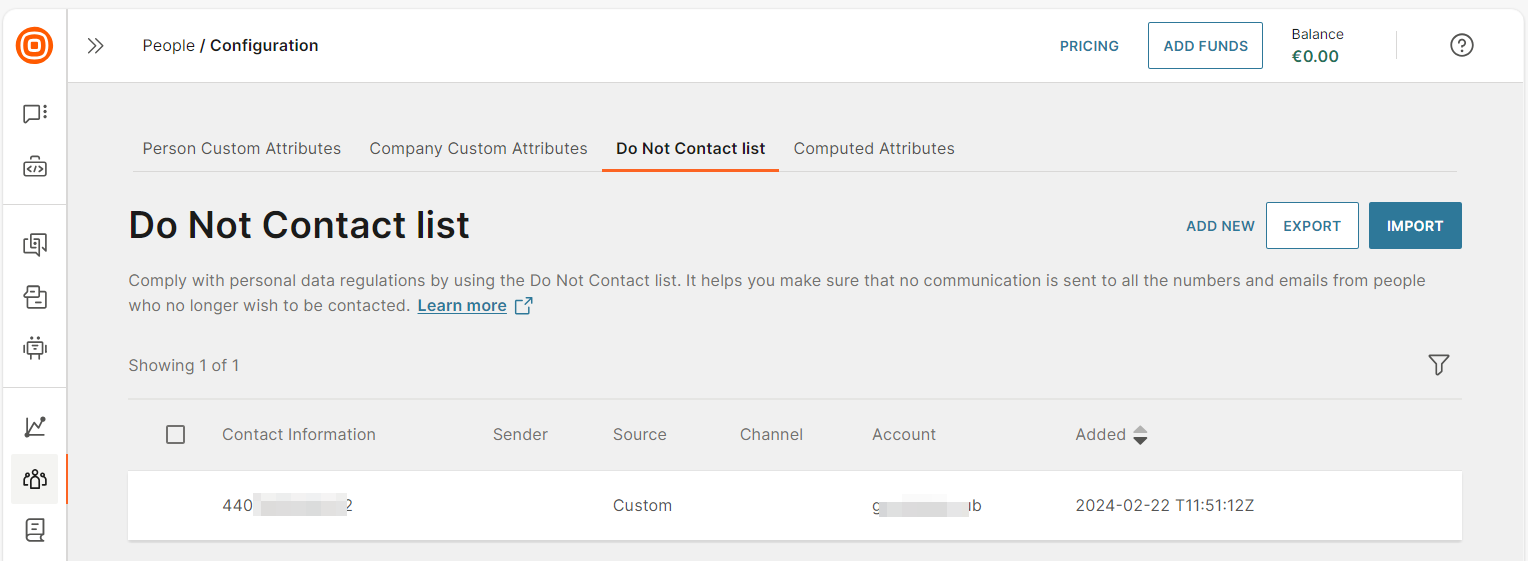
View a list of contacts in the Do not contact list
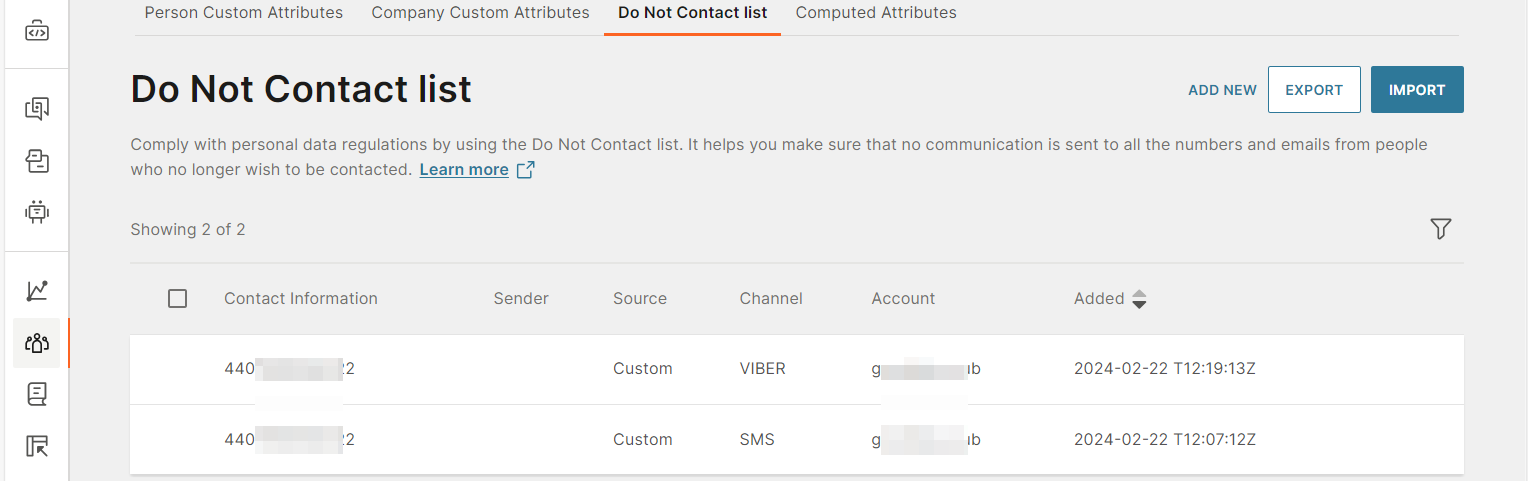
On the Infobip web interface (opens in a new tab), go to People > Configuration > Do Not Contact list tab. You can see a list of unsubscribed contacts. Each contact shows the following information.
- Contact information: Contact information of the end user. Depending on the channel, this field is either the phone number or the email address of the end user.
- Sender: Senders from which messages cannot be sent to the end user.
- Source: How the opt out was received. Example: Message from the end user, campaign action, URL opt out, or added manually.
- Channel: Channels on which messages cannot be sent to the end user.
- Account: Accounts from which messages cannot be sent to the end user.
- Added: Timestamp of when the profile was added to the list.
Sort the list
You can sort the list by the columns on the page.
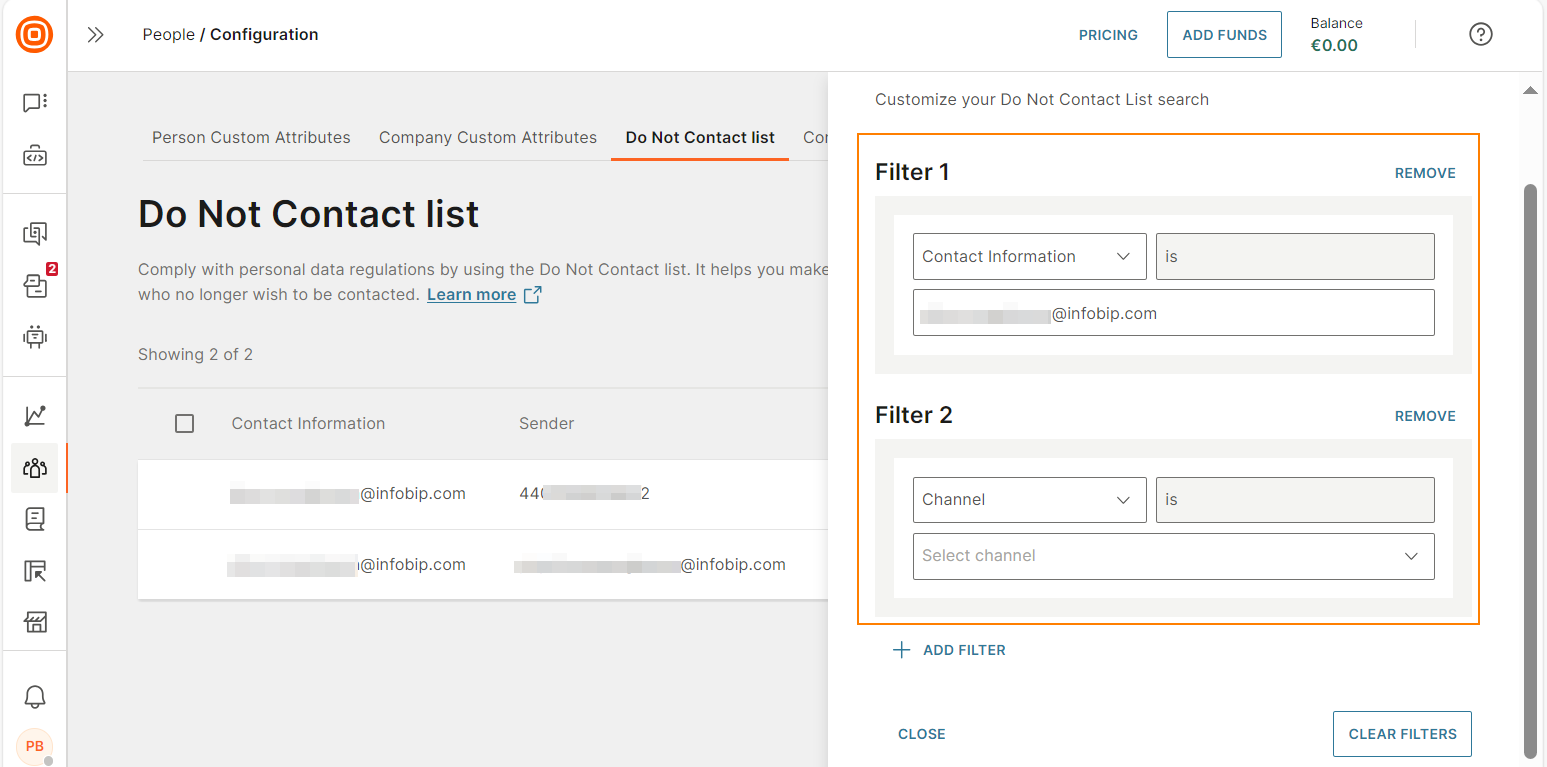
Filter the list
You can filter the contacts.
Do the following.
-
Select the filter icon.

-
Select Add filter and then select the required filters.
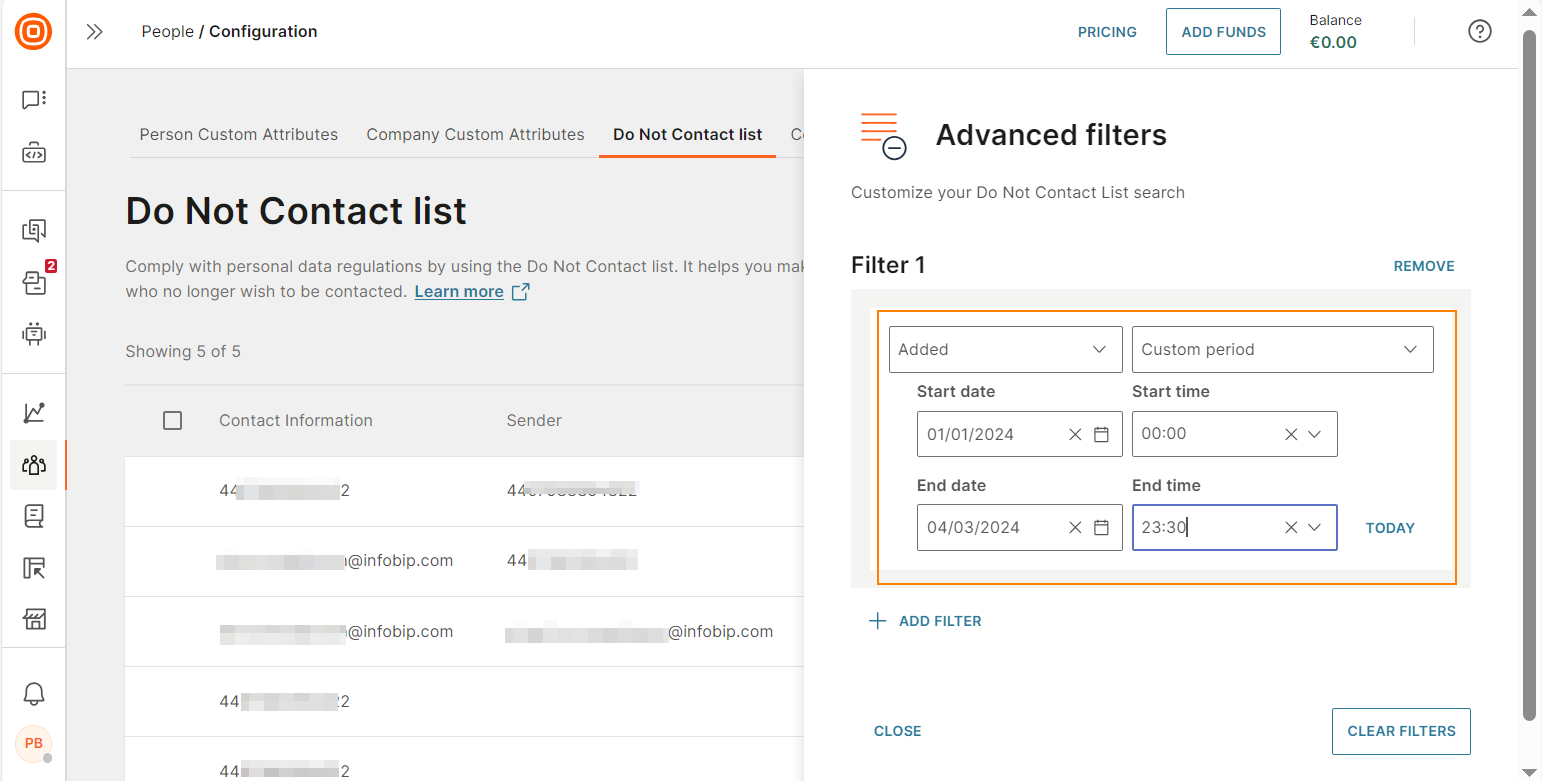
You can add more than one criterion to the same filter.
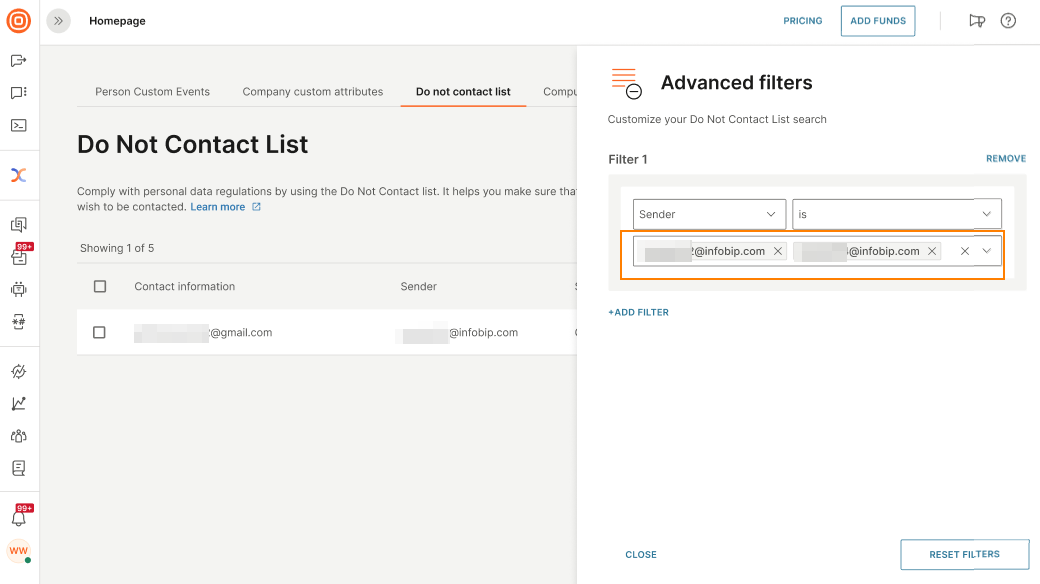
You can configure multiple filters.
Add to Do not contact list through People
-
On the Infobip web interface (opens in a new tab), go to People > Configuration > Do Not Contact list tab.
-
Select Add new. A new line is added at the beginning of the list.
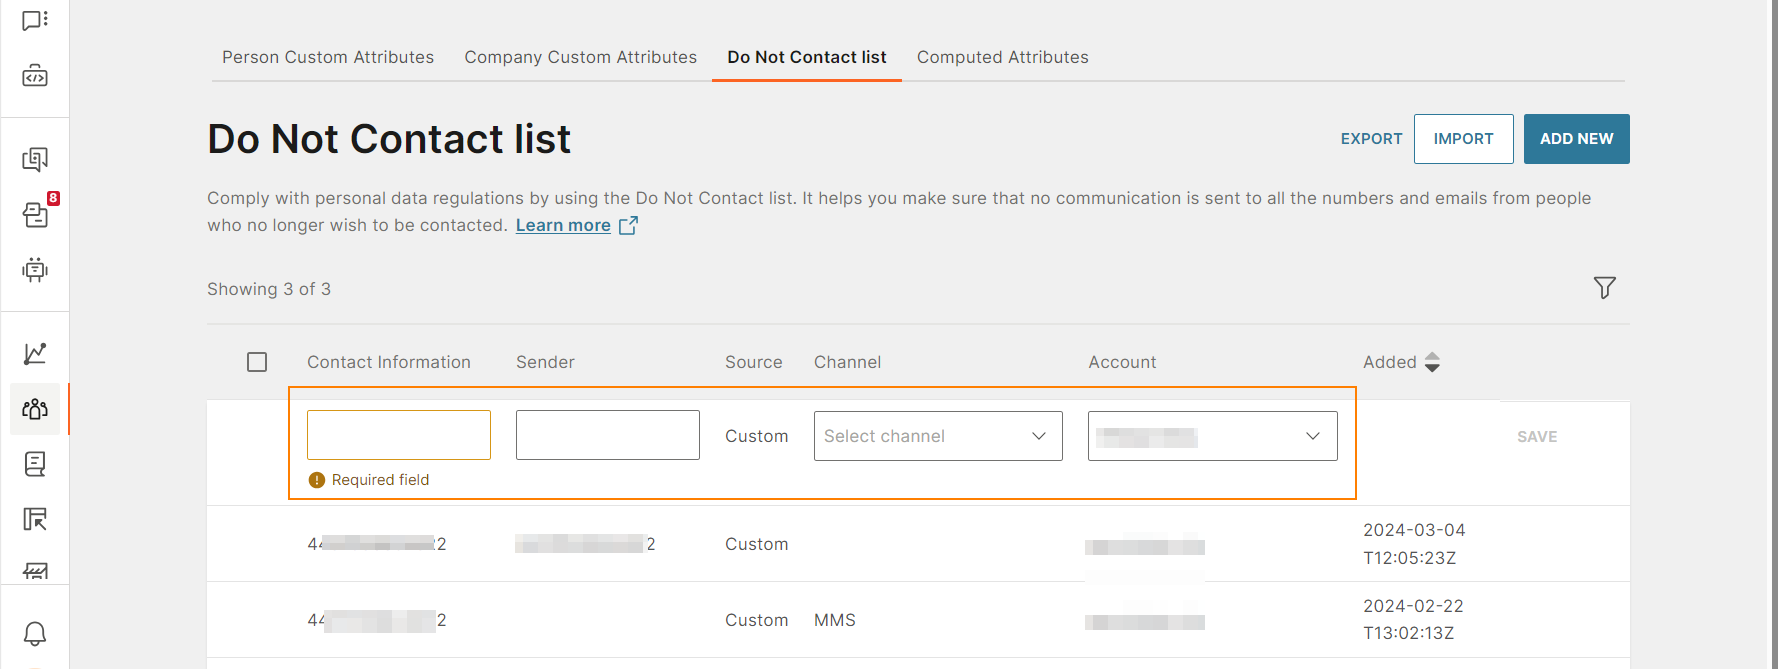
-
Complete the following fields:
-
Contact information: Contact information of the end user. Depending on the channel that you select, enter either the phone number or the email address of the end user.
If you enter an email address, you can select only Email in the Channel field.
NOTEMake sure that phone numbers are in international format. Example: 441234567890
-
Sender (Optional): Select your sender. All communication to the end user is blocked from this sender. The end user can still receive communication from your other senders.
To add more than one sender, create a separate entry for each sender.
-
Channel: Select the channel. All communication to the end user is blocked on this channel. The end user can still receive communication on your other channels.
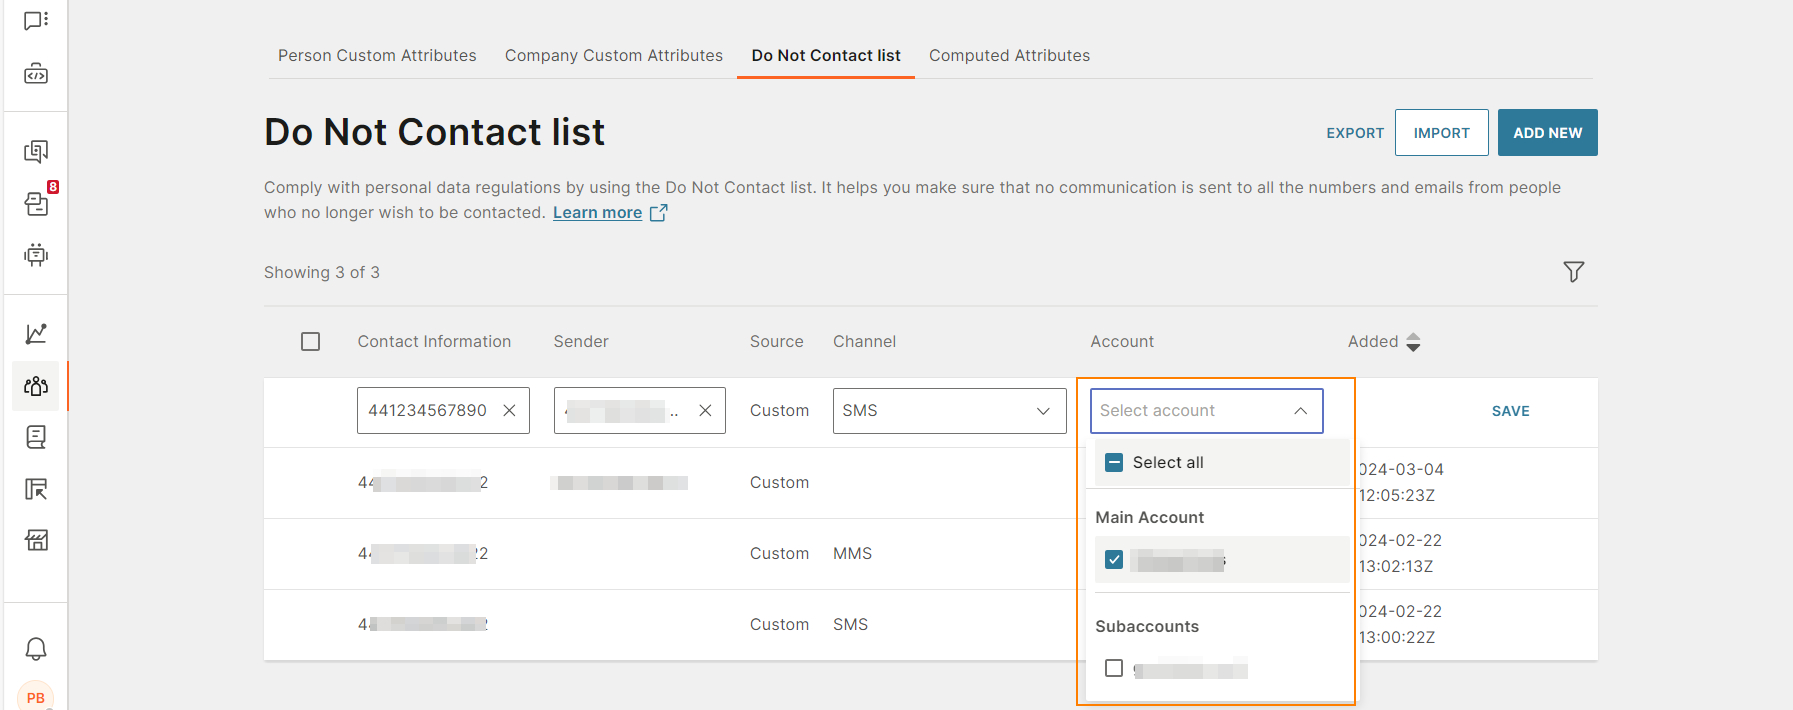
To add more than one channel, create a separate entry for each channel. Example: The following image shows the same contact added to Viber and SMS channels. The end user can still receive communication on other channels.
NoteYou cannot select the WhatsApp channel. To block communication over WhatsApp, use the Add to Do not contact list element in your flow.
To block communications over all channels, including WhatsApp, leave the channel field blank.
-
Account: Select one or more of your accounts. All communication to the end user is blocked from these accounts. The end user can still receive communication from your other accounts.
-
-
Select Save.
The end user is now added to the Do not contact list.
Import a list of contacts into the Do not contact list
Prepare the file
The file must follow these specifications:
- Supported file formats: .txt, .csv, .xlsx, and .zip.
- Maximum file size: 15 MB
- For all file formats other than .zip, if the file size exceeds the maximum file size, try compressing it into a .zip file. The .zip file should contain only 1 compressed file. If you add more than 1 file, only the first file is used to update the Do not contact list, and the other files are ignored.
Example:
| Contact information | Sender | Channel |
|---|---|---|
| 1234567890 | 9876543210 | Viber |
| [email protected] | [email protected] |
Import the file
-
On the Infobip web interface (opens in a new tab), go to People > Configuration > Do Not Contact list tab.
-
Select Import.
-
Select the import file from your system.
-
(Optional) In the Skip rows field, select the row from which the data needs to be imported. The rows before the specified row are ignored during the import.
-
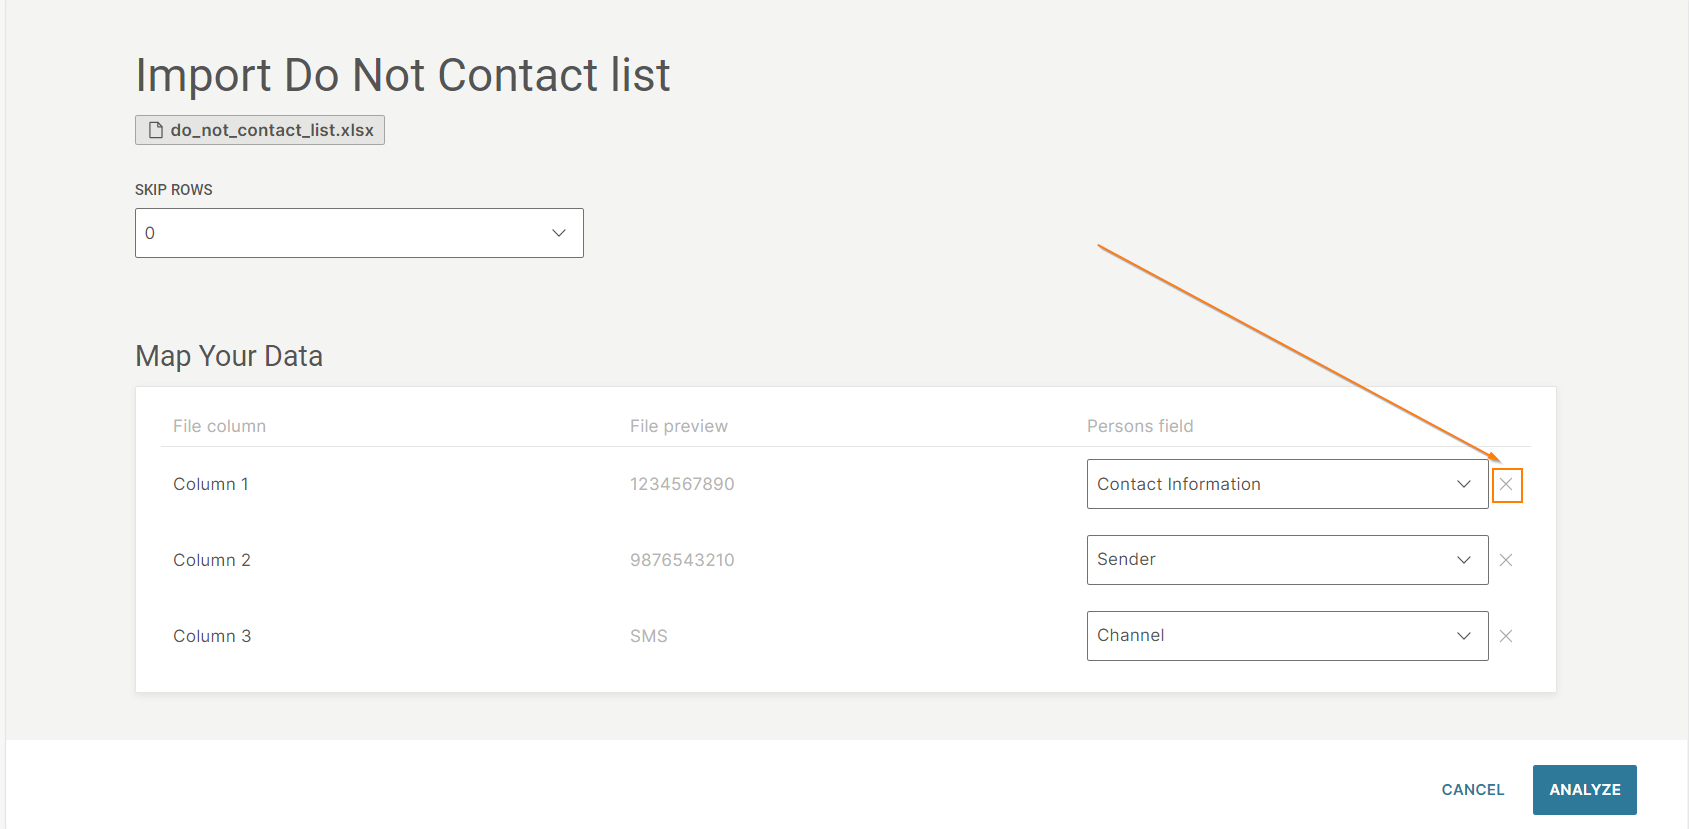
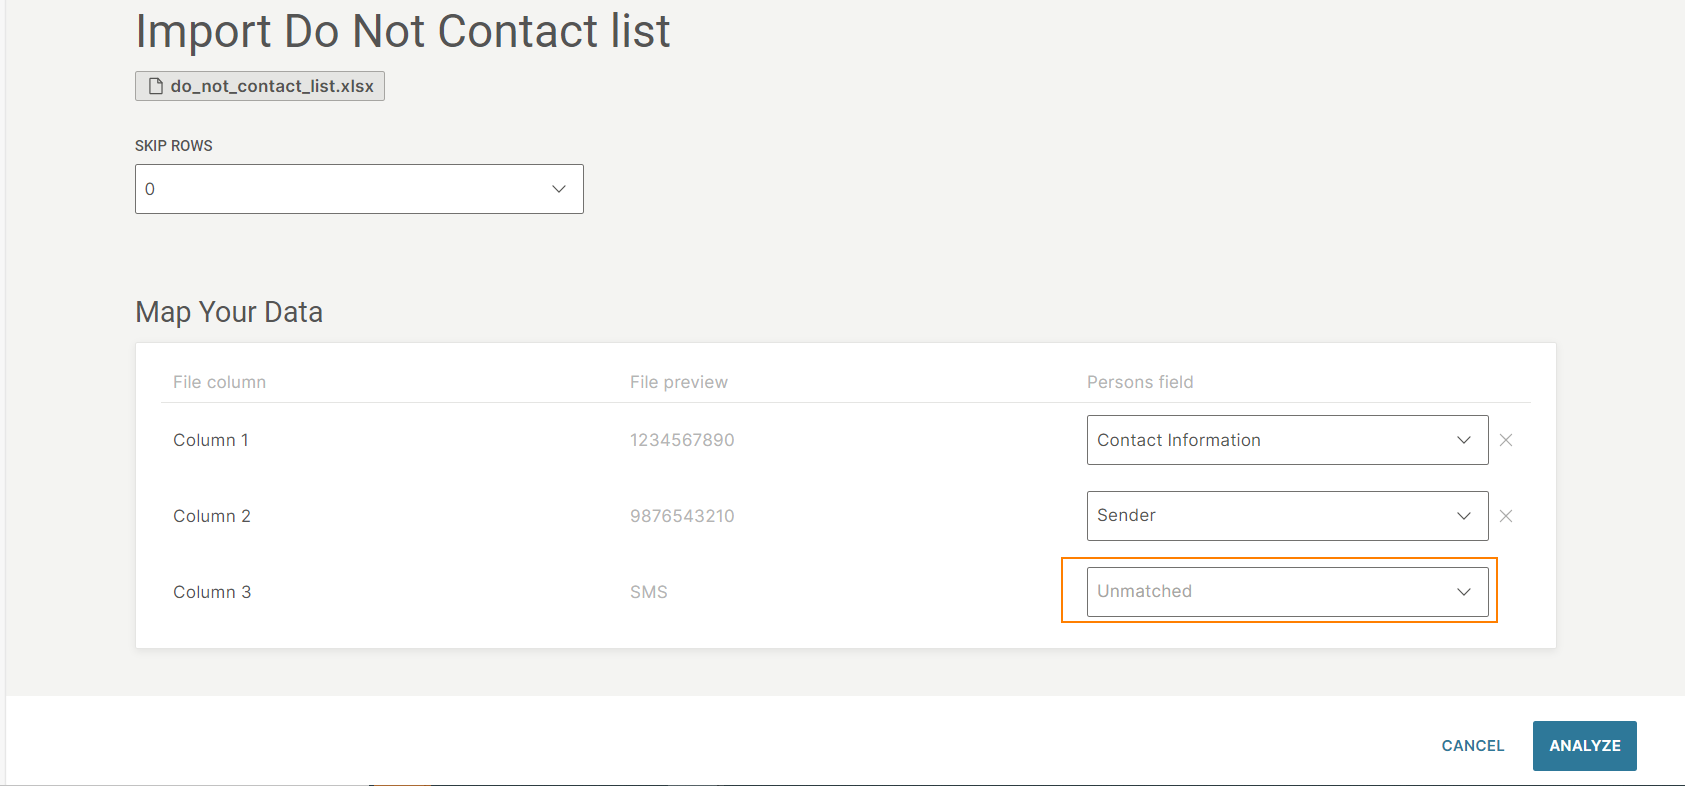
In the Map your data section, map the columns in your file with the fields in the Do not contact list.

-
To undo the mapping for a specific column, select the undo option.
-
To skip specific columns in the file, leave them unmapped. These columns are not imported.
-
-
Select Analyze.
-
Select one or more accounts into which the file needs to be imported.
-
Select Import.
The import time depends on the amount of data in your file. You can view the progress of the import process.
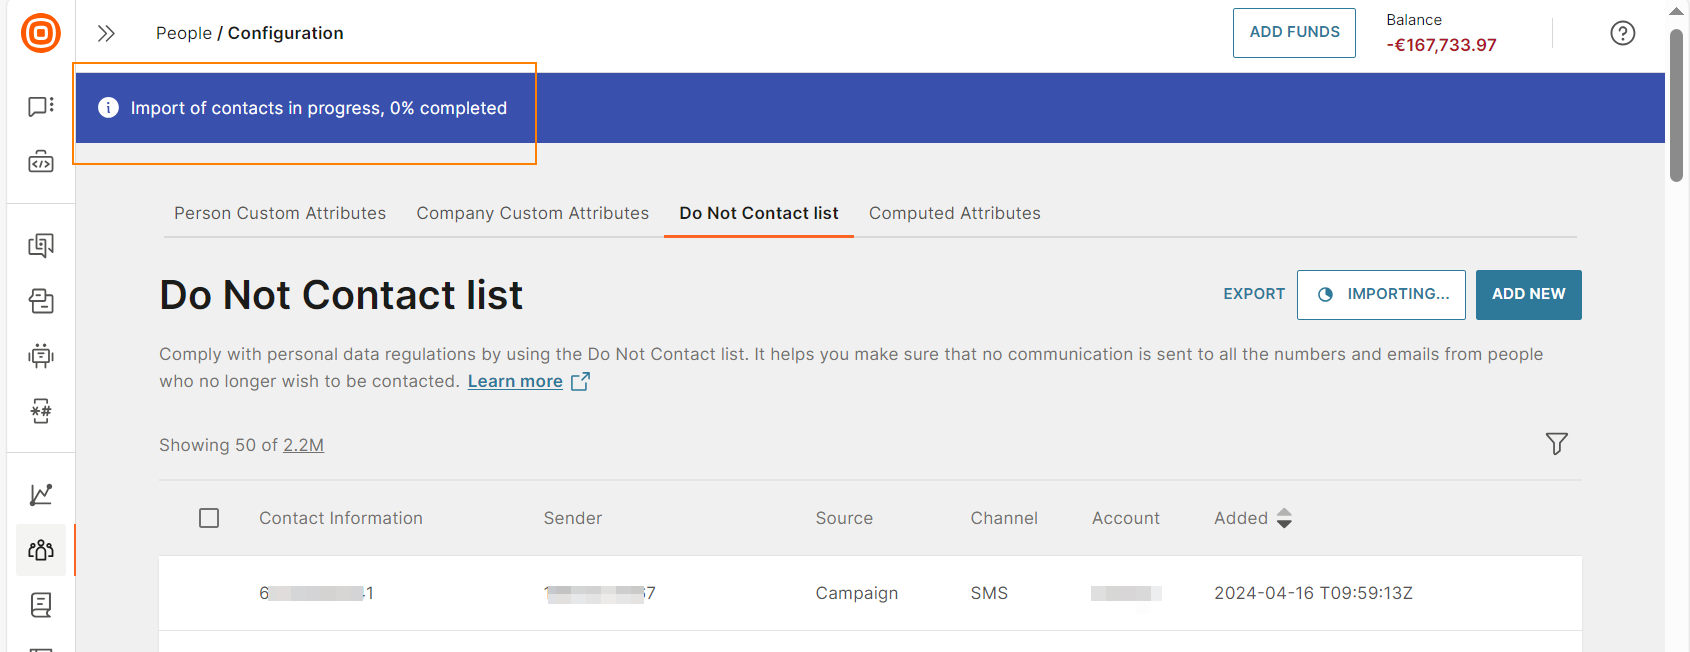
You will get a notification when the import is complete.

Add to Do not contact list through a flow in Moments
Refer to the Add to do not contact list section in the Moments documentation.
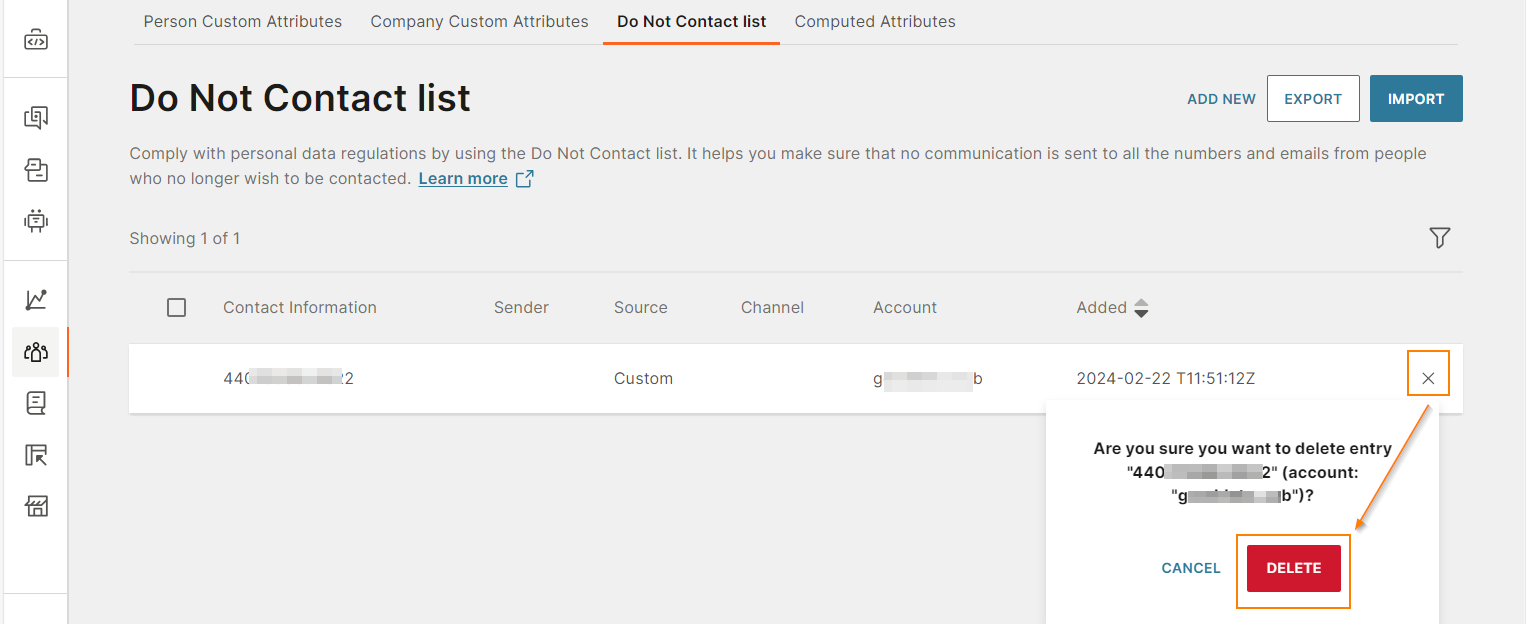
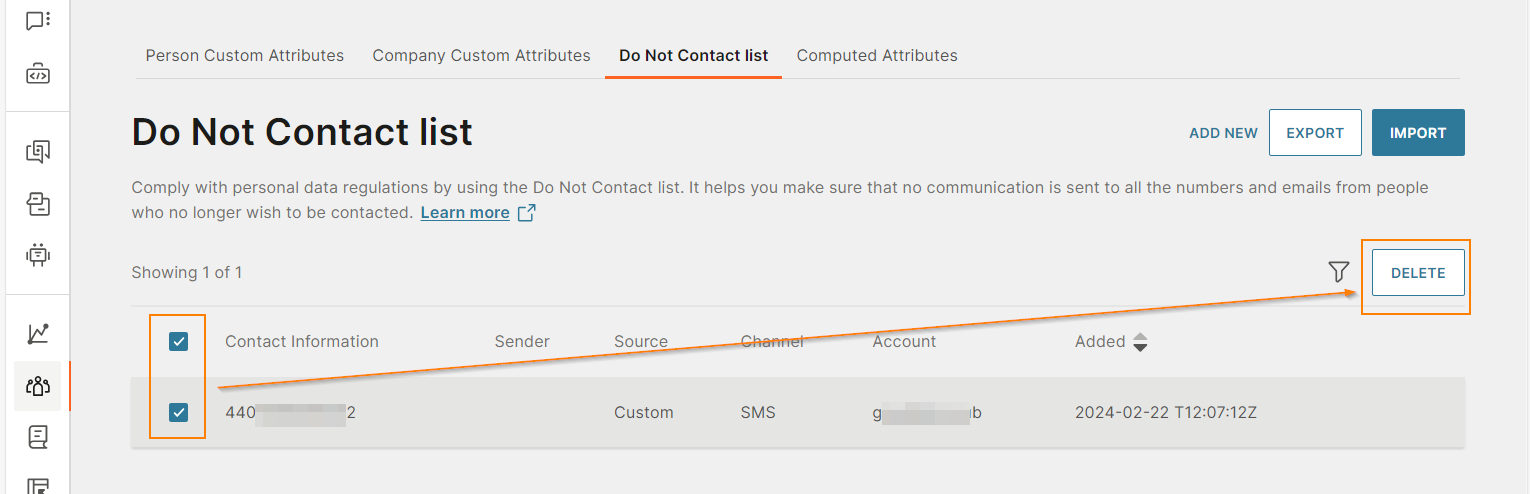
Remove from Do not contact list through People
- On the Infobip web interface (opens in a new tab), go to People > Configuration > Do Not Contact list tab.
- Do one of the following.
-
Select the x icon against a contact and then select Delete.
-
Select one or more contacts that you want to delete and then select Delete.
-
Remove from Do not contact list through a flow in Moments
Refer to the Remove from do not contact list section in the Moments documentation.
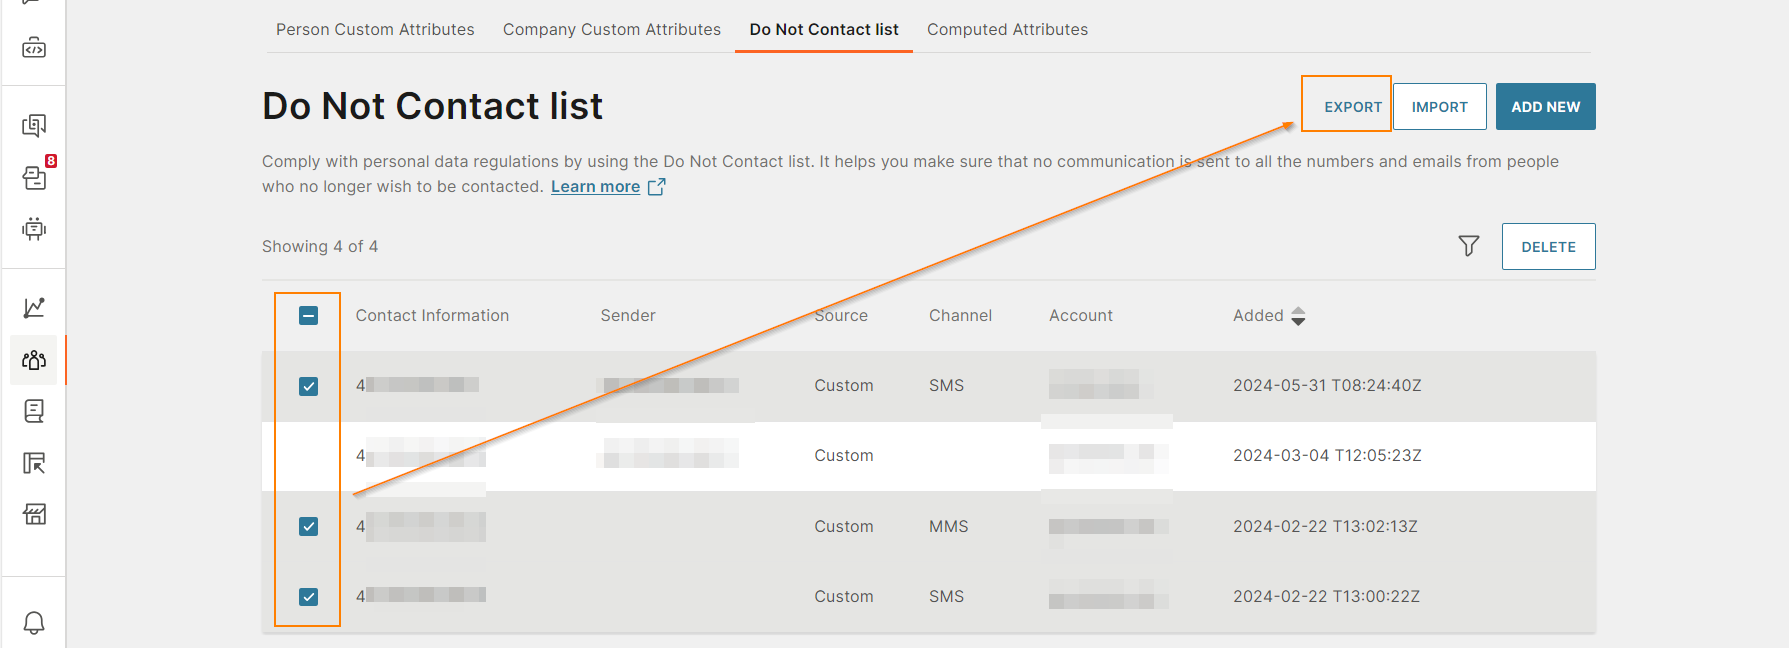
Export contacts from Do not contact list
-
On the Infobip web interface (opens in a new tab), go to People > Configuration > Do Not Contact list tab.
-
Select the contacts that you want to export.
-
Select Export.
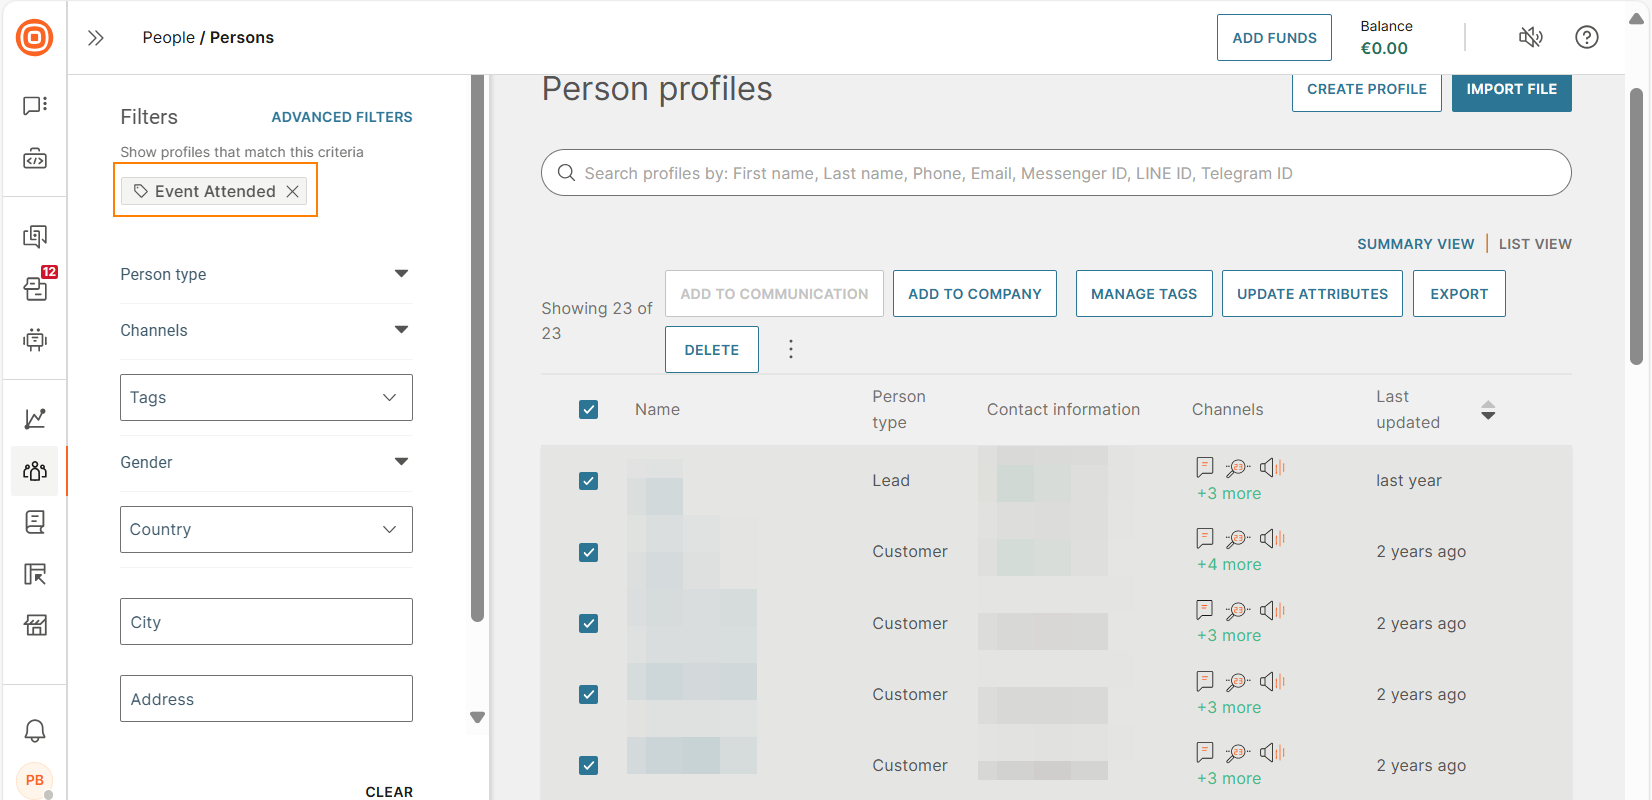
Audience Filters
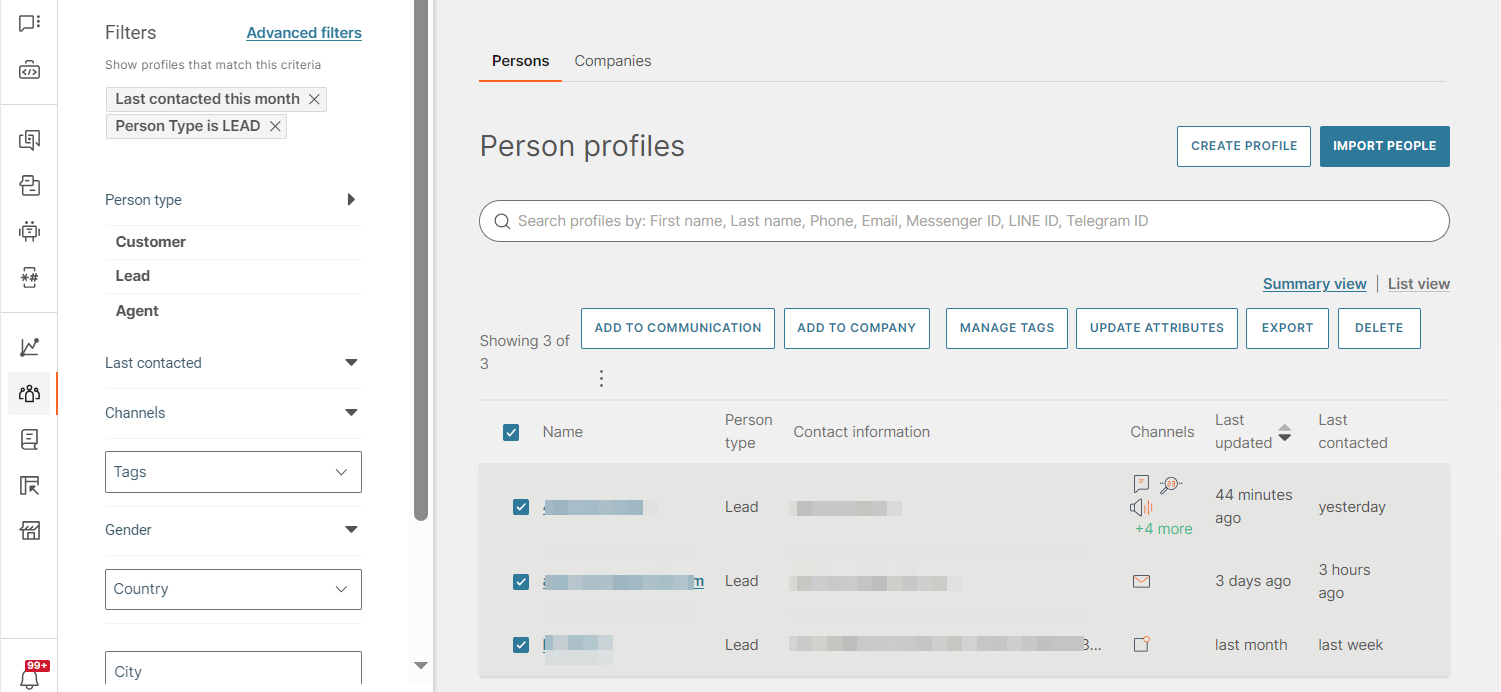
Filters are helpful when you want to see how many people were contacted within a specific time period and how many were reached over a certain channel. You can also use them to search for people by tags, gender, country, city, address, or combine these categories to perform an even more advanced search.
Quick Filters
To use quick filters, open the People page and make your selection. When a filter has been applied, a summary card will display the number of persons who meet your criteria. Add more filters to refine the search.
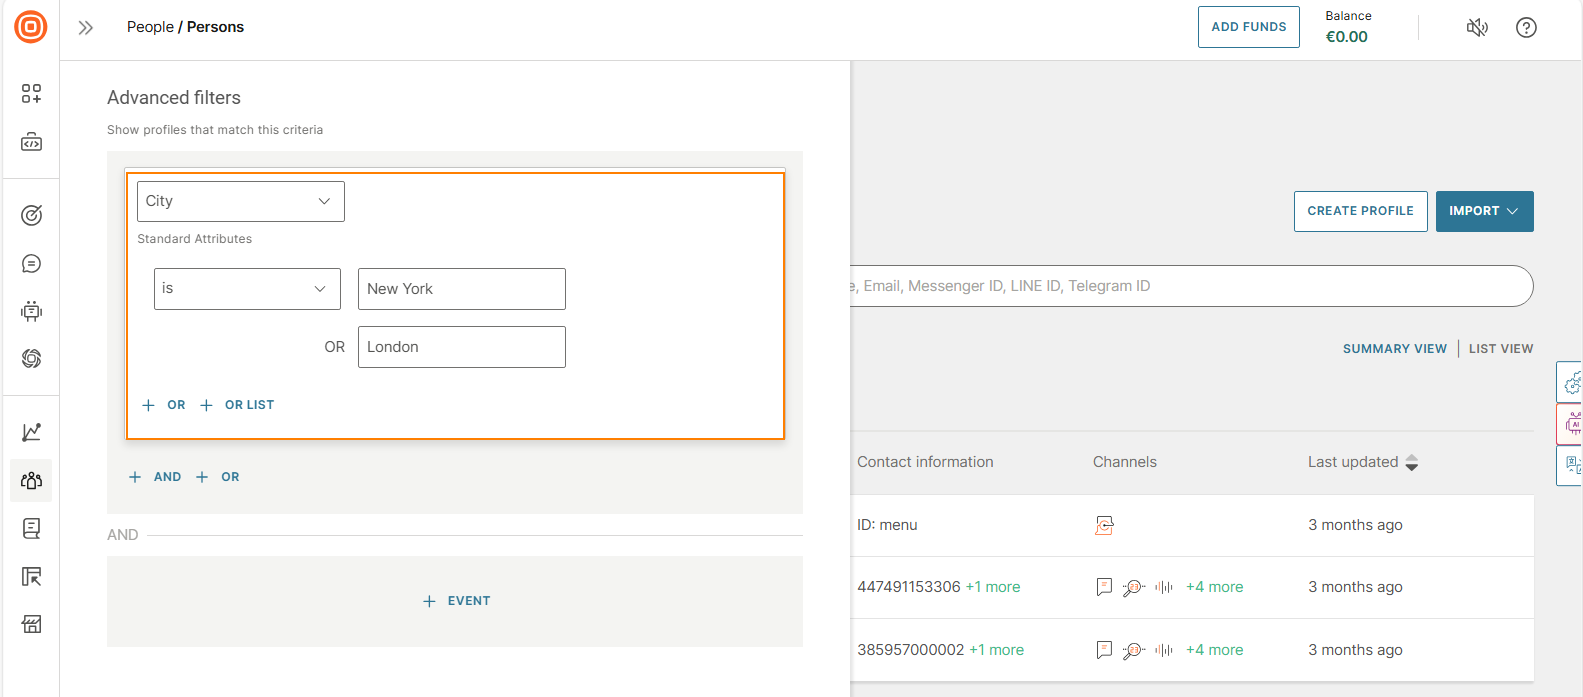
Advanced Filters
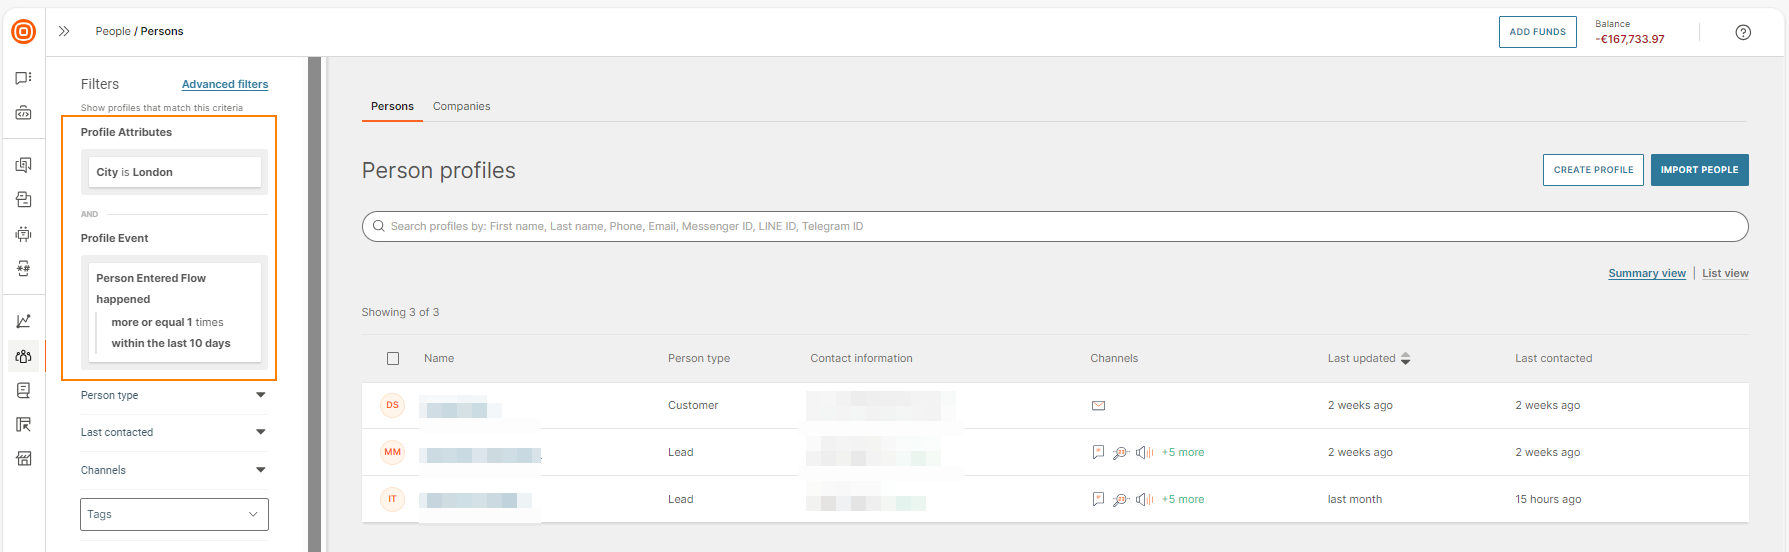
Segment your customers by any criteria. Select this advanced option if you want to filter using any attribute in the system.
Let’s say you want to filter all the contacts who live either in New York or in London. For this scenario, we will select the attribute city, add the operator is, and the value New York. Then, select OR and add London.
When you are done, click the Apply filter button to get results.
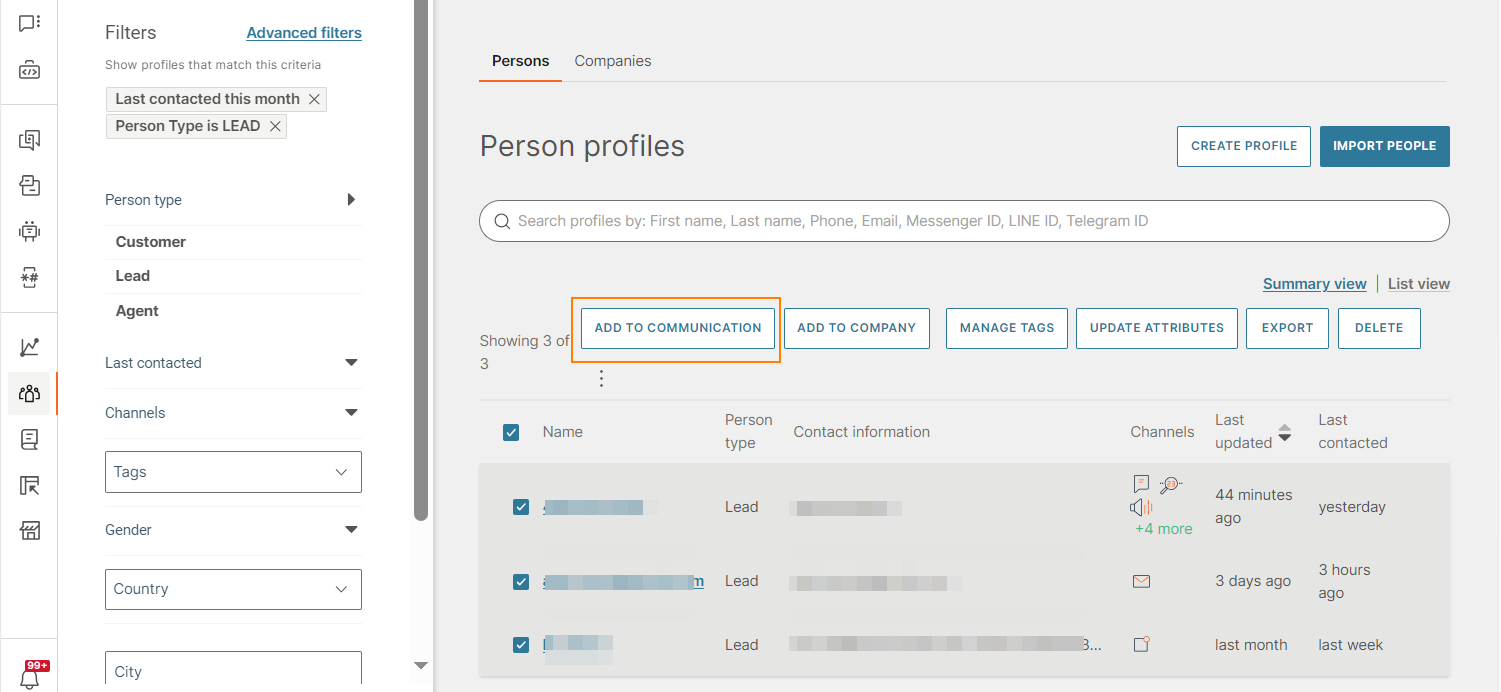
Add audience to a broadcast
You can add profiles from People to a new broadcast.
Do the following:
- On the Infobip web interface (opens in a new tab), go to People.
- Use search and filter options to get the required list of profiles. Select the profiles that you want to add to a broadcast.
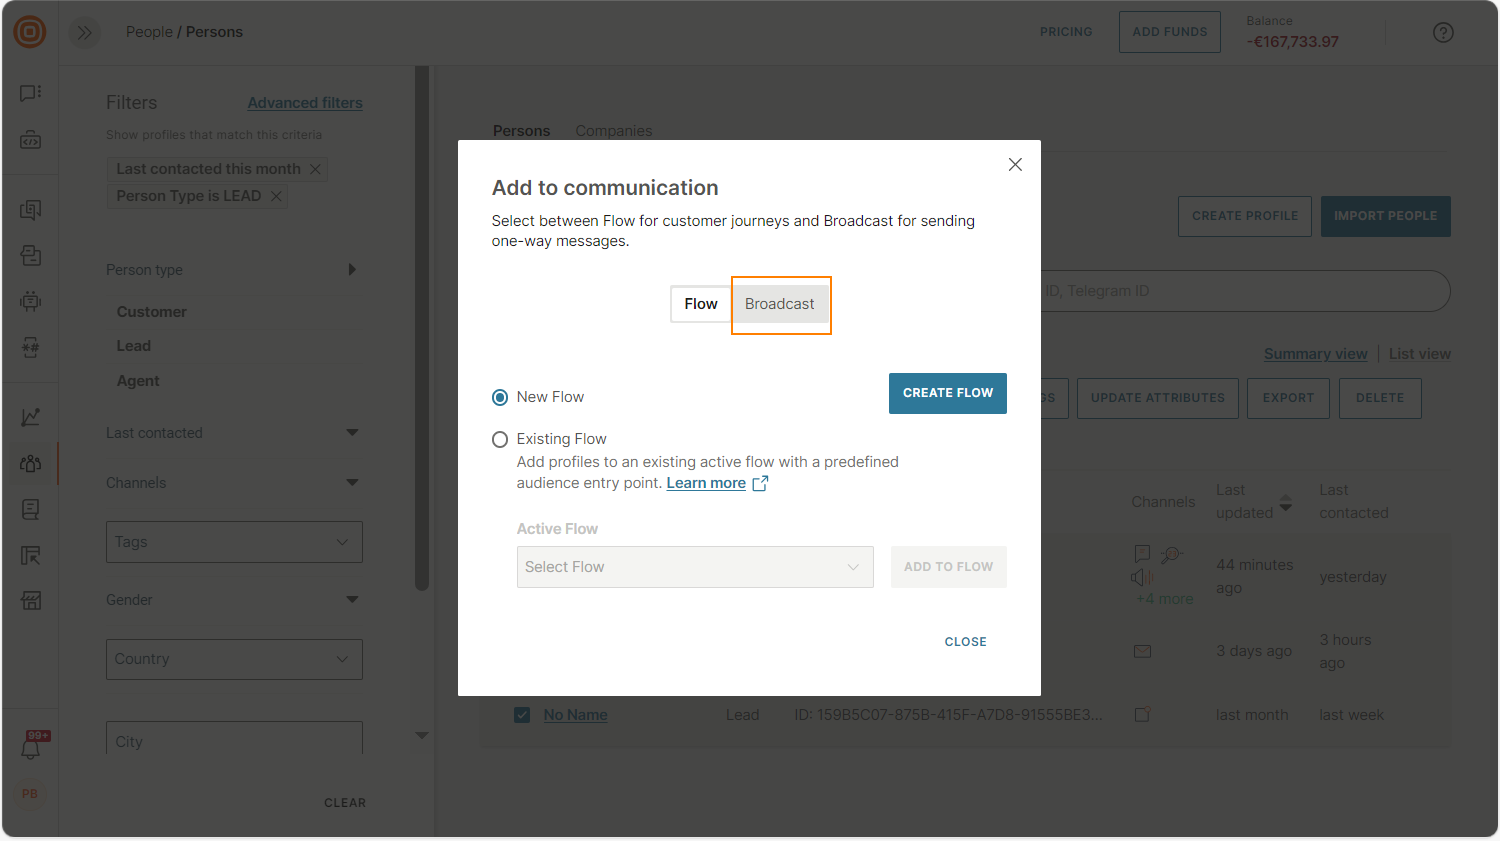
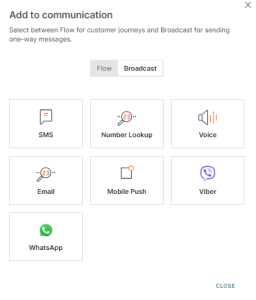
- Select Add to communication.
- Select Broadcast.
- Select the channel through which you want you want to send the broadcast.
 This directs you to Broadcast in the web interface, where you can create a new broadcast. The selected profiles are automatically added to the Recipients field.
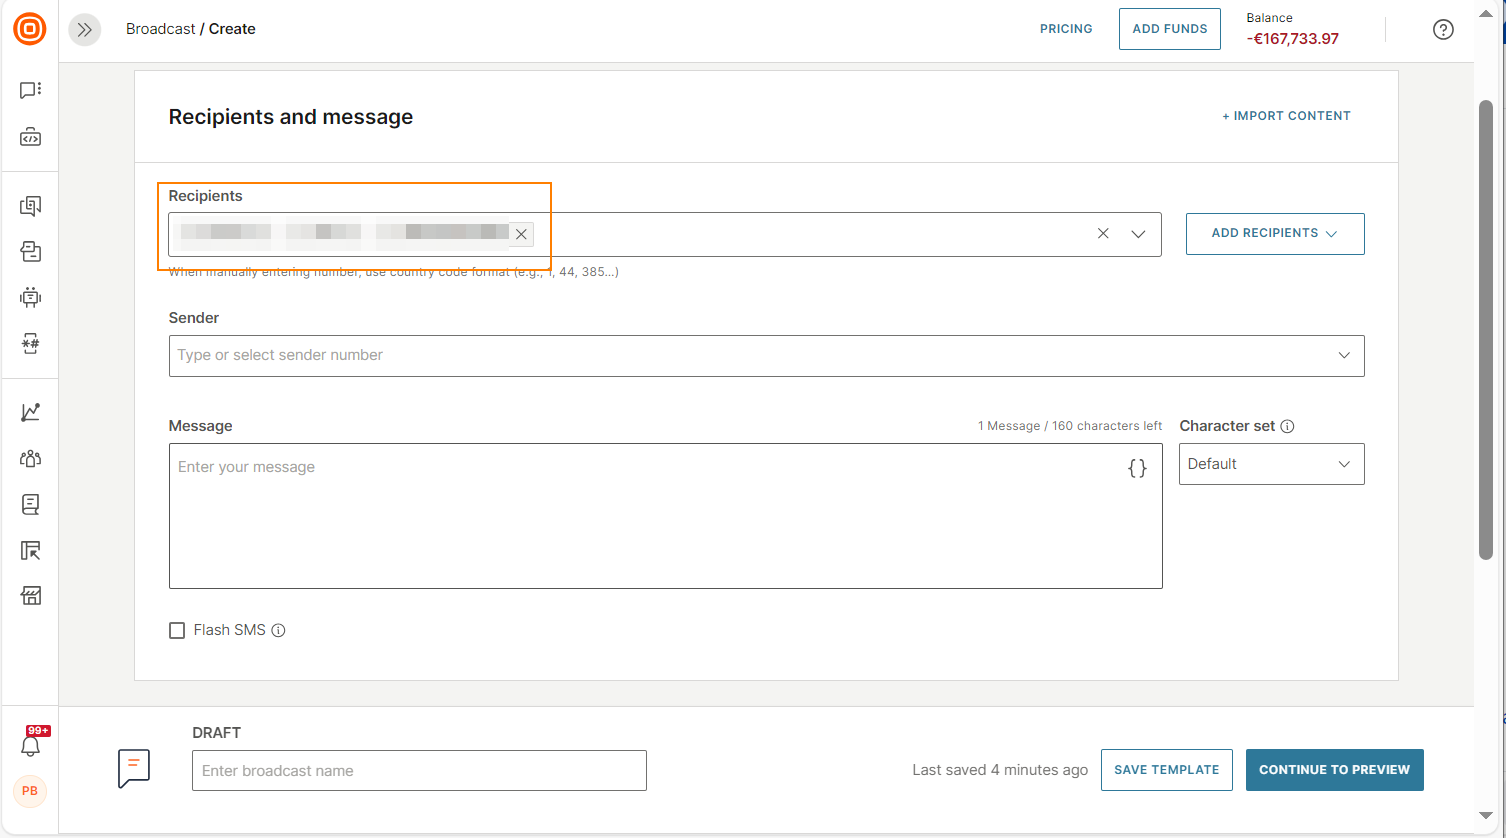
- Follow the instructions in the Create broadcast documentation to create the broadcast.
Add audience to a flow
You can add profiles from People to a flow in Moments.
You can add the following to either new or existing flows in Moments.
- Tags: Adds all profiles, which have the tags that you select, to the flow.
- Audience segments: Adds all profiles, which belong to the segments that you select, to the flow.
- Person profiles: Adds all profiles that you select to the flow.
- Companies: Adds all profiles, which belong to the companies that you select, to the flow.
The following instructions show how to add profiles to a flow. Follow similar steps to add tags, segments, and companies to a flow.
-
On the Infobip web interface (opens in a new tab), go to People.
-
Use search and filter options to get the required list of profiles. Select the profiles that you want to add to a flow.
-
Select Add to communication.
-
Select Flow.
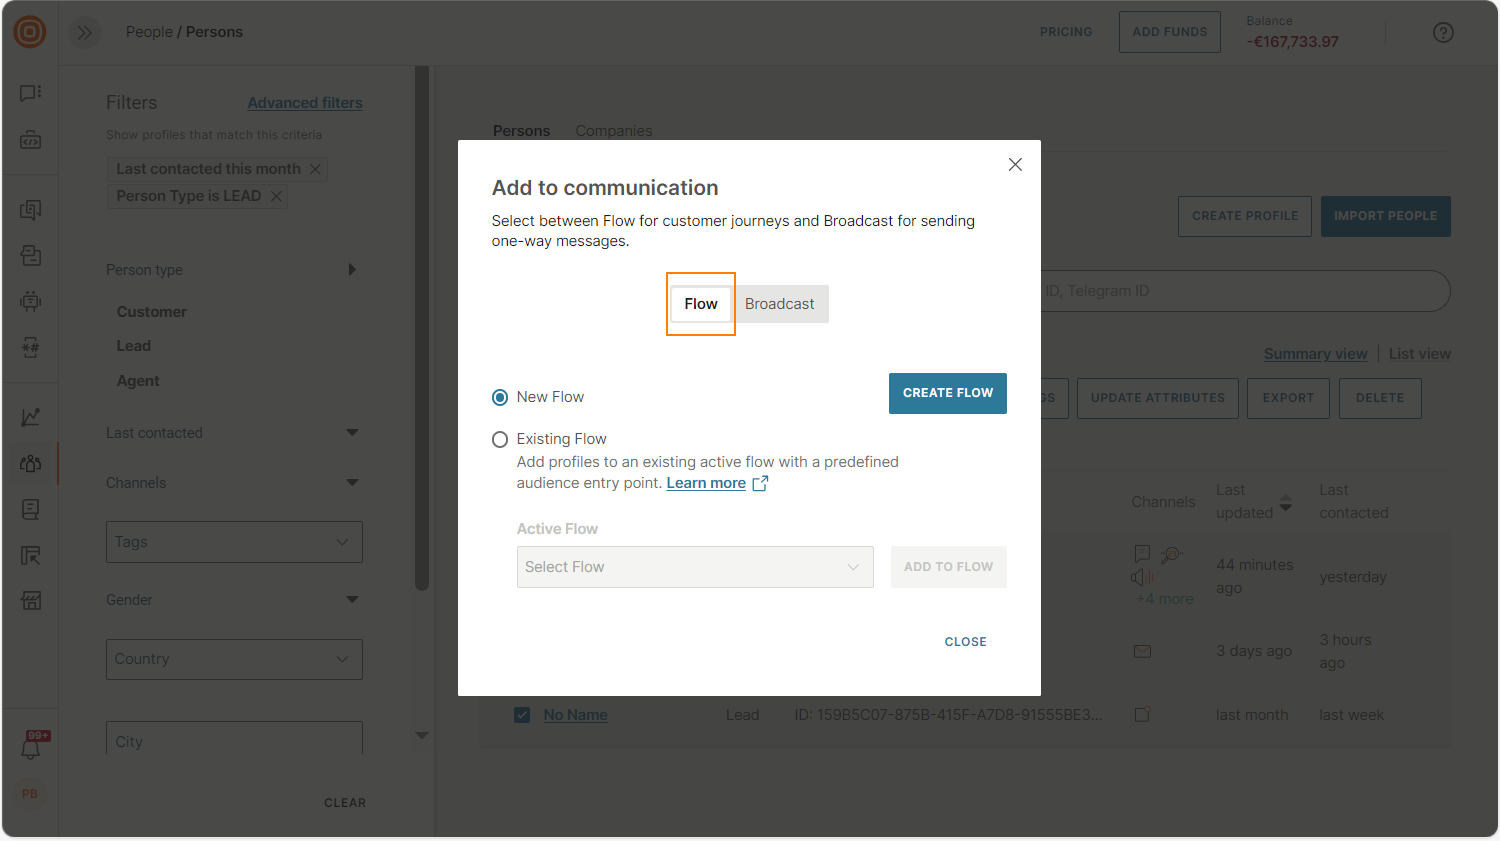
-
Select whether you want to add to an existing flow or a new one.
-
To add to a new flow, select New flow and select Create flow.
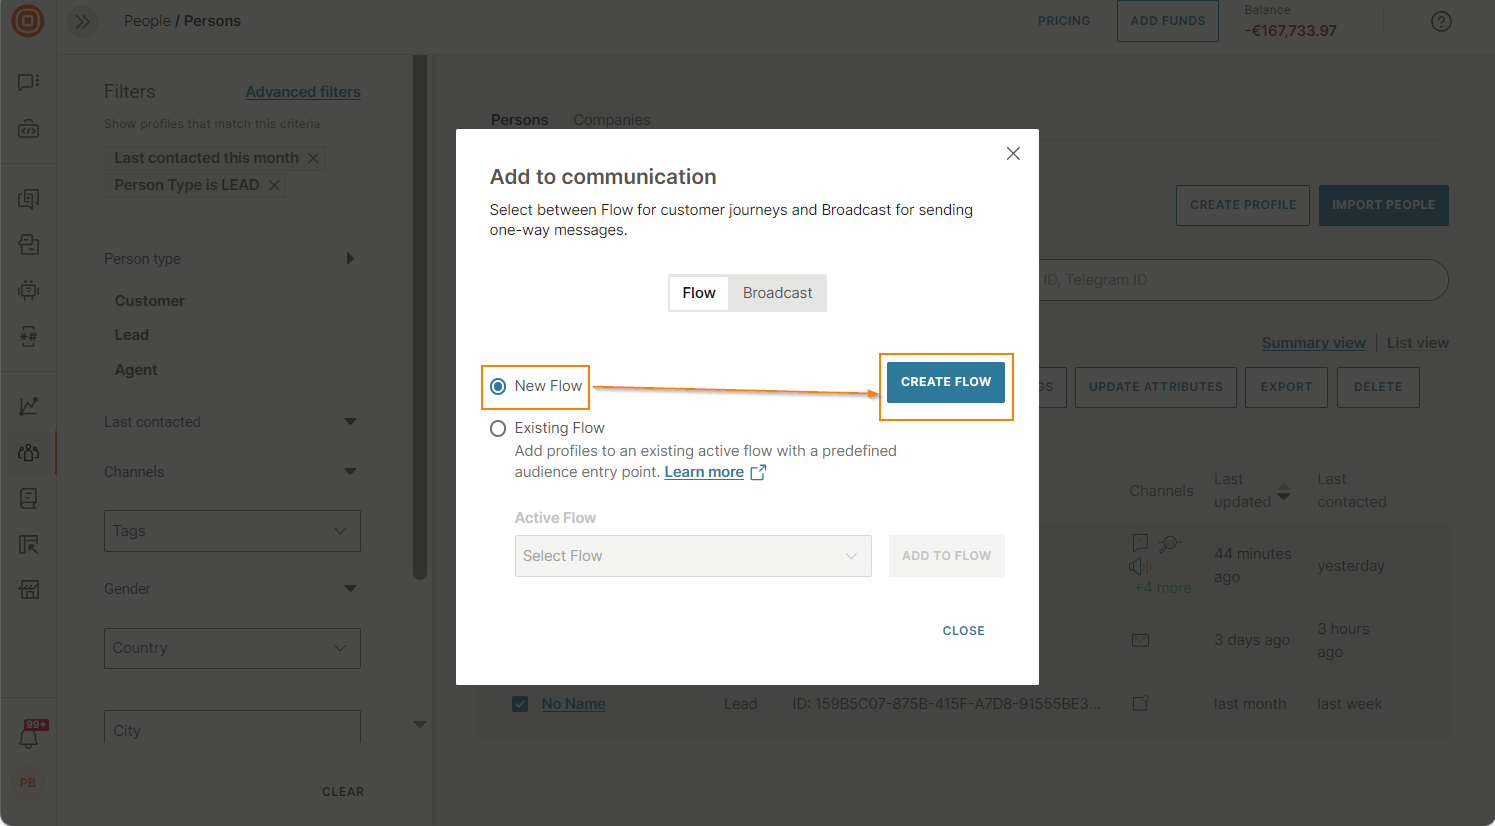
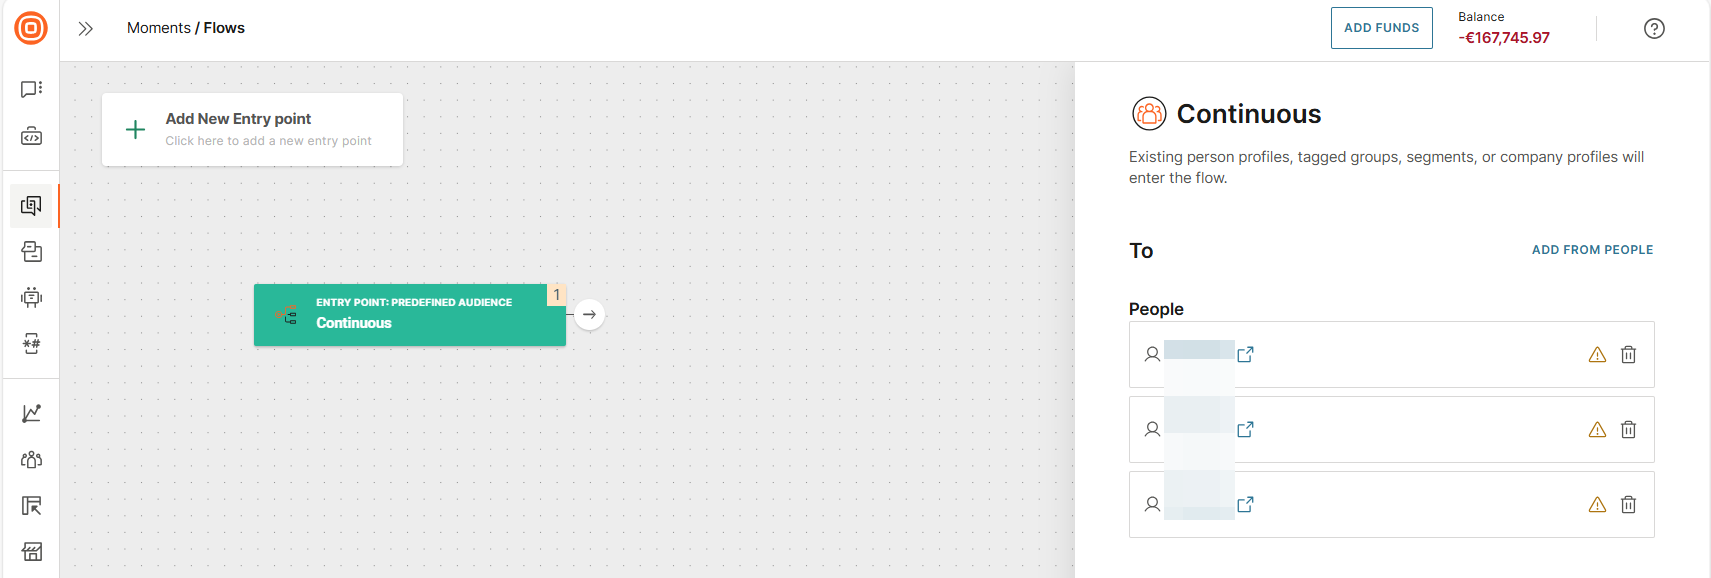
This directs you to the flow editor in Moments, where a new flow that has the Continuous entry point is created. The selected profiles are automatically added to the audience in this entry point.
-
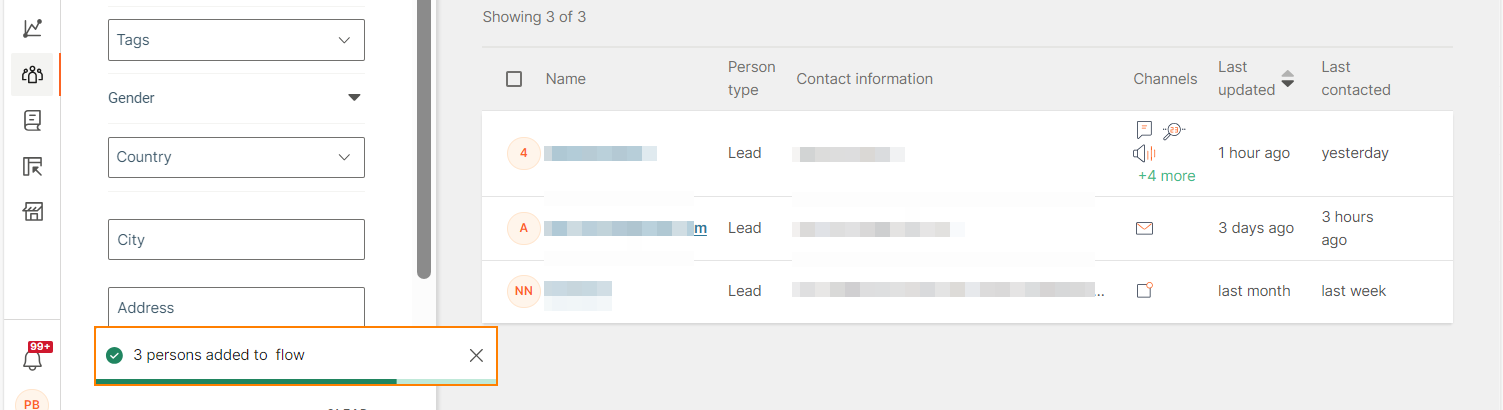
To add to an existing active flow that has the Continuous entry point, select Existing flow. Select the flow from the list and select Add to flow.
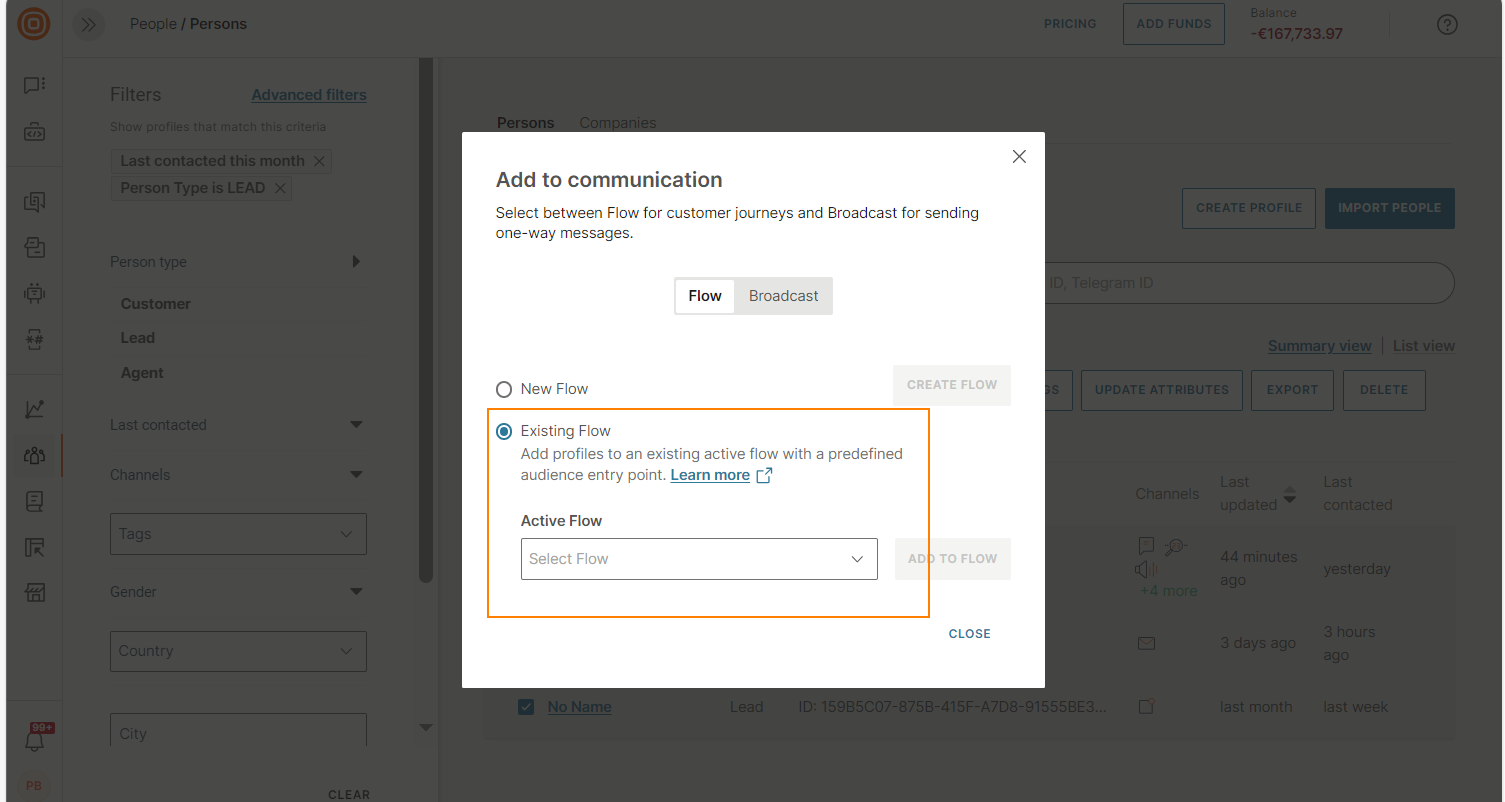
The selected profiles are added to the flow.
-