Functions
The elements in Flow that help you plan and direct your messages the way you want are called functions. They let you wait for events such as purchases to send a relevant message or have a failover channel in case the customer does not check the messages on the first one that you used.
Segment Audience
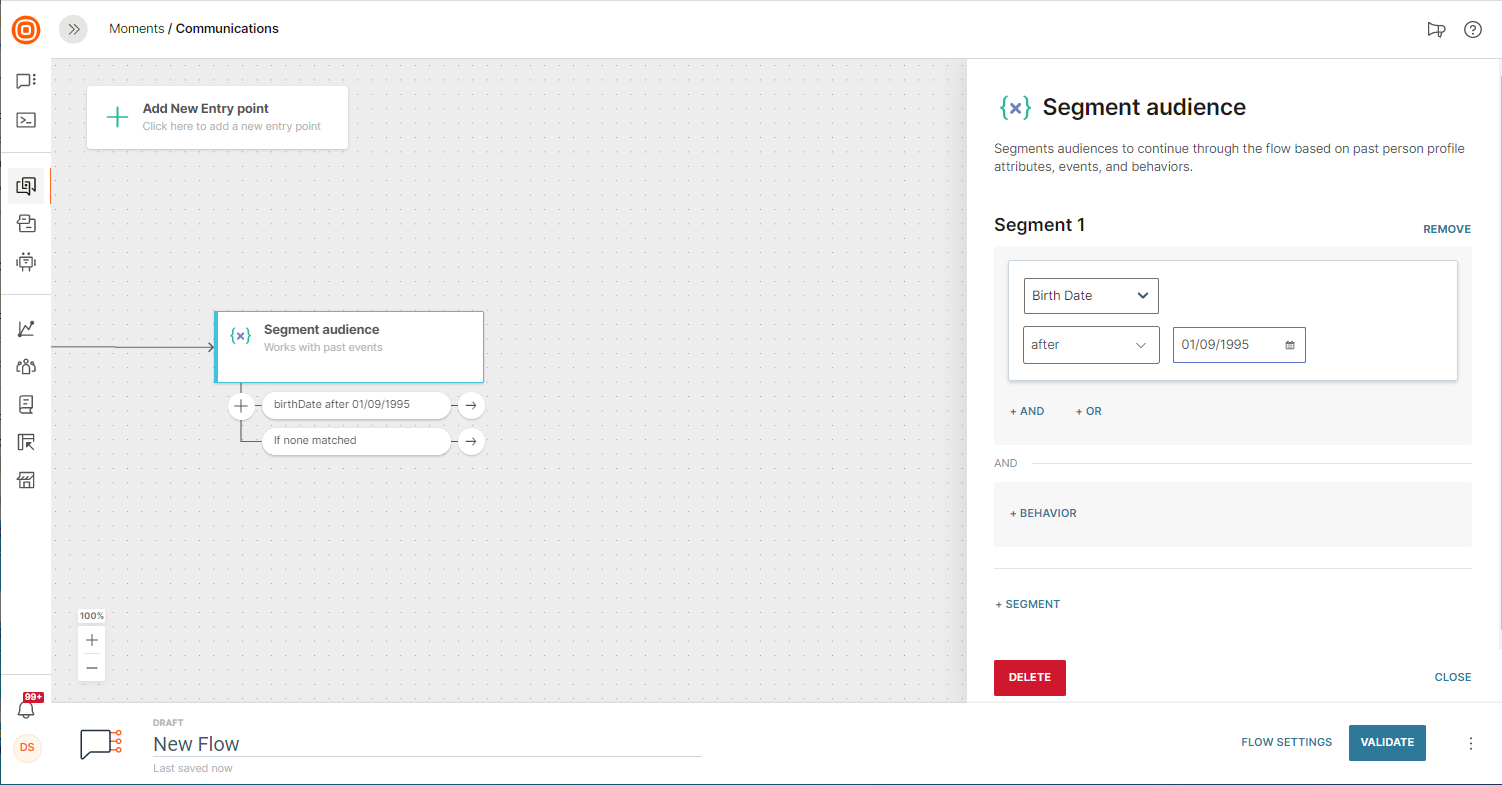
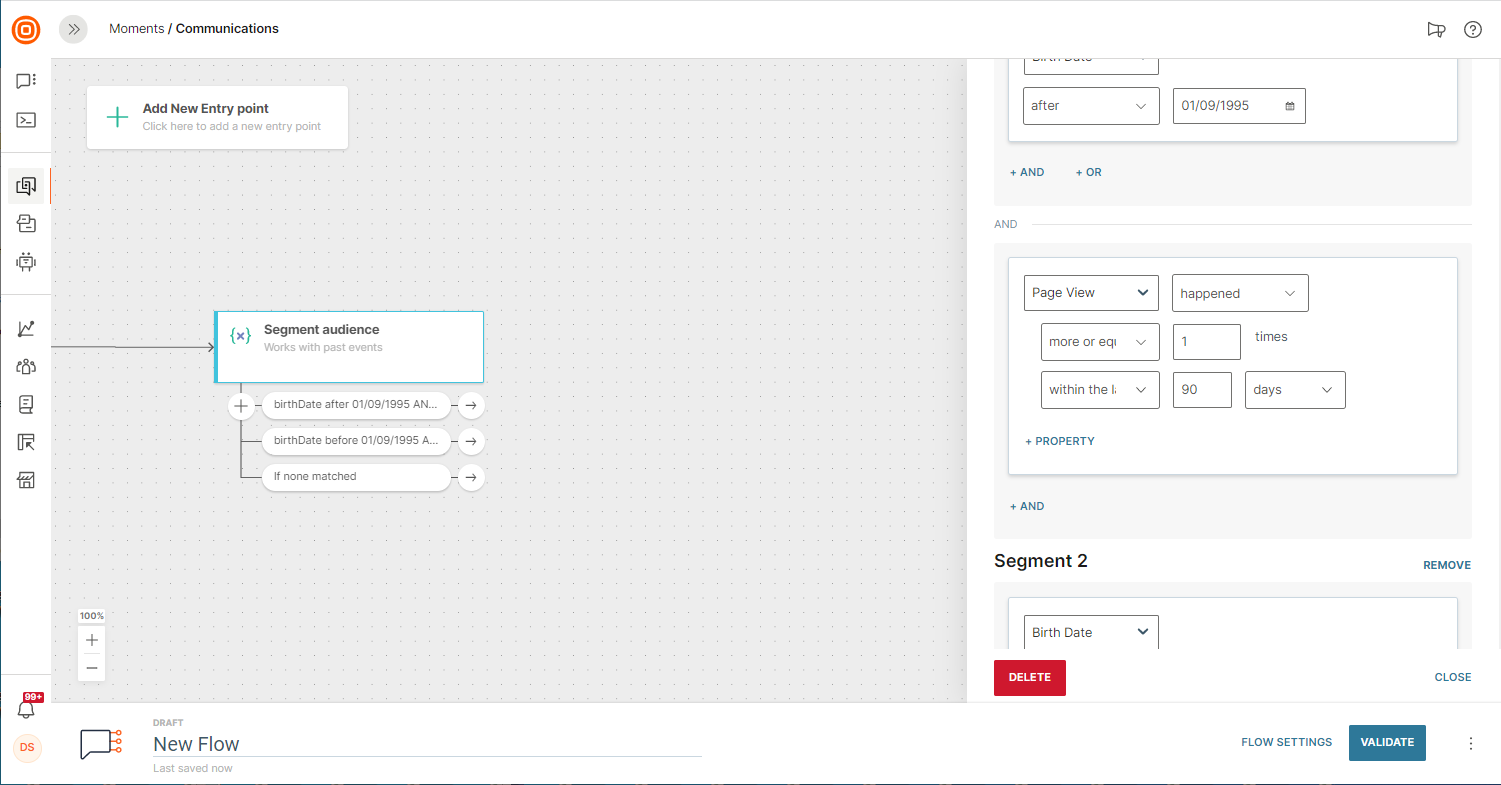
Split your audience based on attributes and behavior. If, for instance, you want to send different messages to people belonging to different age groups who recently checked out your web page, this is exactly what the Segment Audience element is for.
Attributes and events that you need for segmentation are selected in the element's side panel.
Available attributes:
- Standard - basic, predefined customer information
- Custom - customer information that you define yourself in the People module
- Contact information - email address, phone number, and other channels available for contacting this customer
- Channel specific - showing when the customer was contacted last time
- Computed attributes - customer information created from computed attributes
- List of objects attributes (Closed early access) - a list that contains multiple properties. You can segment based on whether any or all items in the list match specific values of the selected list properties.
Note
Segmenting based on List of objects is in closed early access. For more information, contact your Infobip account manager.
Operators per attribute:
| BOOLEAN | TEXT | NUMBER | DATE |
|---|---|---|---|
| is | is | is | is |
| is not | is not | is not | is not |
| contains | less than | before | |
| starts with | less than or equal | until | |
| ends with | greater than or equal | since | |
| is empty | greater than | after | |
| is not empty | is empty | is empty | |
| is not empty | is not empty | ||
| will be in | |||
| will be within | |||
| will be more than | |||
| was | |||
| was within | |||
| was more than | |||
| was today |
To get an idea how attributes work, select a custom attribute "age" and operator "less or equal" inside the Segment Audience side panel.
The types of events to be combined with attributes are as follows:
- External - actions on other platforms like websites and apps
- People - changes in profile information
- Channel - interaction with messages
- Product events - information about when a person entered or exited the communication flow
Visit the People Real-Time Event article to learn more about each type and then think about how to include them in your future communication campaigns. (The Wait for an Event trigger and element are used when you want to base your communication on events only, while the Segment Audience element allows you to use both attributes and events.)
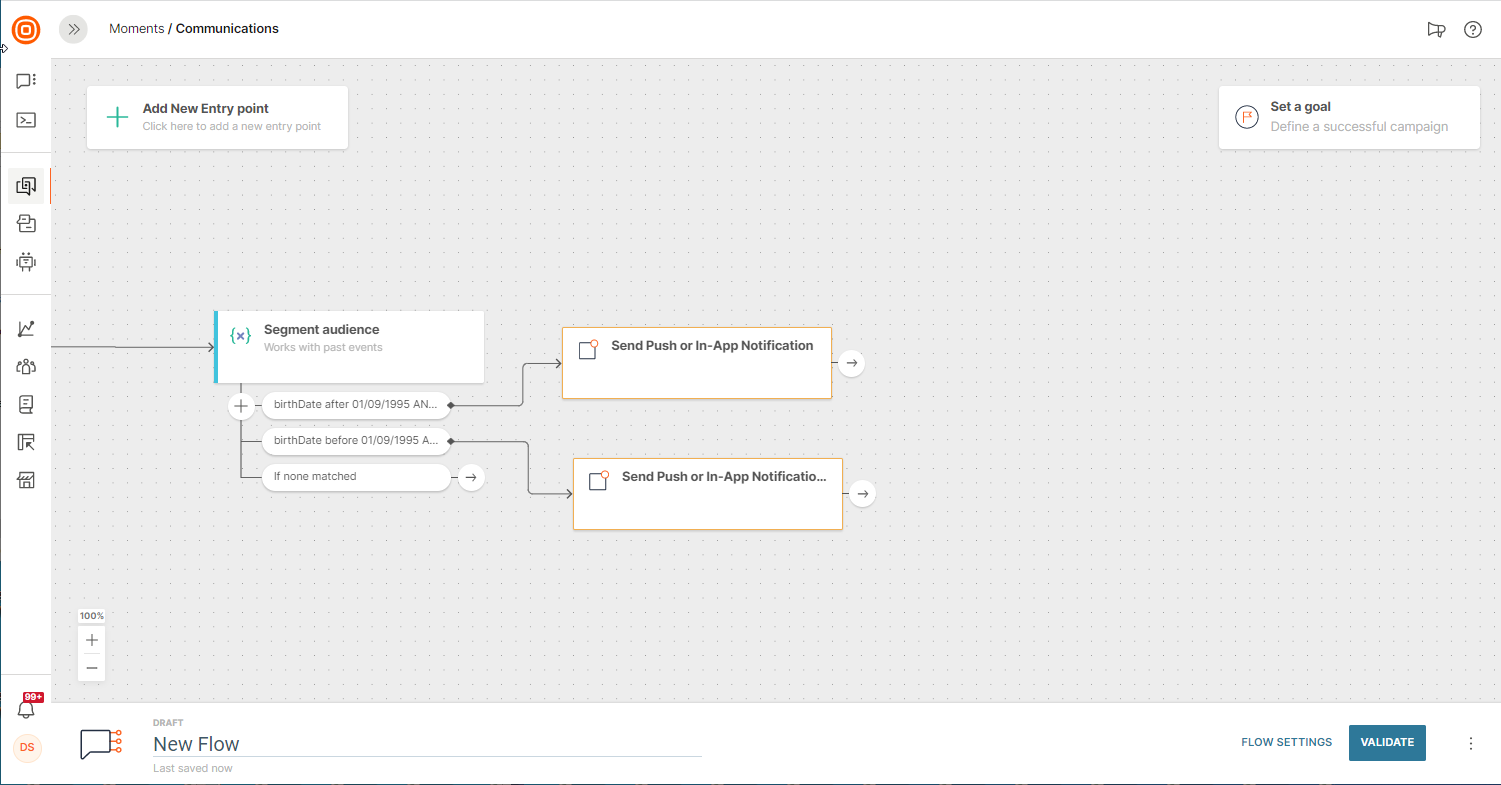
So, if you were to send a message to two different age groups (attribute) who viewed your webpage (external event), the final setup would look like this:
Wait for an event
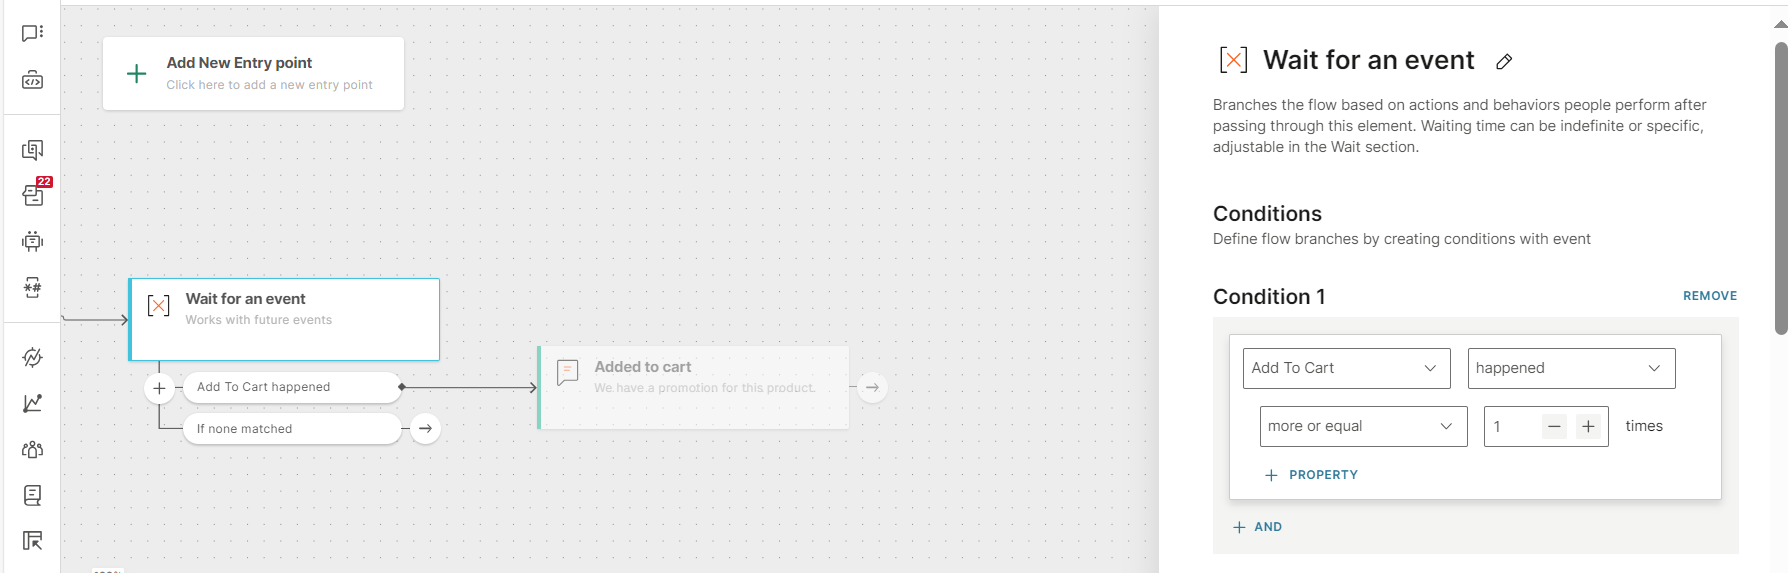
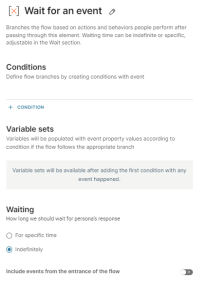
The Wait for an event element activates when an end user performs a specific action that you configure in the element. You can define these actions through the associated events. When the element is activated, the flow performs the actions that you specify in the event happened branch of the element.
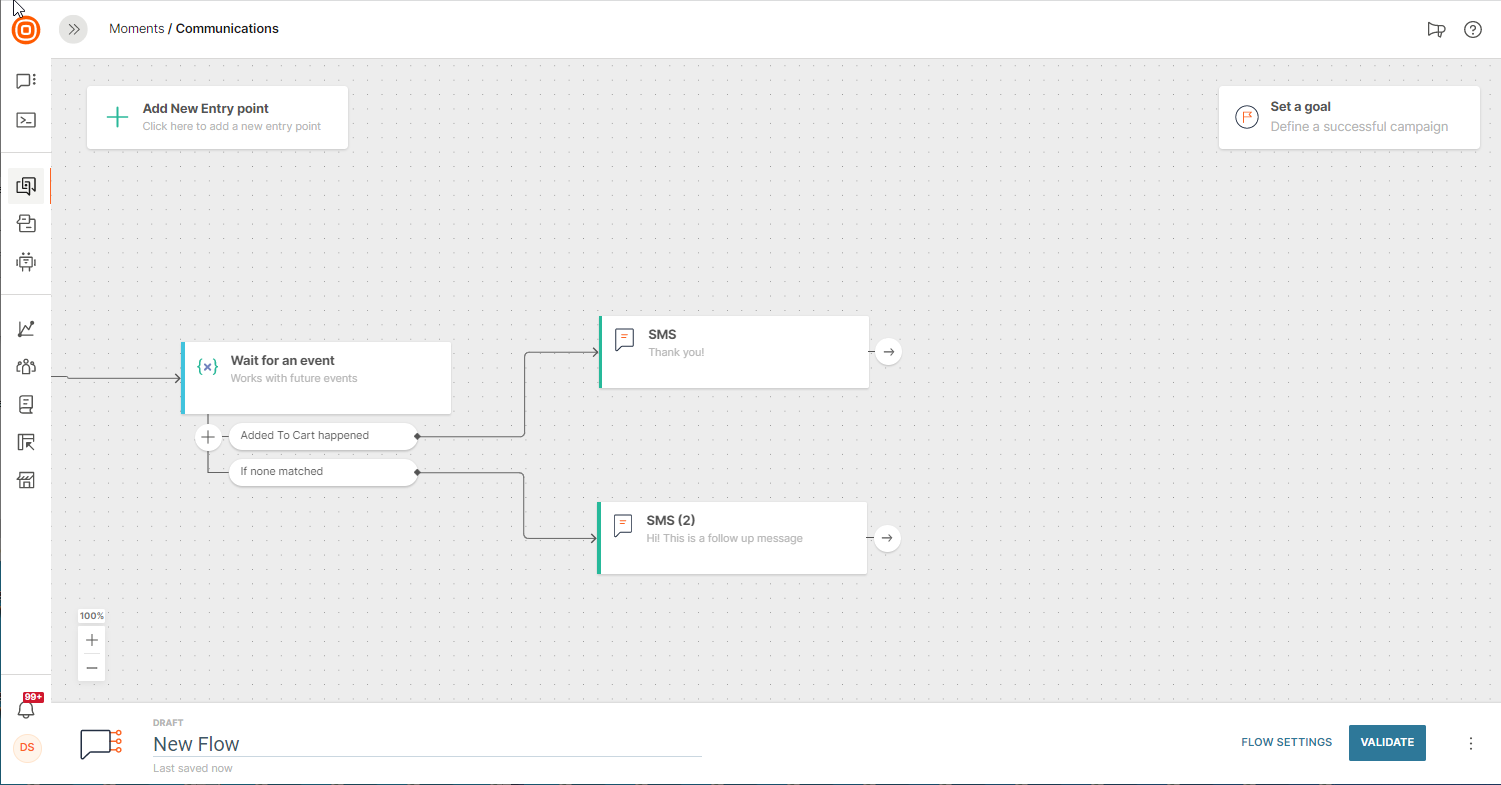
Example: You want to send a message when end users add items to their cart on your product website. Add the addToCart event in the Wait for an event element. In the add to cart happened branch of this element, add a Send SMS message element. When an end user adds an item to the cart, the Wait for an event element is triggered and the flow sends the SMS message.
The Wait for an event element is triggered only for end users who are already in the flow. By default, this element considers events only when the end user arrives at this element in the flow. If you want the element to trigger for events that occurred earlier in the flow, select Include events from the entrance of the flow.
Events tracked through the element
You can track the following categories of events through this element:
Use cases for the element
Use this element to identify how end users interact with your digital assets such as websites, how they react to your messages, and if there are any changes in their profile information.
The following are some examples.
- In abandoned cart campaigns when you want to remind customers that the products that they selected are still in the cart
- Offer a discount to end users who view the same item three or more times within 7 days.
- Other advanced multi-step campaigns.
Configure the element
Follow these steps to configure the element.
- In the Conditions section, define the events that trigger the element. For each condition, an associated branch is added to the element.
- (Optional) In the Variable sets section, save the event properties in flow variables.
- In the Waiting section, select how long the flow should wait for the event to occur.
- (Optional) Include events from the entrance of the flow.
For more information, refer to the following sections.
Define the conditions
Define one or more conditions that trigger the flow.
In each condition, do the following.
- Select the event.
- Select the operator and criteria for the event. You can target either customers who performed the action or those who did not perform the action.
- (Optional) If the event has properties, you can add them to the condition to refine the target audience.
Select the event
Select the event. For more information about events, refer to the Events documentation in People.
You can search by event name and filter by event type.
To select a custom event, you must define the event, along with its properties, in People.
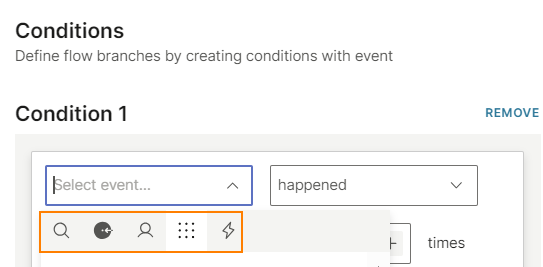
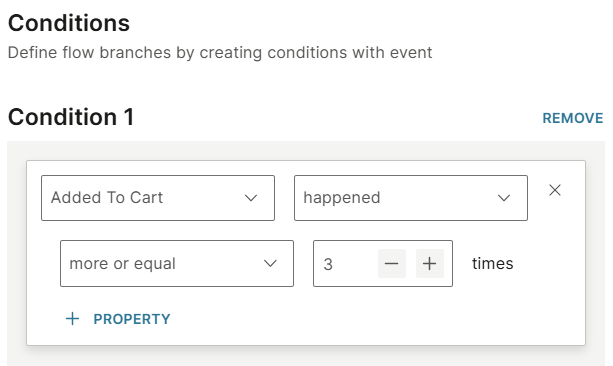
Select the operator
Select which end users you want to target.
- Happened: Targets end users who performed the action. Set the number of occurrences. Example: To trigger the flow the third time an event happens, specify the number of occurrences as equals 3 times.
- Not happened: Targets end users who did not perform the action.
Do not use Not happened condition by itself. Use it only with the Happened condition. This is because while it is possible to trigger a flow when an event occurs, it is not possible to trigger the flow when an event does not occur.
Example: Start the flow when Event_A happened AND Event_B did not happen.
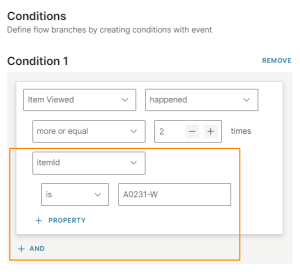
Add event properties to the condition (Optional)
If the event has properties, use them to refine the audience. Select Property to add one or more properties.
In the example shown in the following image, the itemId property of the Item viewed event is added as a filter.
Map event properties to flow variables (Optional)
If the event has properties, you can save them in flow variables and reuse the variables later in the flow.
Example: For the Appointment booked event, you can save the event properties such as Appointment time and Appointment name in flow variables. You can then use these variables to send the end user a confirmation message with the appointment details.
The values of the mapped variables could change as the end user moves through the flow.
Example: As the delivery event progresses to the next stage, the delivery status variable changes from Pending to Dispatched.
You can also pass list attributes to flows. For more information, refer to the Pass lists in events to flows documentation.
For more information about creating and using variables, refer to the Map event properties to flow variables documentation.
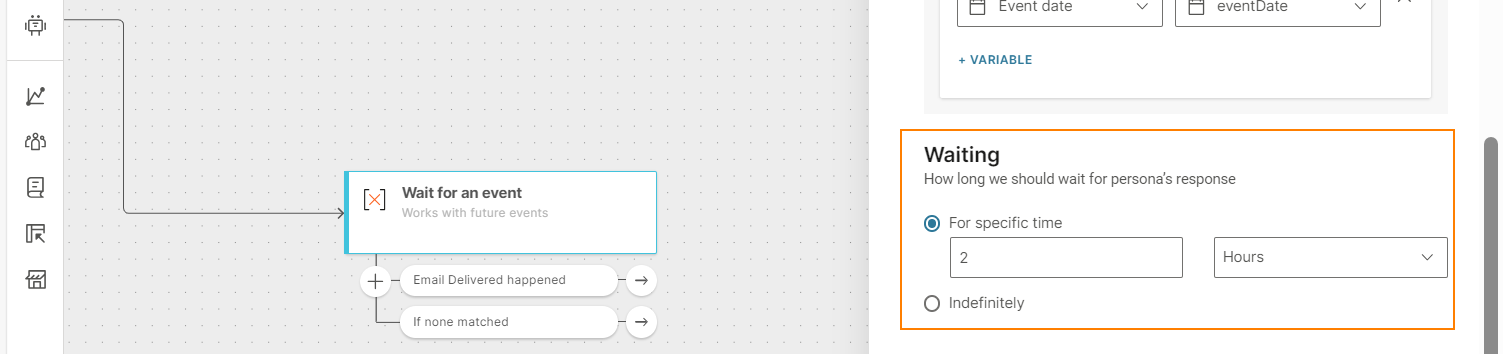
Waiting
Specify how long the flow should wait for the event.
- For specific time: Specify the duration.
- Indefinitely: The wait time depends on the flow schedule, which you configure in the Flow settings. If none of the elements in the flow are activated in 1 year, the flow ends.
Include events from the entrance of the flow (Optional)
By default, the Wait for an event element considers events only when an end user arrives at this element in the flow. If you want the element to trigger for events that occurred earlier in the flow, select Include events from the entrance of the flow.
This option is useful to avoid situations where an end user gets stuck because the flow is waiting for an event that has already occurred.
Example: A marketer builds a funnel to track emails by using the Wait for an event element. This element waits for 3 events - Email sent, then Email opened, and then Email Link Clicked, each with a waiting period of 2 days. The end user opens the email, but the email client blocks the Email opened event for privacy. After 2 days, the end user reaches the Email clicked event. But the waiting period for this event is over. So, the end user cannot move forward in the flow. If you enable Include events from the entrance of the flow, then the past events are considered, and the end user moves forward in the flow as expected.
If all the events in the conditions already happened before the flow started, the person does not enter the flow. However, if the flow is recurrent, the person enters the flow only if these events happen again.
Next steps
Configure each of the following:
- What happens if the event occurs during the waiting period: Add an element, such as SMS message, as the next step in the flow.
- What happens if the event does not occur during the waiting period: Add the next element in the flow.
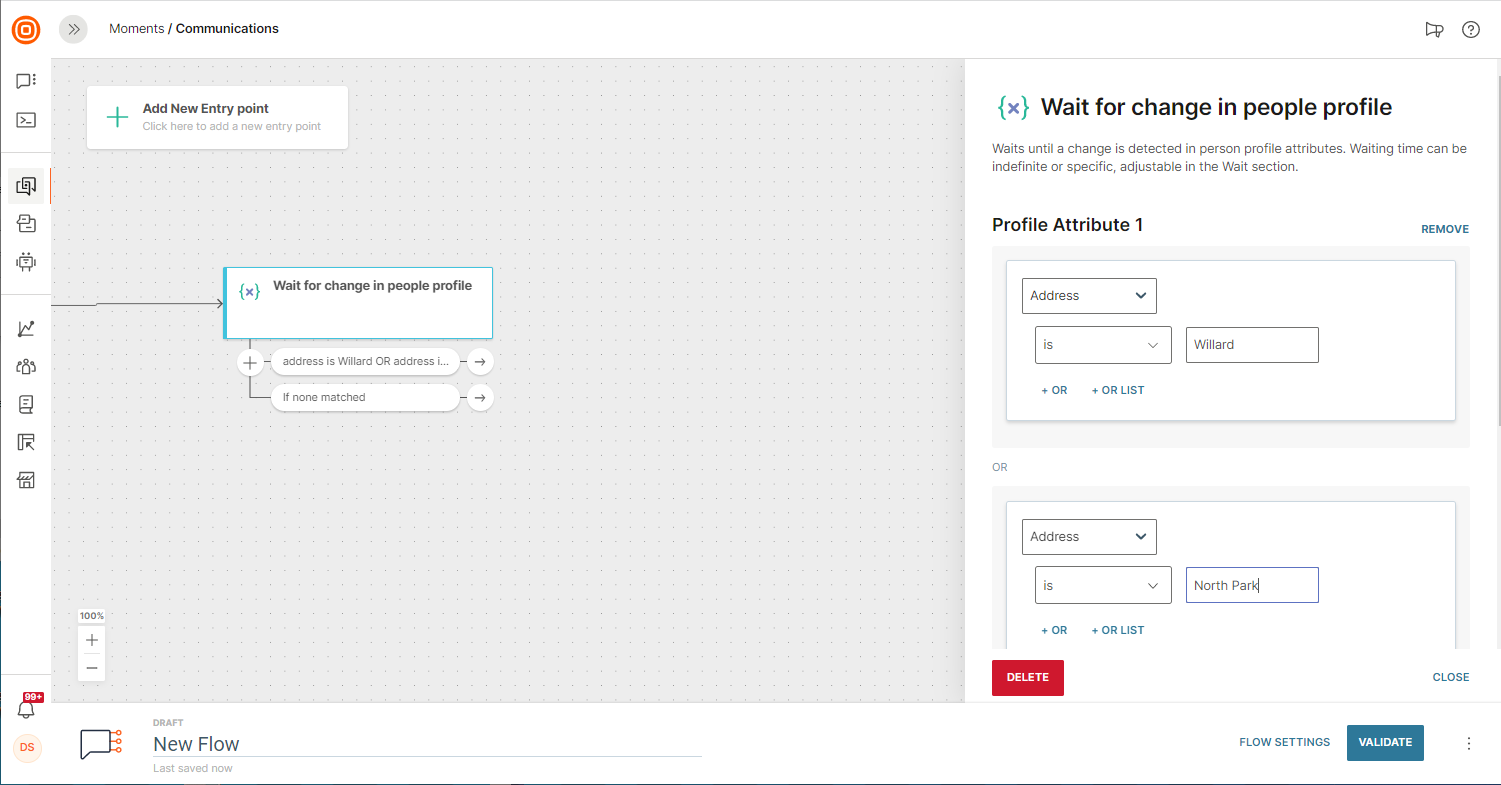
Wait for Change in People Profile
When you want to wait a predetermined amount of time for a change in a specific attribute of a person who entered the Flow after an event happened, opt for the element called Wait for Change in People Profile.
This is what you will need to configure:
- The change in attribute the flow should wait for
- How long the Flow should wait for that change
- What happens if the change occurs during the waiting period
- What happens if the change doesn’t occur during the waiting period
- This element will be helpful in more advanced automation campaigns.
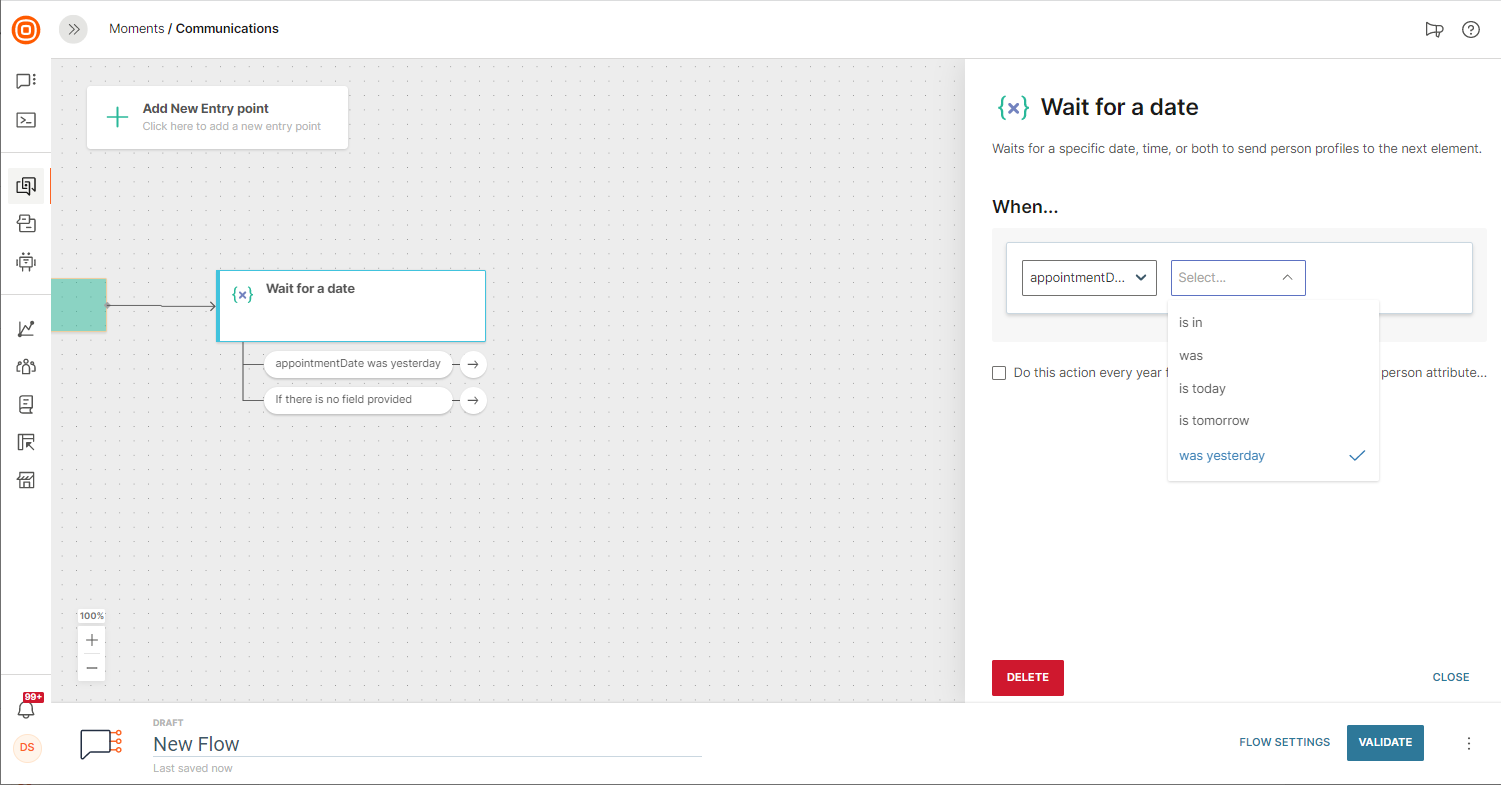
Wait for a Date
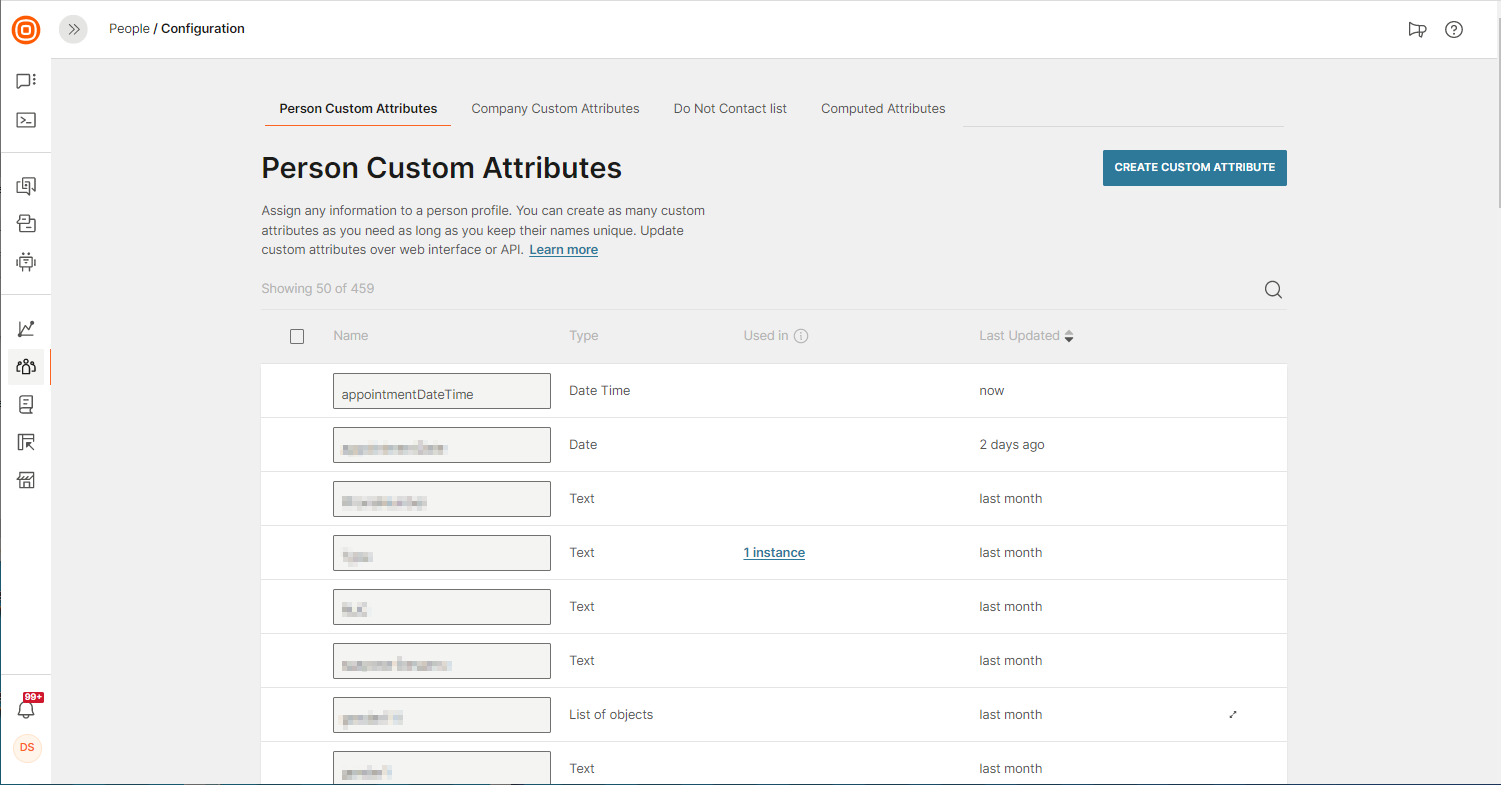
To continue your communication before, on, or after a specific date/time from a person's profile, add the Wait for a Date element.
What you need to do beforehand is add this "profile information" as a custom attribute using our People platform.
There are several options available inside this element:
IS IN – use this condition to continue communication hours or days before the date/time you have set as a custom attribute inside the person profile.
For example, with “TrialExpiryDateTime is in 4 hours,” the customer will reach the next step in the flow when the current date/time is 4 hours before the one set in the TrialExpiryDateTimeattribute.
WAS – the amount of time that has passed after the set date/time had been reached. For instance, you would set “TrialExpiryDate was 1 day ago” to get the customer to the next step in the communication one day after the date set in the TrialExpiryDatecustom attribute.
IS TODAY – use it when you want the customer to get to the next step in communication on the very date set in the custom attribute (“DueDate is today”).
IS TOMORROW – the customer will reach the next step in the Flow one day before the date set in the custom attribute.
WAS YESTERDAY – the customer will reach the next step in the Flow one day after the date set in the custom attribute.
DO THIS ACTION EVERY YEAR – select this check box if you want to perform this same action every year for each person (ignores the year in the person attribute and makes it a recurring action).
You can also start a communication based on a specific date or time.
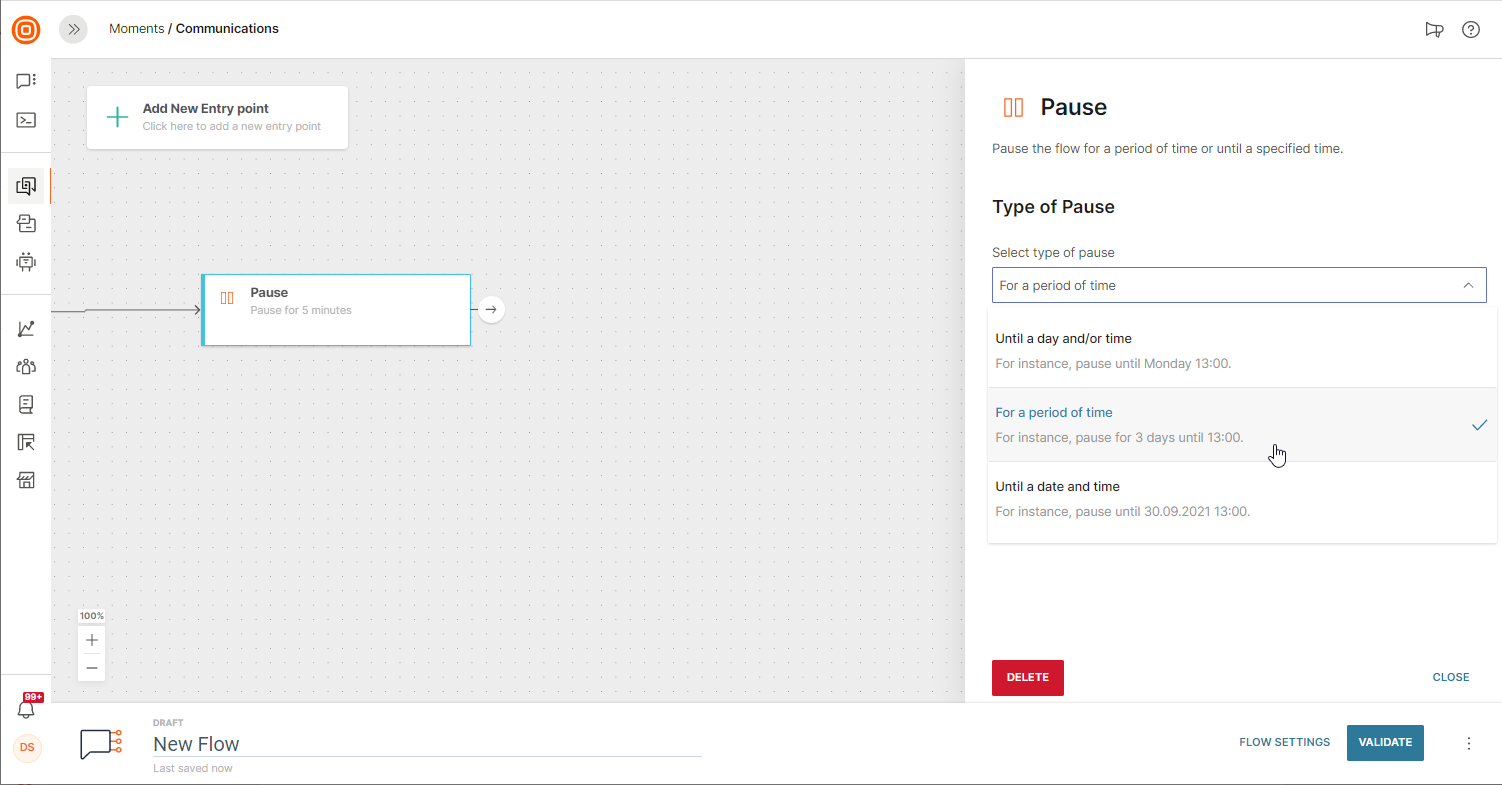
Pause
This is the element that delays your communication flow for a specific amount of time. For example, you send one message from the flow and you want to wait before sending another one. What you need to do is select Pause and then select the type of pause and its duration along with a time unit – seconds, minutes, hours, days.
There are 3 types of pause you can select from:
- Pause until a day and/or time - This will pause until the day or time milestone is hit. For example, Pause until Monday at 13:00.
- Pause for a period of time - This is useful if you want to set a generic waiting period that will start counting after the user comes into contact with the Pause element in the Flow. Choose from seconds, minutes, hours, and days. For example, Pause for 3 days until 13:00.
- Pause until an exact date and time - This is useful for planning user communications to remind users about an event that will happen at a known time. For example, sending a message before a holiday or appointment. Such as pause until 30th November at 13:00.
When the time specified for the pause passes, the next element (for instance, an SMS message) in the communication flow will be triggered.
The Pause element can also be used with all the Evaluate elements available in the Flow.
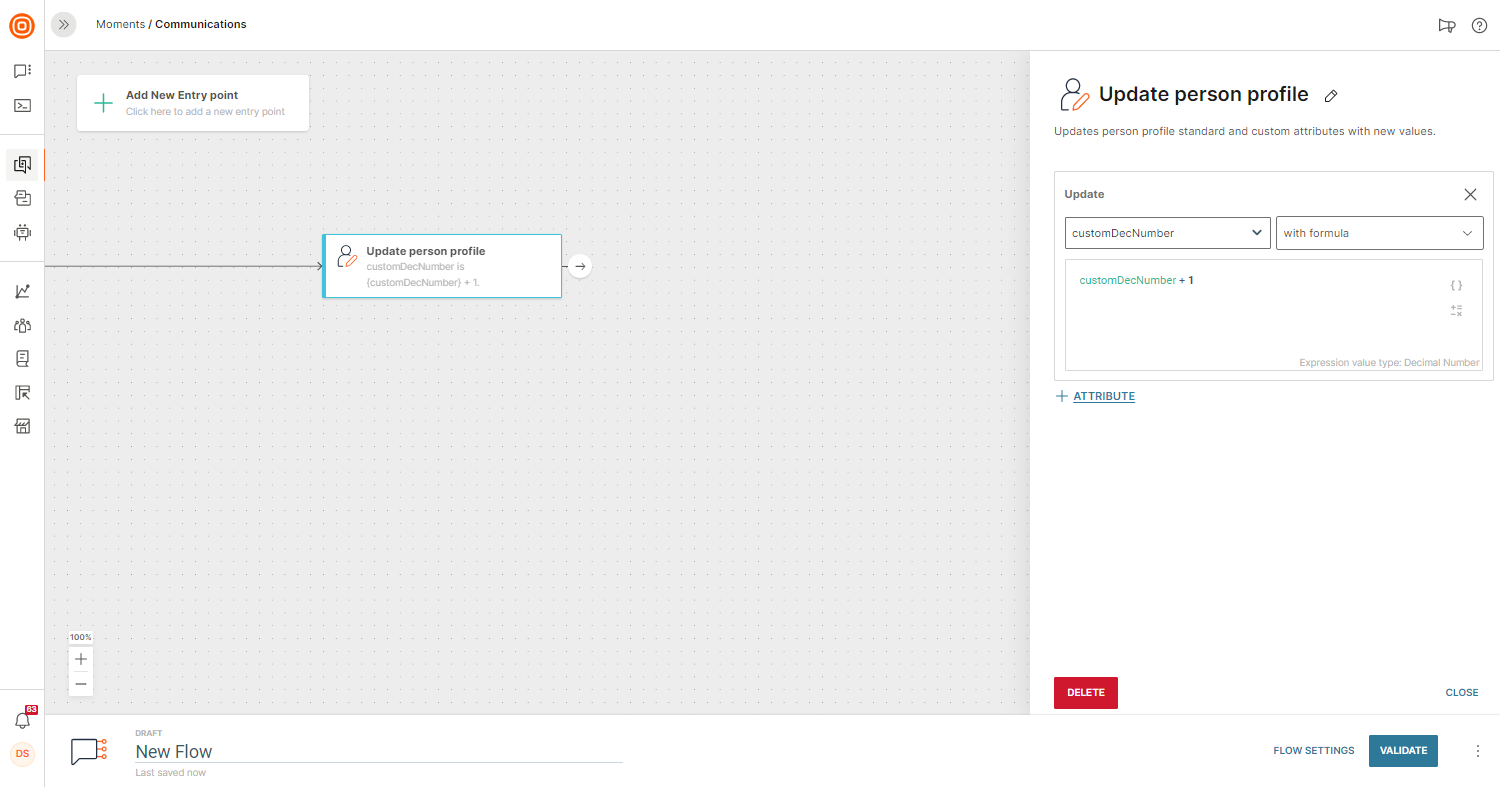
Update Person Profile
To update and save values for the customer standard or custom data attributes that are stored in the People module, use the Update Person Profile element.
Select Update Person Profile and then, in the right side panel, select the attribute you want to update and how you want the attribute to be updated. You can choose to update the person profile with a value, set it to empty (i.e. erase), or apply a formula to the attribute.
- If you select with value, then the user can add a static value, or select a different attribute from People or a variable using the curly brackets.
- If you select with formula, the expression editor will open you can define your formula using expression language.
- If you set to empty, then the data in the person profile attribute will be set to empty.
Any data that customers provide related to the plan will be saved on the People platform to help you in future communication campaigns.
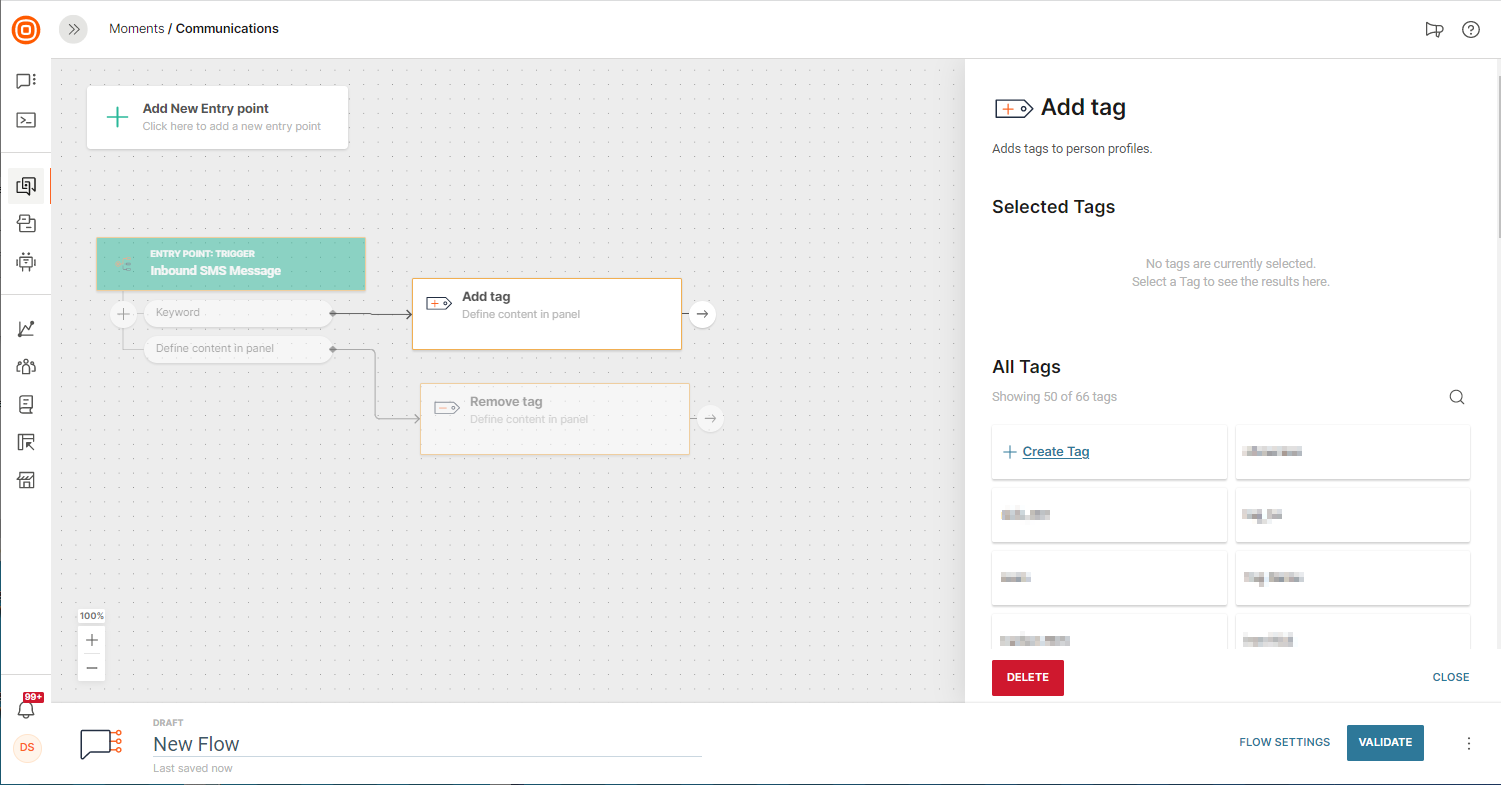
Add or Remove Tag
If you want to mark customers based on their actions, use tags so that they can be included in any future communication based on these tags.
Flow supports two tag related elements:
- Add tag
- Remove tag
To get a better idea about how to apply this feature, check out how tags can be used for feedback.
Add or Remove from Do Not Contact List
When end users want to stop receiving communications from your business, they can opt out or unsubscribe. Use the Add to Do not contact list element to unsubscribe end users from communications sent from your Infobip account. These end users are added to the Do not contact list in People. A contact that is in this list does not receive any communication from the selected senders and channels.
When these end users opt back in, use the Remove from Do not contact list element to remove the contact from the Do not contact list.
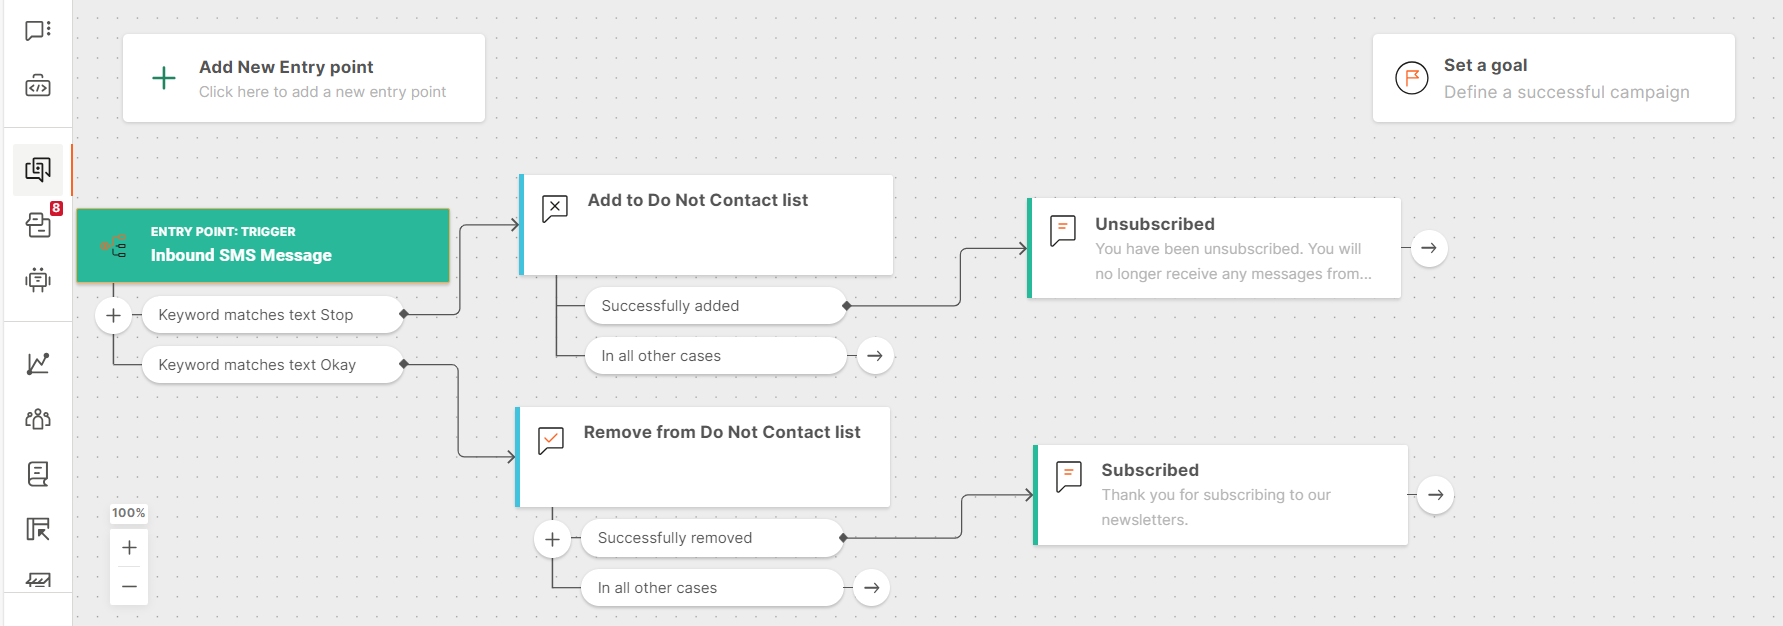
Design the flow
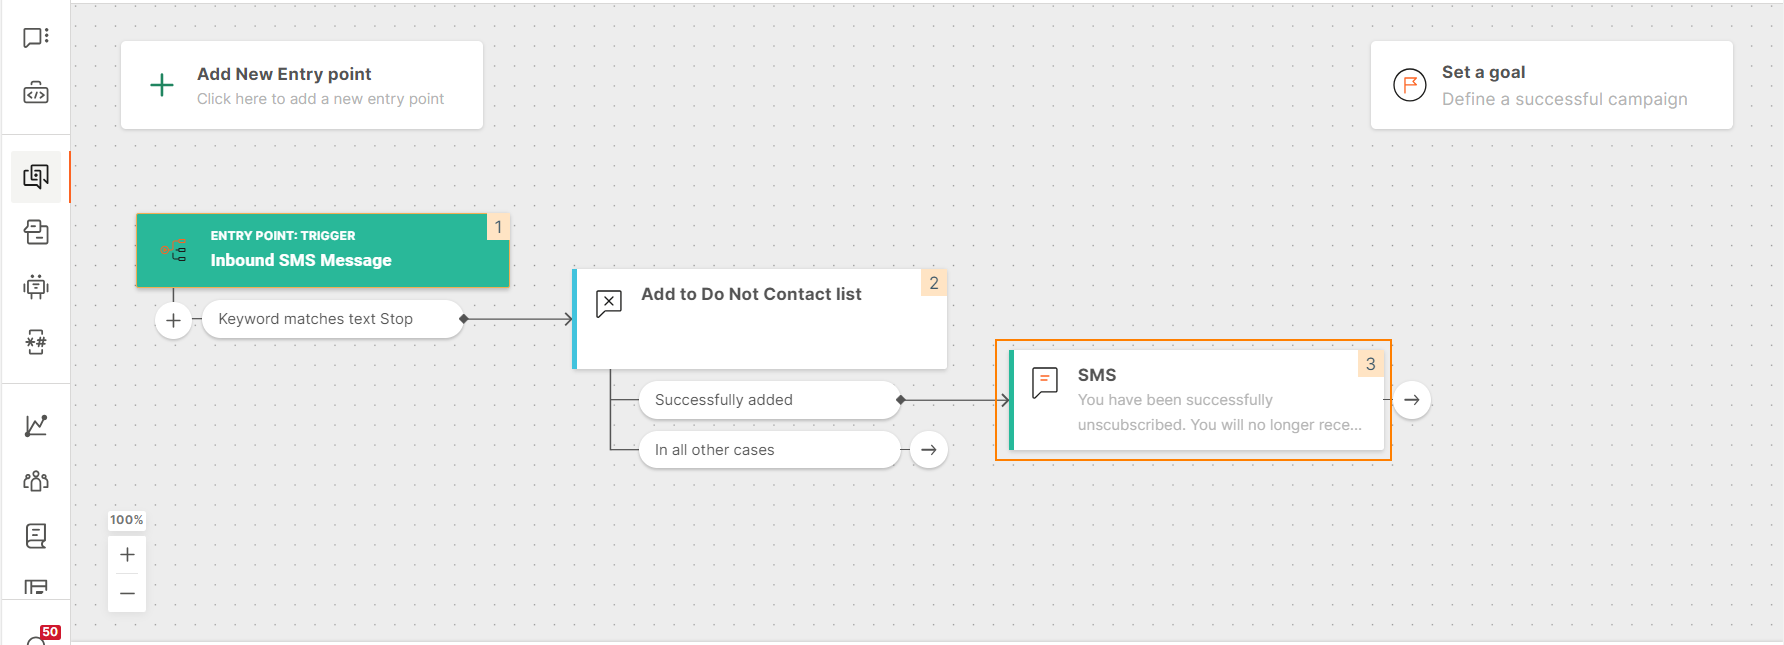
Design your flow such that opt-ins or opt-outs are compliant with your local laws and regulations as well as with your corporate policy. Example: Track inbound keywords, such as Stop, to unsubscribe a contact.
Example
Use the Inbound message trigger or the Evaluate inbound message element to identify whether the end user's message contains the keyword to opt in or opt out.
Then, use the Add to Do not contact list or Remove from Do not contact list elements in your flow to add or remove these end users from the Do not contact list.
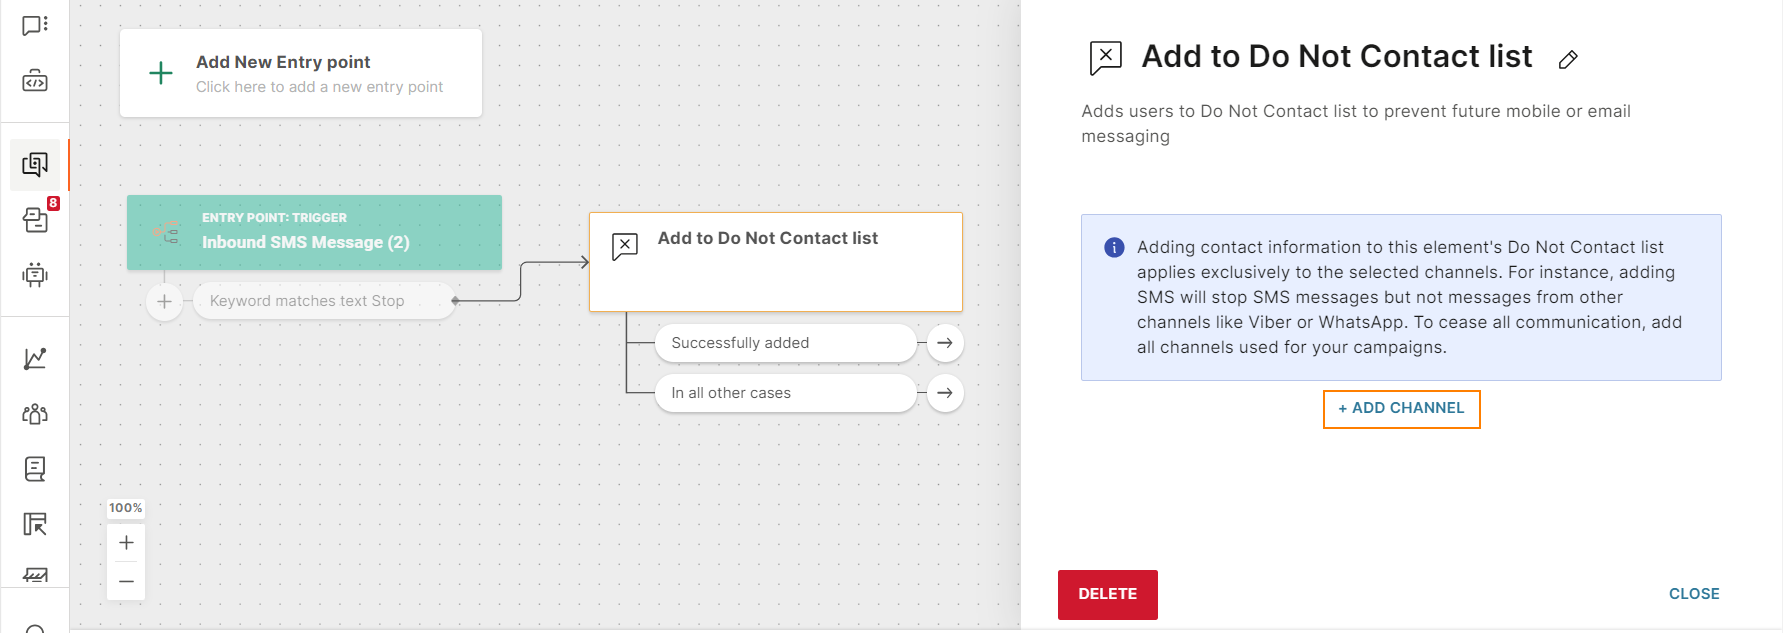
Add to Do not contact list
Use the Add to Do not contact list element to block communication from one or more senders on a specific channel, without affecting other channels or senders.
Select a channel and one or more senders for that channel. When an end user comes to this element in the flow, the contact information from the end user's profile is added to the Do not contact list for the specified channel and senders.
Blocking works as follows:
-
Channel: Messages are not sent on the selected channel but can be sent on other channels. Example: An end user wants to receive offers only through email but not through SMS. In this case, select the SMS channel in the Add to Do not contact list element.
You can select only one channel in an Add to Do not contact list element. To block multiple channels, use a separate element for each channel.
The channel that you block does not need to be the same as the channel on which the end user contacted you.
-
Senders for the selected channel: Messages are not sent from the selected senders but can be sent from other senders on the same channel. Example: An end user wants to receive emails only about transactions but not about promotions. In this case, block only the sender for promotions.
Blocking is applicable to the specified senders only on the selected channel. Other channels that use the same senders are not affected.
Design the flow
You can add only one channel through the Add to do not contact list element. To add more than one channel, add an Add to do not contact list element for each channel.
To add an end user to the Do not contact list, do the following:
-
Add the Add to Do not contact list element to your flow.
-
In the element, select Add channel.
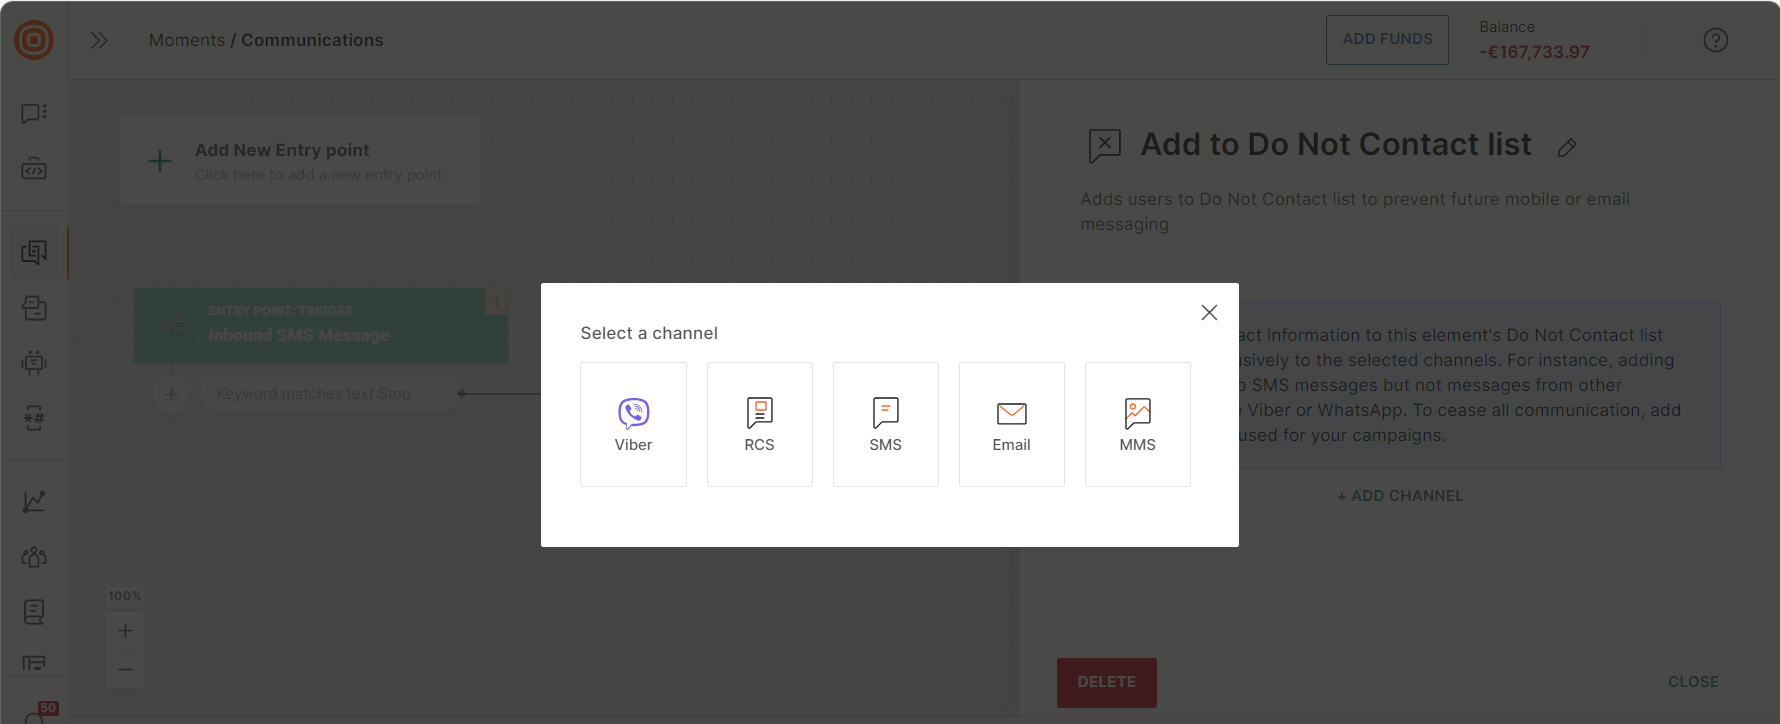
-
Select the channel that you want to add to the Do not contact list.
-
For the selected channel, select the senders that you want to add to the Do not contact list.
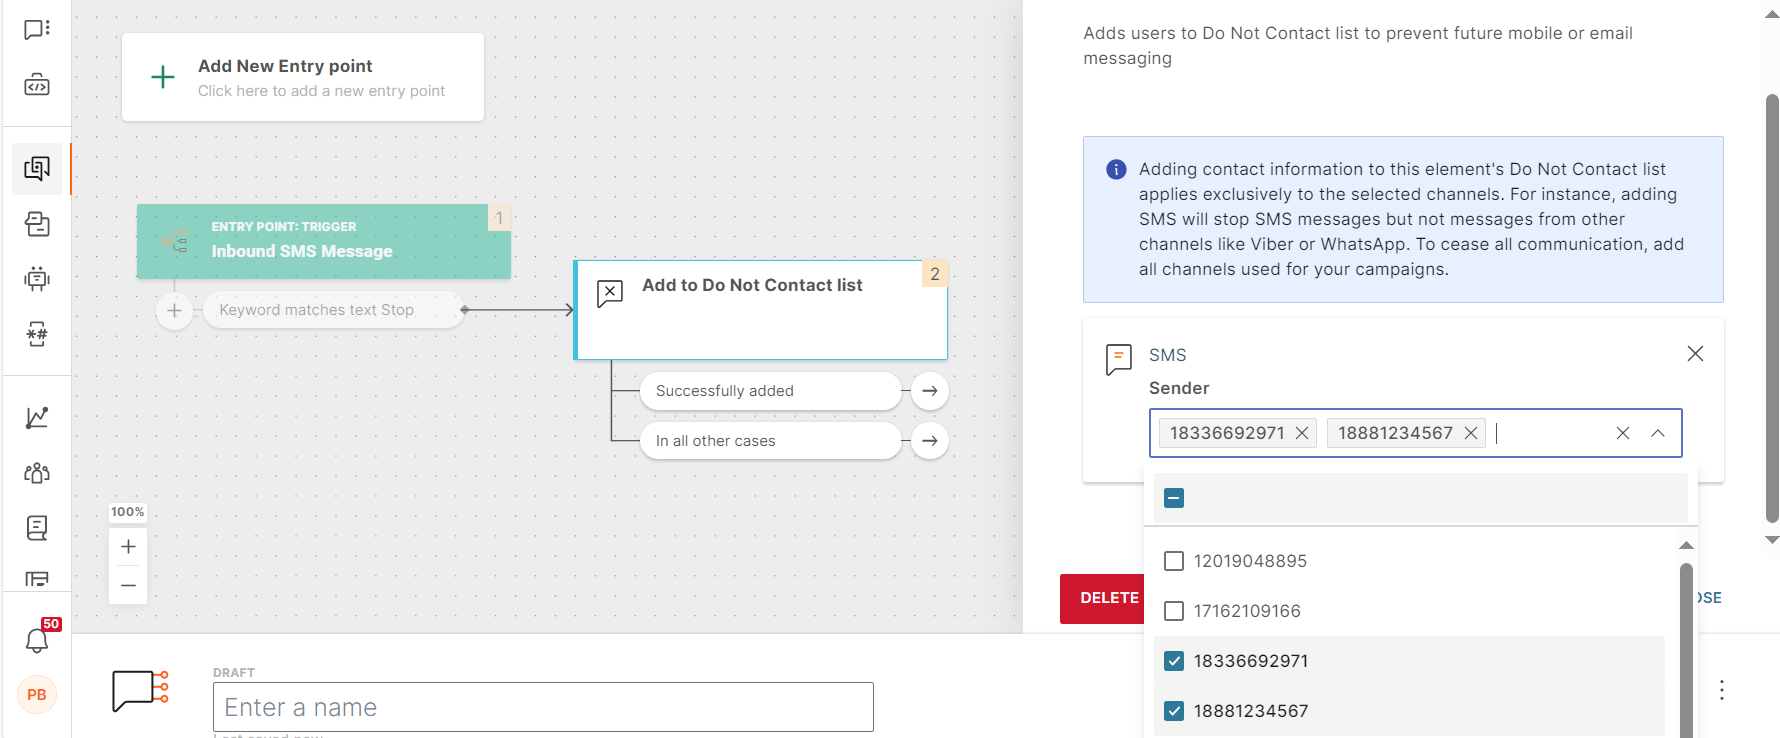
-
Define the next steps. Example: Send a message to the end user saying that they have successfully unsubscribed.
If you use the Add to Do not contact list element to manage opt outs or manage end users who want to stop receiving messages, make sure that the flow does not expire. Otherwise, end users who opted out will receive messages after the flow expires.
To set the flow to not expire, in the Flow settings > Scheduling tab, disable Flow stop.
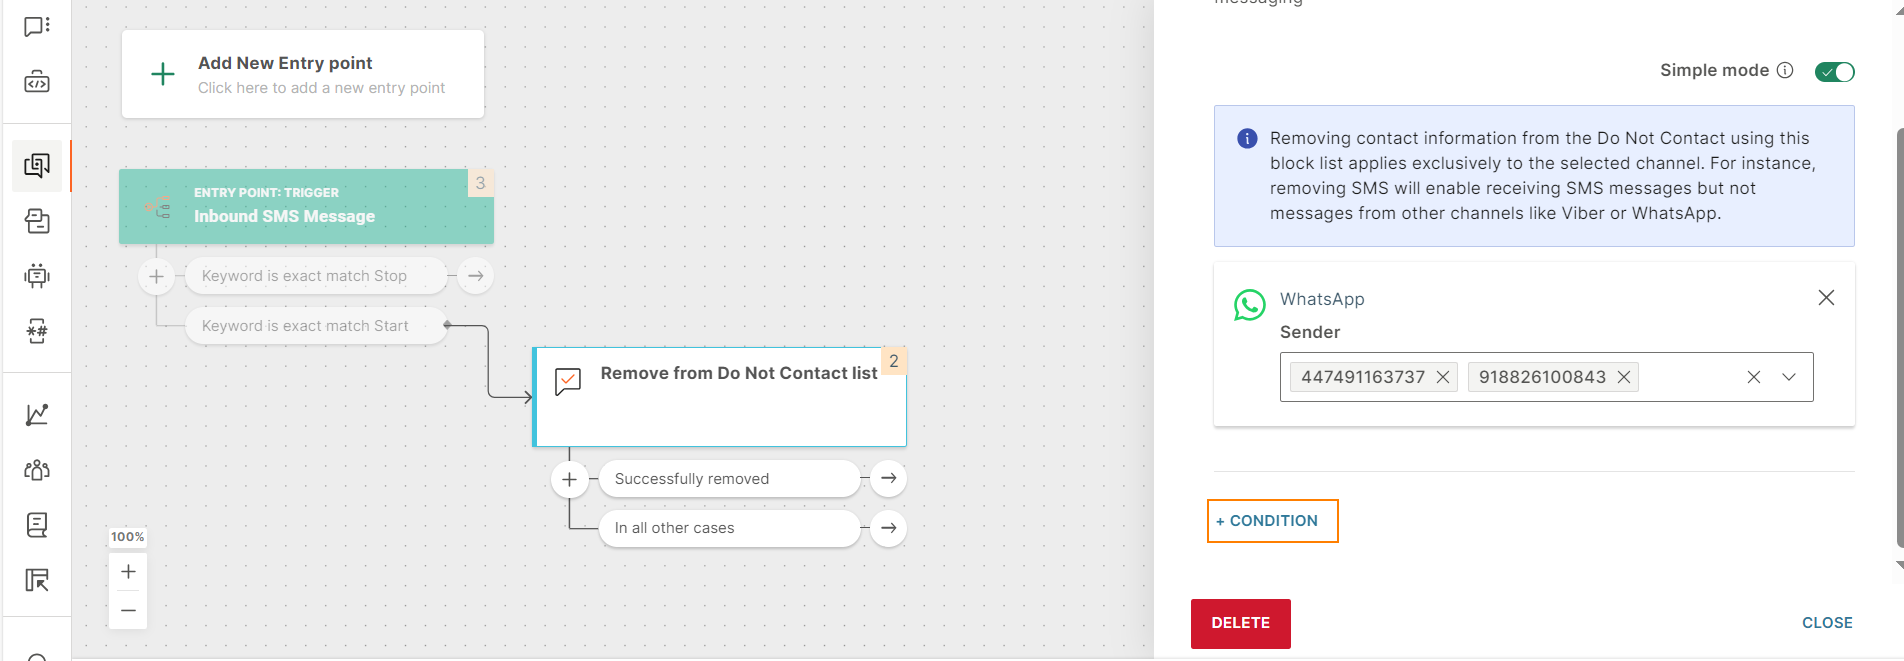
Remove from do not contact list
Use the Remove from Do not contact list element to unblock communication.
You can remove end users from the list in the following ways.
-
Simple mode: Use this option to unblock communication from one or more senders on a specific channel, without affecting other channels or senders.
When an end user comes to this element in the flow, the end user's contact information is removed from the Do not contact list for the specified channel and senders.
Unblocking works as follows:
-
Channel. Messages can now be sent on the channel that you remove. Other channels in the list continue to be blocked.
Example: An end user wants to receive offers only through email but not through SMS. In this case, select the Email channel in the Remove from Do not contact list element.
You can select only one channel in a Remove from Do not contact list element. To unblock multiple channels, use a separate element for each channel.
The channel that you remove does not need to be the same as the channel on which the end user contacted you.
-
Senders for the selected channel: Messages can now be sent from the selected senders. Other senders for this channel that are in the list continue to be blocked.
Example: An end user wants to receive emails only about transactions but not about promotions. In this case, unblock only the sender for transactions.
Unblocking is applicable to the specified senders only on the selected channel. Other channels that use the same senders are not affected.
-
-
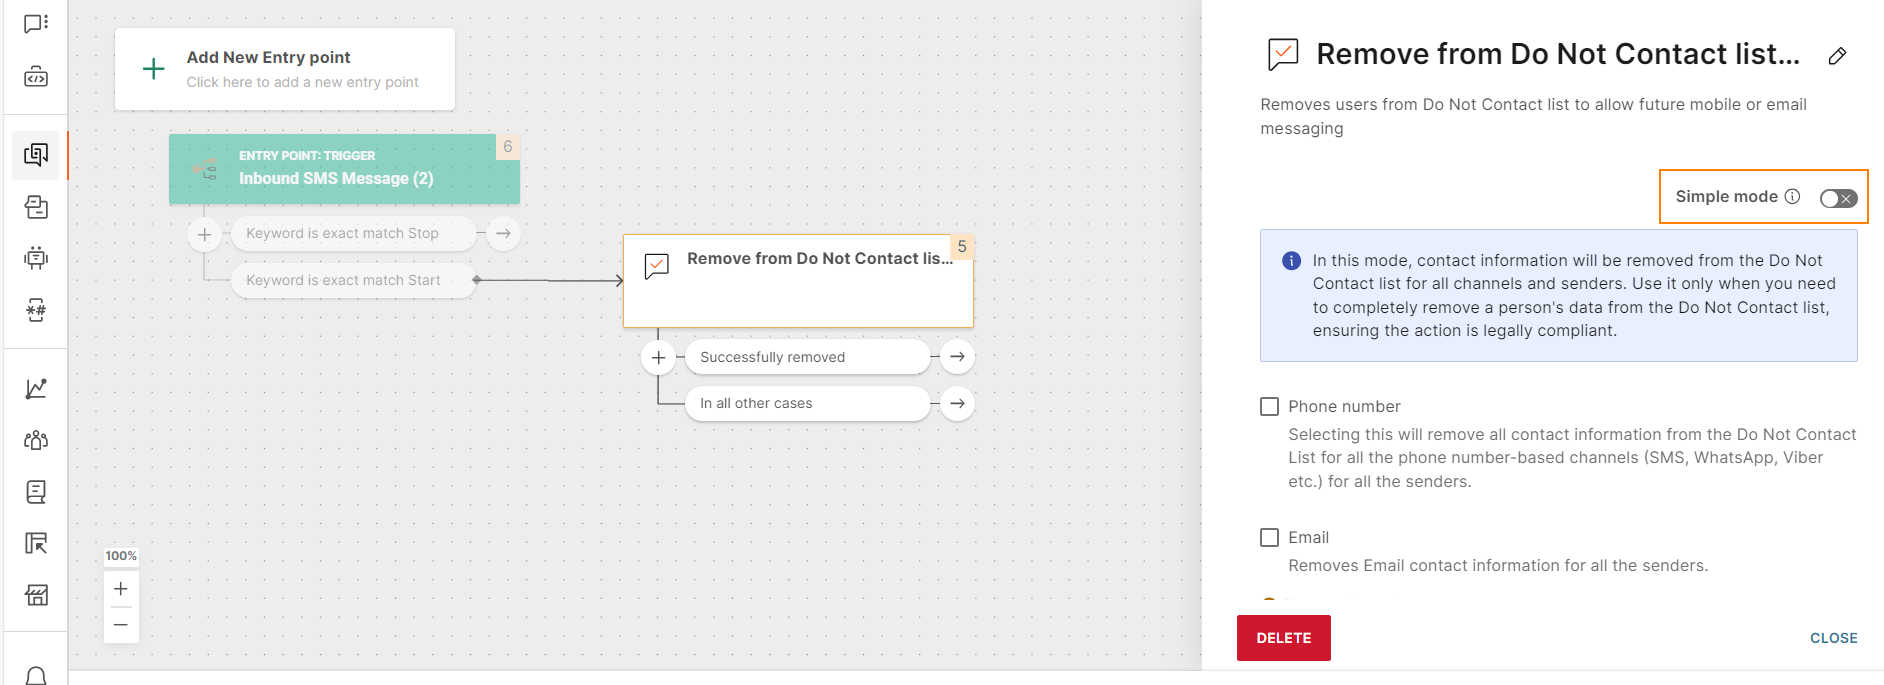
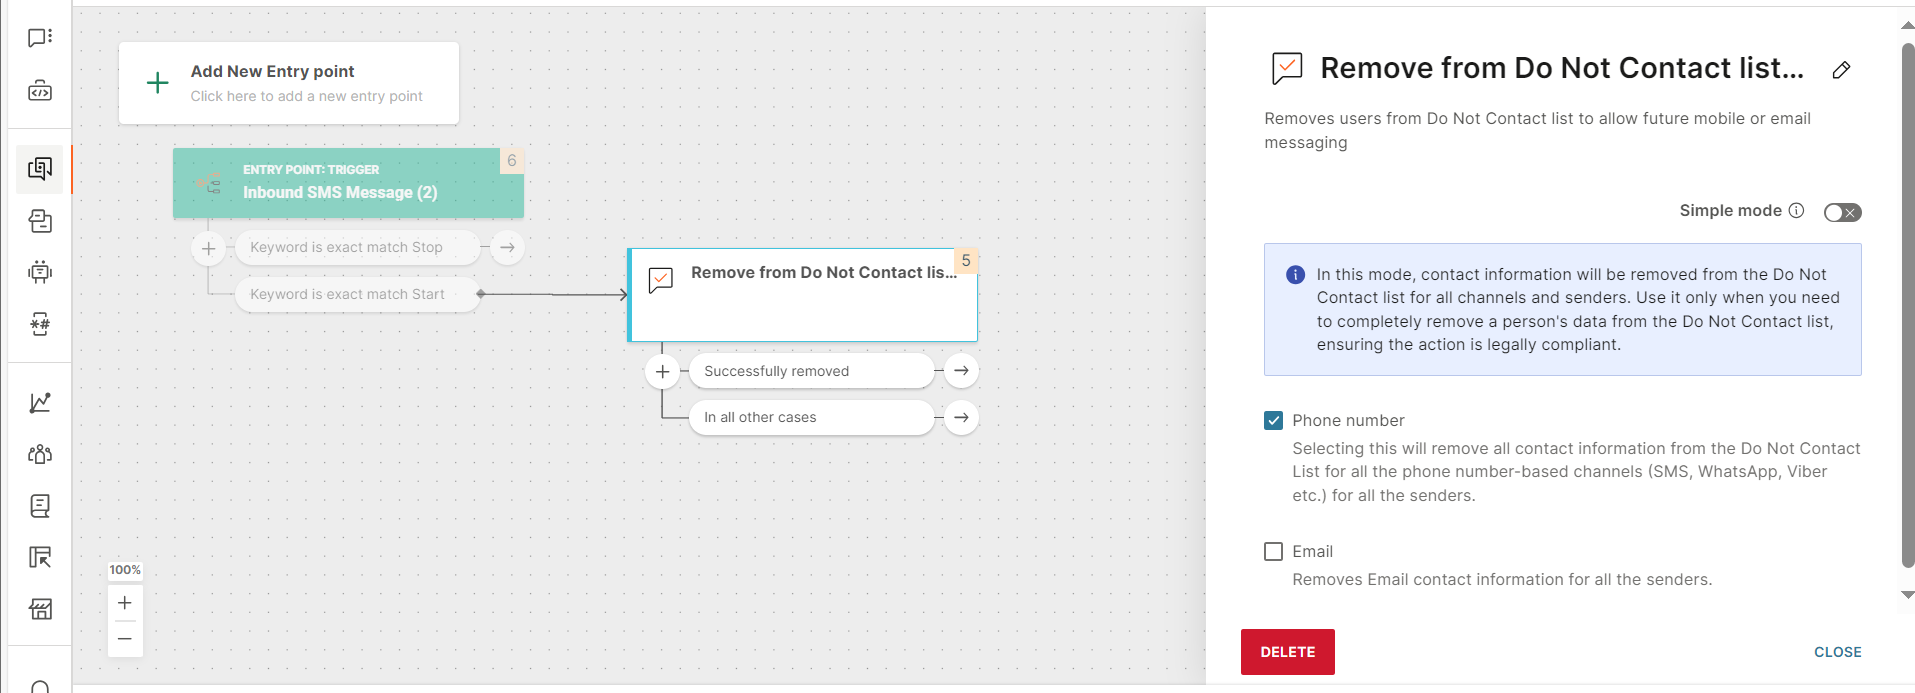
Advanced mode: Use this option to remove all records of the end user's contact information (phone number and/or email) from the Do not contact list.
ImportantTraffic to all phone number-based channels and/or email is unblocked.
You can remove one or more of the following from the list.
- Phone number. Remove all contact information for all phone number-based channels. Example: SMS, WhatsApp, and Viber.
- Email address. Remove all contact information for the Email channel.
When an end user comes to this element in the flow, the specified contact information is removed from the Do not contact list.
If you use the Remove from Do not contact list element to manage opt ins or manage end users who want to receive messages, make sure that the flow does not expire. Otherwise, end users who opted in will not receive messages after the flow expires.
To set the flow to not expire, in the Flow settings > Scheduling tab, disable Flow stop.
Design the flow for Simple mode
In the Simple mode, you can remove only one channel through the Remove from do not contact list element. To remove more than one channel, add a Remove from do not contact list element for each channel.
To remove a channel from the Do not contact list, do the following:
-
Add the Remove from do not contact list element to your flow.
-
In the element, enable Simple mode.
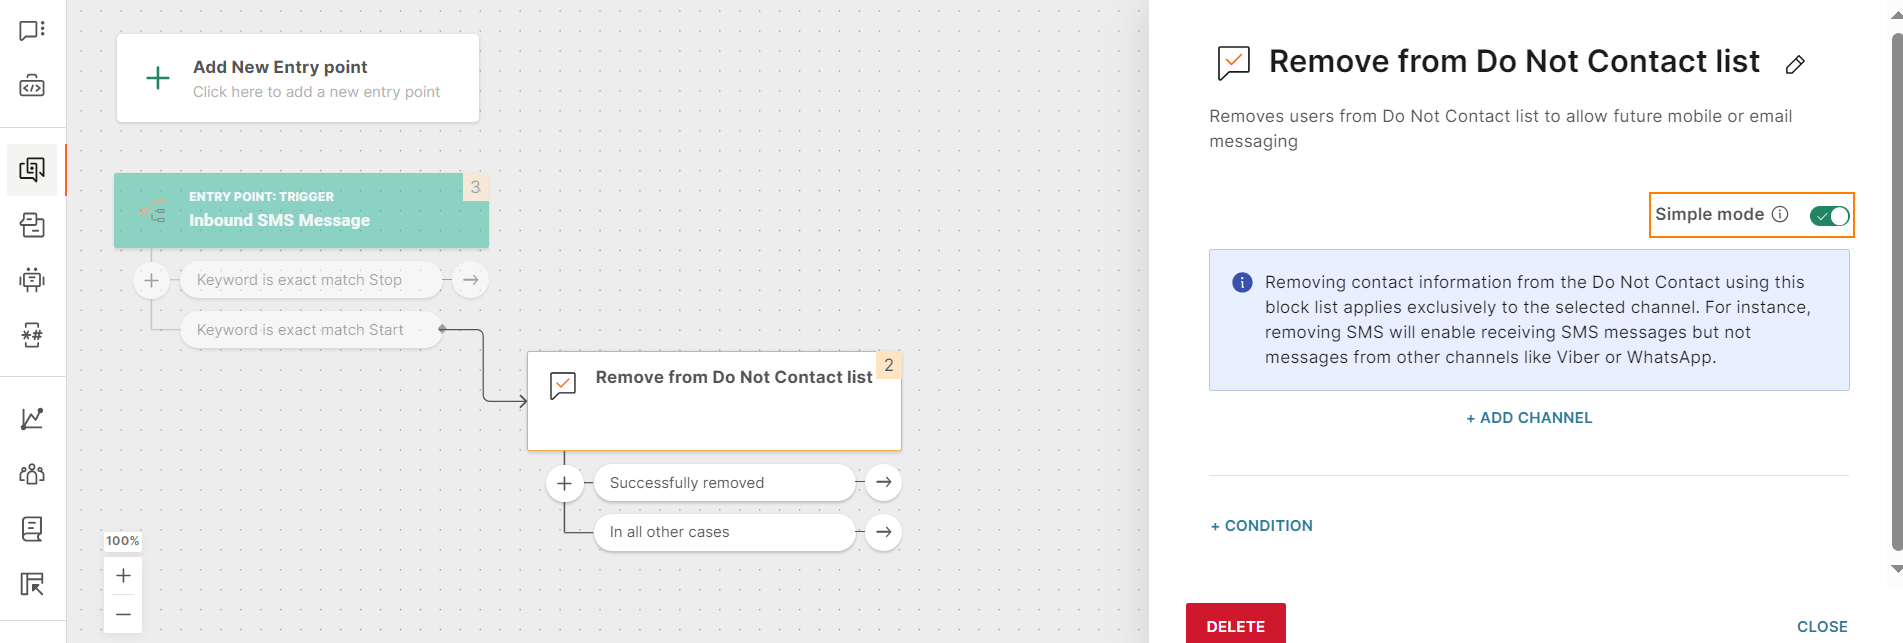
-
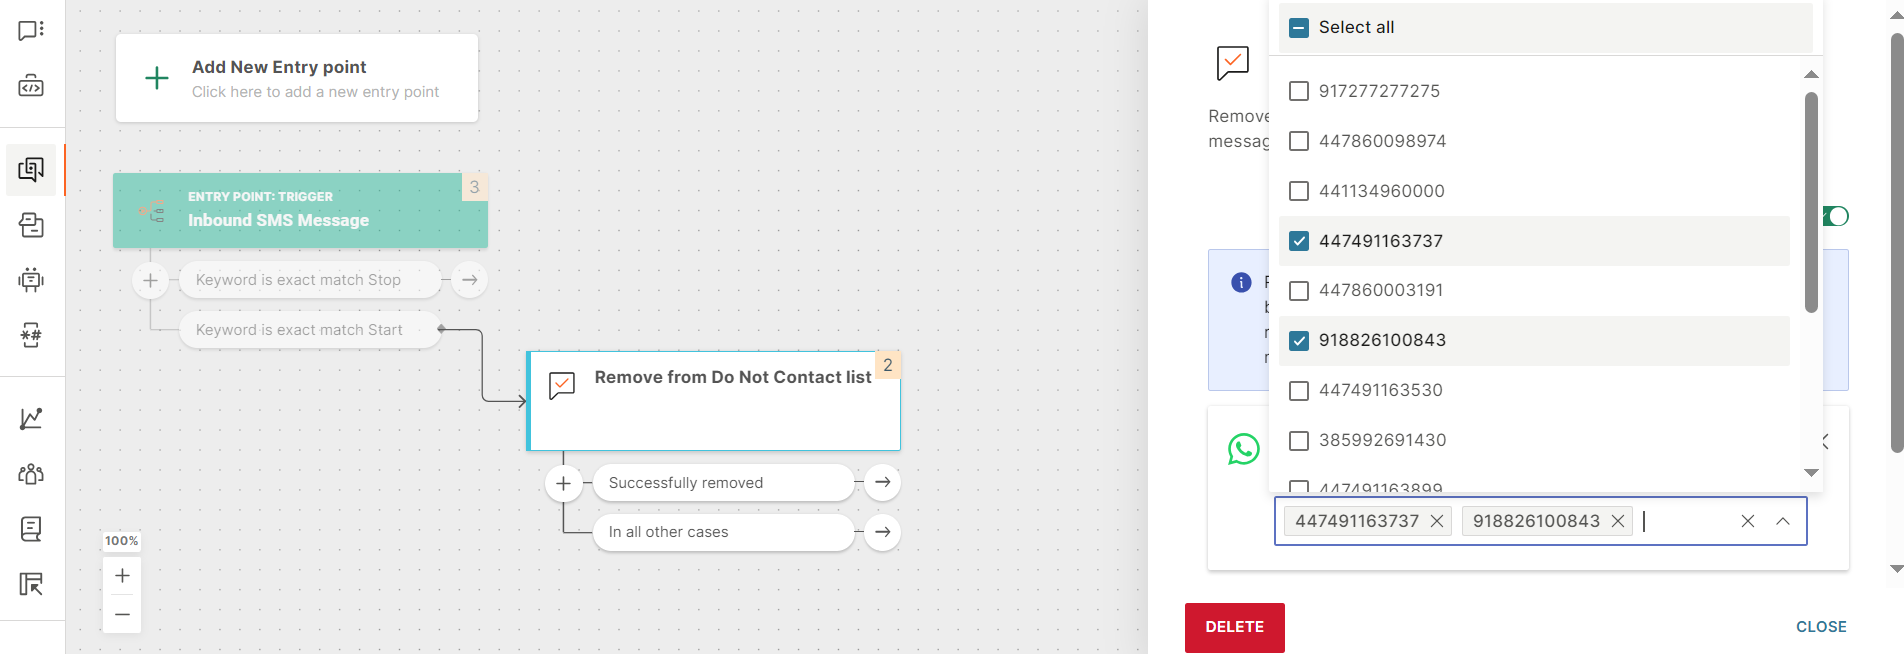
Select Add channel.
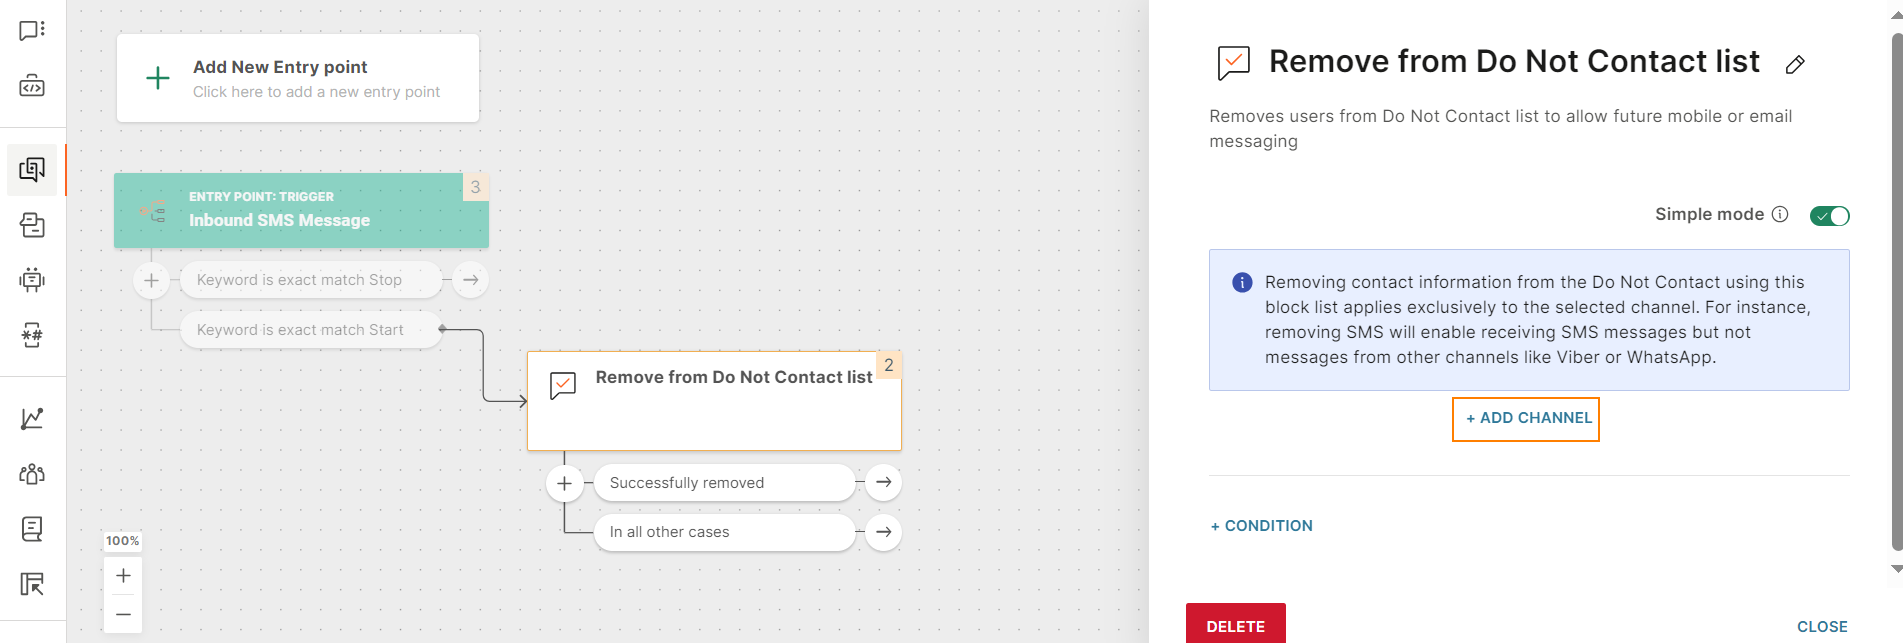
-
Select the channel that you want to remove from the Do not contact list.

-
For the selected channel, select the senders that you want to remove from the Do not contact list.
-
(Optional) Add a branch to manage situations where the contact information was removed from the Do not contact list but there is a high record of the traffic being blocked. Select Condition.
The branch is added to the element.
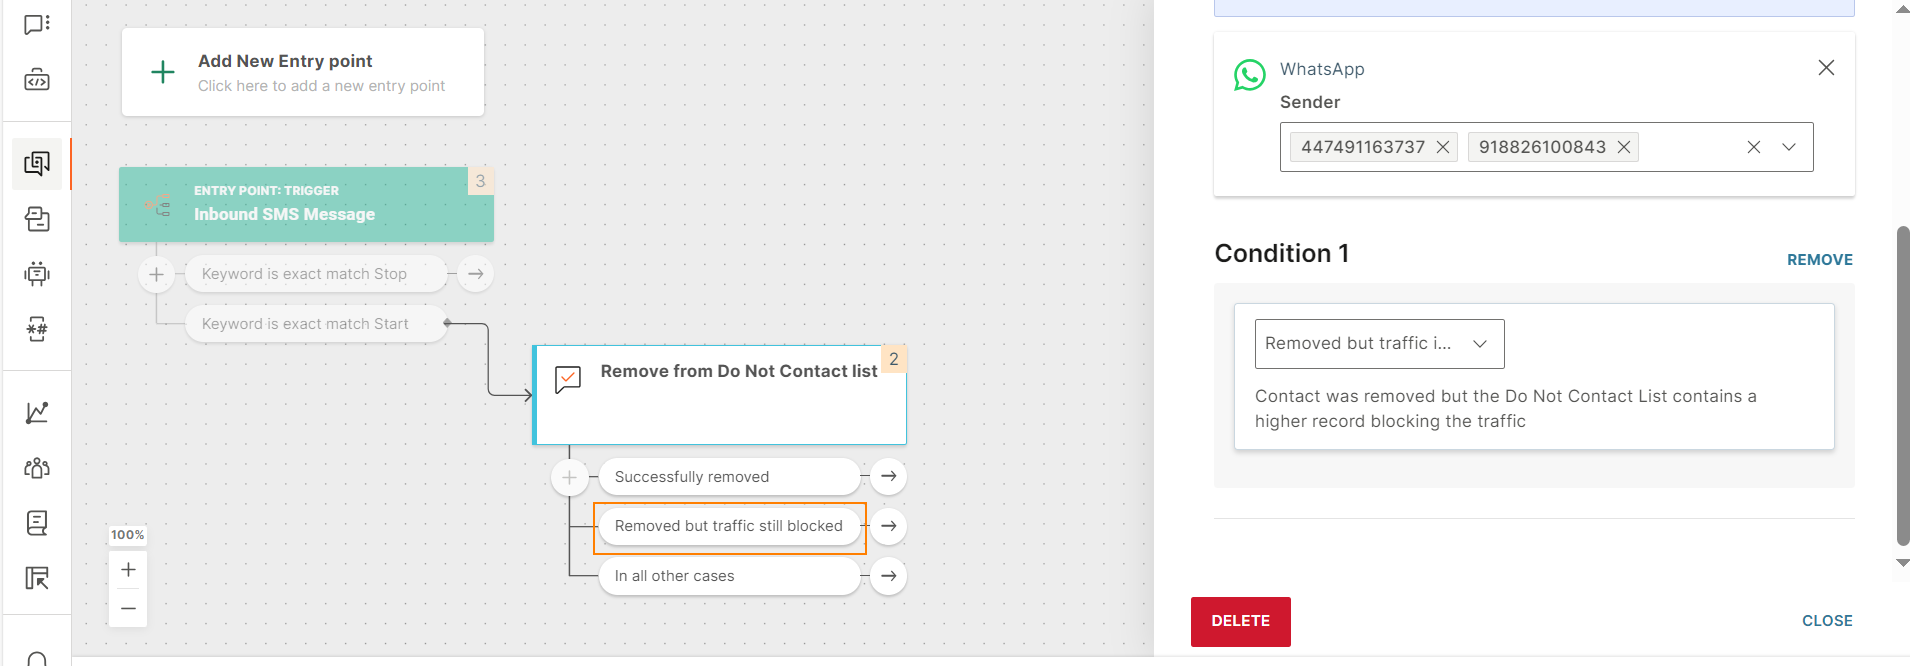
-
Define the next steps. Example: Send a message to the end user saying that they have successfully subscribed.

Design the flow for Advanced mode
To remove all records of the end user's contact information from the Do not contact list, do the following:
-
Add the Remove from do not contact list element to your flow.
-
In the element, disable Simple mode.
-
Select one or more of the following.
- Phone number. Remove all contact information for all phone number-based channels. Example: SMS, WhatsApp, and Viber.
- Email address. Remove all contact information for the Email channel.
-
Define the next steps. Example: Send a message to the end user saying that they have successfully subscribed.

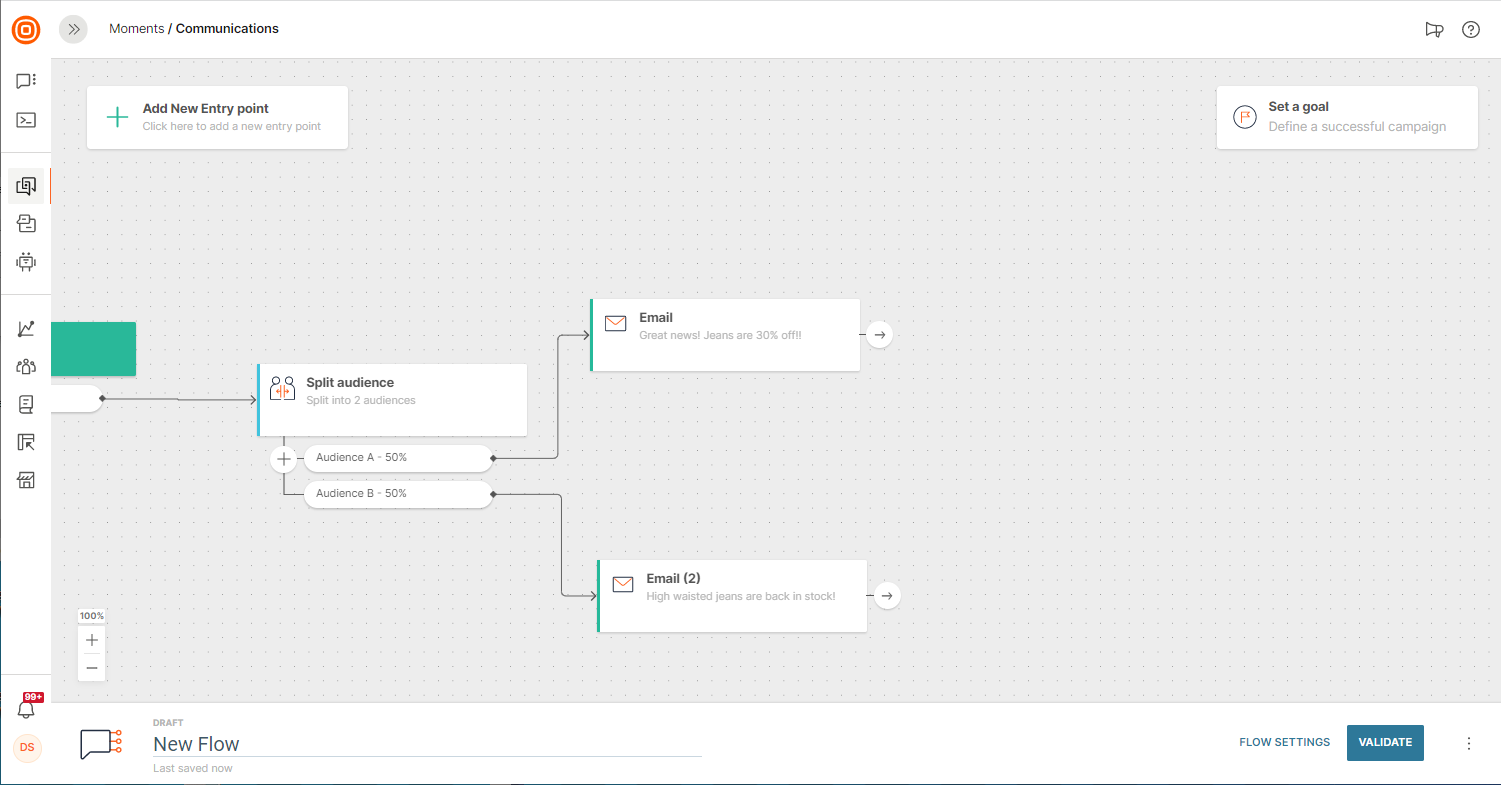
Split Audience
Divide your audiences and get more precise metrics about how they react to your content. The Split Audience element is especially useful when you want to do the following:
• Perform simple experiments such as testing two versions of the same Email message as shown in the image below.
• Create more advanced experiments that involve testing which channel (Email, SMS, Push, etc.) works best.
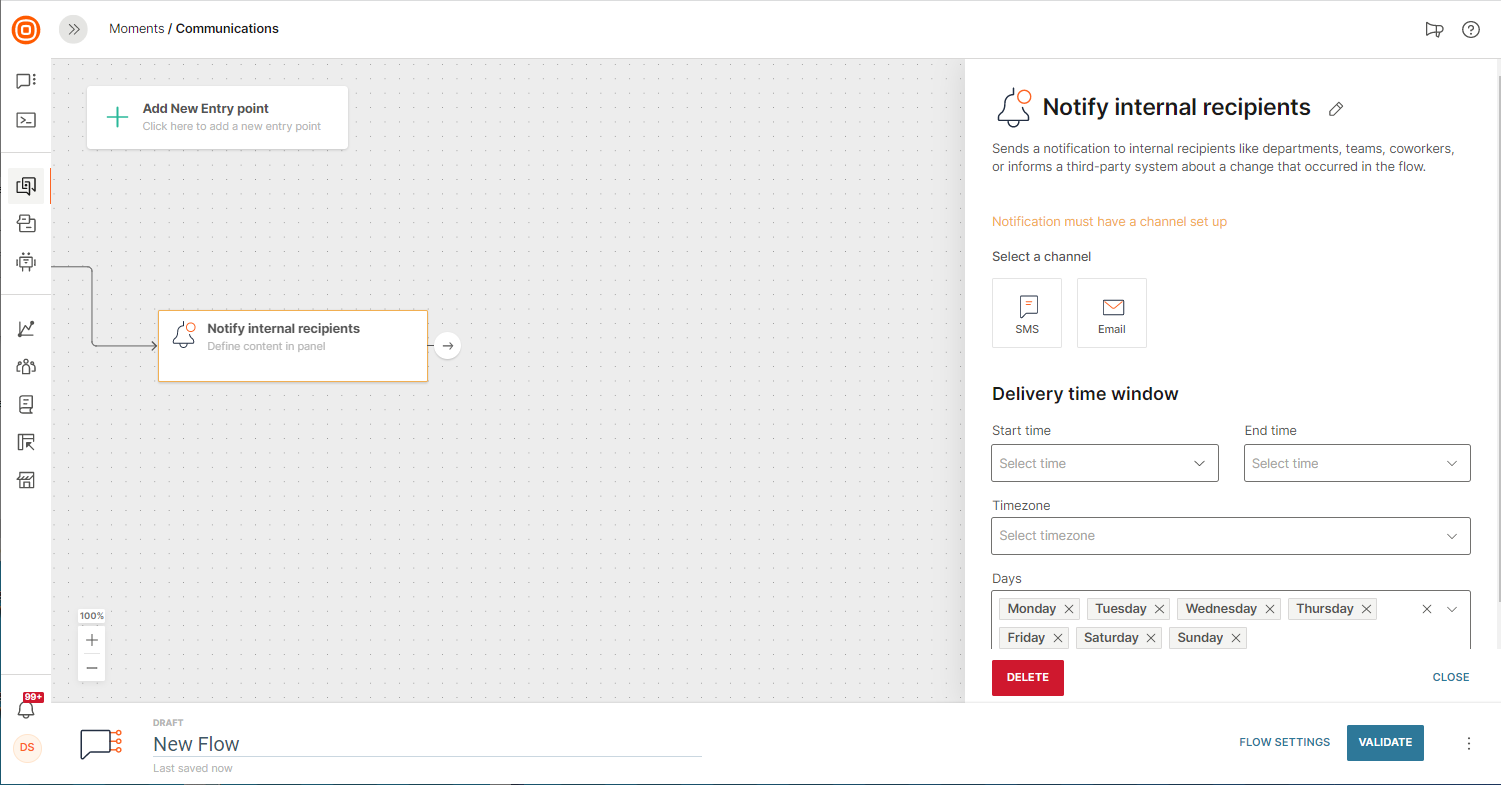
Notify Internal Recipients
Sometimes it is important to send an email or SMS notification to internal business units as part of a flow. Perhaps you would like to notify store managers, staff, or a physical store when a customer has started the process of returning an item. Maybe you would like to send a confirmation email to a physical store with an action reminder or even notify an employee that they do not have the authorization to do a particular operation. All this can be done with the Notify Internal Recipients element.
This element is different from the send Email or SMS channels because here you set the exact recipient of the message and choose the channel in the element rather than defining it in the entry point when the flow begins.
When you add this element to your flow you choose if you would like to send SMS or Email and then compose your message in the message editor. You can define your recipient through manual input of the phone number / email address.
You can define your recipient through manual input of the phone number, email address or using Flow Variables if you have dynamic recipients. For example, if the phone number of the store manager is different depending on what store the customer visits.
Each variable can only contain one destination phone number or email address
Track Performance
If you would like to track the performance of non-customer related communications that are generated using the Notify Internal Recipients element you can do so by hovering over the element in a flow. On hover you will be able to track total engagements for this element. Other performance metrics are coming soon.
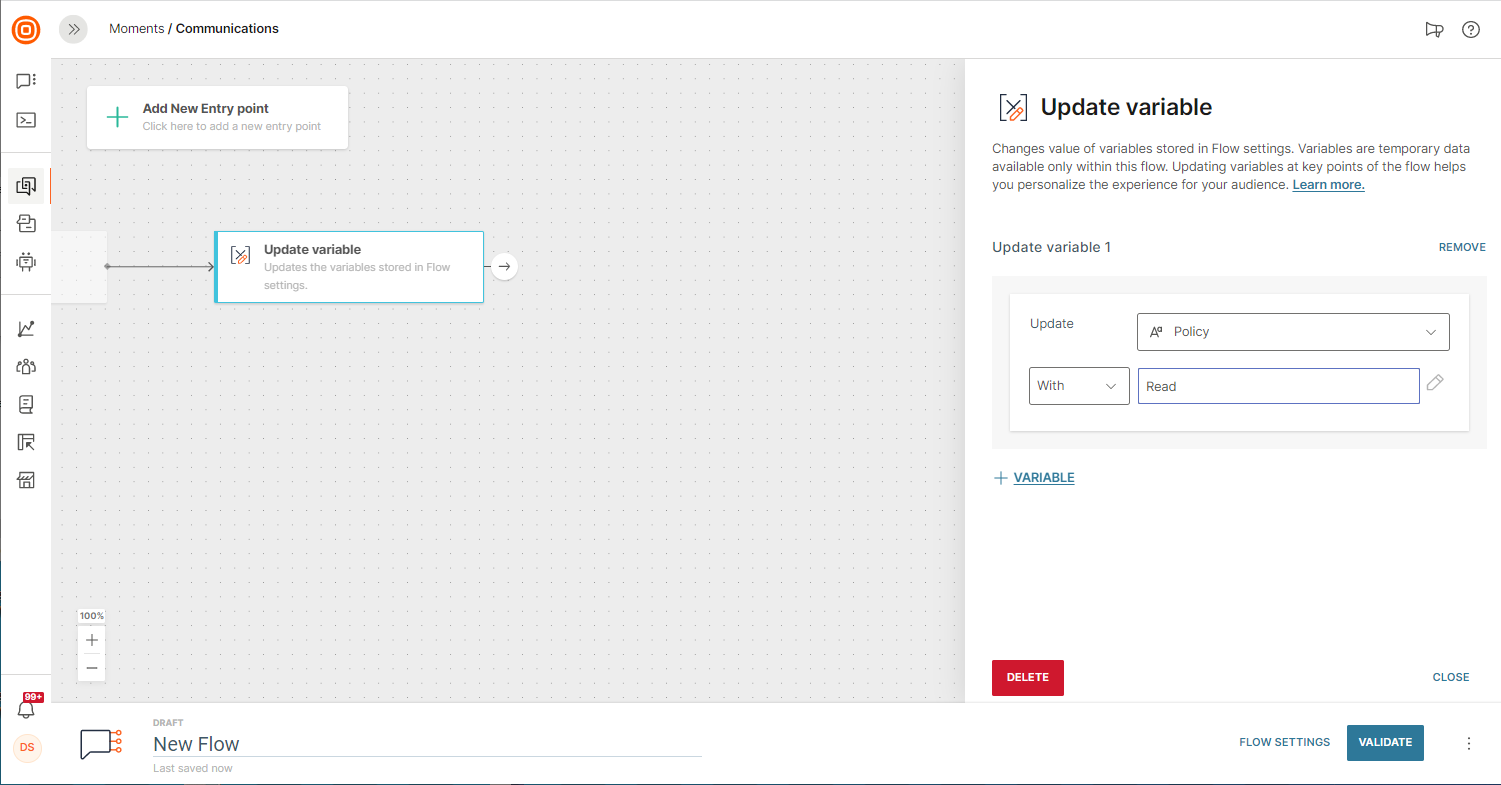
Update Variable
Use the Update variable function to update the value of any Flow variables you have predefined. If you have multiple variables defined in your flow you can choose to update only a single variable or multiple variables at the same time. This is particularly useful if you need your session information like order status to be dynamic and adapt as the flow progresses i.e. from ordered to dispatched or canceled.
You can even make your variables go even further by using them with expression language. To set an expression inside the Update variable element, click the pencil icon next to the variable value field. See expression language to learn more.
Update Variable functionality is not available for use with IVR Flows (Voice call sessions).
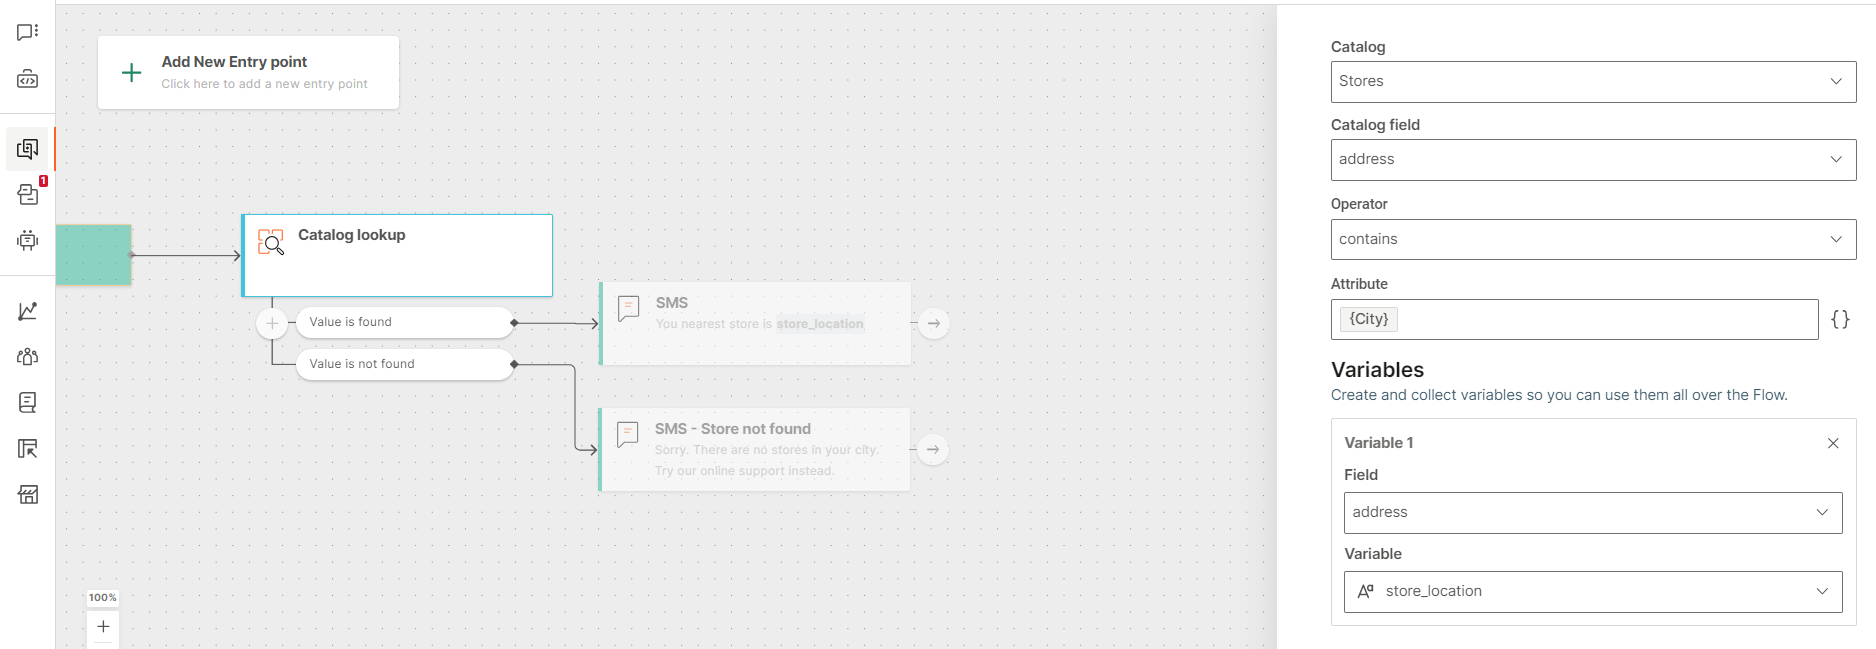
Catalog lookup
Catalogs is an Infobip feature that enables you to create catalogs. Example: Catalogs of products, services, newsletters, and store locations.
Use the Catalog lookup element in your flow to obtain information from a catalog. In the element, compare a field in a catalog with an attribute in Moments. If there is a match, get the required information from the catalog. You can then use this information to send customized information to end users.
Example: You have a catalog that contains a list of store locations. An end user enters the flow. Use the Catalog lookup element to compare the City attribute from the end user's profile with the Address field in the Stores catalog. You can find a store that matches the city, save the address in a variable, and send the address to the end user.
Configure the element
Add the Catalog lookup element to the flow and configure the following fields.
Catalog: Name of the catalog in Catalogs. You can select only existing and active catalogs.
Catalog field: The required column in the data table to check and retrieve items. Example: Address field in the Stores catalog.
Operator: The operator compares the value of the Catalog field with the Attribute field. Example: is, is not, starts with, ends with, and contains.
Attribute: The attribute in Moments against which you want to compare the queried item in the catalog field. Example: City attribute from the end user's profile.
Variables (Optional): Use variables to temporarily store information related to the current session. You can then use the variables in subsequent steps in the flow. Example: You can save the address from the Stores catalog.