Integrations
The Start a conversation element is renamed to Transfer chat to agent.
Use integration elements in Flow to connect to external platforms.
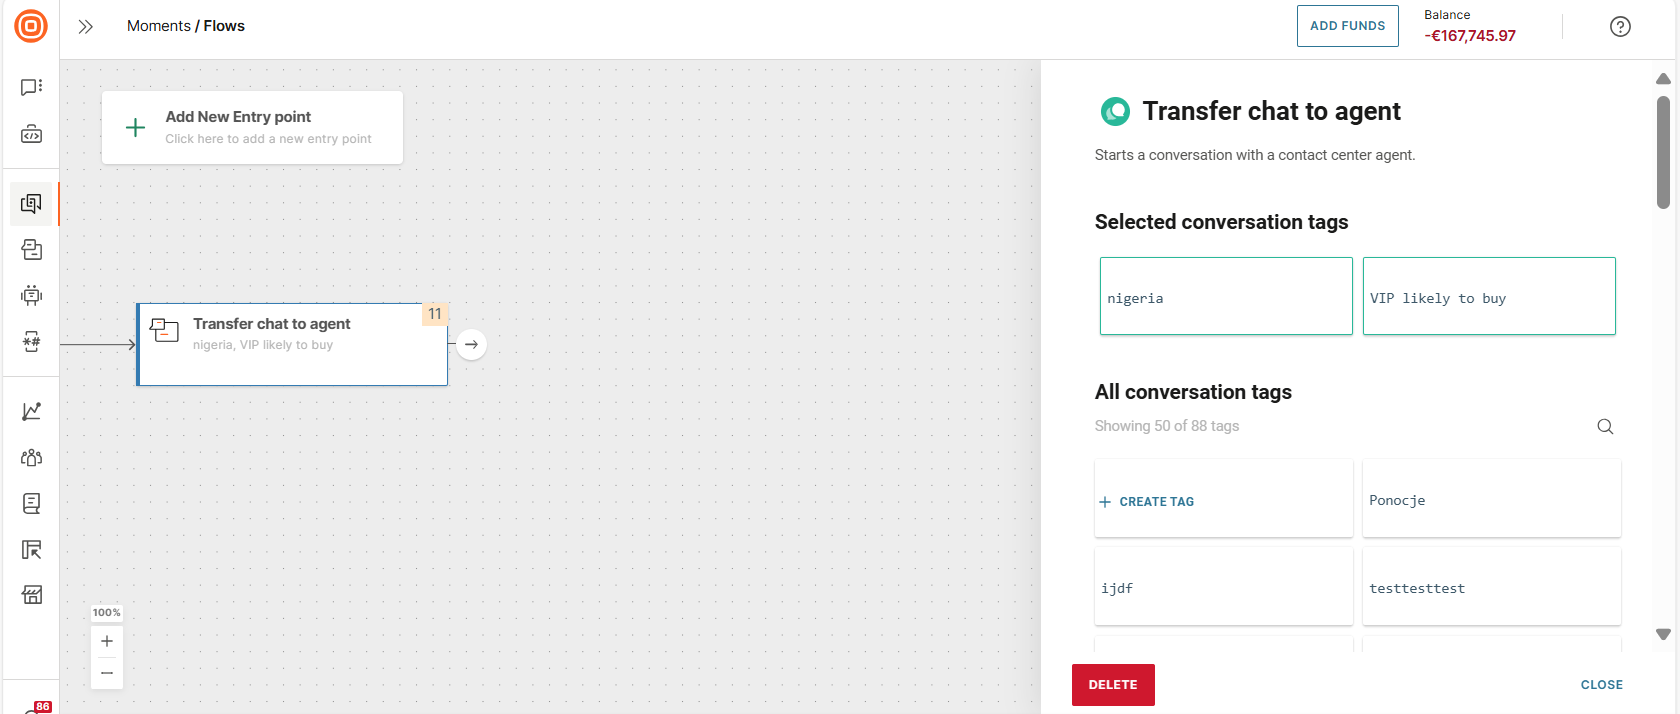
Transfer chat to agent
Use this element to transfer the end user to a live agent for text-based chats.
To transfer to an agent through a voice channel, use the Transfer call to agent element.
Configure the element
(Optional) In the side panel of the element, assign conversation tags to do the following.
- Route the flow to the relevant queue in Conversations.
- Inform the agent what the conversation is about. Example: Add a tag, data verification, to indicate that the agent needs to verify the end user's information.
In the All conversation tags section, either create a new tag or select one or more existing tags.
Example
For an example of how to use this element, refer to the Set up an efficient sign up and account verification tutorial.
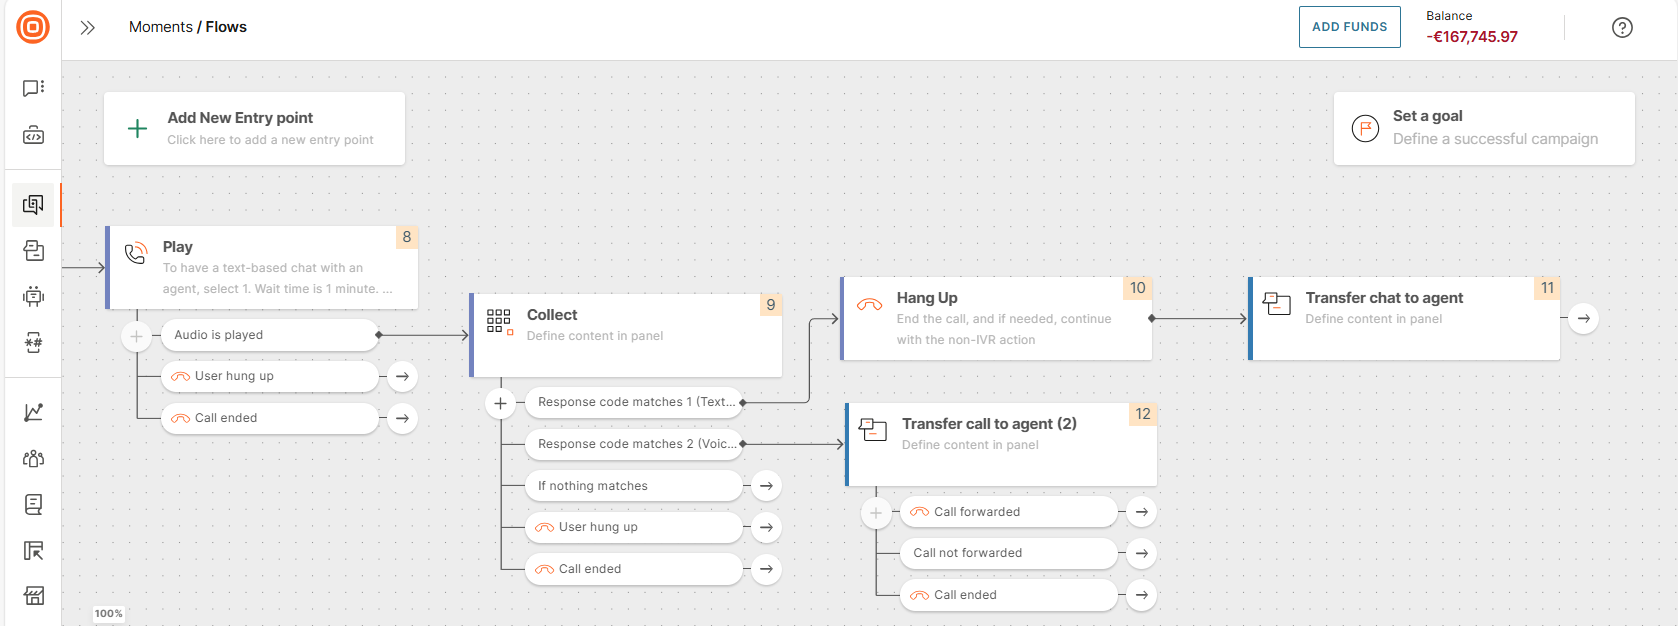
Use this element with a call session
You can use this element with a call (IVR) session as shown in the following example.
-
Use the Play element to ask whether the end user wants to wait on the line for an available agent or use a text-based channel such as WhatsApp.
Example:
To have a text-based chat with an agent, select 1. Waiting time is 1 minute.
To talk to an agent over the phone, select 2. Waiting time is 12 minutes.
-
If the end user wants to use a text-based channel, Hang up the voice session and add the Transfer chat to agent element.
-
If the end user wants to wait for an agent, use the Transfer call to agent element.
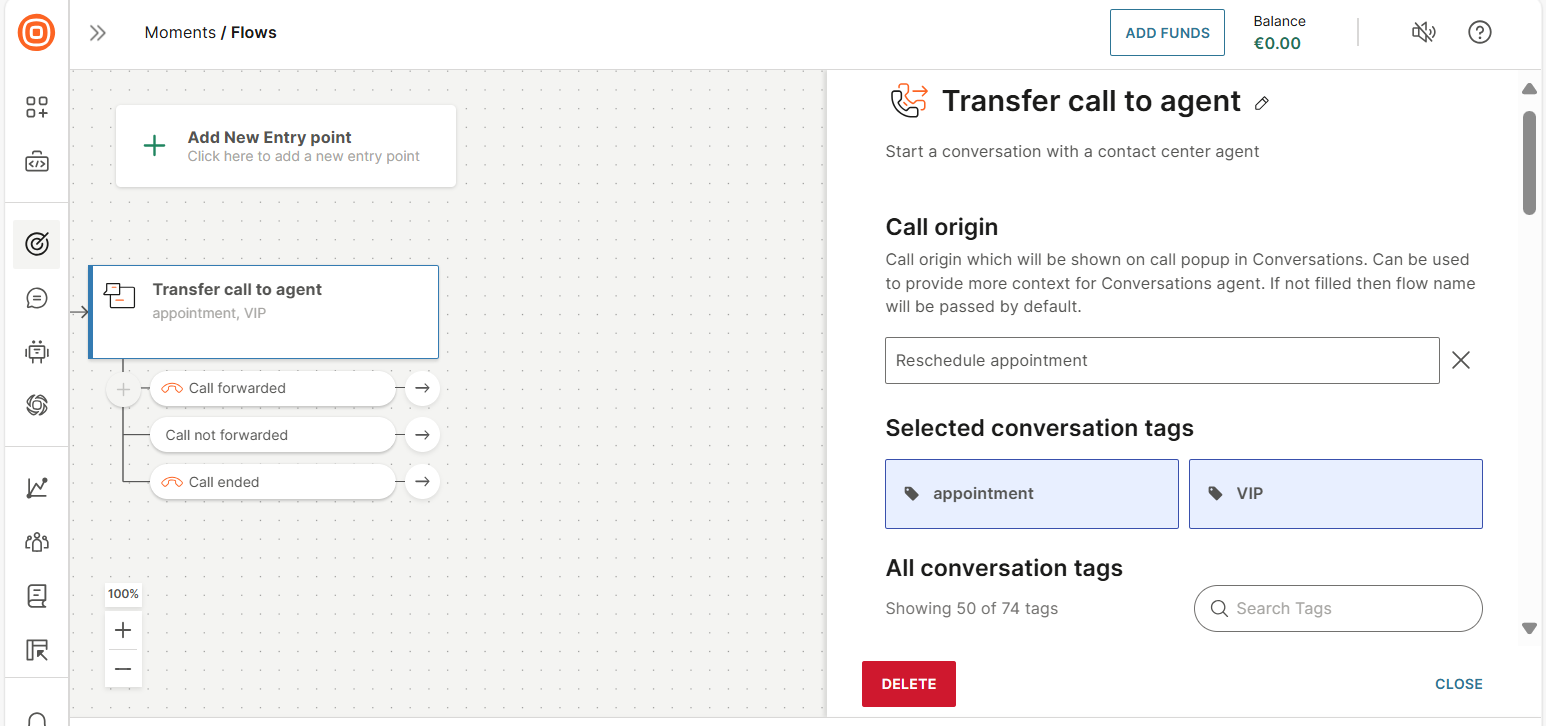
Transfer call to agent
Use this element to transfer a voice (IVR) call to a live agent in Conversations.
- You can use this element only within an inbound IVR session.
- To transfer to an agent outside an IVR session, that is, for text-based chats, use the Transfer chat to agent element.
When forwarding the call, the system automatically adds contextual information to help agents in Conversations manage the interaction effectively. Example: It includes the channel so that the agents know over which channel the call originated.
Configure the element and use the branches in the element to specify the next steps in the flow.
Configure the element
In the side panel of the element, configure the following fields:
Call origin
Use this field to provide context about the conversation to the agent. Example: Reschedule the appointment. In Conversations, this information is displayed as a popup message.
Select Add call origin and specify the context.
If you do not configure this field, the flow name is used as the context.
Conversation tags
(Optional) Assign conversation tags to do the following.
- Route the flow to the relevant queue in Conversations.
- Inform the agent what the conversation is about. Example: Add a tag, data verification, to indicate that the agent needs to verify the end user's information.
In the All conversation tags section, either create a new tag or select one or more existing tags.
Next steps
Use the following branches in the element to manage the next steps.
| Branch | Call session status |
|---|---|
| Call forwarded | Call was forwarded. A call session was successfully established between the end user and the destination. The flow exited the call session. |
| Call not forwarded | The flow was unable to forward the call. A call session was not established between the end user and the destination. The call session continues between the end user and the flow. |
| Call ended | Call was ended either by the end user or because of network issues, before it was forwarded. |
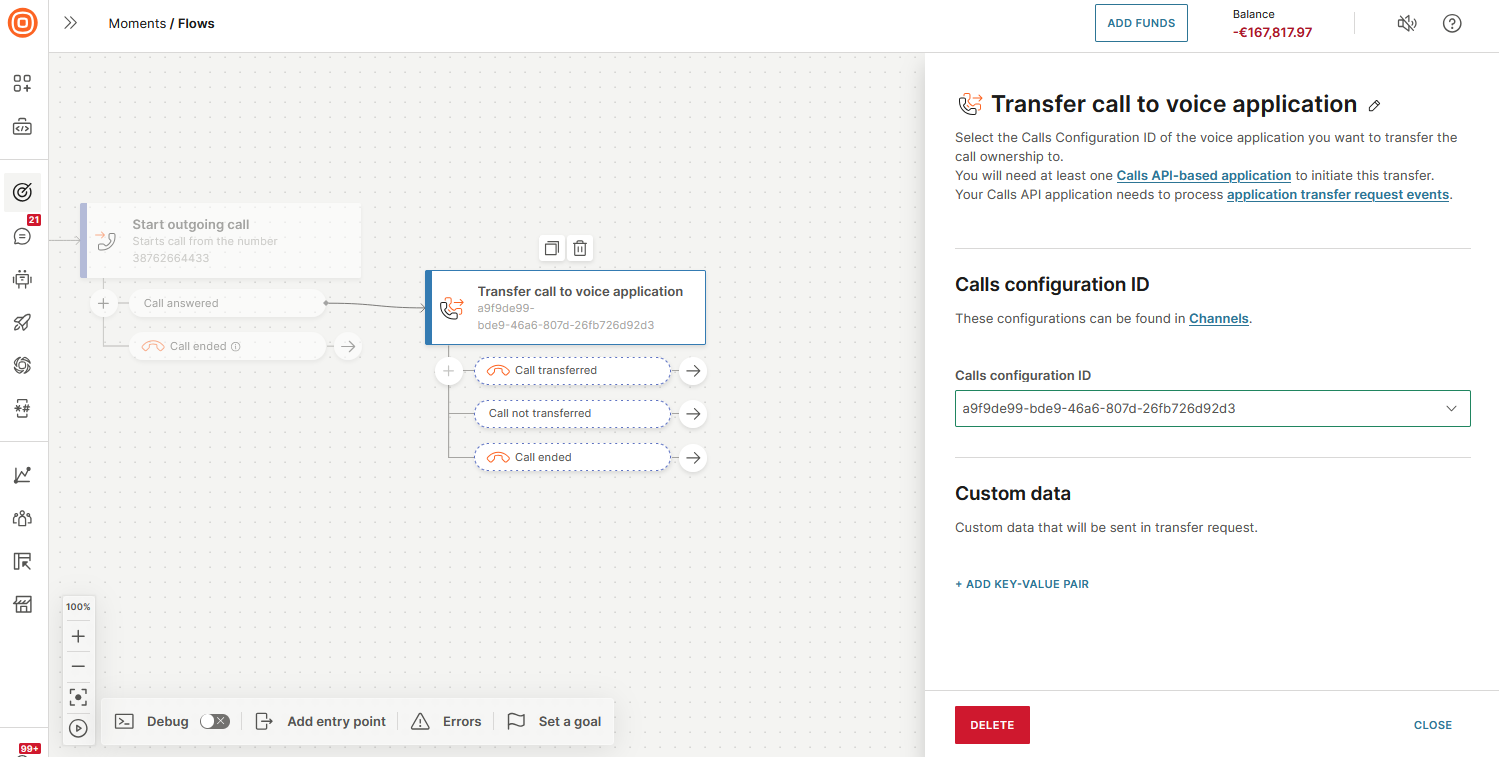
Transfer call to voice application
Use this element to transfer a voice (IVR) call from a flow to a custom Calls API application. This enables you to manage calls within your application.
You can use this element only within an IVR session.
Prerequisites
- A Calls API-based application (opens in a new tab) to which the IVR call needs to be transferred. The application should be capable of processing application transfer request events.
- A Calls configuration (opens in a new tab) with a unique ID.
Configure the element
In the side panel of the element, configure the following fields:
- Calls configuration ID: Select the Calls configuration ID for the application.
- Custom data (Optional): Use key-value pairs to add custom data, if required. This data is sent to the application.
Next steps
For each exit branch in the element, configure the next steps.
The following table contains the description of each branch.
| Event | Description |
|---|---|
| Call transferred | The flow transferred the IVR call to the application. A call session was successfully established between the end user and the application. The flow exited the call session. |
| Call not transferred | The flow was unable to transfer the IVR call to the application. This could be for several reasons. Example: The API call failed. A call session was not established between the end user and the application. The call session continues between the end user and the flow. |
| Call ended | The IVR call was ended either by the end user or because of network issues, before it was transferred. |
Test the functionality of the element
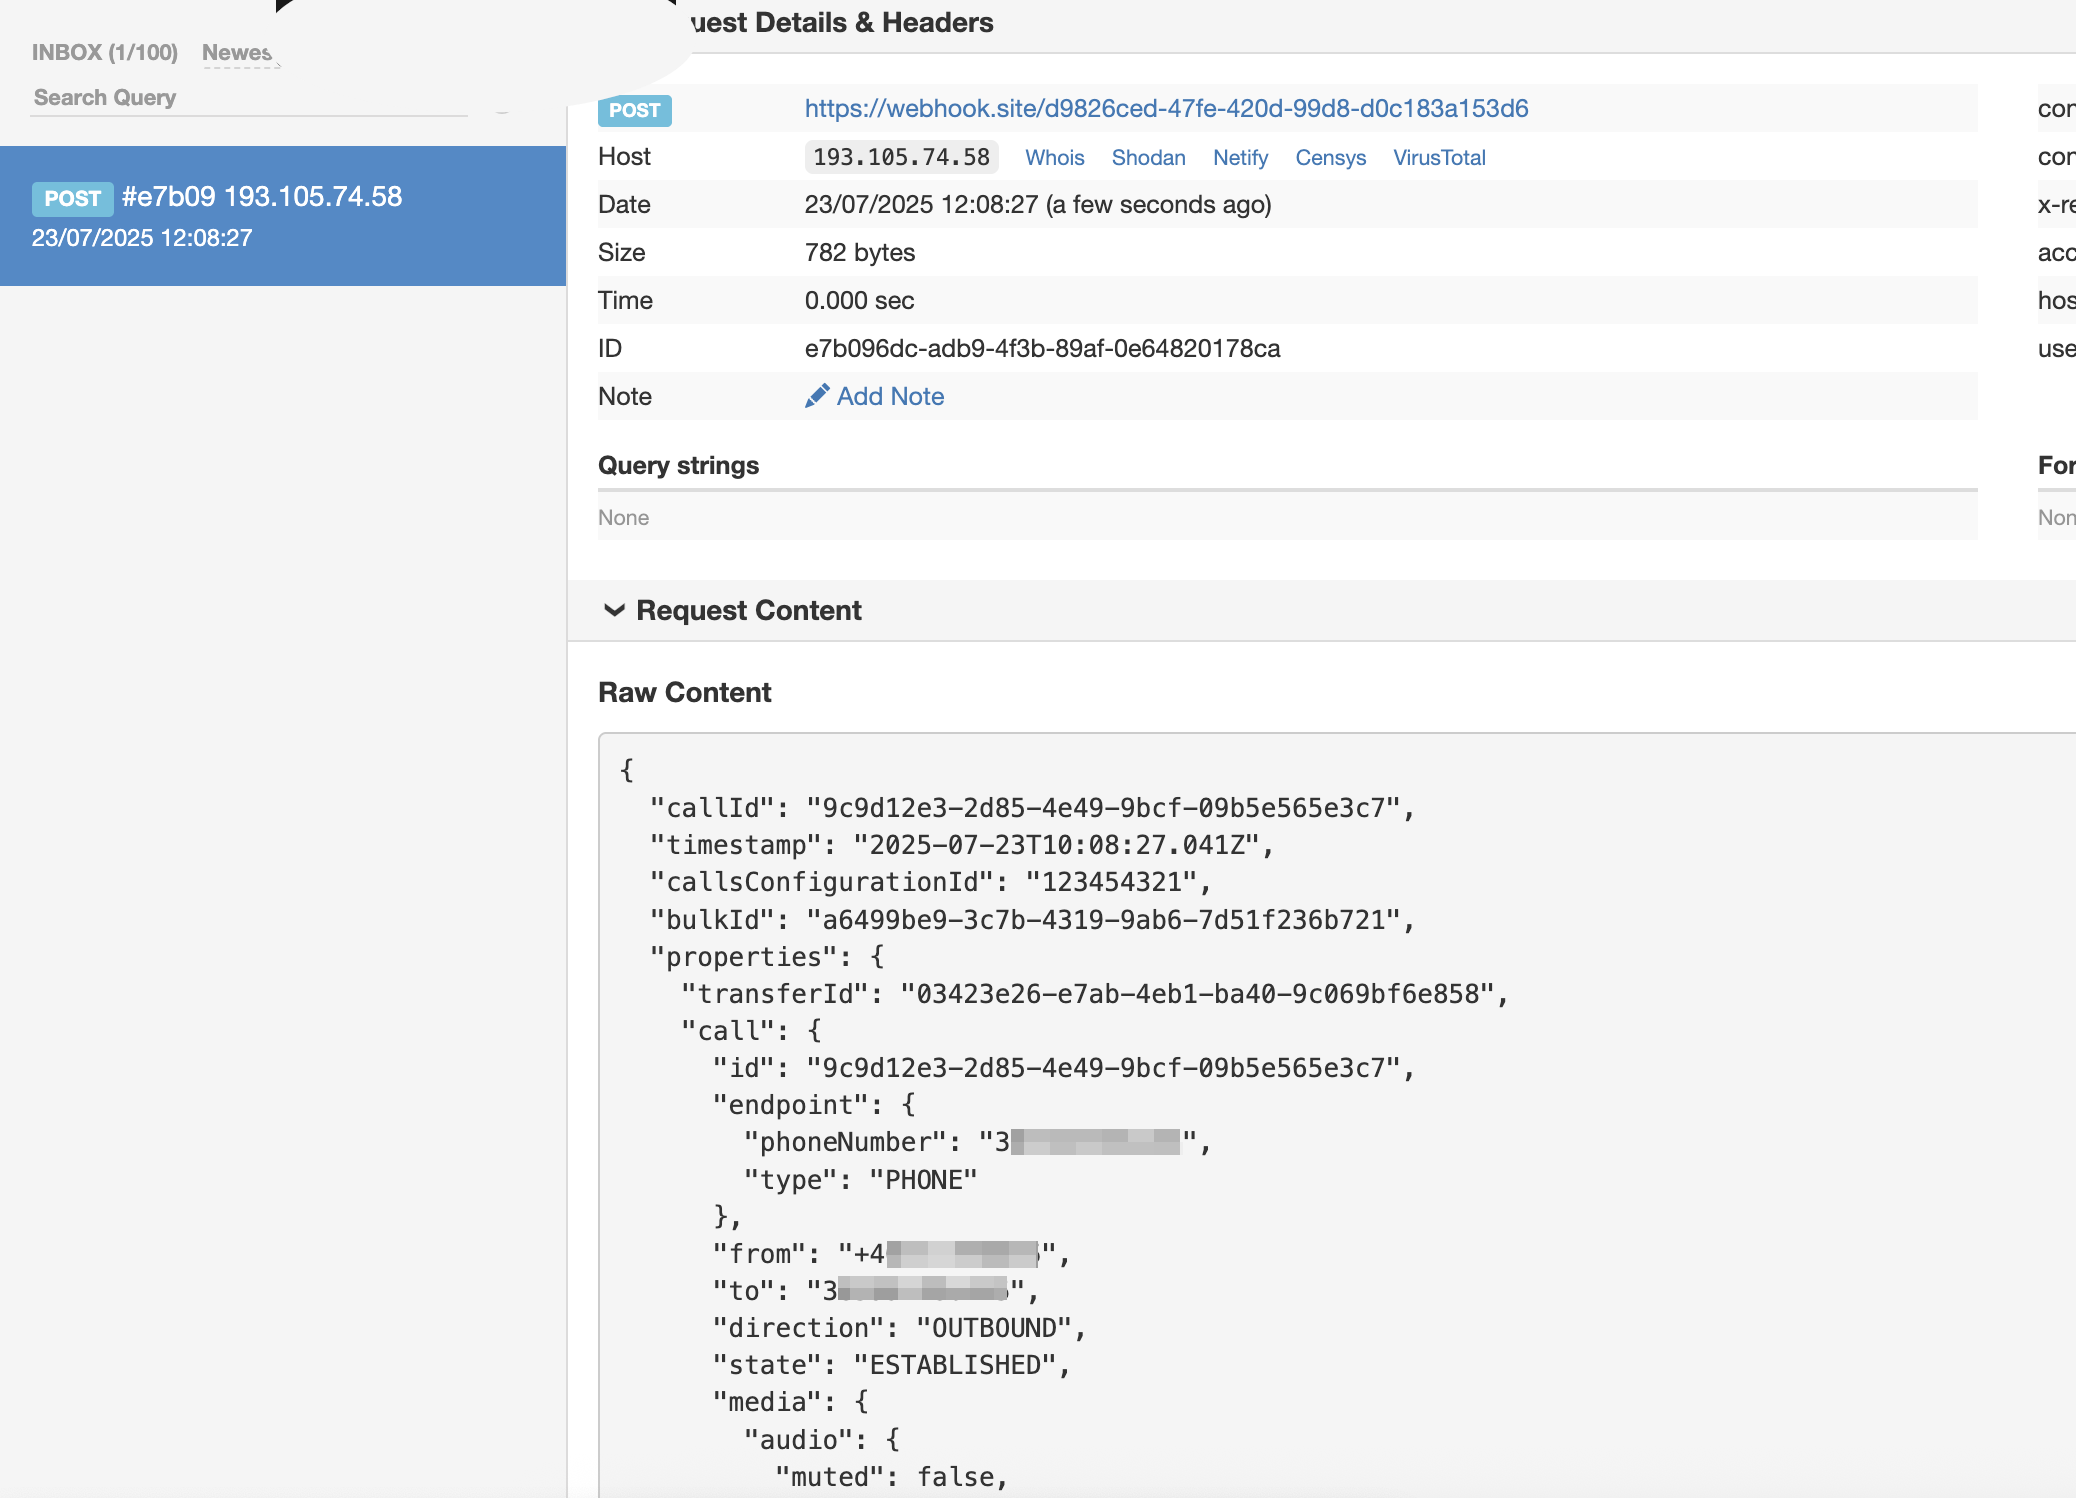
To verify the functionality of the Transfer call to voice application element, use a custom webhook. Test the transfer of the call from the flow to the webhook.
Set up your system for the call transfer
- Configure a webhook to which the IVR call needs to be transferred.
- Create a Calls configuration (opens in a new tab) with a unique ID.
- Create a notification profile.
- Use the URL of the webhook.
- Create a subscription.
- Select Voice channel.
- Select the required events.
- Select the notification profile that you created.
Configure the flow
-
In the IVR session of your flow, add the Transfer call to voice application element.
-
Configure the following fields in the element:
- Calls configuration ID: Select the Calls configuration ID that you created.
- Custom data (Optional): Use key-value pairs to add custom data, if required. This data is sent in the request body to the webhook.
-
For each exit branch in the element, configure the next steps.
-
Configure the flow as required.
-
Activate the flow.
You can now get the call information on your webhook.
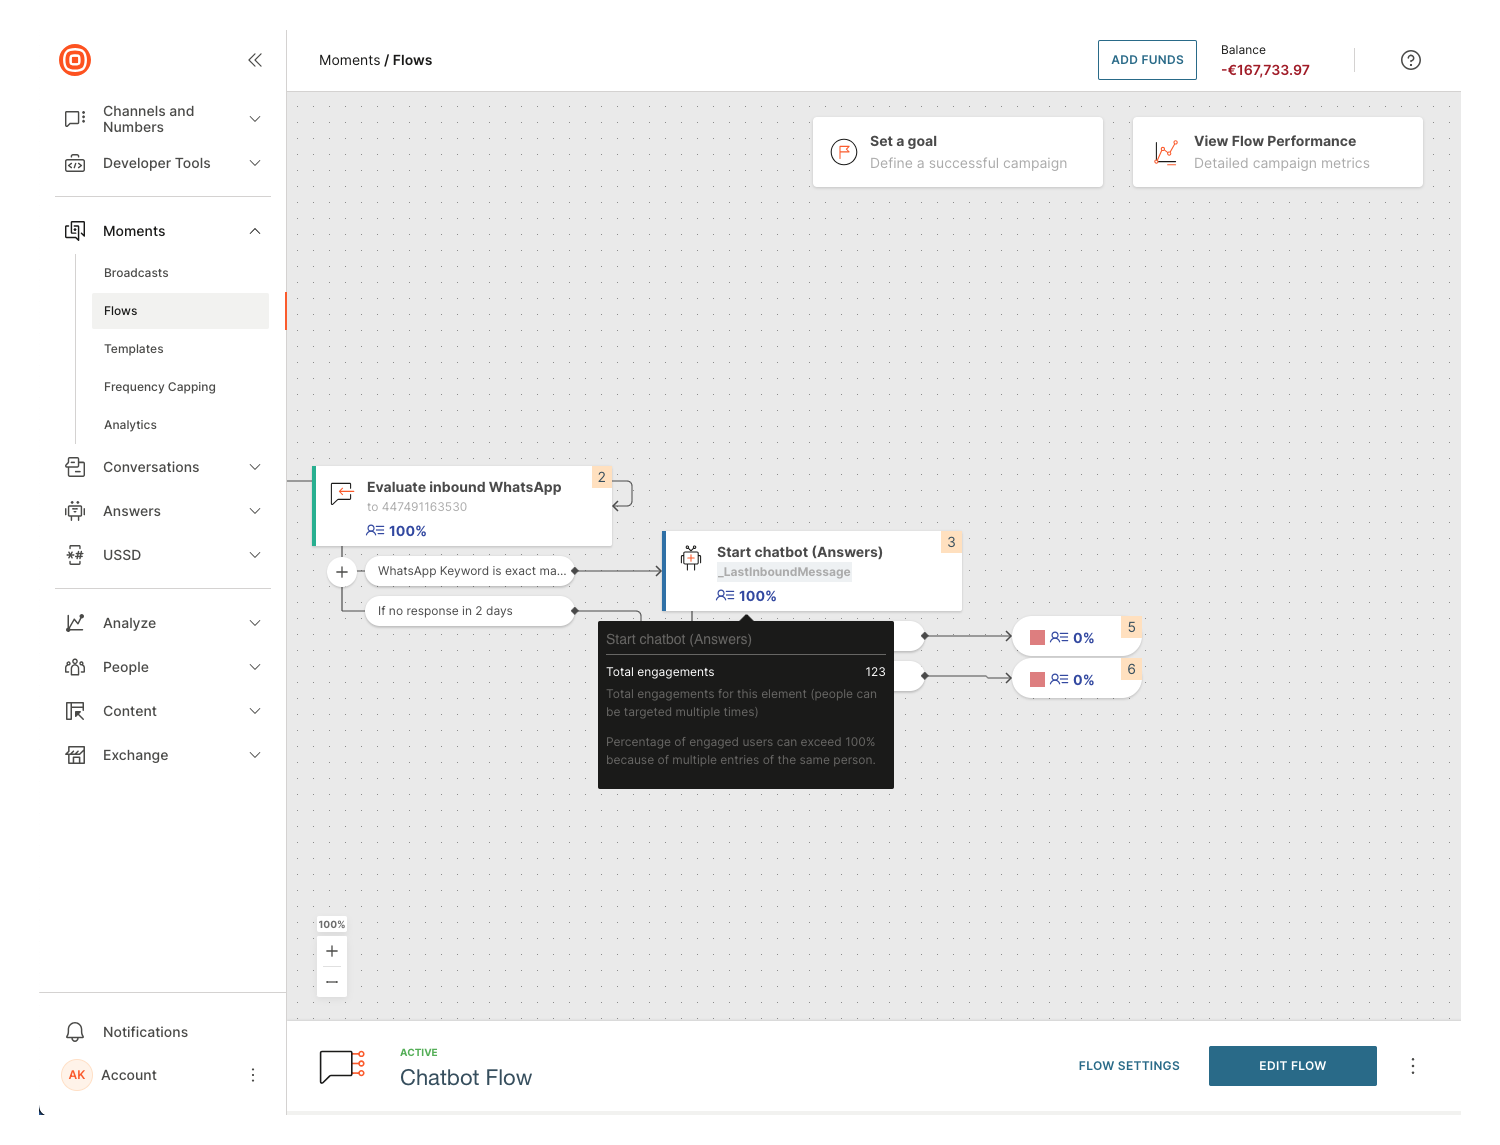
Start chatbot (Answers)
Use the Start chatbot (Answers) element to direct the end user from the flow to an Answers chatbot. After the chatbot session ends, the end user returns to the flow.
Prerequisites
-
Answers enabled in your Infobip account. Only then, you can access the Start chatbot (Answers) element in your flow.
-
An active Answers chatbot that uses a text-based channel such as SMS, Viber, or WhatsApp. To create a chatbot, refer to the Answers documentation.
The Answers chatbot must use the same channel and sender that is used in the flow.
Criteria to design the flow
- The chatbot session can start only after it receives an initial message from the end user. Use the Evaluate inbound message element to obtain the end user's message.
- You can add the Start chatbot (Answers) element only after an Evaluate inbound message element. So, these 2 elements must be in the same branch in the flow.
- Transfer to agent must be done in the flow. If the chatbot contains the To agent element and the end user reaches this element, the end user returns to the flow. Use the Transfer chat to agent element in the flow to connect the end user to an agent.
Process overview
- The end user's message from the Evaluate inbound message element is sent to the Start chatbot (Answers) element through the LastInboundMessage variable.
- When the end user reaches the Start chatbot (Answers) element, the flow automatically selects a chatbot that uses the same channel and sender that are configured in the Evaluate inbound message element.
- The chatbot receives the message from the Start chatbot (Answers) element.
- The chatbot session starts and the end user is redirected to the chatbot.
- When the chatbot session ends, the end user returns to the flow.
- The end user continues the journey based on the flow configuration.
The flow redirects the end user to any active chatbot that is associated with the sender. So, if the associated chatbot is stopped and a new chatbot is created on the same sender, the flow redirects the end user to the new chatbot.
If you cancel the flow, the associated chatbot is not affected.
Create the flow
-
Add an Evaluate inbound message element to the flow.
-
Configure the sender and condition in the element.
-
Add the Start chatbot (Answers) element to the same branch.
-
Configure the following fields in the element.
-
Chatbot sender: This field is prepopulated with the sender from the To recipient field in the Evaluate inbound message element.
If you update the sender in the Evaluate inbound message element, you must update the sender in the Start chatbot (Answers) element. To do so, select Update chatbot sender.
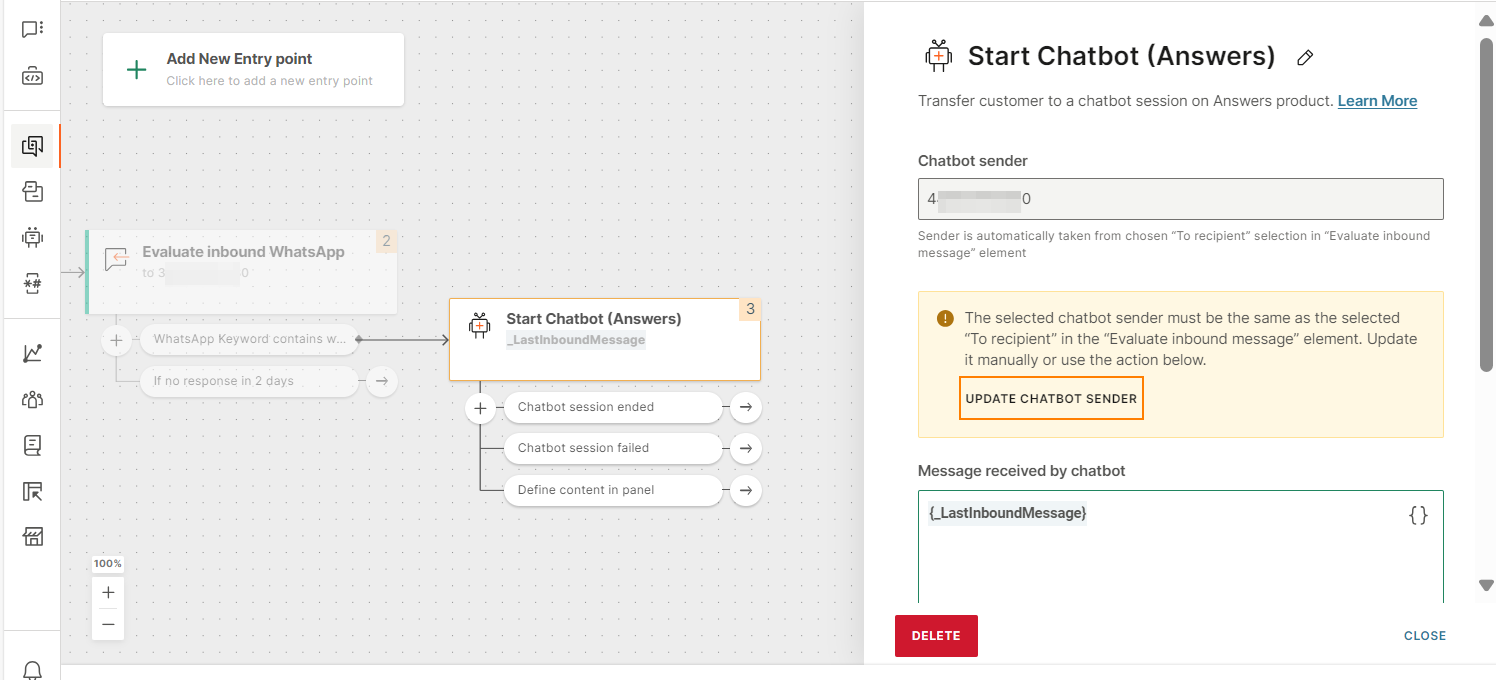
-
Message received by chatbot: This field contains the LastInboundMessage variable by default. Specify any additional information and context that you want to share with the chatbot.
The content of this field is sent to the chatbot.
-
Condition (Optional): Select one or more exit conditions to redirect the flow based on what happens in the chatbot session. In the Start chatbot (Answers) element, an exit branch is automatically added for each condition that you select.

-
-
For each exit branch in the Start chatbot (Answers) element, configure the next steps.
The following table contains descriptions of each condition and examples of the next steps for the condition.
| Condition | Description | Example of next steps |
|---|---|---|
| Session not started | The chatbot session could not start. This could be for several reasons. Example: The chatbot was deactivated after the flow was activated. | |
| Session ended externally (new session started) | The chatbot session ended because a new external session was started. Example: A new session was initiated for the end user through Conversations. | |
| Session expired by timeout | The chatbot session timed out because the chatbot did not receive a response from the end user. | Retarget the end user the following day to check if their request was resolved successfully. |
| Closed by Close session element | The chatbot session was ended by the Close session element in the chatbot. | |
| Chatbot deactivated | The chatbot was deactivated when the end user was in a chatbot session. | |
| Redirect to agent failed | The chatbot was unable to transfer the conversation to an agent. | Add the Transfer chat to agent element to this branch to redirect the end user to an agent. |
| Session ended by user | The end user ended the chatbot session. |
Analytics
To view the analytics for the Start chatbot (Answers) element, hover over the element in the flow.
Add to Flow
The Add to Flow element should be used when you would like to send your user to a different 'secondary' flow. This is a very powerful element that contributes to the creation of modular flows which can help you split very complex flows into smaller, more manageable flows. To learn more, we've captured all the benefits of modular flows, when to use them, and also provided some examples in the Benefits of Modular Flows section of docs.
There is a limit of 100 elements per Flow so if your Flow has more than this number will not be able to add more elements and should split your Flows using Modular Flows.
The Add to Flow element can be used at any position in a flow. If you use the Add to Flow element just before the exit element the user will end the current flow and be moved to another flow that you define. Whereas if you add the element at another step in the flow (that isn't the last step) then the user will continue the journey in both flows.
Before you use the Add to Flow element make sure that you have created all the flows that you would like to connect and that they have the appropriate Existing Flow entry point. Then when you add the element to your flow you will then be able to choose from all flows that are available to be used.
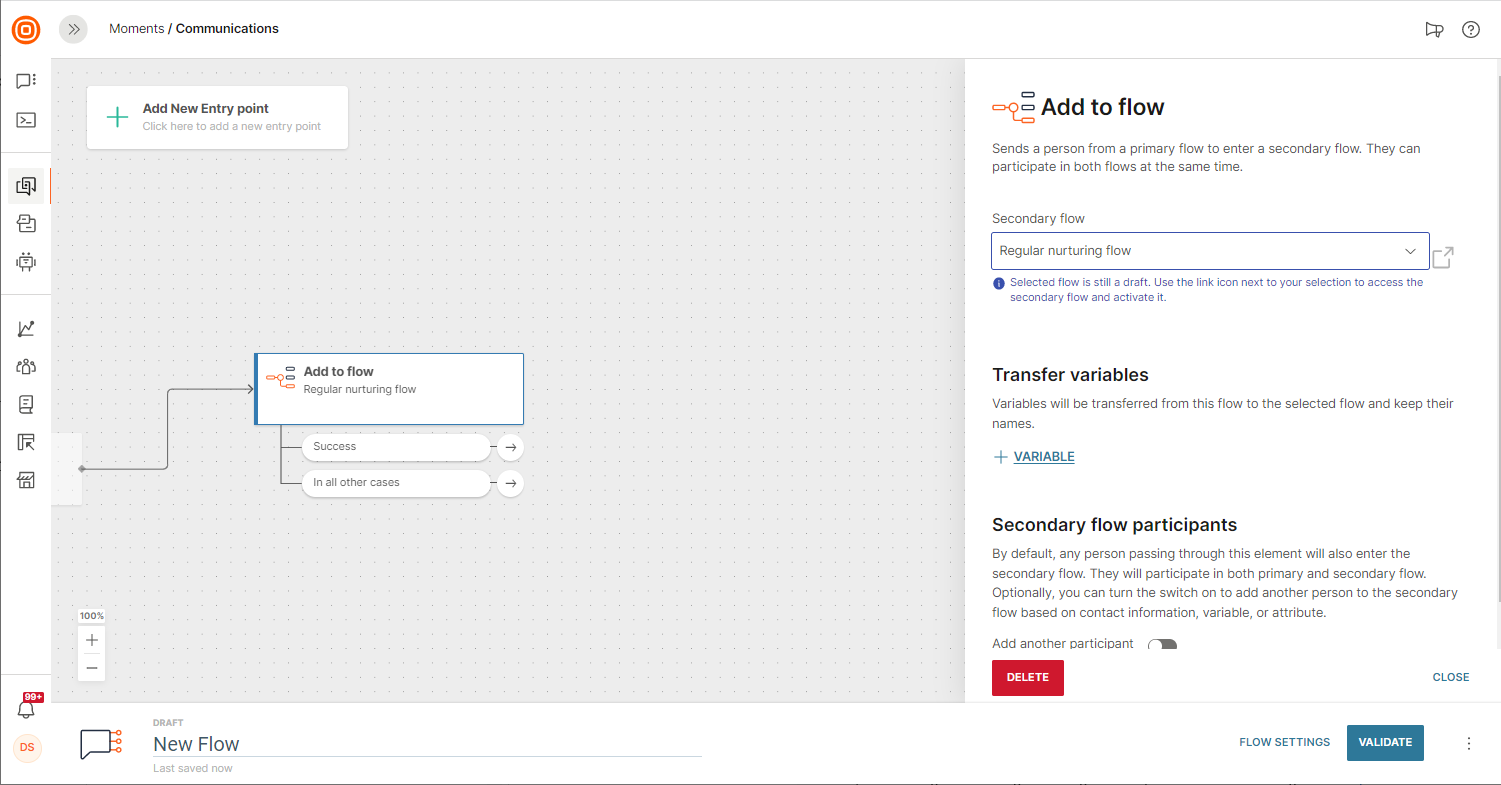
Variables and variable values can also be passed from your flow to a chosen flow using the Add to Flow element. By doing so you can ensure that as a user passes between flows any corresponding placeholder data will be passed too.
As good practice it is advisable to also include a failover branch at 'In all other cases' in the Add to Flow element. This way if it is not possible for the user to be transferred to the secondary flow (for instance, if the secondary flow is set to draft or has been canceled) then the user will still be able to continue on their journey.
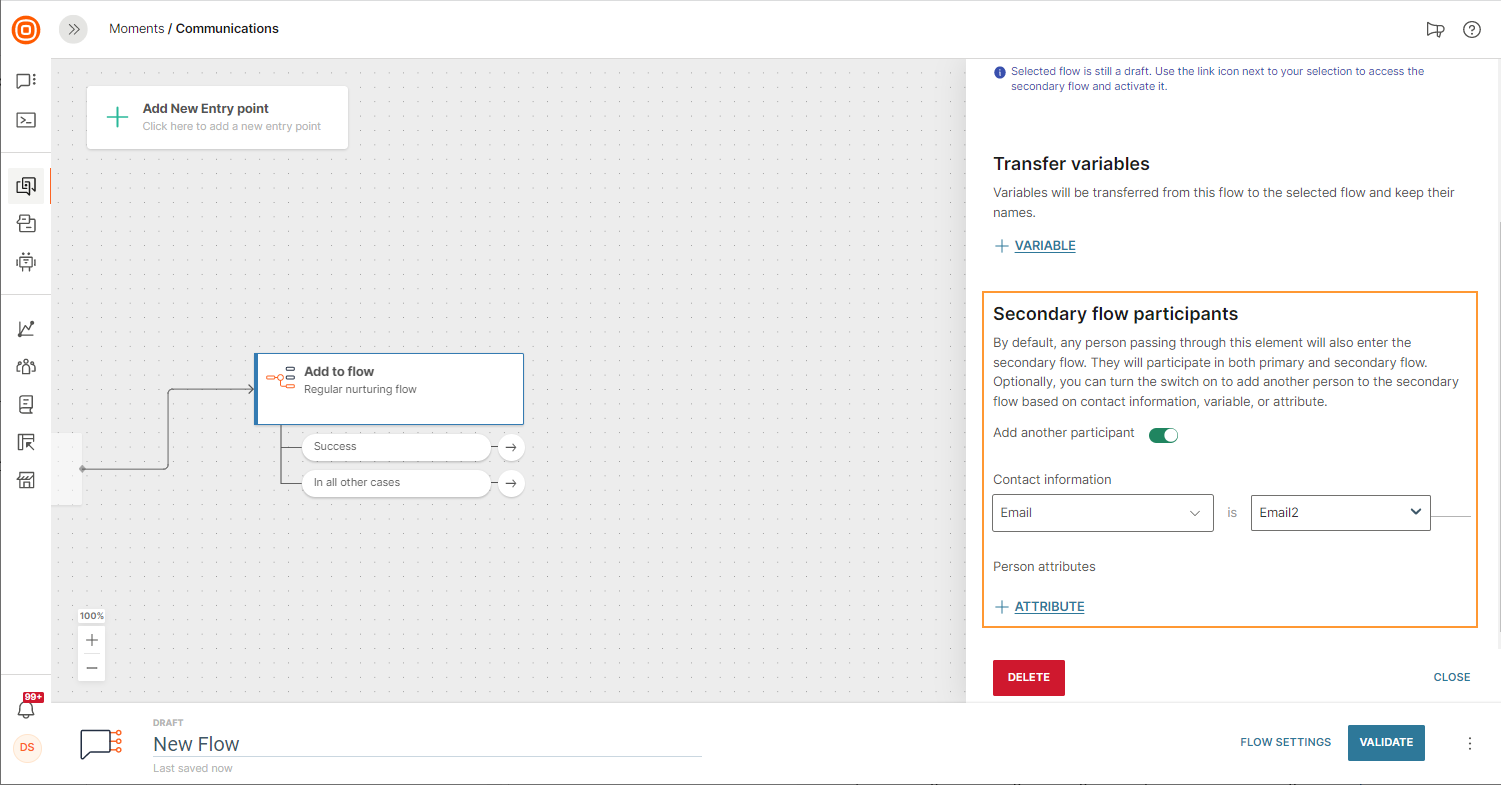
Secondary Flow Participants
By default, any person passing through the Add to Flow element will also enter the secondary flow. They will participate in both primary and secondary flows until they exit from the flow.
You can also configure the element to so that another user can pass through the flow based on their contact information. To do so toggle to add another participant when you are adding your Add to Flow element. You can then define the primary contact information (phone number or email) to use for this participant that matches a flow variable, or a standard/custom attribute of the person who is currently in the Flow
If the participant exists in People then the flow will be started for the person as identified by their contact information and any mentioned attributes in the flow will be updated. If the person does not exist in People then a person profile will be created for them and an attribute value will be assigned to the profile.
A good use case for using the secondary flow participant functionality could be for a referral program to get the client to share the contact information of friends or family to receive benefits. As an example, you would ask the client to share the email of a friend over messenger. Then you would parse the email from the inbound message and saving the value into a variable.
You can then use the Add to Flow element to start a flow for another person with contact information and email extracted from the variable. This is a great way to enhance your reach, just always ensure that there is opt-in confirmation from the friend or family member in order to meet data requirements for your region.
Call API
Call API enables real-time interaction between your flow and an external system, such as a website or a CRM. Use this element to request information from your third-party system or database, and save the responses in flow variables. You can then use the responses to personalize your communication and route the communication flow.
In the side panel of the element, configure the following fields.
List variables are not available in the Call API element.
Request
Configure the following request parameters.
Request URL
URL of the third-party system with which the flow wants to communicate. The third-party service receives or sends the data that the flow requires.
If your URL includes attributes that contain reserved, unsafe, and non-ASCII characters, select Enable escaping of URL characters.
Method
The method that is used to call the API. Each method is used for different use cases.
Select one of the following methods.
- POST: The API that is called should process the provided request. Often, POST is used to create a new entity or update an existing one in the third-party system.
- GET: Used to retrieve information from the third-party system.
- PUT: Used to store information in the third-party system.
- DELETE: Used to remove information from the third-party system.
- PATCH: Used to partially modify information in the third-party system.
Header
The header of the data that needs to be sent along with the URL.
Enter the data in Key-Value format.
Example:
username: user1
password: password123
By default, headers are empty. However, most web frameworks and services require a content-type header in the request to process it correctly. So, you might want to include a header.
Example: When sending data in JSON format, add a header with Content-type as the Key and application/json as the Value.
Body
The body of the data that needs to be sent along with the URL.
You can enter the data in one of the following formats.
-
Key-Value format: Example - name: Tom, or external user ID.
-
JSON format: Example - {'name': 'Tom'}. This format supports the following types.
- JSON: By default, data is sent as JSON.
- URL encoded form: To send the data in this format, add a header with Content-type as the Key and application/x-www-form-urlencoded as the Value.
Authorize each API call
To authorize every call, do the following.
- In the Header, provide a username and a password.
- In the Body, pass the External ID for each end user profile that you want to include in the API call. This enables the third-party system to know which end user's data should be stored or fetched. External IDs for end user profiles are stored in People.
Response
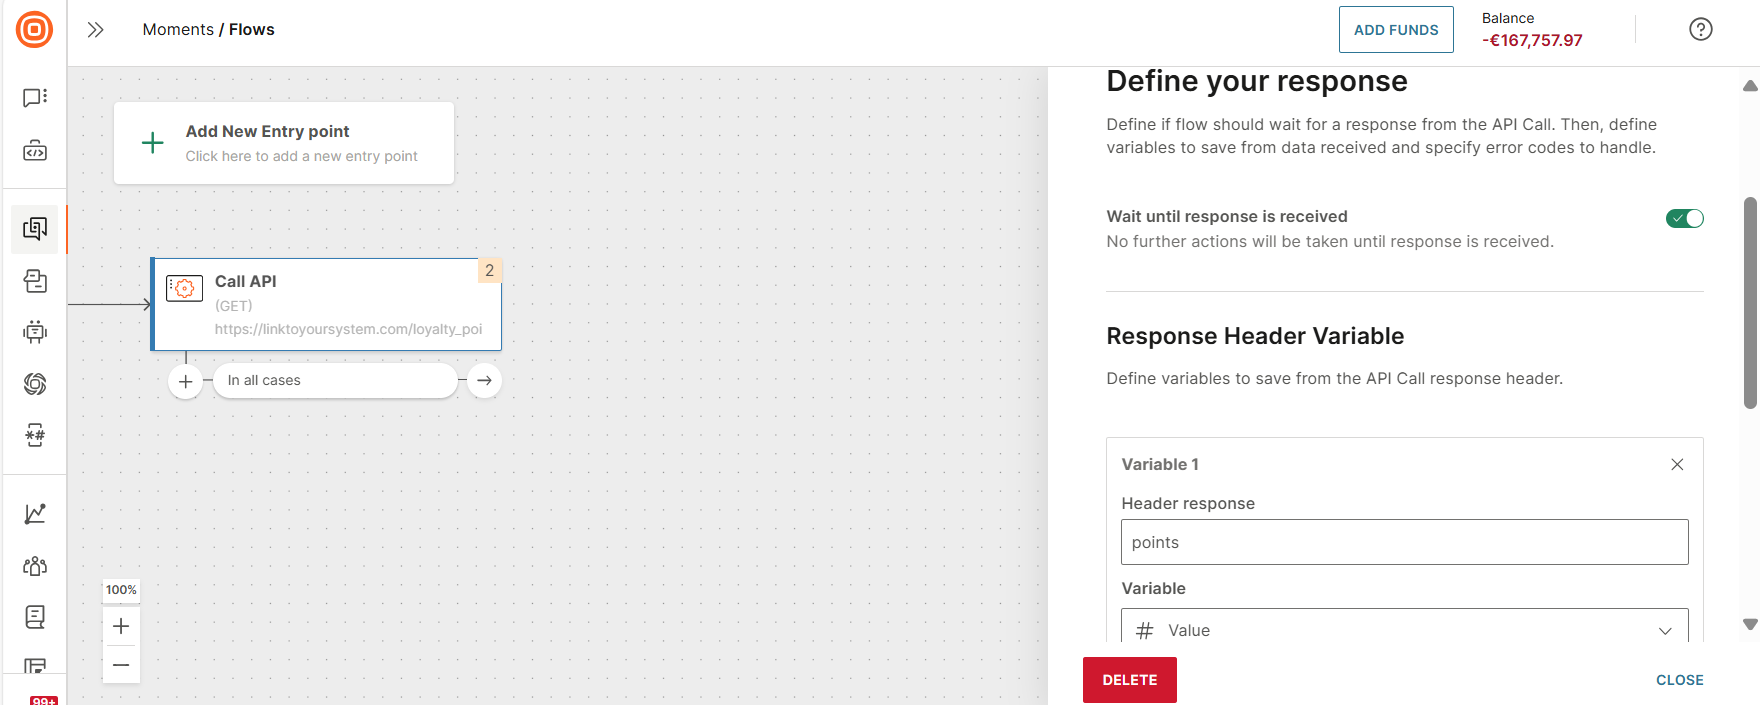
Configure the following response parameters.
Wait until response is received
Enable this option if you want the next step in the flow to be activated only after the response has been received.
You must enable this field to configure other response parameters.
Response header variable
Enables the server to pass additional information about the response which cannot be placed in the Status-Line. The header fields provide information about the server and further access to the resource identified by the Request-URI.
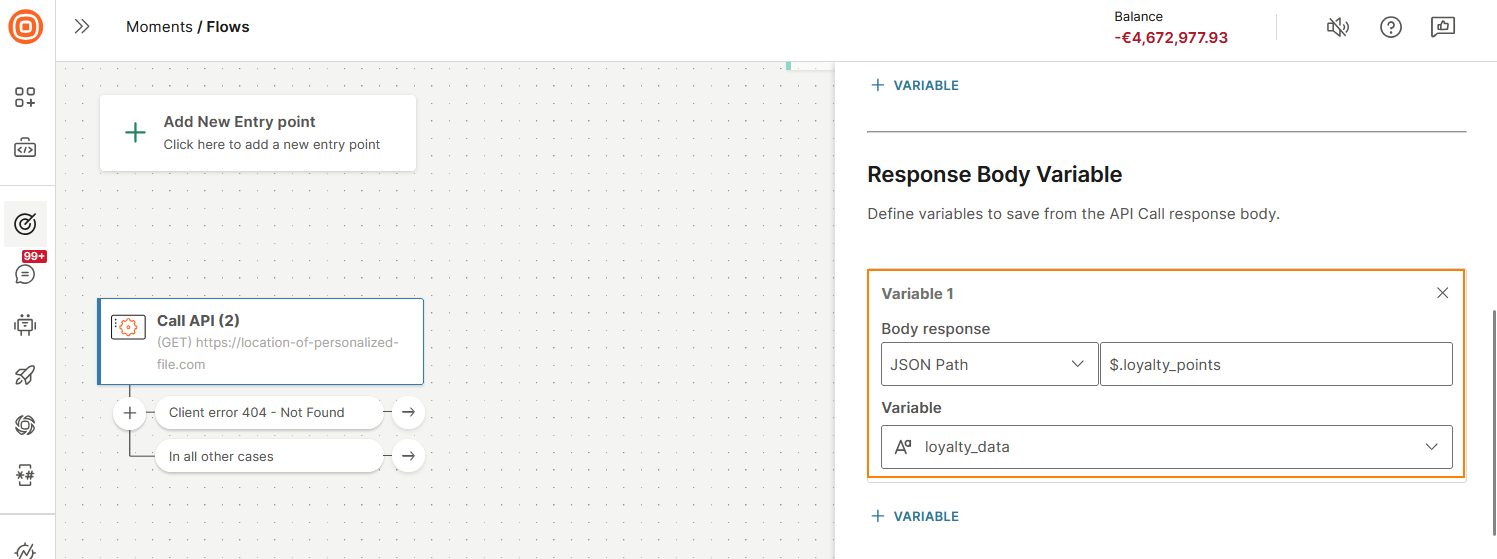
Response body variable
You can save the API data that is received from the external system in a flow variable and use it in the rest of the flow.
You can save to a flow variable in one of the following ways:
- JSON path
- Save the whole body of the response
Save the JSON path
To save data to a variable, do the following:
- In the Body response field, select JSON path.
- To save data to a variable, enter a JSON path expression such as $. loyalty_points. The path must point to a single value. If the value is an array or object, it is considered an error, and the variable is set to NULL.
- In the Variable field, select a flow variable.
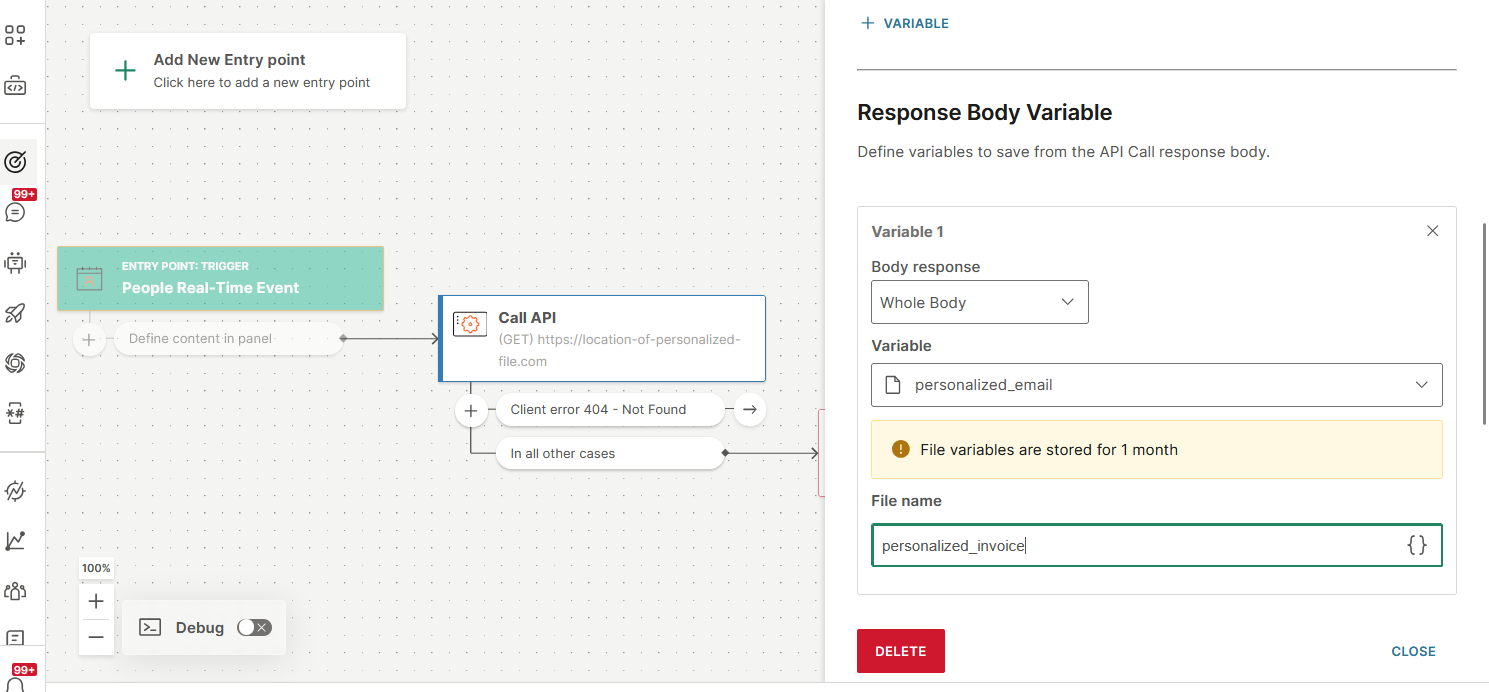
Save the whole body of the response
You can save the whole body only to flow variables of type Text or File.
- In the Body response field, select Whole body.
- In the Variable field, select a flow variable.
- If the flow variable is of type File, add the File name, along with its extension.
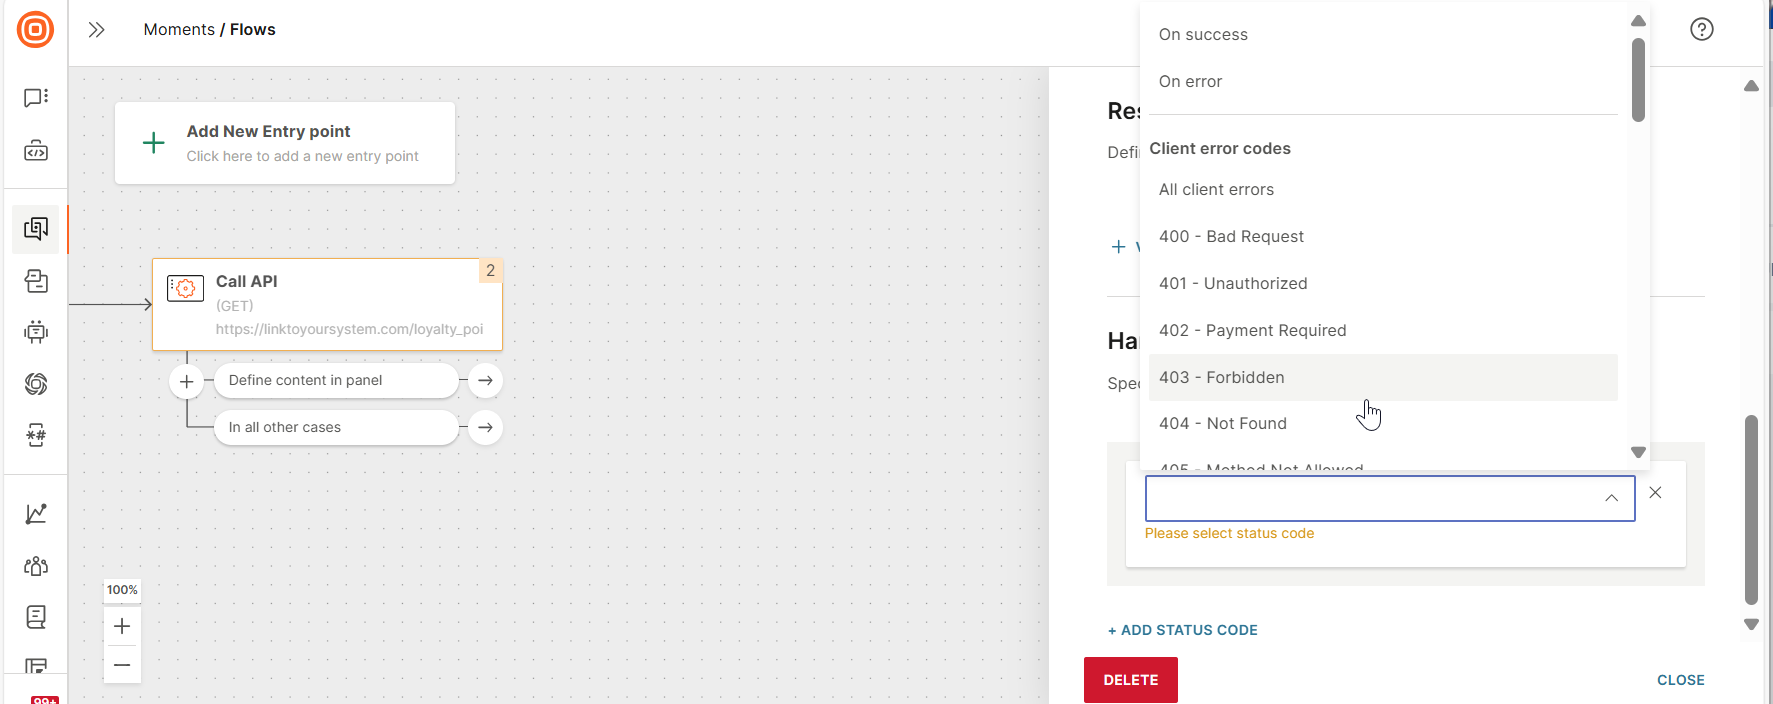
Handle status codes
You can branch the flow depending on whether the response has been received and based on the response status code. Select the required status codes. For each status code, a branch is added to the Call API element. Specify the action to take for each branch.
Response status codes are of the following types.
- On success - Exit: In case of 2XX error. Requires no action.
- On error - Exit: In case of any error.
- All client error codes - Exit: In case of 4XX error.
- Server error codes - Exit: In case of 5XX error.
Scheduling
Scheduling options help streamline the data exchange. To start scheduling, enable one or more of the following features in the Scheduling tab.
Delivery time window
Set the period during which the flow communicates with the third-party system.
For more information, refer to the Delivery time window documentation.
Define message sending speed
Specify the number of messages you want delivered within a specific period.
For more information, refer to the Message sending speed documentation.
Custom Exchange elements
Create custom elements in Exchange and use them in your flow to add new functionality to the flow.
Example: Create a custom element to integrate your flow with third-party systems. Call third-party APIs and personalize the flow journey based on the response.
Configure the element once and reuse it across multiple communications.
The following are examples of use cases.
- Integrate your flow with a webinar platform to automatically register the end user for meetings.
- Connect your flow with a GenAI platform to generate personalized content within the flow.
- Connect your flow to your CRM to transfer data or add profiles to specific groups.
For more information, refer to the Developing with Infobip documentation.