Set up and integrate the Tech Provider Program
Integrating WhatsApp Business with your system requires setting up a Meta app, registering as a Meta Developer, and configuring key components such as business verification and partner solutions. Follow these steps to ensure a smooth setup and seamless integration with the Infobip platform.
Setup
Before you begin using WhatsApp Business, you need to configure your business portfolio, register as a Meta Developer, and create a Meta app. These steps help establish your business presence and enable WhatsApp sender registration.
Create a business portfolio
To get started, you can either create a new business portfolio (opens in a new tab) or review and update your existing one to include all the required business details, such as business address, website, and email. Ensure that the account creator or owner can provide accurate information about the business during the business verification process later.
Things to keep in mind:
- Your business can have up to two business portfolios.
- Ensure all the information provided is correct. Otherwise it will be rejected during the business verification stage.
Register as a Meta Developer
If you are not already a registered Meta Developer, you must register first to access Meta's developer tools, APIs, and the App Dashboard.
-
Start the registration process
- Log into your Facebook account and go to Meta Developer Registration (opens in a new tab).
- Alternatively, visit the Social Technologies Dev Center (opens in a new tab) and select Get Started.
-
Accept the terms and policies
- Select Next to agree to Meta's Platform Terms (opens in a new tab) and Developer Policies (opens in a new tab).
-
Verify your account
- Enter a valid phone number and email address.
- Meta will send a confirmation code to both for verification.
- These contact details will be used for important developer notifications.
-
Select your occupation
- Choose the occupation that best describes your role.
Once registered, you can use the App Dashboard to create and manage your apps.
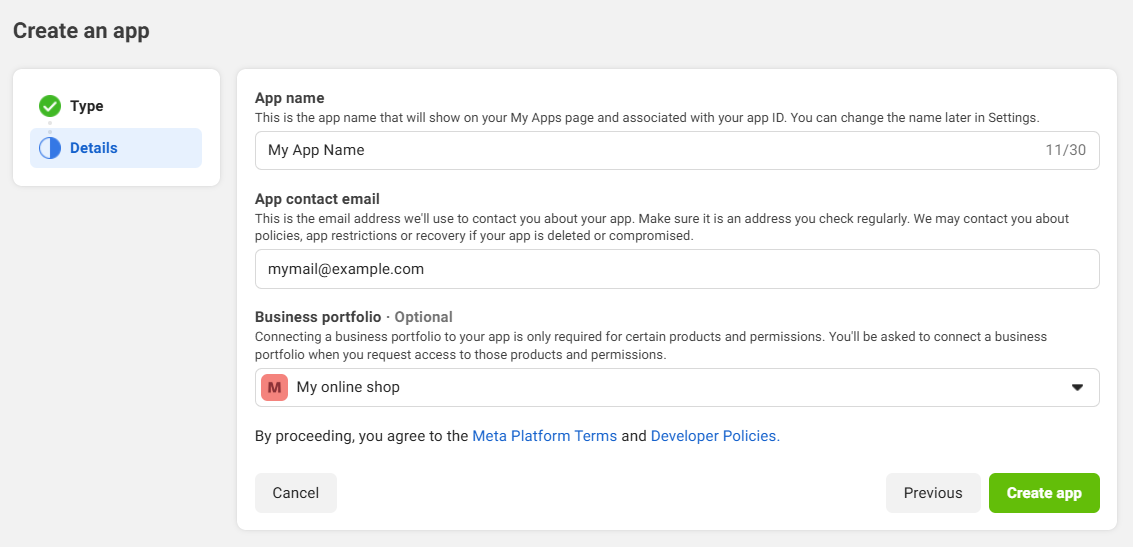
Create and set up a Meta app
To integrate WhatsApp with your business portfolio, you need to create a new Meta app. Even if you already have a Meta app, it is recommended to start with a new one. Reusing an existing app provides little benefit unless you have already completed the WhatsApp Tech Provider process for another BSP or directly with Meta.
-
Navigate to the My Apps (opens in a new tab) panel and select Create app.
NOTEThe name of your Meta app, along with your business portfolio name, will be visible to customers during the WhatsApp Sender registration process. Do not include Meta trademarks, such as WhatsApp, in the app name.
-
Enter your app name and contact email, then select Next.
-
Under Use cases, select Other, then select Next.
-
For Type, select Business, then select Next.
-
Under Details, verify the following and select Create app:
- App name: Enter the name of your application.
- App contact email: Provide an email address for support.
- Business portfolio: Select your business portfolio from the dropdown menu.
 Note
NoteIf you cannot complete this step, try selecting No business portfolio selected on the Business portfolio dropdown.
-
Once the app is created, navigate to it in your App Dashboard and go to Settings > Basic. Update the following details:
Field Description App ID A unique identifier automatically assigned to your app. It must be included in API requests and cannot be changed. App secret A confidential key used for authentication and generating access tokens. Keep it secure and do not expose it in your code. Display name The name of your app that will be visible to users. Ensure it follows Meta's naming guidelines and does not include trademarks like WhatsApp. Namespace A unique identifier for your app's Canvas page, used to provide additional information about your app. App domains The primary domains and subdomains associated with your app. These are used for app installation and Graph API verification. Contact email The email address where developer notifications will be sent. This field is required to switch your app to Live mode. Privacy policy URL A link to your app’s privacy policy, which must clearly explain how user data is handled. Terms of service URL A link to your app’s terms of service, required when switching to Live mode. User data deletion An URL with instructions for users on how to request deletion of their data. This link is used when users remove your app using Facebook settings. App icon A visual representation of your app in the App Center. Follow Meta's guidelines (opens in a new tab) to avoid rejection. Category The category that best describes your app. This helps users discover your app more easily. NotePrivacy Policy and Terms of Service URLs will be visible to users onboarding through the WhatsApp sender registration process.
-
Under Category, choose Messaging.

Add the WhatsApp product
-
Navigate to the Dashboard within your Meta app.
-
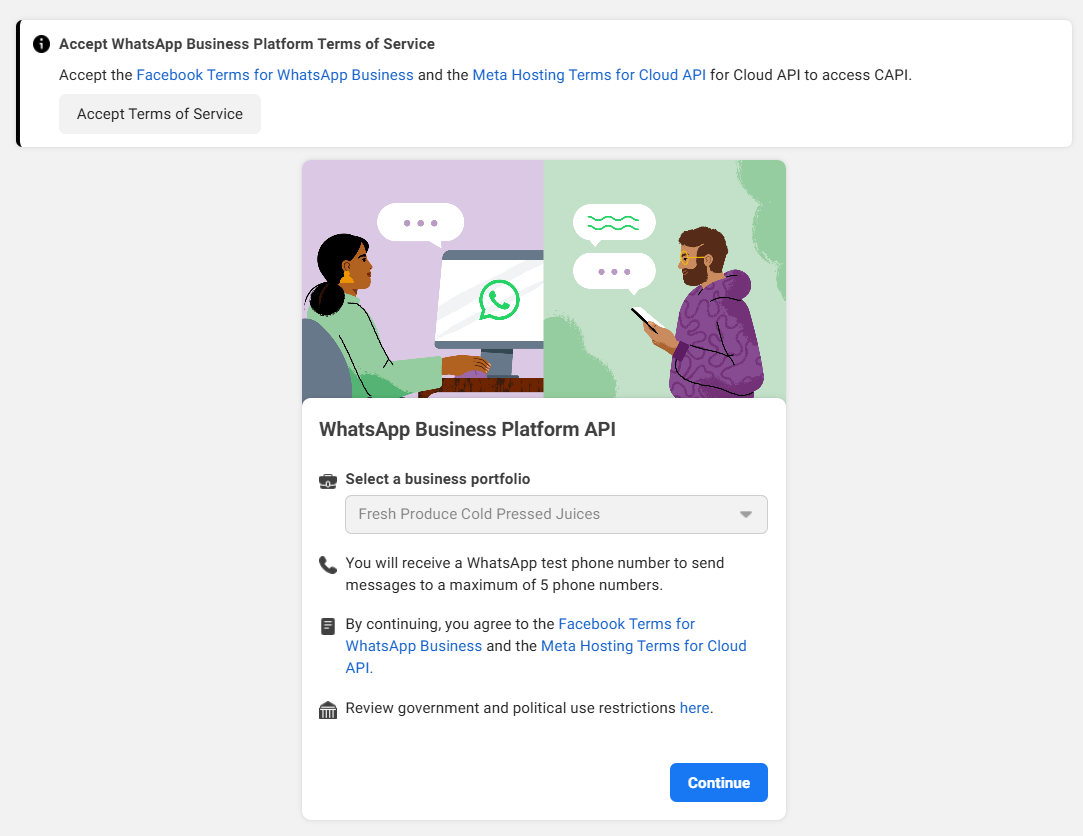
Find WhatsApp and select the Set up button underneath it.
-
Accept Facebook Terms for WhatsApp Business (opens in a new tab) and the Meta Hosting Terms for Cloud API (opens in a new tab), then select Continue.
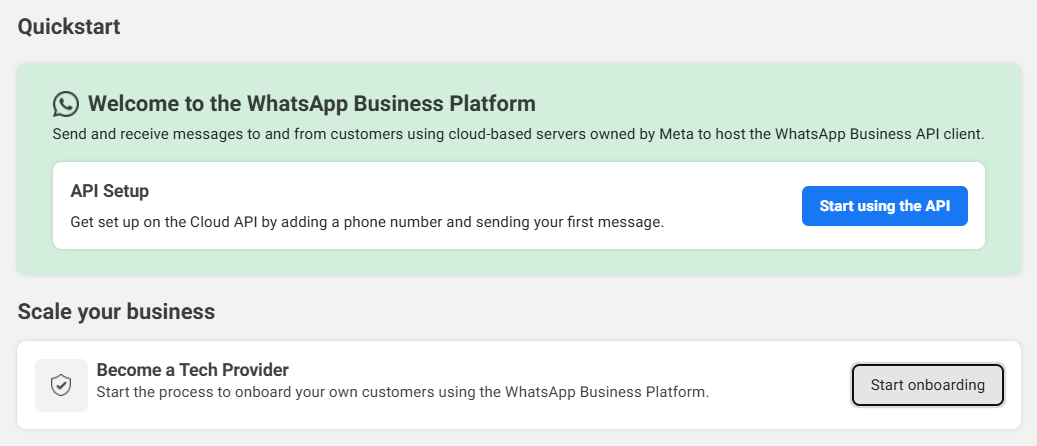
You will be redirected to the Quickstart page. You can then either start testing the environment using a full-featured sandbox or immediately scale your business by becoming a Tech Provider.
-
On the Quickstart page, go to the Improve ROI with marketing messages with optimization and select Get started.
-
Select Request permission to add any missing app review permissions.
-
Select Continue to accept the terms of service.
Once you have your integration with WhatsApp set up, you can start testing your setup and scale your business as a Tech Provider.
Scale your setup as a Tech Provider
-
Navigate to App Dashboard > WhatsApp > Quickstart.
- Under Scale your business card, select Start onboarding to become a Tech Provider.
NoteIf you have already added the product to your app, but have not accepted the terms, go back to the Quickstart section to complete this step.
-
Choose Working with a Solution Partner and then select Start onboarding.
-
Complete business verification (opens in a new tab) by selecting Start verification.
- Meta uses this process to confirm that you are associated with a legal entity.
- Be sure to upload the required official documents (opens in a new tab) and follow the guidelines on domain verification (opens in a new tab).
- Business verification usually takes 2–5 business days.
- If your request is not approved, Meta will provide feedback to help you resubmit it.
NoteYour business needs to be verified before using the WhatsApp sender registration process.
Submit the Meta app for review
Your business must complete business verification and be verified in order to complete app review.
App review (opens in a new tab) is a required step to allow apps to access specific WhatsApp features. Since your app will manage another business's WhatsApp Business Account and send messages on their behalf, Meta needs to validate how you intend to use the requested permissions to prevent abuse or harm to user data. Meta's operational team will review your submission and either approve, reject, or request additional information.
Prepare for app review
To prepare for the app review (opens in a new tab), follow the steps below:
-
Build your prototype
- Complete your app development and ensure that it complies with Meta's Platform Terms (opens in a new tab) and Developer Policies (opens in a new tab).
- Your website can subscribe to webhooks to receive updates on a user's WhatsApp Business Account.
-
Review app settings
- Go to your Meta app's Onboarding page and select Review your app settings.
- Ensure that the following information is correctly set:
- App icon (1024 x 1024 px)
- Privacy Policy URL
- App category
-
Record video documentation
- As part of the app review process, you will need to provide a video recording for each permission you request. Refer to Meta's guidelines on screen recordings (opens in a new tab), but keep a few things in mind while recording:
- Use English as the app UI language
- Provide captions and tooltips if your app is not available in English
- Explain the meaning of buttons and other UI elements.
NOTEIf you have an existing Infobip integration, you can record these actions on our web interface (opens in a new tab).
- As part of the app review process, you will need to provide a video recording for each permission you request. Refer to Meta's guidelines on screen recordings (opens in a new tab), but keep a few things in mind while recording:
Start the app review
You can start the app review process in the App Dashboard. This step ensures that your app meets Meta and WhatsApp requirements.
Follow these steps to initiate the review:
-
Request permissions
- Permissions are granular, user-granted authorizations. Before your app can use a service to access an app user's data, the user must grant all permissions required by that service. To pass the app review, request only the permissions necessary for your app to function, as asking for unnecessary permissions is a common reason for rejection.
- On the App Review > Permissions and Features page, find the required permissions:
whatsapp_business_managementwhatsapp_business_messaging
- Select Request advanced access, then Continue request to start the review process.
-
Submit business verification
- If you have completed business verification, this step will be marked as complete.
- If you have not completed business verification, you must do so (opens in a new tab) before proceeding.
-
Answer data handling questions
- Provide information about your data handling practices, including:
- Your data controller and its location
- The company name for each data processor
- Processes in place for handling public authority requests regarding access to personal data
- If your submission is not approved, Meta will provide feedback to help you resubmit it.
- Provide information about your data handling practices, including:
-
Complete app verification
- Submit instructions for each platform where your app will be available (iOS, Android, web).
- Explain why and how your app uses each requested permission by submitting a text explanation and a video for each permission, highlighting where the respective permissions are used. Ensure your video submissions showcase your product (website or mock-ups) and not Infobip or Meta products.
-
whatsapp_business_management- Text explanation
- Explain how your app or API manages a customer’s WhatsApp account, including account details, message templates, and other WhatsApp assets. Highlight how your platform enables customers to control their account settings and assets.
- Video requirements
- Your video or screen recording must demonstrate your app being used to create a message template or show the WhatsApp Manager being used by you to create a message template.
- Alternatively, you can capture a screen recording of WhatsApp Manager (opens in a new tab) as you use it to create a template message.
- Text explanation
-
whatsapp_business_messaging- Text explanation
- Describe how your app uses this permission to send messages on behalf of your users. Explain whether messages are sent through an API or an application you have developed, and how it benefits your users.
- Video requirements
- Your video or screen recording must demonstrate a message being sent with your app and appearing in the WhatsApp client.
- Alternatively, you can screen record the API Setup cURL script (opens in a new tab) as you use it to send a message to a WhatsApp number designated as a test recipient.
- Text explanation
-
-
Submit for review
- Once you have completed your app verification, select Submit for review.
- Meta usually responds in 3-5 business days with either a full or partial pass or fail.
- You can use approved permissions right away, and for denied permissions, Meta will provide you its feedback to help you resubmit.
Access verification
Meta requires access verification to ensure that only businesses with a legitimate use case can access another business's data. Access verification confirms that a business is eligible to act as a Tech Provider and handle business data securely.
Once your Meta app is approved, you must complete Meta's access verification to confirm that your business operates as a Tech Provider.
Prerequisites:
- To start the process, you must be the business admin.
- Business verification must be completed.
- The business account must not have any restrictions (opens in a new tab).
Verification steps:
-
Go to your App Dashboard.
-
Navigate to App settings > Basic.
-
On the Verifications card, select Start verification.
-
Provide the required information, including how your business uses other businesses' data to provide a service.
-
Submit your request.
Meta typically reviews and provides a decision within approximately 5 days. Once your verification is approved or denied, you will receive either a confirmation email or a rejection email. Once verified, businesses do not need to verify again, though under certain conditions (opens in a new tab), verification may be temporarily revoked. If a rejected business' use case changes, a business admin may reapply for verification.
Integration
During this phase, you can build your end-to-end product experience. Make sure you adhere to the Meta and WhatsApp terms (opens in a new tab) with regard to user data handling when you build your solution.
Partner solutions with Infobip
The core of the Tech Provider model is the partner solution, configured in the App Dashboard. This setup defines the WhatsApp assets you and Infobip can access for your end clients. Once approved, the setup allows you to customize the embedded signup process. During this process, your end clients can grant access to these assets for both business entities.
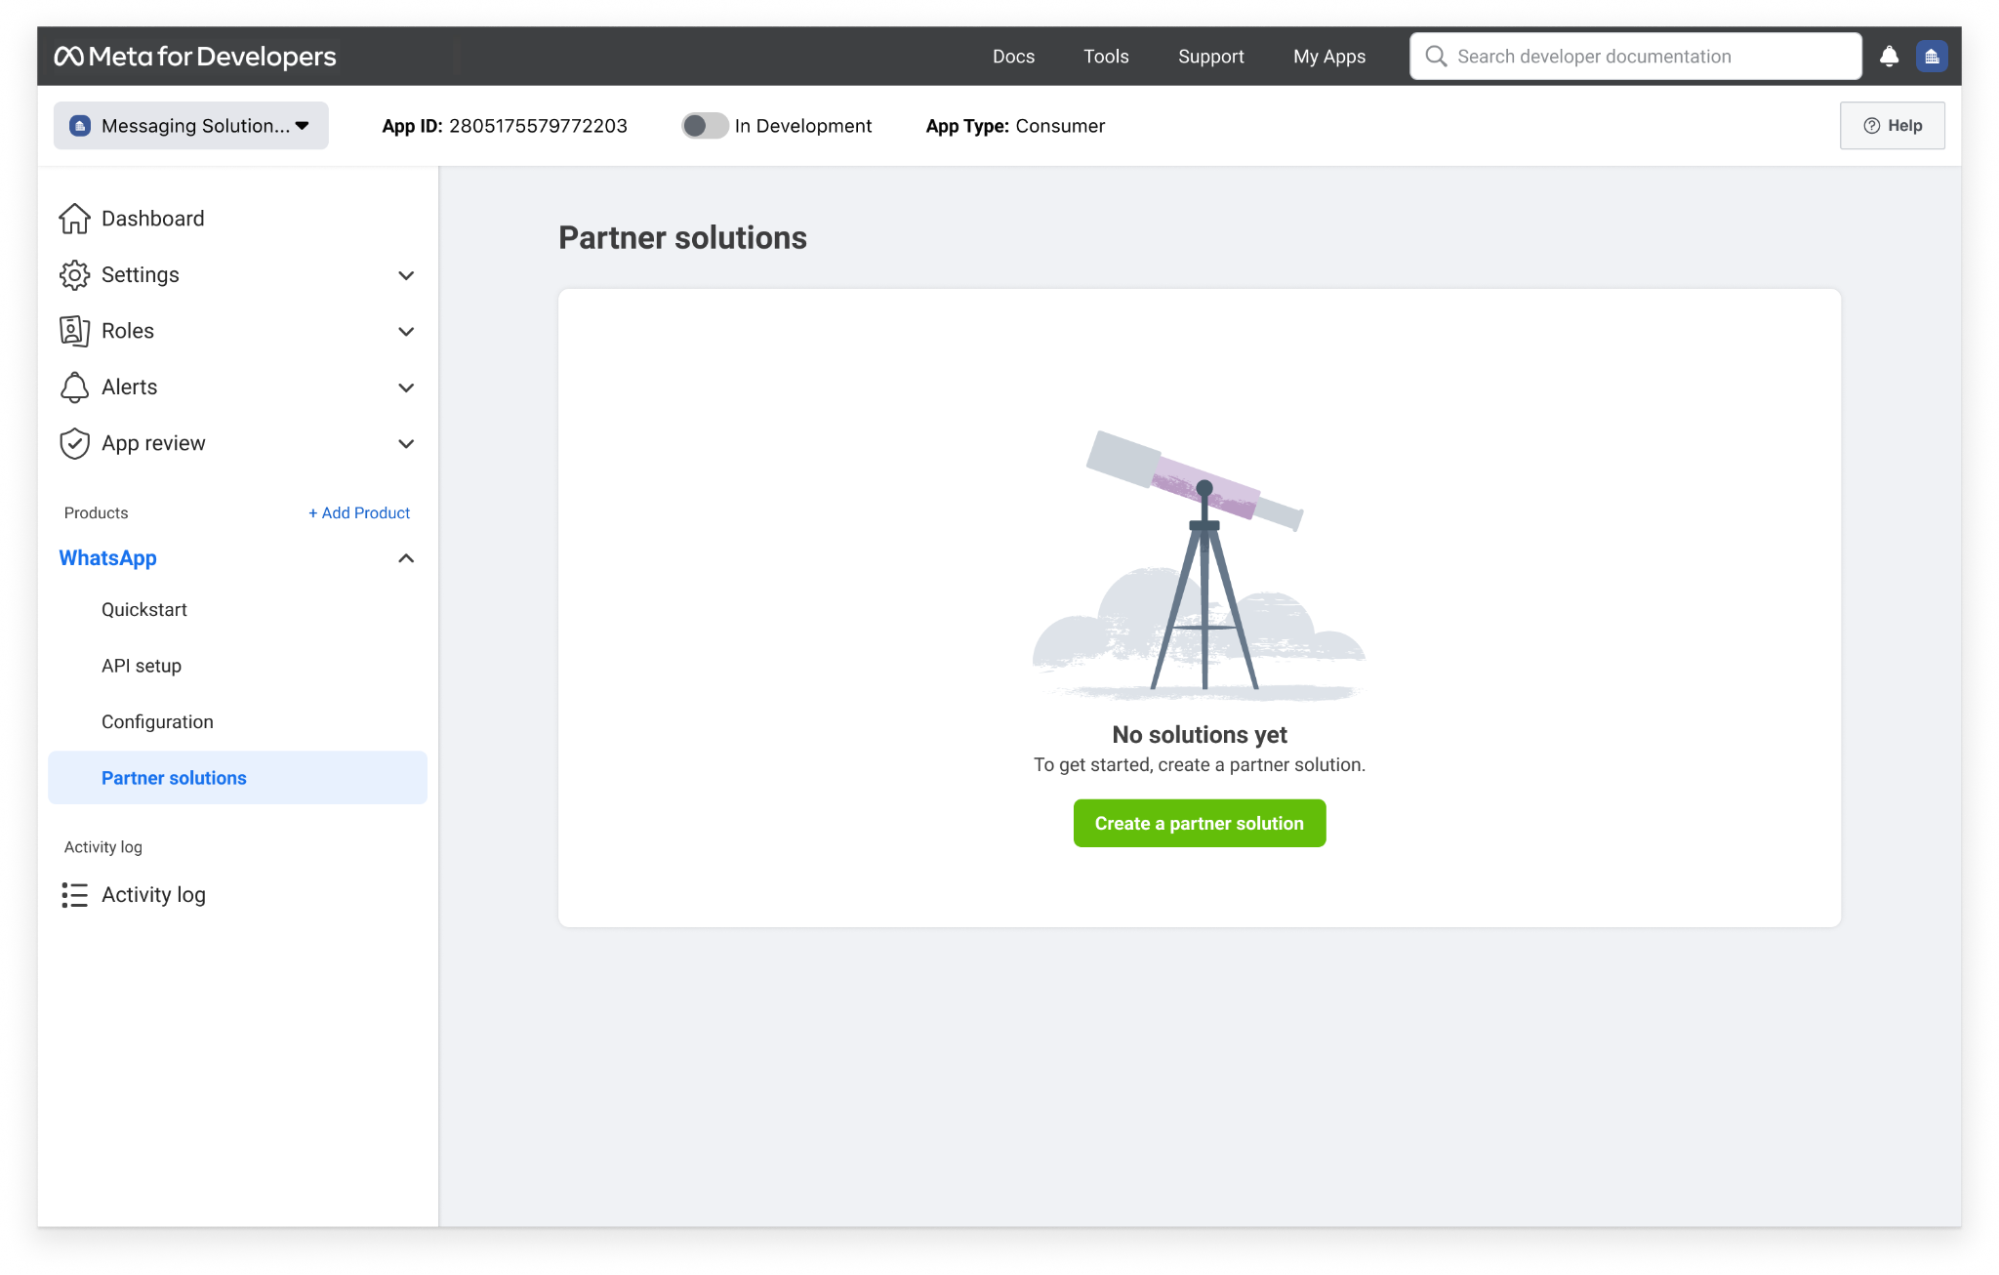
Create a partner solution
A partner solution establishes an asset-sharing relationship between two business entities. To configure, initiate, and accept it, open the following panel:
- App Dashboard > WhatsApp > Partner solutions.
Partner solutions can have the following states:
| State | Description |
|---|---|
| Active | Infobip has accepted the solution and you can use it to configure sender registration flow for end-client onboarding. |
| Pending | Infobip has not accepted or rejected the solution. End clients who try to access the sender registration flow configured for a solution in this state will see an error indicating it cannot be used for onboarding. |
| Draft | The solution has been initiated and saved but has not been sent to Infobip. End clients who try to access the sender registration flow configured for a solution in this state will see an error indicating it cannot be used for onboarding. |
| Inactive | Infobip declined the solution request. End clients who try to access the sender registration flow configured for a solution in this state will see an error indicating it cannot be used for onboarding. |
| Pending deactivation | Infobip has requested to deactivate the solution. You can accept or decline this request. |
| Deactivated | The solution has been deactivated. End clients who try to access the sender registration flow configured for a solution in this state will see an error indicating it cannot be used for onboarding. |
You can use each solution to onboard up to 200 end clients in a rolling one-week period.
Add Infobip app to the partner solution
To add the Infobip app to your partner solution, follow these steps:
-
Collaborate with Infobip to determine a solution name
- Work with Infobip to decide on a solution name that will appear in the WhatsApp > Partner solutions panel in the App Dashboard. This name helps you and Infobip easily identify the solution, among others.
-
Initiate a partner solution request
- Once you have agreed on the solution name, access the App Dashboard > WhatsApp > Partner solutions.
-
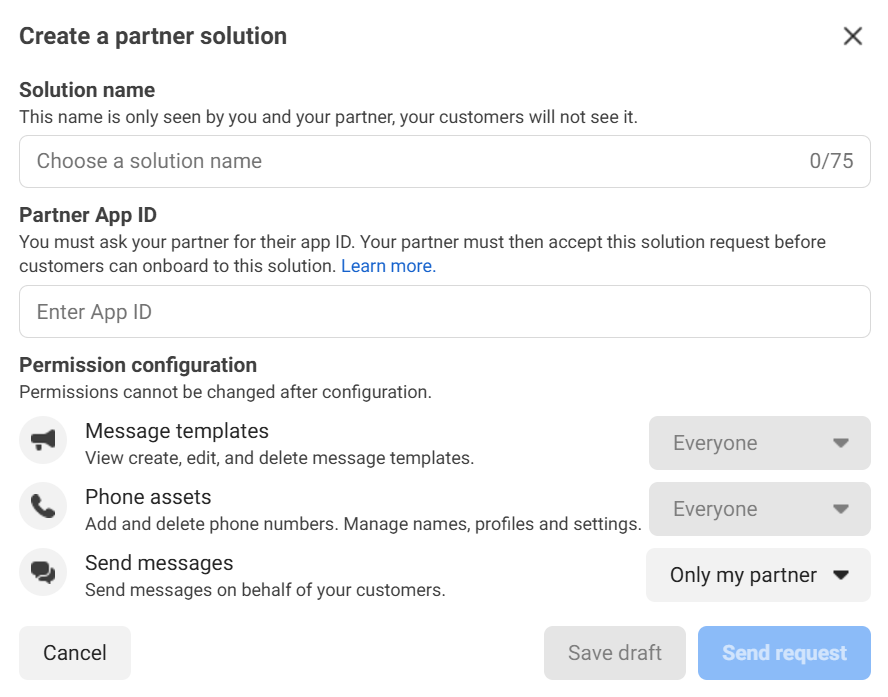
Create a partner solution
- In the Partner solutions panel, select Create a partner solution.
- Enter the agreed solution name.
-
Enter Infobip app ID
- Provide the Infobip app ID:
1370401139746733.
- Provide the Infobip app ID:
-
Configure permissions
- Next to Send messages, choose Only my partner.
-
Complete the partner solution request
- Follow the prompts to complete the process and initiate the partner solution request.
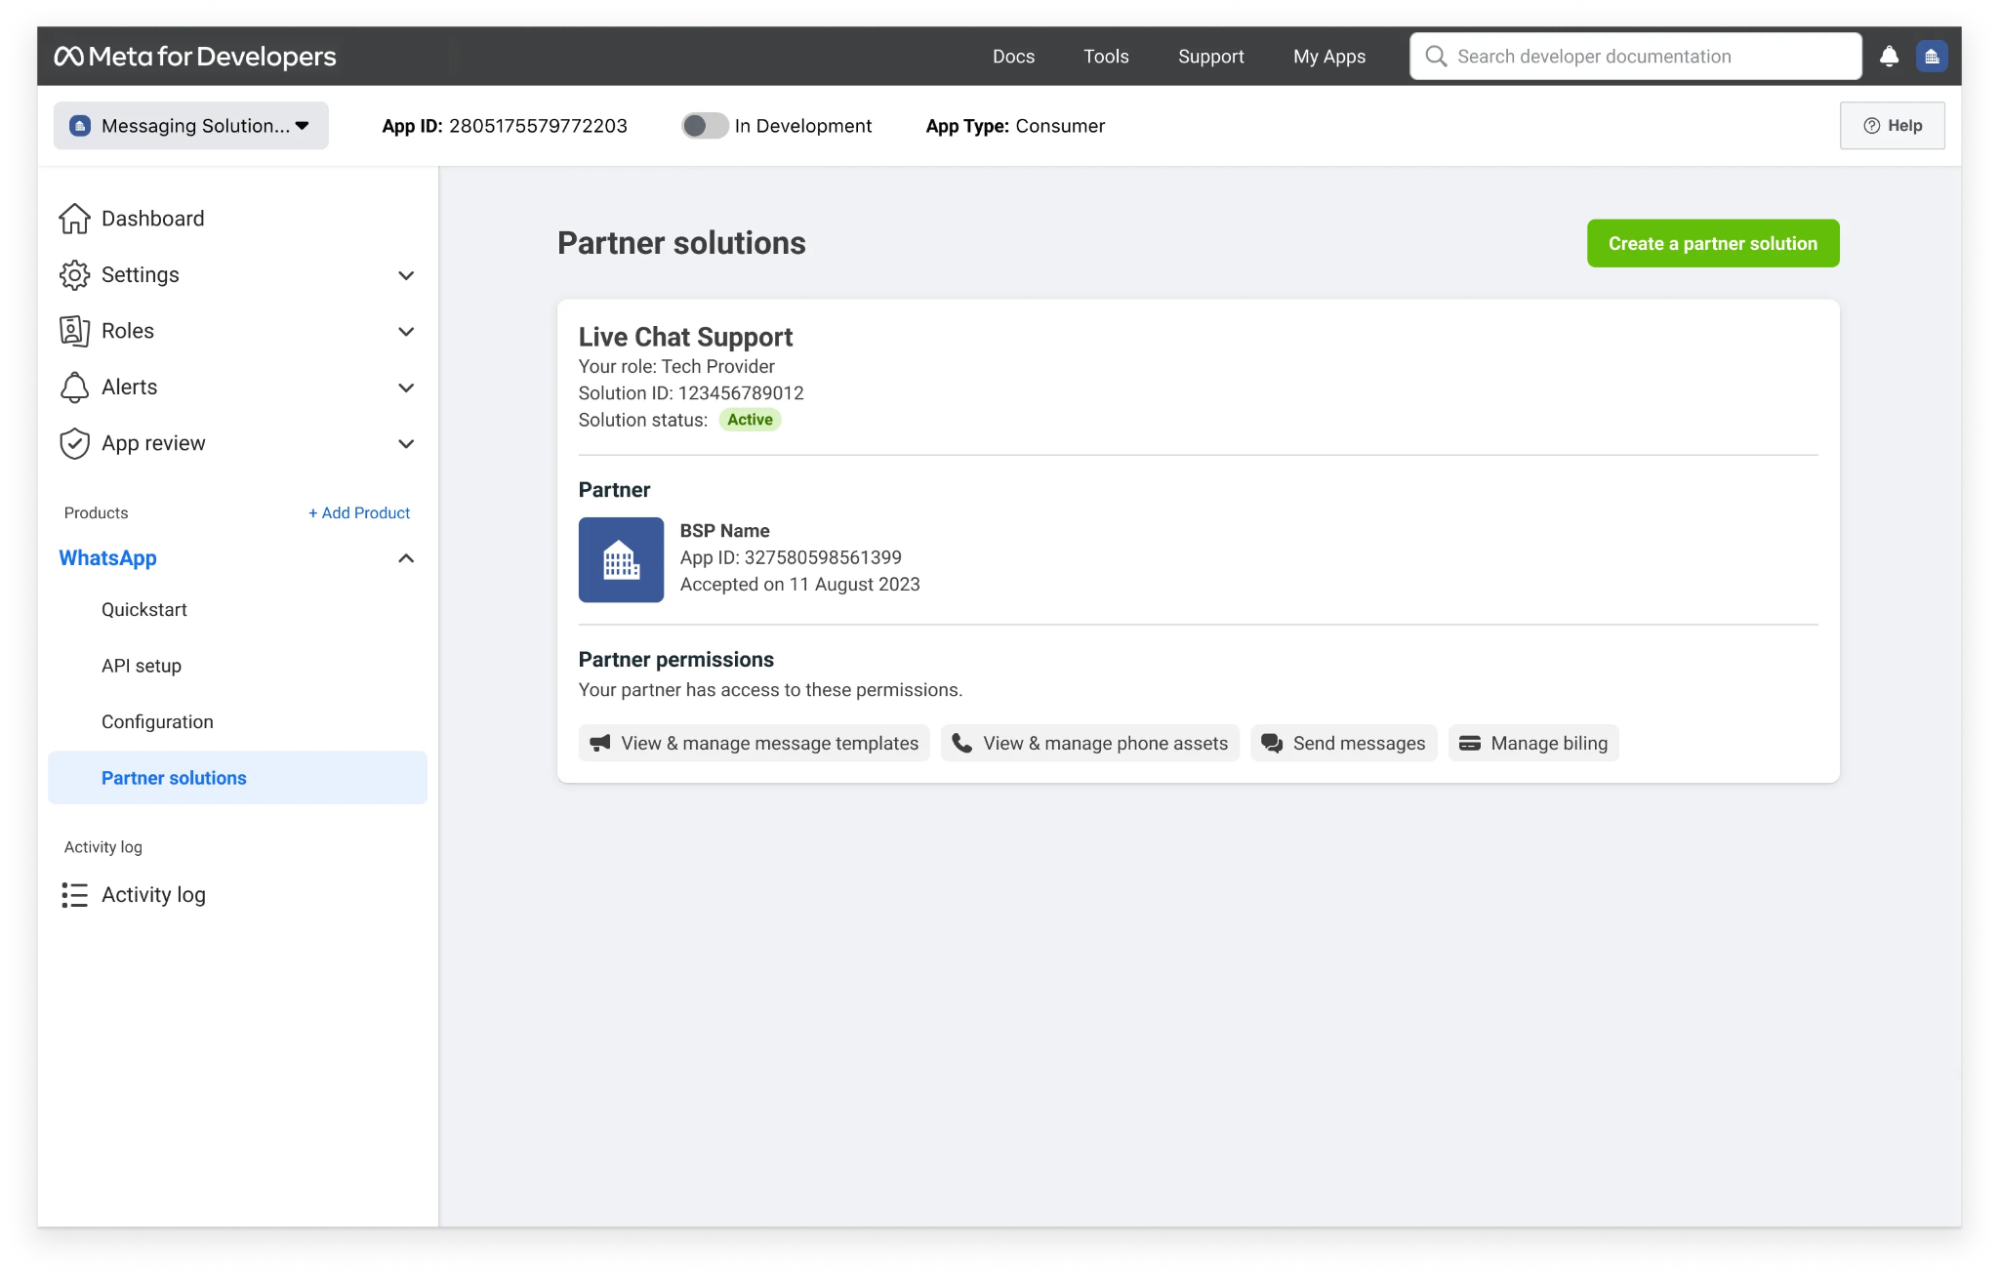
After the partner solution request is complete, Infobip receives an email and notification in Meta Business Suite about your request. The solution appears in the Partner solutions panel with a Pending status until Infobip accepts it.
When Infobip accepts the partner solution request, the status changes from Pending to Active. Once the status is active, copy the Solution ID and add it during the embedded signup configuration.
Sender registration setup
After confirming your status as a Tech Provider, you can start onboarding business customers.
Your users must complete the sender registration setup, which Meta refers to as embedded signup. To enable this process, first, add a Login with Facebook button to your UI. This button will launch the sender registration flow.
Once users complete the registration, the required WhatsApp assets are automatically generated, and access to these assets is granted to both you and Infobip.
Set up your configuration
Before setting up the sender registration flow, you must create a login configuration. This configuration allows customers to log into their Facebook account and complete the flow.
To do so, follow these steps:
-
Log in to Meta for Developers (opens in a new tab) and go to your Tech Provider app.
-
In your App Dashboard, go to Facebook Login for Business > Configurations.
-
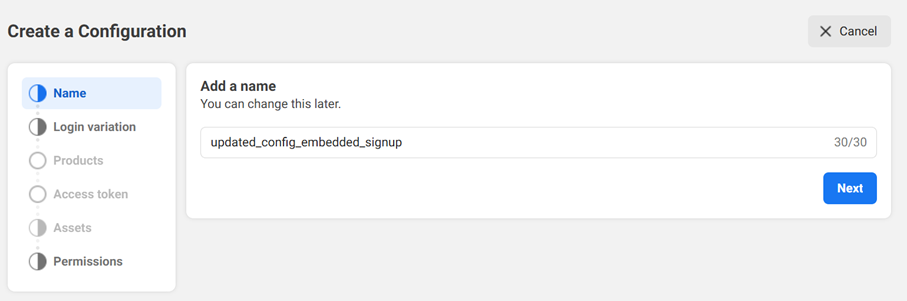
Create or update the login configuration:
- To create a new configuration, select Create configuration and give it a descriptive name (for example updated_config_sender_registration).
- To update an existing configuration, find it in the list and select Edit next to its name.
-
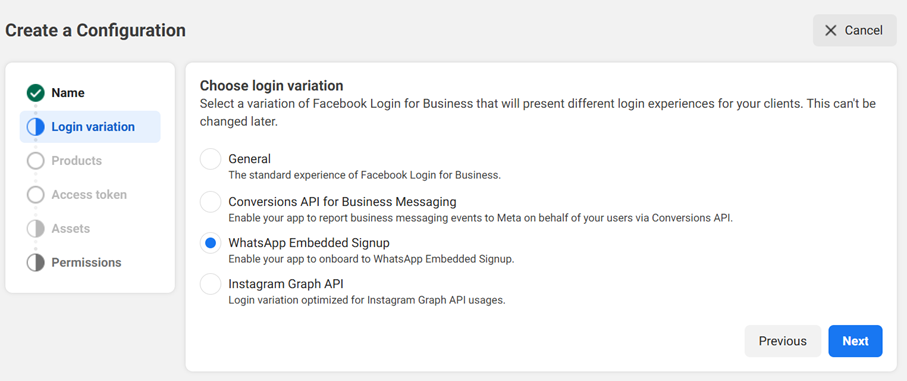
On the Login variation screen, select WhatsApp Embedded Signup, then select Next.
-
On the Products screen, select WhatsApp Cloud API and Marketing Messages API for WhatsApp, then select Next.
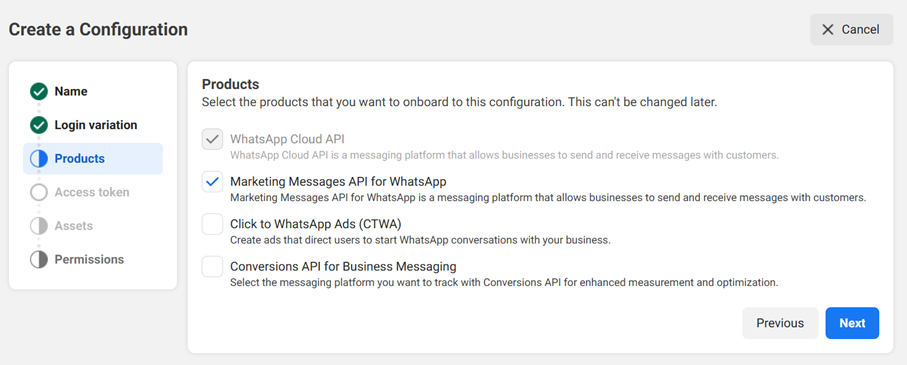
-
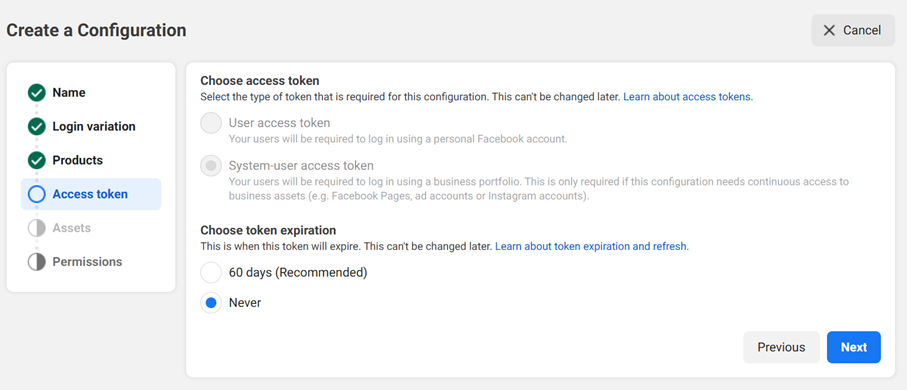
On the Access token screen, under Choose token expiration, select Never, then select Next.
-
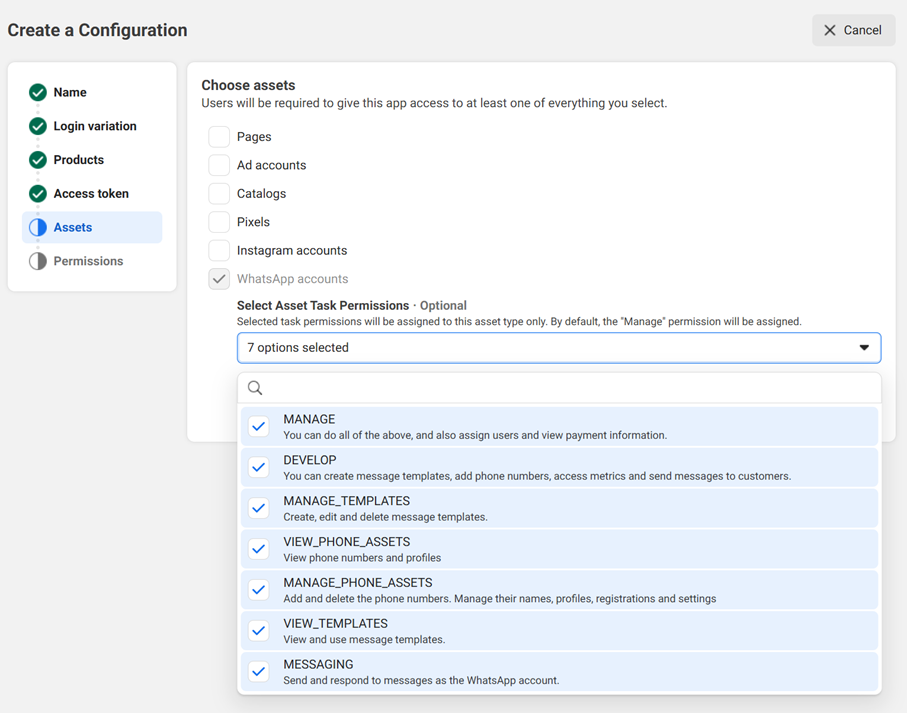
On the Assets screen, select WhatsApp accounts and choose the following permissions:
MANAGEDEVELOPMANAGE_TEMPLATESVIEW_PHONE_ASSETSVIEW_TEMPLATESMESSAGING
-
On the Permissions screen, verify that the following permissions are included:
whatsapp_business_managementwhatsapp_business_messaging

-
Select Create and save the configuration ID (
config_id) provided by Meta.
Manage allowlist
To ensure smooth onboarding and secure authentication, you must configure your Facebook Login for Business settings and allowlist the necessary domains. This step is required for the sender registration process to function correctly.
To update your login settings, follow these steps:
-
Go to your App Dashboard and navigate to Facebook Login for Business > Settings > Client OAuth settings.
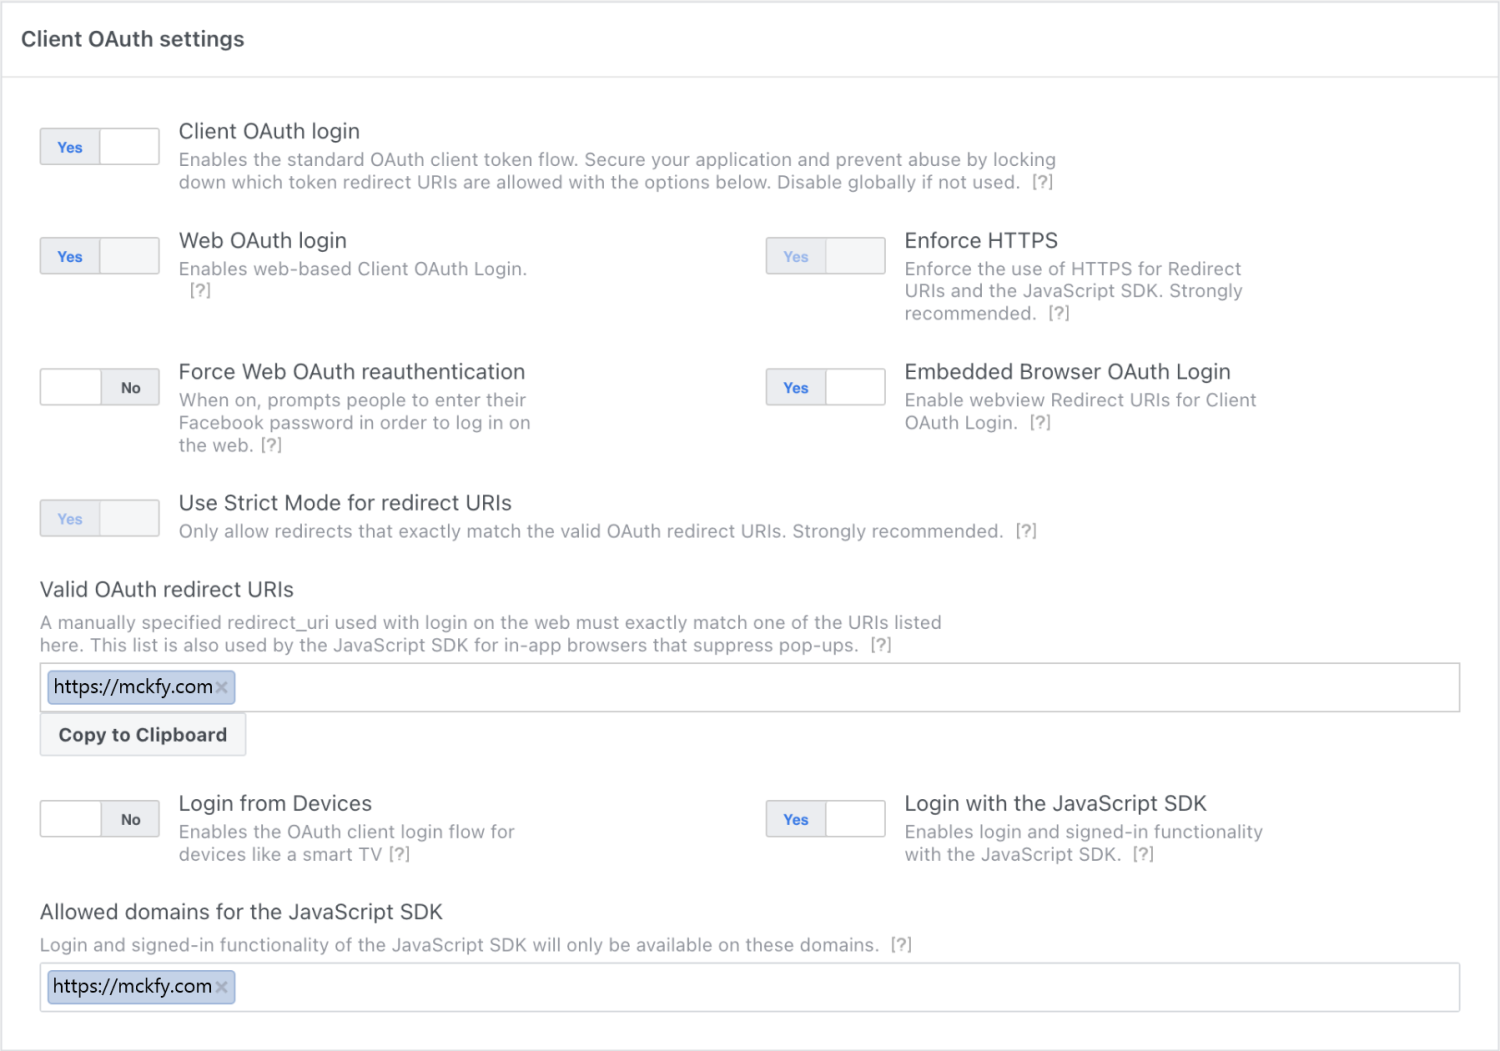
-
Enable the following options:
- Client OAuth login
- Web OAuth login
- Enforce HTTPS
- Embedded Browser OAuth Login
- Use Strict Mode for redirect URIs
- Login with the JavaScript SDK
-
Add your domain into Valid OAuth redirect URIs and Allowed domains for the JavaScript SDK.
IMPORTANTEnsure all domains use HTTPS and are static (wildcards or dynamic URLs are not supported).
-
Select Save changes to apply the settings.
Update roles
You can add team members to your Meta app to grant them access as admins or developers. Be cautious when assigning admin roles; only grant them to users who require full access. Added team members will be able to test your sender registration integration.
To update the roles, follow these steps:
- Open your App Dashboard.
- Navigate to App roles > Roles panel.
- Select Edit roles in Business Manager.
- Select Assign people and add the necessary admins and developers.
This button shows the embedded signup code with several pre-filled values, such as your app ID. Make sure to assign your permission configuration ID to the config_id property in the script.
Configure sender registration flow
To enable businesses to complete the sender registration flow, you must integrate Facebook Login into your application. This ensures that users authenticate with their Facebook account and provide the necessary permissions to link their WhatsApp Business Account (WABA).
The sender registration flow requires the Facebook JavaScript SDK to be loaded before initiating the login flow. The SDK handles authentication and allows your application to retrieve the necessary credentials for setting up a WhatsApp Business Account.
-
Load the Facebook JavaScript SDK
- Before launching the signup flow, initialize the Facebook JavaScript SDK by adding the following script to your web page (below the opening
<body>tag).
javascript<script> window.fbAsyncInit = function() { FB.init({ appId: '<APP_ID>', // Replace with your Meta App ID as a string autoLogAppEvents: true, xfbml: true, version: 'v20.0' }); }; </script> <script async defer crossorigin="anonymous" src="https://connect.facebook.net/en_US/sdk.js"> </script>APP_IDshould be replaced with the Meta app ID associated with your business.- This script loads the Facebook SDK asynchronously, ensuring it does not block the page from rendering.
- Before launching the signup flow, initialize the Facebook JavaScript SDK by adding the following script to your web page (below the opening
-
Implement the login flow
- Once the Facebook SDK is loaded, you can launch the Facebook Login flow to authenticate users and retrieve their WhatsApp Business Account (WABA) ID.
- The following JavaScript snippet defines a function that triggers the Facebook Login flow. When a user logs in, the script retrieves an access token, which is required to fetch the WABA ID for further setup
javascript<script> // Facebook Login with JavaScript SDK function launchWhatsAppSignup() { // Launch Facebook login FB.login(function (response) { if (response.authResponse) { const accessToken = response.authResponse.accessToken; // Use this token to call the debug_token API and get the shared WABA's ID } else { console.log('User cancelled login or did not fully authorize.'); } }, { config_id: '<CONFIG_ID>', // Replace with your Configuration ID response_type: 'code', // Must be set to 'code' for System User access token override_default_response_type: true, extras: { setup: { solutionID: '<SOLUTIONID>' // Solution ID goes here } } }); } </script>-
Configuration details:
CONFIG_ID: Replace with your configuration ID, described in the Set up your configuration ID section.SOLUTIONID: Replace with your solution ID, which identifies the WhatsApp Business integration.
-
The following HTML snippet creates the button that, when clicked, initiates the Facebook Login flow.
html<button onclick="launchWhatsAppSignup()" style="background-color: #1877F2; border: 0; border-radius: 4px; color: #fff; cursor: pointer; font-family: Helvetica, Arial, sans-serif; font-size: 16px; font-weight: bold; height: 40px; padding: 0 24px;"> Login with Facebook </button>- When a user clicks the Login with Facebook button, the script prompts them to log in and authorize access.
- If the user grants permission, the script retrieves an access token, which is required to fetch the associated WABA ID for further setup.
Billing
End clients onboarded through the embedded signup (configured for a partner solution) share Infobip's credit line. Infobip handles billing for any end-client API usage and charges the solution to you. You can bill your clients directly for your value-added solution or service.
Customer registration
After customers complete the sender registration flow on your site, notify Infobip by triggering the designated API endpoint. This step ensures that the WhatsApp Business Account (WABA) ID is shared with Infobip for further processing.
- Endpoint:
POST/whatsapp/1/embedded-signup/registrations/share-waba
curl -X POST "https://api.infobip.com/whatsapp/1/embedded-signup/registrations/share-waba" \
  -H 'Authorization: {authorization}' \
  -H 'Content-Type: application/json' \
  -d '{
    "businessAccountId": "WABA_ID"
  }'
Webhook registration event
Infobip sends real-time notifications to your webhook when there are changes to a WhatsApp Business Account (WABA) registration status. The possible statuses are:
IN_PROGRESS: Registration is ongoing.FAILED: Registration was unsuccessful.FINISHED: Registration is complete.
To enable webhook notifications, provide your webhook URL to your Infobip account manager or contact Support (opens in a new tab).
{
  "businessAccountId": 102384266223093,
  "status": "FINISHED",
  "createdAt": "2023-06-07T15:17:37.444+0000",
  "lastModifiedAt": "2023-08-28T17:01:04.904+0000",
  "senders": [
    {
      "phoneNumberId": "122098754222007518",
      "displayPhoneNumber": "+1 313-513-8538",
      "type": "CLOUD",
      "status": "FINISHED"
    },
    {
      "phoneNumberId": "119302867930080",
      "displayPhoneNumber": "+1 213-218-6042",
      "type": "CLOUD",
      "status": "FAILED"
    }
  ]
}
Automatic resource association
The system can automatically associate WhatsApp resources with an application ID and entity ID during the WhatsApp sender registration through the embedded signup flow. This feature links WhatsApp resources to the correct application and entity IDs as they are created, simplifying the management of multiple customer accounts. For example, when a Tech Provider receives a subscription event with a default entity ID, they can quickly assign the appropriate entity and application IDs for a new customer, ensuring smooth onboarding and efficient resource allocation.
The system will automatically assign the entity ID to match the end user's Business Manager ID received from the registration event. Users can modify the entity IDs afterward if necessary.
Implement template and traffic management APIs
To manage WhatsApp traffic effectively, you can use APIs that support message sending, template configuration, service orchestration, and reporting. Whether you are using the standalone WhatsApp API or integrating through Infobip's unified solutions like Messages API and CPaaS X, these tools help you scale, automate, and maintain compliant communications with users across the full messaging lifecycle.
WhatsApp standalone API
When you send a WhatsApp message to an end user's device, you are sending an outbound message. There are several types of WhatsApp messages:
- Message templates: Pre-defined and pre-approved templates used to send text, images, videos, locations, documents, carousels, and buttons, with options to configure SMS failover.
- Free-form messages: Messages you can use when the end user contacts you within a certain timeframe. You can send text, images, audio, video, stickers, locations, or contacts without Meta's pre-approval. They can include interactive elements like buttons, lists, or product messages for user engagement.
When an end user sends a WhatsApp message from their device to your phone number, it is an inbound message. The inbound message is routed through the Infobip platform and delivered to you. Common actions with inbound messages include:
- Marking messages as read to indicate to the end user that their message has been seen.
- Downloading media and metadata shared by the end user.
Learn more about integrating outbound and inbound WhatsApp traffic (opens in a new tab).
Service management
Effective service management for WhatsApp business solution involves maintaining seamless communication and engagement. Key aspects include:
- Template management: Design and maintain pre-defined message structures that comply with WhatsApp guidelines to ensure consistent communication with customers.
- Sender management: Manage registered WhatsApp sender to align with business representation and maintain high communication standards.
Implementing robust service management practices ensures compliance, reliability, and optimal performance, leading to better customer interactions on the WhatsApp business solution platform.
Learn more about WhatsApp business solution service management (opens in a new tab).
Message status reports
Message status reports provide insights into the delivery and engagement of messages in WhatsApp business solution management:
- Delivery reports (opens in a new tab): Confirm the successful message transmission from the business to the recipient's device, ensuring message reachability.
- Seen reports (opens in a new tab): Indicate when a recipient has viewed the message, offering deeper insights into user engagement.
Effective management of these reports involves capturing, processing, and interpreting data from Infobip APIs, allowing businesses to monitor message effectiveness and refine their communication strategies.
Messages API
WhatsApp outbound and inbound traffic can also be managed through the Messages API, which integrates multiple messaging channels into a single interface. Instead of using separate APIs for each channel, you can manage all channels with one API.
- Unified endpoint: All channels use the same endpoint, enabling consistent message sending, receiving, and other actions across all channels.
- Future-proof solution: Ideal for businesses using multiple channels or planning to expand, reducing integration efforts and simplifying management.
Find more information in the Messages API product documentation and API details (opens in a new tab) page.
CPaaS X
CPaaS X is our next-generation Communication Platform as a Service (CPaaS) API stack designed to make your messaging experience more scalable, modular, and efficient.
With CPaaS X, you are already leveraging its capabilities during the automatic resource association process. This feature automatically creates and assigns entity ID and application ID during WhatsApp sender registration, reducing manual effort and ensuring smooth onboarding.
Beyond this, CPaaS X provides additional features that you can explore and integrate, including advanced messaging capabilities, analytics, automation, and seamless scaling options. Take advantage of CPaaS X to streamline your messaging setup and explore how its modular and flexible APIs can further support your business needs.
Validate and test your setup
Once you have set up the sender registration process, ensure it is accessible on your website, where you can test it. To test embedded signup, simulate a customer completing the flow using test business credentials generated from your platform. To validate that your sender registration setup is correct, confirm the following:
- Successfully register a number using the sender registration flow hosted on your platform.
- Successfully send messages on behalf of your customer using Infobip traffic APIs, such as WhatsApp (opens in a new tab) or Messages API (opens in a new tab), based on your preference.
If your app is not yet reviewed, you can only onboard test accounts through the sender registration process. The WhatsApp business account (WABA) you create for testing cannot be associated with your Tech Provider's Facebook Business Manager. You must create a new Business Manager account using the sender registration process.
To successfully create a test WABA, the person performing the setup must have admin rights on both the newly created Business Manager account (admin rights are automatically assigned upon creation) and the Tech Provider Business Manager account. This limitation does not apply to production environments.
Launch your setup
You are almost there! 🚀
Once your app has been reviewed and your sender registration flow is fully set up and tested, it is time to go live.
In your App Dashboard, switch the App Mode to Live, and you are ready to start onboarding customers and scaling your WhatsApp Business integration with Infobip! ![]()