API authentication
To use Infobip APIs in your integration, you need to use an authentication method. For private apps, you may wish to embed the authentication credentials in your app.
For apps used by multiple accounts, you may need to capture the user’s Infobip account information to connect each user with the right functionality within the integration.
A common use case for this is to connect an Infobip account to an account in an external platform. You can get account, user and additional information in a token using OAuth 2.0.
Select your authentication method
The following table provides information that helps you choose which authentication method to choose.
| Authentication method | API key | OAuth 2.0 |
|---|---|---|
| Security level | Moderate – can be intercepted or shared easily | High – Tokens are short-lived and scoped |
| Implementation effort | Simple to implement and use | Requires setup for token management and flows |
| Good for API integrations | ✔ | ✔ |
| Get account and user information | ✖ | |
| Use Infobip APIs | ✔ | ✔ |
| Use for embedded UIs (settings pages, context cards) | ✖ | ✔ |
| Best for | Private apps used on one account | Apps used by multiple accounts |
| Use scopes for best results | ✔ | ✔ |
API keys
If using API keys, ensure the proper API scopes have been assigned to the API key. API keys are associated with an Infobip account, so take steps to ensure that the keys are encrypted and secure.
OAuth 2.0
OAuth 2.0 is an authorization protocol that enables data from another site to be shared by passing identification tokens instead of login credentials.
OAuth enables your Exchange app to request authorization for details of the user's Infobip web interface account, and to access approved API functionality, without getting their password.
In other words, your application requests a token that allows your app to act on behalf of the Infobip web interface user. The overall authorization flow looks like this:
User experience for your app
Users installing your app or authenticating via OAuth use the following steps:
- From your site or activation page, the user activates a link that redirects them to Infobip.
- If needed, the user logs into their Infobip account.
- The user reviews the permissions (scopes) needed for the OAuth connection.
- The user accepts the needed permissions or cancels the installation.
- If the user cancels the installation, they are rerouted to the referring webpage.
- If the user accepted the permissions, authentication is complete and the user is redirected to the Redirect URL.
Using OAuth 2.0 to authenticate users in your integration or platform
To use OAuth in your app:
- Create your app shell to create a unique Client ID and Client Secret for your app (like a username and password for the OAuth flow) and assign the scopes that your app will need.
- Enter the redirect URI for the app to be used during the OAuth flow.
- Get the Client Id and Client Secret for your app. These values are unique to your app and help communicate with Infobip. Use the copy icon to copy the secret to your clipboard.
- Create your site activation link. In your webpage or platform, create a link where users can connect to Infobip.
Set up your redirect uri
If an authenticated user approves the app and the client id and secret are valid, Infobip creates a request to the redirect_uri with a temporary code as query parameter and a state parameter you provided it in Step 1.
[redirect_uri?code={code}&state={state}]
You may match the state to validate that the request was generated for this OAuth flow.
code- [Required] - Authorization code of 16-character hexadecimal string.state- [Optional] - Same as in the previous request.
For example: [https://www.my-app.com/?code=822762fa24e04975&state=xyz]
This is your Authorization code. Authorization codes can only be exchanged once, and they expire one minute after creation.
Exchange the code for a token
In the next stage, you need to exchange the code for a token.
-
After completing step 2 (Create your site activation link) successfully, exchange the code for the access token by calling with a POST method to the following Get Token endpoint:
[https://oneapi.infobip.com/exchange/1/oauth/token] -
Pass the following values as URL encoding body request (--data-urlencode):
client_id- [Required] - Public app identifier of 32-character hexadecimal stringclient_secret- [Required] - Private app identifier that is a hexadecimal representation of a 256-bit key that uses AES encrypt algorithmcode- [Required] - Temporary authorization code received from the authorization server in step 2redirect_uri- [Required] - Identical redirect_uri from authorization request since step 1grant_type- [Required] - It should be set to authorization_code by standard
For example:
    curl --location --request POST 'https://oneapi.infobip.com/exchange/1/oauth/token' \
    --header 'Accept: application/json' \
    --header 'Content-Type: application/x-www-form-urlencoded' \
    --data-urlencode 'client_id=d5e47f02d627e390d615c2e93f168eb6' \
    --data-urlencode 'client_secret=YED8Q0KHeYgQxtjdUkR376Uxu0/zdvwAVZb3ZQ3GGZU=' \
    --data-urlencode 'code=822762fa24e04975' \
    --data-urlencode 'redirect_uri=https://www.my-app.com' \
    --data-urlencode 'grant_type=authorization_code'
You receive a JSON response containing the token and more user information:
- token - [Required] - Infobip token
- tokenType - [Required] - IBSSO
- accountKey - [Required] - Hexadecimal String in representation of accountId from request
- userKey - [Required] - Hexadecimal String in representation of userId from request
- username - [Required] - Infobip web interface username registered
- email - [Required] - Infobip web interface email registered
- locale - [Required] - Infobip web interface language defined by user
- roles - [Optional] - List of Infobip web interface user roles
- groups - [Optional] - List of Infobip web interface user groups
The following is a JSON example:
{ "token": "3d7908aa-7b8c-4c5a-94bf-5cdeef18947b", "tokenType": "IBSSO", "accountKey": "8F0792F86035A9F4290821F1EE6BC06A", "userKey": "F443BCAEB8517F7159F44D0E8CFE725D", "username": "developeruser", "email": "developer@infobip.com", "locale": "en-US", "roles": [ { "id": 79, "name": " Manager 1" }, { "id": 81, "name": " Manager 2" }, { "id": 1297, "name": " Manager 3" }, { "id": 1393, "name": " Designer" }, { "id": 1394, "name": " Supervisor" } ], "groups": [ { "id": 54004, "name": "Group1" }, { "id": 54242, "name": "Group2" }, { "id": 749187, "name": "Group3" } ] } This is your OAuth token. Tokens expire one minute after creation.
Using your OAuth token
Now that you have the token, you can use it as an authentication method when calling Infobip endpoints.
You must add the token to the headers to be authorized:
- Authorization - [Required] -
{tokenType + " " + token}
The following is an example (to send an SMS message):
curl -L -X POST 'https://3vzg6v.api.infobip.com/sms/2/text/advanced' \ -H 'Authorization: IBSSO 3d7908aa-7b8c-4c5a-94bf-5cdeef18947b' \ -H 'Content-Type: application/json' \ -H 'Accept: application/json' \ --data-raw '{ "messages": [ { "destinations": [ { "to": "41793026727" } ], "from": "InfoSMS", "text": "This is a sample message" } ] }' Refresh token
To continue access to the account’s Infobip services, refresh the token before it is expired. To do this, make another call to the Get Token endpoint:
[ https://oneapi.infobip.com/exchange/1/oauth/token ]
code- [Required] – Authorization token acquired in step 4.grant_type- [Required] – refresh_token to extend your token
If the request is valid, the response will be the same as the example above.
Continue to refresh the token as needed.
Using OAuth 2.0 for UI embedded in Infobip web interface
You can embed your own UI in the Infobip web interface for Conversations Context Cards, or App Settings Pages. You can use OAuth to get customer account information to enhance your UI’s functionality. To use OAuth in embedded UI:
- Create your app shell to create a unique Client ID and Client Secret for your app (like a username and password for the OAuth flow).
- Set the redirect URI for the app to be used during the OAuth flow.
- Get the Client Id and Client Secret for your app. These values are unique to your app and help communicate with Infobip. Use the copy icon to copy the secret to your clipboard.
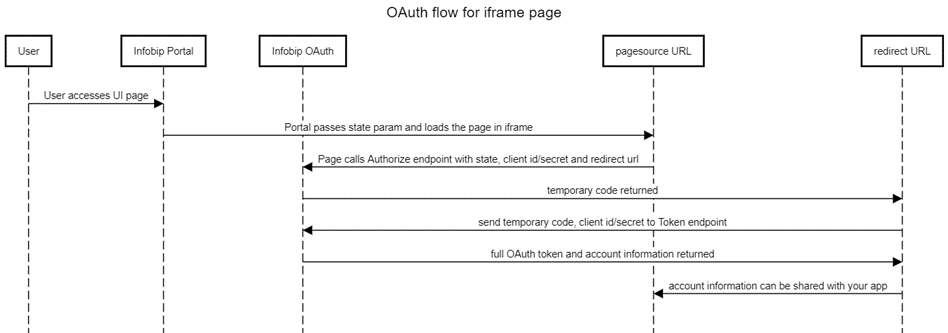
Getting customer account information via OAuth
Create a step in your app onboarding flow to authorize your app with Infobip. Usually, this can be triggered on your app's configuration and/or context card page.
To get the client's access code:
-
When Infobip loads your page in iframe, it passes a user state parameter in the URL. For example:
https://yoursite.com/contextcardui?state= WeHH_yy2irpl8UYYour app should temporarily store this state value and send it for authorization with a GET method using this Authorize endpoint:
https://oneapi.infobip.com/exchange/1/oauth/authorizeYou must pass the following values as query parameters:
response_type- [Required] - Code indicating that you want an authorization code as the responseclient_id- [Required] - Public app identifier of 32-character hexadecimal stringstate- [Required] - Value included in the redirect request to your appredirect_uri- [Required] URL to redirect the request to your appscope- [Required] - Additional levels of access
Example:
httphttps://oneapi.infobip.com/exchange/1/oauth/authorize?response_type=code&client_id=d5e47f02d627e390d615c2e93f168eb6&state=xyz&redirect_uri=https://www.my-app.com&scope=api_read -
If the page was loaded by an authenticated user and the client id and secret are valid, Exchange creates a request to the
redirect_uriwith a temporary code as query parameter and also thestateparameter you provided it in Step 1.redirect_uri?code={code}&state={state}You may match the state in order to validate that the request was generated for this OAuth flow.
code- [Required] - Authorization code of 16-character hexadecimal string.state- [Optional] - Same as in the previous request.
Example:
httphttps://www.my-app.com/?code=822762fa24e04975&state=xyzThis is your Authorization code. Authorization codes can only be exchanged once, and they expire one minute after creation.
-
After completing step 2 successfully, exchange the code for the access token by calling with a POST method to the following Get Token endpoint:
https://oneapi.infobip.com/exchange/1/oauth/tokenYou must pass the following values as the URL encoding body request (
--data-urlencode):client_id- [Required] - Public app identifier of 32-character hexadecimal stringclient_secret- [Required] - Private app identifier that is a hexadecimal representation of a 256-bit key that uses AES encrypt algorithmcode- [Required] - Temporary authorization code received from the authorization server in step 2redirect_uri- [Required] - Identicalredirect_urifrom authorization request since step 1grant_type- [Required] - It should be set toauthorization_codeby standard
For example:
curlcurl --location --request POST 'https://oneapi.infobip.com/exchange/1/oauth/token' \ --header 'Accept: application/json' \ --header 'Content-Type: application/x-www-form-urlencoded' \ --data-urlencode 'client_id=d5e47f02d627e390d615c2e93f168eb6' \ --data-urlencode 'client_secret=YED8Q0KHeYgQxtjdUkR376Uxu0/zdvwAVZb3ZQ3GGZU=' \ --data-urlencode 'code=822762fa24e04975' \ --data-urlencode 'redirect_uri=https://www.my-app.com' \ --data-urlencode 'grant_type=authorization_code'You receive a JSON response containing the token and more user information:
- token - [Required] - Infobip token
- tokenType - [Required] - IBSSO
- accountKey - [Required] - Hexadecimal String in representation of accountId from request
- userKey - [Required] - Hexadecimal String in representation of userId from request
- username - [Required] - Infobip web interface username registered
- email - [Required] - Infobip web interface email registered
- locale - [Required] - Infobip web interface language defined by user
- roles - [Optional] - List of Infobip web interface user roles
- groups - [Optional] - List of Infobip web interface user groups
The following is a JSON example:
json{ "token": "3d7908aa-7b8c-4c5a-94bf-5cdeef18947b", "tokenType": "IBSSO", "accountKey": "8F0792F86035A9F4290821F1EE6BC06A", "userKey": "F443BCAEB8517F7159F44D0E8CFE725D", "username": "developeruser", "email": "developer@infobip.com", "locale": "en-US", "roles": [ { "id": 79, "name": " Manager 1" }, { "id": 81, "name": " Manager 2" }, { "id": 1297, "name": " Manager 3" }, { "id": 1393, "name": " Designer" }, { "id": 1394, "name": " Supervisor" } ], "groups": [ { "id": 54004, "name": "Group1" }, { "id": 54242, "name": "Group2" }, { "id": 749187, "name": "Group3" } ] } -
Now that you have the token, you can use it as authentication method when calling Infobip endpoints.
You must add the token to the headers to be authorized:
Authorization - [Required] - {tokenType + " " + token}Example (to send an SMS message (opens in a new tab)):
curlcurl -L -X POST 'https://3vzg6v.api.infobip.com/sms/2/text/advanced' \ -H 'Authorization: IBSSO 3d7908aa-7b8c-4c5a-94bf-5cdeef18947b' \ -H 'Content-Type: application/json' \ -H 'Accept: application/json' \ --data-raw '{ "messages": [ { "destinations": [ { "to": "41793026727" } ], "from": "InfoSMS", "text": "This is a sample message" } ] }'
Accessing the customer's account on their behalf for single-page applications
For applications that cannot store a client secret, such as native or single-page apps, use the Proof Key for Code Exchange (PKCE) flow.
To get the client's access code:
-
When Infobip loads your page in iframe, it will pass a user state parameter in the URL. For example:
https://yoursite.com/contextcardui?state= WeHH_yy2irpl8UYYour app should temporarily store this state value and send it for authorization with a GET method:
https://oneapi.infobip.com/exchange/1/oauth/authorizePass the following values as query parameters:
response_type- [Required] - Code indicating that you want an authorization code as the responseclient_id- [Required] - Public app identifier of 32-character hexadecimal stringstate- [Required] - Value included in the redirect request to your app.redirect_uri- [Required] URL to redirect the request to your appscope- [Required] - Additional levels of accesscode_challenge- [Required] - Base64-URL-encoded without padding string of the SHA256 hash of the code verifier
For example:
httphttps://oneapi.infobip.com/exchange/1/oauth/authorize?code_challenge=pmWkWSBCL51Bfkhn79xPuKBKHz__H6B-mY6G9_eieuM&response_type=code&client_id=d5e47f02d627e390d615c2e93f168eb6&state=xyz&redirect_uri=https://www.my-app.com&scope=api_read -
If the page was loaded by an authenticated user and the client id and secret are valid, Exchange creates a request to the
redirect_uriwith a temporary code as query parameter and also thestateparameter you provided it in Step 1.redirect_uri?code={code}&state={state}You may match the state in order to validate that the request was generated for this OAuth flow.
code- [Required] - Authorization code of 16-character hexadecimal stringstate- [Optional] - Same that in the previous request
For example:
https://www.my-app.com/?code=822762fa24e04975&state=xyzAuthorization codes can only be exchanged once, and they expire one minute after creation.
-
After completing the previous step successfully, exchange the code for the access token by calling with a POST method to the following Get Token endpoint:
https://oneapi.infobip.com/exchange/1/oauth/tokenPass the following values as URL encoding body request (
--data-urlencode):client_id- [Required] - Public app identifier of 32-character hexadecimal stringcode_verifier- [Required] - Cryptographic random string using the characters A-Z, a-z, 0-9, and the punctuation characters -.~, between 43 and 128 characters long (recommended)code- [Required] - Temporary authorization code received from the authorization server in step 2redirect_uri- [Required] - Identical redirect_uri from authorization request since step 1grant_type- [Required] - It should be set toauthorization_codeby standard
For example:
curlcurl --location --request POST 'https://oneapi.infobip.com/exchange/1/oauth/token' \ --header 'Accept: application/json' \ --header 'Content-Type: application/x-www-form-urlencoded' \ --data-urlencode 'client_id=d5e47f02d627e390d615c2e93f168eb6' \ --data-urlencode 'code_verifier=123' \ --data-urlencode 'code=822762fa24e04975' \ --data-urlencode 'redirect_uri=https://www.infobip.com' \ --data-urlencode 'grant_type=authorization_code'You receive a JSON response containing the token and more user information:
token- [Required] - Infobip tokentokenType- [Required] - IBSSOaccountKey- [Required] - Hexadecimal String in representation of accountId from requestuserKey- [Required] - Hexadecimal String in representation of userId from requestusername- [Required] - Infobip web interface username registeredemail- [Required] - Infobip web interface email registeredlocale- [Required] - Infobip web interface language defined by userroles- [Optional] - List of Infobip user rolesgroups[Optional] - List of Infobip web interface user groups
Now that you have the token, you can use it as authentication method when calling some Infobip endpoint:
Infobip-protected resource endpoint
GET https://portal.infobip.com/api/amg/exchange/1/apps/\{appId\}/oauthYou have to add the following header to be authorized:
Authorization - [Required] - {tokenType + '" " + token}The example JSON response is:
json{ "clientId": "d5e47f02d627e390d615c2e93f168eb6", "clientSecret": "YED8Q0KHeYgQxtjdUkR376Uxu0/zdvwAVZb3ZQ3GGZU=", "appId": "3bb98d89-af5d-4a56-8ccd-c3e0e2ae976b", "redirectUri": "https://www.infobip.com", "signingSecret": "H+WPXpCaBeLkd5pukqMoqWLZnL/5yEscexA73H7Uffw=" }