Developing with Infobip
User journeys and information flows

User journeys and information flows

Each app has its own functionality, however, the customer experience follows the same overall flow for apps of the same type. Most apps have an installation or setup phase and an execution phase.

App installation and setup

The app installation, setup, and configuration phases are where a user connects the app to their account, sets any app permissions, enters credentials for the app or the platform the app connects to, and defines any account-level app settings.

App installation

App installation and setup vary depending on whether your app is intended for private use only or you plan to list it in the Exchange marketplace.

Private access apps

If your app is intended only for your use, installation and setup are optional.

To access the configuration page, from the Publish tab, click the three-dot menu for your app, and select Configure.

The configuration page loads as an iframe within the web interface.
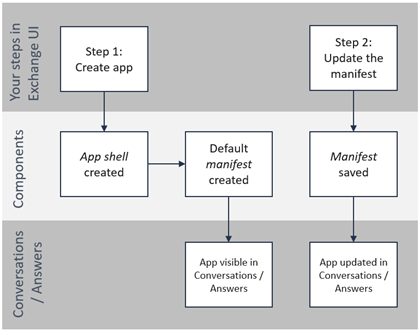
Private app

Publicly available apps

If your app is listed in the Exchange marketplace, installation is required for customers to use the app. The setup step is optional, but highly recommended.

App activation

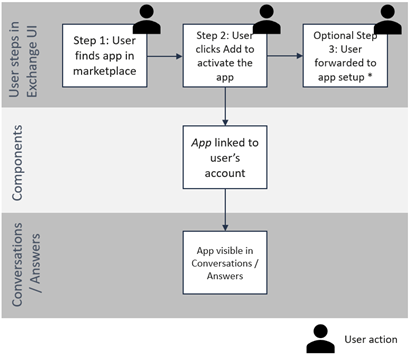
Users can activate an app by finding the listing on the Exchange marketplace, then clicking the Add button. For Answers bot blocks and Conversations context cards, the app is immediately available and displayed within Answers or Conversations.

Components used:

  • App shell
App activation

App setup

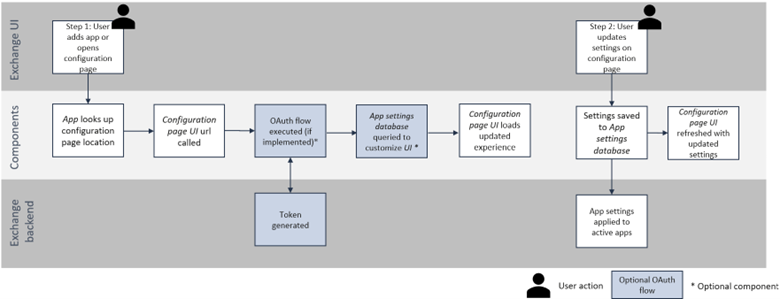
If a configuration page is defined for an app, users access the app setup immediately after installing the app. Users are forwarded to the Configuration page, which loads as an iframe within the web interface.

Users access the configuration page at any time by finding their installed apps in the My Apps tab of Exchange. To re-open the configuration page (if available), they can click the Open button in the listing. The configuration page loads as an iframe within the web interface.

Components used:

  • App shell
  • Configuration page UI
  • App settings database
App setup

App execution

The following sections describe what happens during the app execution phase and the components required for the app types:

  • Context card
  • Answers bot block
  • Moments - Flow element
  • People data sync

Context card execution (iframe load)

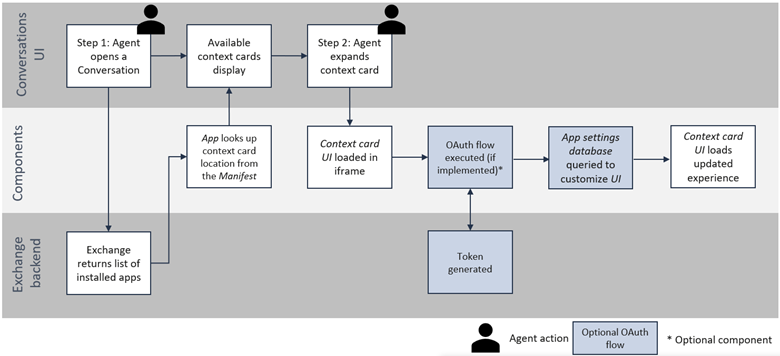
If your context card needs information about the Infobip account, the Conversations agent, or the end user, you need to implement the OAuth flow to capture this information.

Components used during context card execution

  • App shell
  • Manifest
  • Context card UI
  • App settings database (if used)
App execution

Answers bot block creation

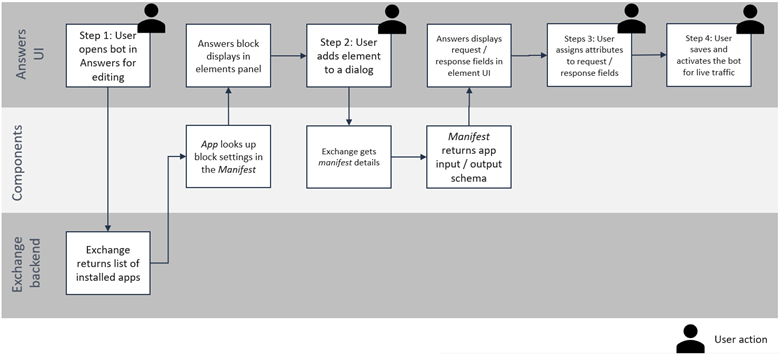
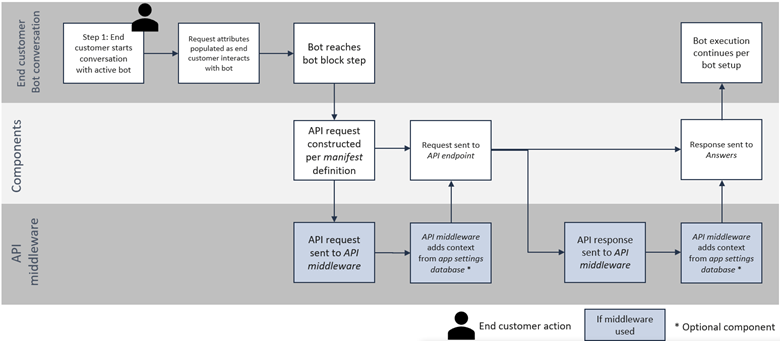
The Answers bot block is available to bot designers in the Answers chatbot editor. Designers can place the bot block at any step of their overall chatbot flow, select input and output fields from the chatbot’s list of attributes, and activate their bot for use. During bot setup, Answers displays all bot blocks activated for that account as chatbot elements. When the block is added to a chatbot flow, the user can select the attributes for the Request and Response, as defined in the app’s Manifest.

Components used during Answers bot block creation

  • App shell
  • Manifest
  • API endpoint
Answers bot creation

Answers bot block execution

When an Answers bot block is active, and a user interacts with it, the bot block is activated. Answers uses dynamic attributes in the bot to populate the input fields to construct the API call to your endpoint or middleware. As needed, your middleware can translate the call from Answers into the correct format for your API endpoint. Common translations include:

  • Adding account details from the App settings database to the API request
  • Adding app preferences from the App settings database to the API request
  • Restructuring the API request if the API endpoint uses header parameters (Currently only Query and Path parameters are supported by Exchange)

Components used during Answers bot block execution

  • App shell
  • Manifest
  • API endpoint
  • API middleware (if used)
  • App settings database (if used)

Data available during Answers bot block execution

When executing your app from within Infobip, it calls the endpoint from the request/uri that you specify in your manifest and sends information that identifies the account.

The signature is created based on two elements:

  • the timestamp value
  • the request body

You can find the signature in one of the 3 headers called “X-Ib-Exchange-Req-Signature”. This header contains the timestamp value followed by the request body you are using, with no blank spaces nor separators as the data (timestamp + body).

Headers:

  • X-Ib-Exchange-Req-AccountKey: [Encrypted accountId]
  • X-Ib-Exchange-Req-Signature: [Encrypted timestamp + body]
  • X-Ib-Exchange-Req-Timestamp: [Raw timestamp]

Example:


    {
      "user-agent": "Java-http-client/20",
      "content-length": "21",
      "content-type": "application/json",
      "x-forwarded-for": "193.105.74.4",
      "x-forwarded-host": "appendpoint.free.beeceptor.com",
      "x-forwarded-proto": "https",
      "x-ib-exchange-req-accountkey": "D8ADC25936426DE0279BC0C4EA791D9B",
      "x-ib-exchange-req-signature": "e5adabc728a6f1a561f13b043e11c1acb0a5cff61948aec691c86d2bd8ff3fcd",
      "x-ib-exchange-req-timestamp": "1689697378017",
      "accept-encoding": "gzip"
    }

Body:

  • request body: [Raw Data]  
  • request sample: {"email":"[email protected]"} 
  • request sample: {"order_id": "1212721005877-01"} 

Example:


    {
      "order_id": 152512
      "email": "[email protected]"
    }

Validate your signature message

  1. Get your app's Signing Secret (available in the App Shell).
  2. Extract the timestamp from the X-Ib-Exchange-Req-Timestamp header.
  3. Concatenate the timestamp and the request body you are using with no spaces nor separators between them to use it as a base_string. For example, 1667951050990{"email":"[email protected]"} for timestamp: 1667951050990 and request body: {"email":"[email protected]"}.
  4. Use your favorite MAC (Message Authentication Code) implementation with the HmacSHA256 algorithm to sign/hash the above base_string using your Signing Secret as a secret key into a hexadecimal string in lowercase.
  5. Once you have this hexadecimal text, you may compare it with the X-Ib-Exchange-Req-Signature header we sent you on the request.
Validate signature

Flow element creation

The Flow element is available in the Flow editor in Moments.

Flow designers can add functions to a customer journey, selecting the input fields and output fields that are visible in the side panel. Each function is shown in the Select element list under Integrations.

When the Flow element is used in a customer journey, the user can select the fields that are defined in the manifest.

Components used during Flow element creation

  • App shell
  • Manifest
  • API endpoint
Moments - Flow element creation

Flow element execution

When a trigger event starts a customer journey flow, the requested attributes are populated. As the flow encounters a Flow element, the attributes are used to populate the input fields to construct the API call directly to the endpoint or to your middleware. Middleware can translate the call from Flow into the correct format for your API endpoint where you are adding account details or app preferences from an app settings database.

Components used during Flow element execution

  • App shell
  • Manifest
  • API endpoint
  • API middleware (if used)
Moments - Flow element execution

People data sync execution

Depending on the needs of your app, you may want to push data from your third-party platform to People CDP, from People CDP to your third-party platform, or both. Your app middleware orchestrates the flow of data between the two platforms. Platform credentials and data mapping setup should be defined in the App setup phase.

  • To push data from third party platforms, use the tools available in the third party to identify recent changes, and use the People API (opens in a new tab) to create or update profile information.
  • To push data from People API to third party platforms, check for new or modified Person profiles (opens in a new tab) at regular intervals. Use modifiedAt and createdAt to identify the recent changes, then use the third party platform’s tools to push the data.

Components used during People data sync execution

  • App shell (optional, used only for marketplace listings)
  • API middleware
  • API endpoint
  • App settings database (if used)

Authorization and OAuth 2.0 flows

To create different experiences for your app's users, you may need to need to capture the user’s Infobip account information to connect each user with the right environment. You can get account, user, and additional information in a token using OAuth 2.0.

OAuth 2.0 is an authorization protocol that enables data from another site to be shared by passing identification tokens instead of login credentials.

OAuth enables your Exchange app to request authorization for details of the user's Infobip web interface account without getting their password.

In other words, your application requests a token that allows your app to act on behalf of the Infobip web interface user. The overall authorization flow looks like this:

OAuth Flow

You need to do the following:

  • Create your app shell to create a unique Client ID and Client Secret for your app (like a username and password for the OAuth flow).
  • Set the redirect URI for the app to be used during the OAuth flow.
  • Get the Client Id and Client Secret for your app. These values are unique to your app and help communicate with Infobip. Use the copy icon to copy the secret to your clipboard.

Used on

  • Context card UI
  • Full-page UI
  • Configuration page UI

Getting customer account information via OAuth

Create a step in your app onboarding flow to authorize your app with Infobip. Usually, this can be triggered on your app's configuration and/or context card page.

Get the client's access code

  1. When Infobip loads your page in iframe, it passes a user state parameter in the URL. For example:

    https://yoursite.com/contextcardui?state= WeHH_yy2irpl8UY

    Your app should temporarily store this state value and send it for authorization with a GET method using this Authorize endpoint:

    https://oneapi.infobip.com/exchange/1/oauth/authorize

    You must pass the following values as query parameters:

    • response_type - [Required] - Code indicating that you want an authorization code as the response
    • client_id - [Required] - Public app identifier of 32-character hexadecimal string
    • state - [Required] - Value included in the redirect request to your app
    • redirect_uri - [Required] URL to redirect the request to your app
    • scope - [Required] - Additional levels of access

    Example:

    http
        https://oneapi.infobip.com/exchange/1/oauth/authorize?response_type=code&client_id=d5e47f02d627e390d615c2e93f168eb6&state=xyz&redirect_uri=https://www.my-app.com&scope=api_read
     
  2. If the page was loaded by an authenticated user and the client id and secret are valid, Exchange creates a request to the redirect_uri with a temporary code as query parameter and also the state parameter you provided it in Step 1.

    redirect_uri?code={code}&state={state}

    You may match the state in order to validate that the request was generated for this OAuth flow.

    • code - [Required] - Authorization code of 16-character hexadecimal string.
    • state - [Optional] - Same as in the previous request.

    Example:

    http
        https://www.my-app.com/?code=822762fa24e04975&state=xyz
     

    This is your Authorization code. Authorization codes can only be exchanged once, and they expire one minute after creation.

  3. After completing step 2 successfully, exchange the code for the access token by calling with a POST method to the following Get Token endpoint:

    https://oneapi.infobip.com/exchange/1/oauth/token

    You must pass the following values passed as URL encoding body request (--data-urlencode):

    • client_id - [Required] - Public app identifier of 32-character hexadecimal string
    • client_secret - [Required] - Private app identifier that is a hexadecimal representation of a 256-bit key that uses AES encrypt algorithm
    • code - [Required] - Temporary authorization code received from the authorization server in step 2
    • redirect_uri - [Required] - Identical redirect_uri from authorization request since step 1
    • grant_type - [Required] - It should be set to authorization_code by standard

    Example:

    curl
        curl --location --request POST 'https://oneapi.infobip.com/exchange/1/oauth/token' \
        --header 'Accept: application/json' \
        --header 'Content-Type: application/x-www-form-urlencoded' \
        --data-urlencode 'client_id=d5e47f02d627e390d615c2e93f168eb6' \
        --data-urlencode 'client_secret=YED8Q0KHeYgQxtjdUkR376Uxu0/zdvwAVZb3ZQ3GGZU=' \
        --data-urlencode 'code=822762fa24e04975' \
        --data-urlencode 'redirect_uri=https://www.my-app.com' \
        --data-urlencode 'grant_type=authorization_code'

    You receive a JSON response containing the token and more user information:

    • token - [Required] - Infobip token
    • tokenType - [Required] - IBSSO
    • accountKey - [Required] - Hexadecimal String in representation of accountId from request
    • userKey - [Required] - Hexadecimal String in representation of userId from request
    • username - [Required] - Infobip web interface username registered
    • email - [Required] - Infobip web interface email registered
    • locale - [Required] - Infobip web interface language defined by user
    • roles - [Optional] - List of Infobip web interface user roles
    • groups - [Optional] - List of Infobip web interface user groups

    JSON example:

    json
    {
        "token": "3d7908aa-7b8c-4c5a-94bf-5cdeef18947b",
        "tokenType": "IBSSO",
        "accountKey": "8F0792F86035A9F4290821F1EE6BC06A",
        "userKey": "F443BCAEB8517F7159F44D0E8CFE725D",
        "username": "developeruser",
        "email": "[email protected]",
        "locale": "en-US",
        "roles": [
        {
        "id": 79,
        "name": " Manager 1"
        },
        {
        "id": 81,
        "name": " Manager 2"
        },
        {
        "id": 1297,
        "name": " Manager 3"
        },
        {
        "id": 1393,
        "name": " Designer"
        },
        {
        "id": 1394,
        "name": " Supervisor"
        }
        ],
        "groups": [
        {
        "id": 54004,
        "name": "Group1"
        },
        {
        "id": 54242,
        "name": "Group2"
        },
        {
        "id": 749187,
        "name": "Group3"
        }
        ]
        }
  4. Now that you have the token, you can use it as authentication method when calling Infobip endpoints.

    You must add the token to the headers to be authorized:

    Authorization - [Required] - \{tokenType + " " + token\}

    Example (to send an SMS message (opens in a new tab)):

    curl
    
        curl -L -X POST 'https://3vzg6v.api.infobip.com/sms/2/text/advanced' \
        -H 'Authorization: IBSSO 3d7908aa-7b8c-4c5a-94bf-5cdeef18947b' \
        -H 'Content-Type: application/json' \
        -H 'Accept: application/json' \
        --data-raw '{
          "messages": [
            {
              "destinations": [
                {
                  "to": "41793026727"
                }
              ],
              "from": "InfoSMS",
              "text": "This is a sample message"
            }
          ]
        }'
    

Accessing the customer's account on their behalf for single-page applications

For applications that cannot store a client secret, such as native or single-page apps, use the Proof Key for Code Exchange (PKCE) flow.

To get the client's access code

  1. When Infobip loads your page in iframe, it will pass a user state parameter in the URL. For example:

    https://yoursite.com/contextcardui?state= WeHH_yy2irpl8UY

    Your app should temporarily store this state value and send it for authorization with a GET method:

    https://oneapi.infobip.com/exchange/1/oauth/authorize

    Pass the following values as query parameters:

    • response_type - [Required] - Code indicating that you want an authorization code as the response
    • client_id - [Required] - Public app identifier of 32-character hexadecimal string
    • state - [Required] - Value included in the redirect request to your app.
    • redirect_uri - [Required] URL to redirect the request to your app
    • scope - [Required] - Additional levels of access
    • code_challenge - [Required] - Base64-URL-encoded without padding string of the SHA256 hash of the code verifier

    For example:

    http
        https://oneapi.infobip.com/exchange/1/oauth/authorize?code_challenge=pmWkWSBCL51Bfkhn79xPuKBKHz__H6B-mY6G9_eieuM&response_type=code&client_id=d5e47f02d627e390d615c2e93f168eb6&state=xyz&redirect_uri=https://www.my-app.com&scope=api_read
     
  2. If the page was loaded by an authenticated user and the client id and secret are valid, Exchange creates a request to the redirect_uri with a temporary code as query parameter and also the state parameter you provided it in Step 1.

    redirect_uri?code={code}&state={state}

    You may match the state in order to validate that the request was generated for this OAuth flow.

    • code - [Required] - Authorization code of 16-character hexadecimal string
    • state - [Optional] - Same that in the previous request

    Example:

    https://www.my-app.com/?code=822762fa24e04975&state=xyz

    Authorization codes can only be exchanged once, and they expire one minute after creation.

  3. After completing the previous step successfully, exchange the code for the access token by calling with a POST method to the following Get Token endpoint:

    https://oneapi.infobip.com/exchange/1/oauth/token

    Pass the following values as URL encoding body request (--data-urlencode):

    • client_id - [Required] - Public app identifier of 32-character hexadecimal string
    • code_verifier - [Required] - Cryptographic random string using the characters A-Z, a-z, 0-9, and the punctuation characters -.~, between 43 and 128 characters long (recommended)
    • code - [Required] - Temporary authorization code received from the authorization server in step 2
    • redirect_uri - [Required] - Identical redirect_uri from authorization request since step 1
    • grant_type - [Required] - It should be set to authorization_code by standard

    For example:

    curl
    curl --location --request POST 'https://oneapi.infobip.com/exchange/1/oauth/token' \
        --header 'Accept: application/json' \
        --header 'Content-Type: application/x-www-form-urlencoded' \
        --data-urlencode 'client_id=d5e47f02d627e390d615c2e93f168eb6' \
        --data-urlencode 'code_verifier=123' \
        --data-urlencode 'code=822762fa24e04975' \
        --data-urlencode 'redirect_uri=https://www.infobip.com' \
        --data-urlencode 'grant_type=authorization_code'

    You receive a JSON response containing the token and more user information:

    • token - [Required] - Infobip token
    • tokenType - [Required] - IBSSO
    • accountKey - [Required] - Hexadecimal String in representation of accountId from request
    • userKey - [Required] - Hexadecimal String in representation of userId from request
    • username - [Required] - Infobip web interface username registered
    • email - [Required] - Infobip web interface email registered
    • locale - [Required] - Infobip web interface language defined by user
    • roles - [Optional] - List of Infobip user roles
    • groups [Optional] - List of Infobip web interface user groups

    Now that you have the token, you can use it as authentication method when calling some Infobip endpoint:

    Infobip-protected resource endpoint

    GET https://portal.infobip.com/api/amg/exchange/1/apps/\{appId\}/oauth

    You have to add the following header to be authorized:

    Authorization - [Required] - {tokenType + '" " + token}

    The example JSON response is:

    json
    {    "clientId": "d5e47f02d627e390d615c2e93f168eb6",    "clientSecret": "YED8Q0KHeYgQxtjdUkR376Uxu0/zdvwAVZb3ZQ3GGZU=",    "appId": "3bb98d89-af5d-4a56-8ccd-c3e0e2ae976b", "redirectUri": "https://www.infobip.com",    "signingSecret": "H+WPXpCaBeLkd5pukqMoqWLZnL/5yEscexA73H7Uffw="    } 

Need assistance

Explore Infobip Tutorials

Encountering issues

Contact our support

What's new? Check out

Release Notes

Unsure about a term? See

Glossary

Research panel

Help shape the future of our products
Service Terms & ConditionsPrivacy policyTerms of use