Set up a personalized AI-powered weather forecast delivered by SMS
There are many use cases for combining AI and messaging, and your only limit is your imagination. This tutorial will guide you through setting up a personalized AI-powered weather report delivered by SMS every morning. You can also customize it to your liking or use the same principle for other AI-driven reports.
Prerequisites
- Infobip account (opens in a new tab). If you do not have one, you can easily register.
- Python 3.7 or higher installed on your machine.
- API keys for Azure OpenAI and Infobip.
- The following Python libraries installed:
openmeteo-requestsrequests-cacheretry-requestspandasopenairequestsjsonnumpy
Implementation
Step 1: Set up an Infobip account
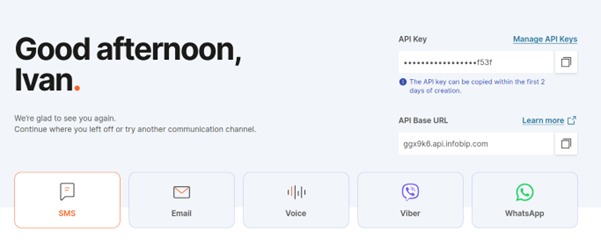
Create an Infobip account (opens in a new tab). After a quick registration, you will obtain your API Base URL and API key, which will enable you to send SMS messages. Make sure to write these two values down as they will be required later on.
Step 2: Create an Azure account
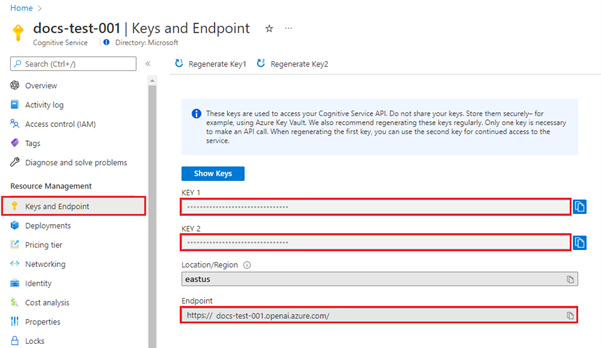
Create an account with Azure and create a new GPT-4 deployment (opens in a new tab). After creating the deployment, make sure to write down your GPT endpoint URL and key.
Step 3: Draft your app
The application flow will have three main elements:
- Open Meteo to fetch the current weather details.
- Azure OpenAI to read the Open Meteo data and transform it into a personalized message.
- Infobip SMS API to actually send the message to the user.
Step 4: Start building your app
First, create a virtual environment and install all the dependencies that we'll use:
python3 -m venv venv
source venv/bin/activate
After creating the virtual environment, install the dependencies:
pip install openmeteo-requests requests-cache retry-requests numpy pandas openai
Step 5: Set up Open Meteo
Open Meteo is both free and doesn't require an API key, so it works out of the box. First, create a function that will accept latitude and longitude as arguments and return the daily weather forecast in JSON format. This is something that we can feed into GPT and use as a basis for a witty, personalized weather forecast:
import openmeteo_requests
import requests_cache
import pandas as pd
from retry_requests import retry

def get_forecast(latitude: float, longitude: float):
    # Setup the Open-Meteo API client with cache and retry on error
    cache_session = requests_cache.CachedSession(".cache", expire_after=3600)
    retry_session = retry(cache_session, retries=5, backoff_factor=0.2)
    openmeteo = openmeteo_requests.Client(session=retry_session)

    # Make sure all required weather variables are listed here
    url = "https://api.open-meteo.com/v1/forecast"
    params = {
        "latitude": latitude,
        "longitude": longitude,
        "hourly": [
            "temperature_2m",
            "rain",
            "showers",
            "snowfall",
            "snow_depth",
            "visibility"
        ]
    }
    responses = openmeteo.weather_api(url, params=params)

    # Process the first location
    response = responses[0]

    # Process hourly data
    hourly = response.Hourly()
    hourly_temperature_2m = hourly.Variables(0).ValuesAsNumpy()
    hourly_rain = hourly.Variables(1).ValuesAsNumpy()
    hourly_showers = hourly.Variables(2).ValuesAsNumpy()
    hourly_snowfall = hourly.Variables(3).ValuesAsNumpy()
    hourly_snow_depth = hourly.Variables(4).ValuesAsNumpy()
    hourly_visibility = hourly.Variables(5).ValuesAsNumpy()

    hourly_data = {
        "date": pd.date_range(
            start=pd.to_datetime(hourly.Time(), unit="s", utc=True),
            end=pd.to_datetime(hourly.TimeEnd(), unit="s", utc=True),
            freq=pd.Timedelta(seconds=hourly.Interval()),
            inclusive="left"
        )
    }
    hourly_data["temperature_2m"] = hourly_temperature_2m
    hourly_data["rain"] = hourly_rain
    hourly_data["showers"] = hourly_showers
    hourly_data["snowfall"] = hourly_snowfall
    hourly_data["snow_depth"] = hourly_snow_depth
    hourly_data["visibility"] = hourly_visibility

    hourly_dataframe = pd.DataFrame(data=hourly_data)

    return hourly_dataframe.to_json(orient="records", lines=True)
Step 6: Set up Azure OpenAI
After obtaining the weather information, start the Azure OpenAI integration. Create an AzureLLM class with two methods defined: one to send the message and the other to read the response and extract our message:
import os
from typing import List
from openai import AzureOpenAI
from openai.types.chat import ChatCompletion, ChatCompletionMessage
from openai.types.chat.chat_completion import Choice

class AzureLLM:
    def __init__(self, model: str, deployment: str):
        super().__init__()
        self.model = model
        self.deployment = deployment
        self.client = AzureOpenAI(
            api_key=<your_key>,
            api_version=<gpt_deployment_version_you_want_to_use>,  # The latest version is 2023-10-01-preview
            azure_endpoint="https://<your_endpoint>.openai.azure.com/"
        )

    def send_message(self, messages: List[ChatCompletionMessage]) -> ChatCompletion:
        response = self.client.chat.completions.create(
            model=os.environ.get(self.model, "gpt-4-32k"),
            messages=messages
        )
        return response

    def extract_response_message(self, response: ChatCompletion) -> ChatCompletionMessage:
        # Take the first choice
        choices: List[Choice] = response.choices
        chosen_response: Choice = choices[0]
        message: ChatCompletionMessage = chosen_response.message
        return message
Step 7: Set up Infobip SMS
Finally, create a function to send an SMS message:
import requests
import json


def send_sms(message: str):
    r: requests.Response = requests.post(
        url="https://ggx9k6.api.infobip.com/sms/2/text/advanced",
        headers={
            'Authorization': f"App <your_infobip_api_key>",
            'Content-Type': 'application/json',
            'Accept': 'application/json'
        },
        data=json.dumps({
            "messages": [
                {
                    "destinations": [{"to": "<your_phone_number>"}],
                    "from": "ServiceSMS",
                    "text": f"{message}"
                }
            ]
        })
    )
    return json.dumps(r.json(), indent=4)
Step 8: Put it all together
Call these functions and introduce a descriptive prompt, instructing GPT what you would like it to do with the data that you are sending.
from gpt import AzureLLM
from forecast import get_forecast
from infobip import send_sms

# Let's check the weather forecast for Zagreb, Croatia
forecast_data = get_forecast(latitude=45.8144, longitude=15.978)

azure = AzureLLM(model="gpt-4-32k", deployment="gpt-4-32k")
response = azure.send_message(
    messages=[
        {
            "role": "system",
            "content": f"Evaluate this weather data: {forecast_data} and send a message that would fit into a SMS.
            It should be a greeting message for the user in the morning, instructing what the weather will be like,
            how to dress, and what to prepare for. Make it light and funny",
        }
    ]
)
message = azure.extract_response_message(response).content
sms_response = send_sms(message)
print(sms_response)
Several seconds after executing this, you should receive your first weather report! You can easily schedule this to be executed every morning, using a scheduler (such as cron (opens in a new tab)), or a simple script that will be running in a while loop, and only send messages at a certain time.