Let AI and WhatsApp add some fun to your photos
AI has numerous applications, ranging from highly practical to just plain fun. In this tutorial, you'll learn how to upload a photo from an end-user's WhatsApp app and have an LLM humorously roast it in the style of Monty Python, sending the response back via WhatsApp.
Prerequisites
- Infobip account (opens in a new tab). If you do not have one, you can easily register (opens in a new tab).
- JVM environment setup. Kotlin is used as a programming language in this tutorial.
- WhatsApp installed on your phone.
- Publicly accessible web server so that Infobip can send webhook requests to your app. If you're developing locally, you can use a tool like ngrok (opens in a new tab).
- A solution capable of detecting photo content and giving a comment. This tutorial shows how to use OpenAI's GPT-4o for both tasks. Step 5 (opens in a new tab) provides more information.
Java dependencies
We used spring-web for exposing an endpoint, okttp3 for talking with the Infobip and OpenAI APIs, and jackson for serialization/deserialization:
<dependencies>
        <dependency>
            <groupId>com.squareup.okhttp3</groupId>
            <artifactId>okhttp</artifactId>
            <version>4.12.0</version>
        </dependency>
        <dependency>
            <groupId>org.springframework.boot</groupId>
            <artifactId>spring-boot-starter-web</artifactId>
        </dependency>
        <dependency>
            <groupId>com.fasterxml.jackson.module</groupId>
            <artifactId>jackson-module-kotlin</artifactId>
        </dependency>
    </dependencies>
Imports that will be needed for the entire tutorial...
import com.fasterxml.jackson.annotation.JsonInclude
import com.fasterxml.jackson.databind.DeserializationFeature
import com.fasterxml.jackson.module.kotlin.jacksonObjectMapper
import com.fasterxml.jackson.module.kotlin.readValue
import okhttp3.*
import okhttp3.Headers.Companion.toHeaders
import okhttp3.MediaType.Companion.toMediaType
import okhttp3.MediaType.Companion.toMediaTypeOrNull
import okhttp3.RequestBody.Companion.toRequestBody
import org.springframework.boot.SpringApplication
import org.springframework.boot.autoconfigure.SpringBootApplication
import org.springframework.web.bind.annotation.PostMapping
import org.springframework.web.bind.annotation.RequestBody
import org.springframework.web.bind.annotation.RestController
import java.util.*
... and for starting your application:
@SpringBootApplication
class Application

const val INFOBIP_API_KEY = "<insert infobip api key>"
const val BASE_URL = "https://api.infobip.com"
const val OPENAI_API_KEY = "<insert openai api key>"

fun main(args: Array<String>) {
    SpringApplication.run(Application::class.java, *args)
}
Implementation
Step 1: Handle the request from Infobip
For Infobip to forward the WhatsApp messages, expose an endpoint that will handle those requests. The payload you will get is explained here (opens in a new tab)).
@PostMapping("/webhook")
fun handleInboundMessage(@RequestBody payload: WhatsappInboundMessagePayload) {
    val endUserPhoneNumber = payload.results[0].from
    val infobipPhoneNumber = payload.results[0].to
    val mediaUrl = payload.results[0].message.url

    println ("Got the message from $endUserPhoneNumber, sent to $infobipPhoneNumber with link to the photo $mediaUrl")
}
Step 2: Configure your sender and webhook URL
Now that a working endpoint is exposed using ngrok (opens in a new tab) or a similar tool, Infobip can access it. Be sure to inform Infobip of your endpoint's URL.
After completing the signup process, you can manage your sender numbers in your Infobip account (opens in a new tab).
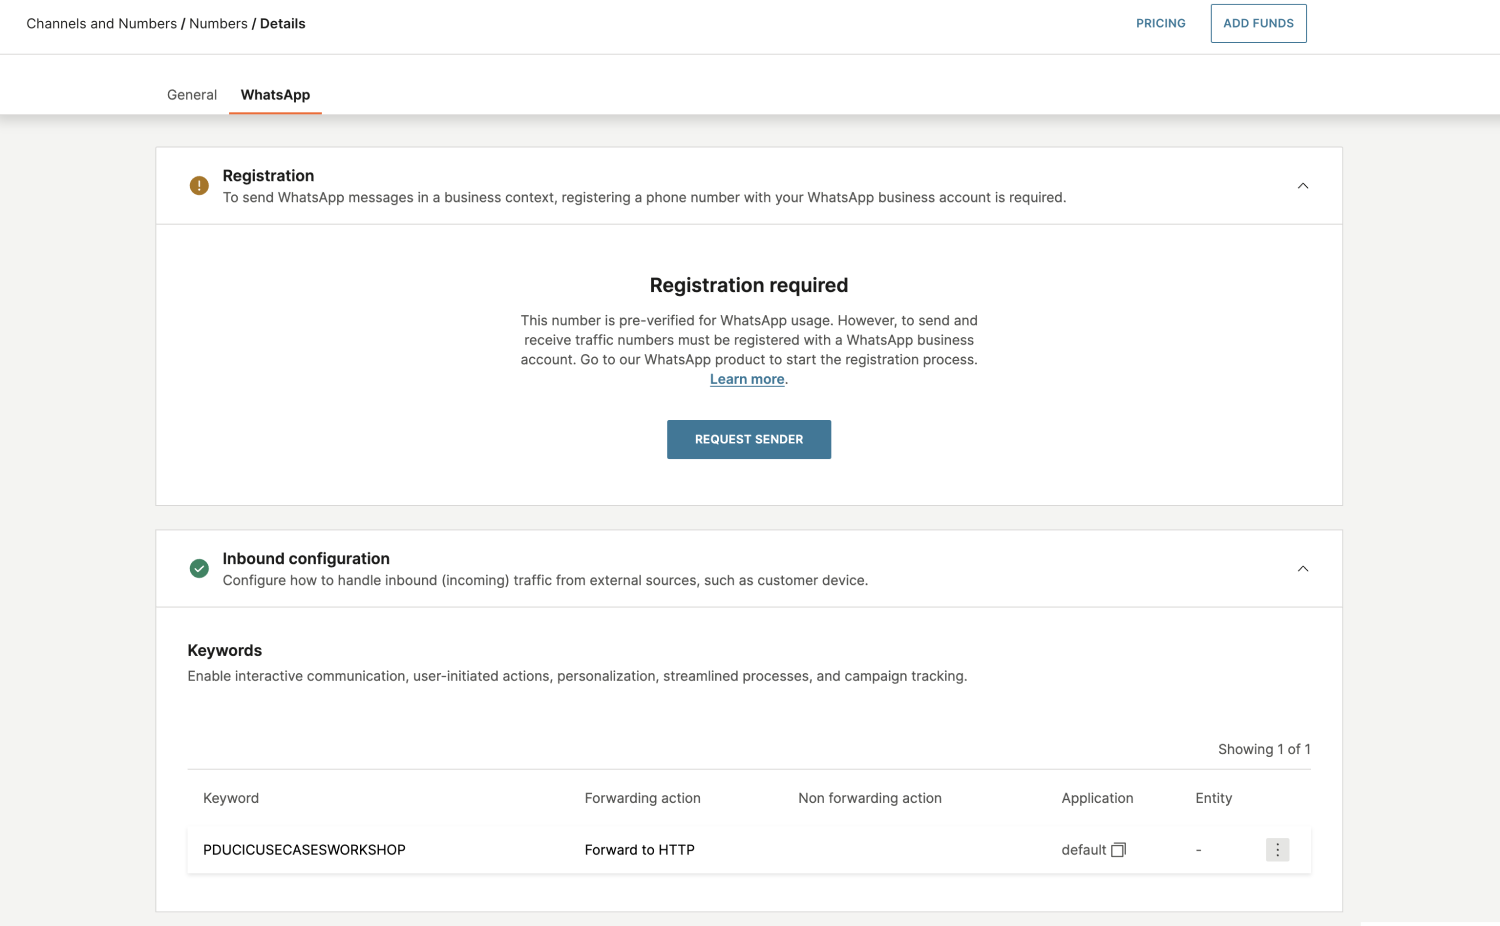
We highly recommend registering your sender. However, for simplicity, you can use the shared number and your default keyword, which corresponds to your username. In the screenshot above, the keyword is PDUCICUSECASESWORKSHOP.
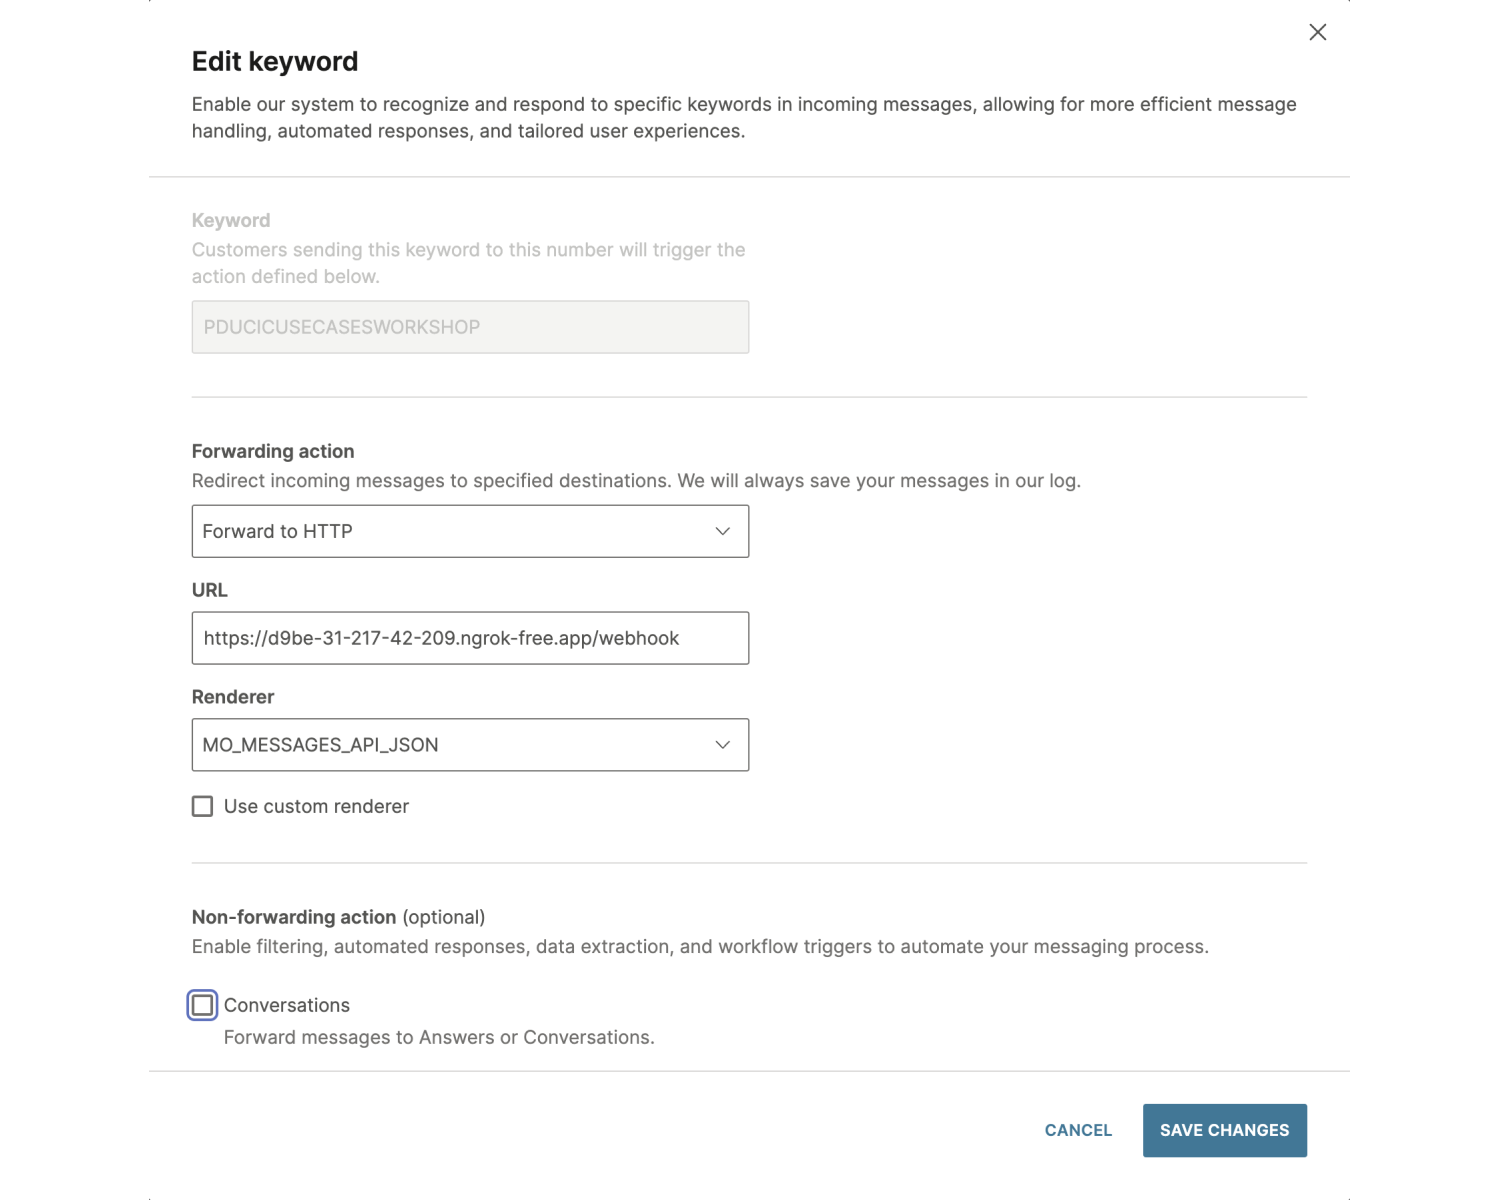
Next, configure your keyword to set the endpoint where Infobip will forward messages received by your sender (or the shared sender, along with your keyword).
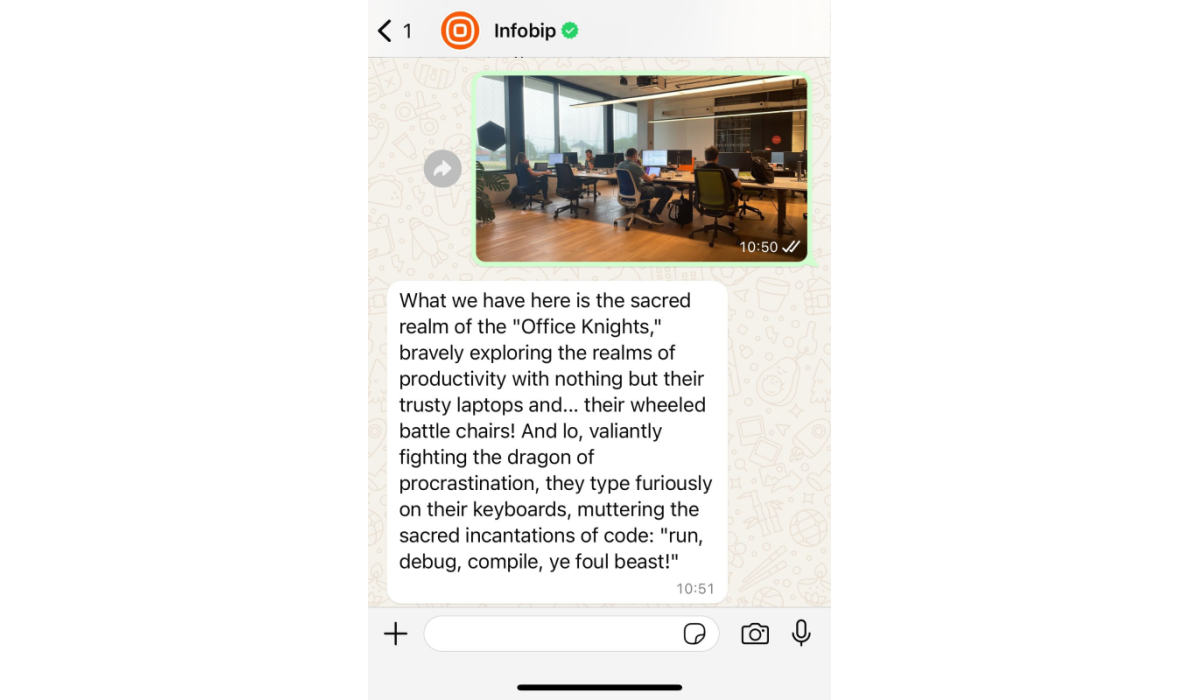
Now, you can test sending a photo to your shared sender number, including your keyword. The keyword is only required for the first message and can be omitted in subsequent ones.
Step 3: Download the photo
Once you have the photo URL, it's time to download the photo. To do this, use the Download inbound media (opens in a new tab) endpoint.
To make this work, configure your Infobip API key and set the necessary permissions.
private fun pullWhatsAppPhoto(mediaUrl: String): ByteArray {
      val client = OkHttpClient().newBuilder()
          .build()
      val request: Request = Request.Builder()
          .url(mediaUrl)
          .get()
          .addHeader("Authorization", "App $INFOBIP_API_KEY")
          .build()

      val execute = client.newCall(request).execute()
      return execute.body!!.bytes()
  }
Step 4: Use your API key and base URL
Head over to your Infobip account and copy the auto-generated API key and your base URL. Read more about the base URL here (opens in a new tab).
If there is no option to copy the API key, you can create a new API key with the appropriate API scopes to cover all the API calls needed for this tutorial:
- inbound-message:read
- whatsapp:inbound-message:read
- whatsapp:manage
- message:send
- whatsapp:message:send
Read more about API scopes here (opens in a new tab).
Step 5: Get the photo explanation
For the photo explanation, we used the GPT-4o vision capability (opens in a new tab). To do so, you first need to create an account on the OpenAI platform. Try playing with your prompt to get the most appropriate answer for you.
private fun getPhotoExplanation(photoByteArray: ByteArray): String {
       val jacksonObjectMapper = jacksonObjectMapper()
       jacksonObjectMapper.setSerializationInclusion(JsonInclude.Include.NON_NULL)
       jacksonObjectMapper.configure(DeserializationFeature.FAIL_ON_UNKNOWN_PROPERTIES, false)

       val base64Image = Base64.getEncoder().encodeToString(photoByteArray)
       val imageContent = OpenAIContent(type = "image_url", image_url = ImageUrl("data:image/jpeg;base64,$base64Image"))
       val textContent = OpenAIContent(type = "text", text = "What’s in this image? Give a funny comment in Monty Python style")
       val openAIMessages = OpenAIMessage(role = "user", content = listOf(textContent, imageContent))
       val openAIRequest = OpenAIRoot(model = "gpt-4o", max_tokens = 300, messages = listOf(openAIMessages))
       val payload = jacksonObjectMapper.writeValueAsString(openAIRequest)

       val client = OkHttpClient()
       val request = Request.Builder()
           .url("https://api.openai.com/v1/chat/completions")
           .post(payload.toRequestBody("application/json".toMediaType()))
           .headers(mapOf("Authorization" to "Bearer $OPENAI_API_KEY").toHeaders())
           .build()
       val response = client.newCall(request).execute()
       val responseString = response.body!!.string()
       val myObject: OpenAIResponse = jacksonObjectMapper.readValue(responseString)
       return myObject.choices[0].message.content
   }
Here are also some alternatives to ChatGPT4, available at the time of writing this tutorial:
- Pix2Struct (opens in a new tab) (PDF version (opens in a new tab))
- BLIP (opens in a new tab) (PDF version (opens in a new tab))
And some LLMs that could roast your photos:
Step 6: Send the WhatsApp message
After receiving the comment, the only task remaining is to send the response to the end user.
private fun sendWhatsappMessage(from: String, to: String, message: String) {
      val client = OkHttpClient().newBuilder().build()
      val whatsAppMessage = WhatsAppMessage(from, to, Content(message))
      val body = jacksonObjectMapper().writeValueAsString(whatsAppMessage)
          .toRequestBody("application/json".toMediaTypeOrNull())
      val request: Request = Request.Builder()
          .url("$BASE_URL/whatsapp/1/message/text")
          .post(body)
          .addHeader("Authorization", "App $INFOBIP_API_KEY")
          .build()
      client.newCall(request).execute()
  }
Step 7: Put it all together
Here is the complete Kotlin class, with all necessary classes and methods:
import com.fasterxml.jackson.annotation.JsonInclude
import com.fasterxml.jackson.databind.DeserializationFeature
import com.fasterxml.jackson.module.kotlin.jacksonObjectMapper
import com.fasterxml.jackson.module.kotlin.readValue
import okhttp3.*
import okhttp3.Headers.Companion.toHeaders
import okhttp3.MediaType.Companion.toMediaType
import okhttp3.MediaType.Companion.toMediaTypeOrNull
import okhttp3.RequestBody.Companion.toRequestBody
import org.springframework.boot.SpringApplication
import org.springframework.boot.autoconfigure.SpringBootApplication
import org.springframework.web.bind.annotation.PostMapping
import org.springframework.web.bind.annotation.RequestBody
import org.springframework.web.bind.annotation.RestController
import java.util.*


@SpringBootApplication
class Application

const val INFOBIP_API_KEY = "<insert infobip api key>"
const val BASE_URL = "https://qwerty.api.infobip.com"
const val OPENAI_API_KEY = "<insert openai api key>"

fun main(args: Array<String>) {
    SpringApplication.run(Application::class.java, *args)
}

@RestController
class Controller {

    private val objectMapper = jacksonObjectMapper().apply {
        setSerializationInclusion(JsonInclude.Include.NON_NULL)
        configure(DeserializationFeature.FAIL_ON_UNKNOWN_PROPERTIES, false)
    }

    private val client = OkHttpClient()

    @PostMapping("/webhook")
    fun handleInboundMessage(@RequestBody payload: WhatsappInboundMessagePayload) {
        payload.results[0].run {
            val photoByteArray: ByteArray = pullWhatsAppPhoto(message.url)
            val photoComment = getPhotoExplanation(photoByteArray)
            sendWhatsappMessage(to, from, photoComment)
        }
    }

    private fun sendWhatsappMessage(from: String, to: String, message: String) {
        val body = objectMapper.writeValueAsString(WhatsAppMessage(from, to, Content(message)))
            .toRequestBody("application/json".toMediaTypeOrNull())
        val request: Request = Request.Builder()
            .url("$BASE_URL/whatsapp/1/message/text")
            .post(body)
            .addHeader("Authorization", "App $INFOBIP_API_KEY")
            .build()
        client.newCall(request).execute()
    }

    private fun pullWhatsAppPhoto(mediaUrl: String): ByteArray {
        val request: Request = Request.Builder()
            .url(mediaUrl)
            .get()
            .addHeader("Authorization", "App $INFOBIP_API_KEY")
            .build()

        return client.newCall(request).execute().body!!.bytes()
    }

    private fun getPhotoExplanation(photoByteArray: ByteArray): String {
        val base64Image = Base64.getEncoder().encodeToString(photoByteArray)
        val imageContent = OpenAIContent(type = "image_url", image_url = ImageUrl("data:image/jpeg;base64,$base64Image"))
        val textContent = OpenAIContent(type = "text", text = "What’s in this image? Give a funny comment in Monty Python style")
        val openAIMessages = OpenAIMessage(role = "user", content = listOf(textContent, imageContent))
        val openAIRequest = OpenAIRoot(model = "gpt-4o", max_tokens = 300, messages = listOf(openAIMessages))
        val payload = objectMapper.writeValueAsString(openAIRequest)

        val request = Request.Builder()
            .url("https://api.openai.com/v1/chat/completions")
            .post(payload.toRequestBody("application/json".toMediaType()))
            .headers(mapOf("Authorization" to "Bearer $OPENAI_API_KEY").toHeaders())
            .build()
        val response = client.newCall(request).execute()
        val responseString = response.body!!.string()
        val myObject: OpenAIResponse = objectMapper.readValue(responseString)
        return myObject.choices[0].message.content
    }
}

data class OpenAIRoot(
    val model: String,
    val messages: List<OpenAIMessage>,
    val max_tokens: Int
)

data class OpenAIMessage(
    val role: String,
    val content: List<OpenAIContent>
)

data class OpenAIContent(
    val type: String,
    val text: String? = null,
    val image_url: ImageUrl? = null
)

data class ImageUrl(
    val url: String
)

data class OpenAIResponse(
    val choices: List<Choice>,
)

data class Choice(
    val message: OpenAIResponseMessage,
)

data class OpenAIResponseMessage(
    val content: String
)

data class WhatsappInboundMessagePayload(
    val results: List<Result>
)

data class Result(
    val from: String,
    val to: String,
    val message: Message
)

data class Message(
    val url: String
)

data class Price(
    val pricePerMessage: Int,
    val currency: String
)

data class WhatsAppMessage(
    val from: String,
    val to: String,
    val content: Content,
)

data class Content(
    val text: String
)
Be aware that in this tutorial, for the sake of simplicity, we did not do any proper logging or monitoring, nor did we handle error codes or exceptions. We strongly recommend checking this page (opens in a new tab) to get familiar with both HTTP status codes and WhatsApp message status codes.
Additionally, we removed all unused fields from the classes to keep the code as short as possible. You can find all the fields provided by the Infobip platform on the API documentation pages mentioned above.
This is just one way to utilize AI and LLMs, but the possibilities are endless.