Get started
This section provides a comprehensive guide to getting started with Infobip Email. Follow the steps to register your domain with Infobip, insert records into the DNS, and register the sender.
Additionally, it includes the recommended best practices to optimize email delivery.
Using Infobip Email as your communication channel ensures that all emails you send reach their intended inboxes.
Managing senders
To use email in Infobip, you need to register your company's domain. There are two choices when onboarding your domain:
- Go straight to onboarding your official company domain (see Register a new domain)
- Test your Infobip email service without the need to make DNS changes (see Test a single sender)
Your choice of domain onboarding depends whether you are ready to go straight to production with your domain, or if you wish to conduct tests before moving to production.
Test a single sender
Setting up a new domain requires various DNS changes and may impact the email service. Before registering a new domain, you may test the email service by testing a single sender domain.
Infobip lets you verify a single sender domain with up to a maximum of 100 emails before you decide to continue to use this as the official company domain.
The single sender can be a publicly registered mailbox.
This mailbox should be used for testing traffic ONLY.
You cannot use Yahoo, Gmail, or Outlook addresses for testing a single sender.
To set up the single sender:
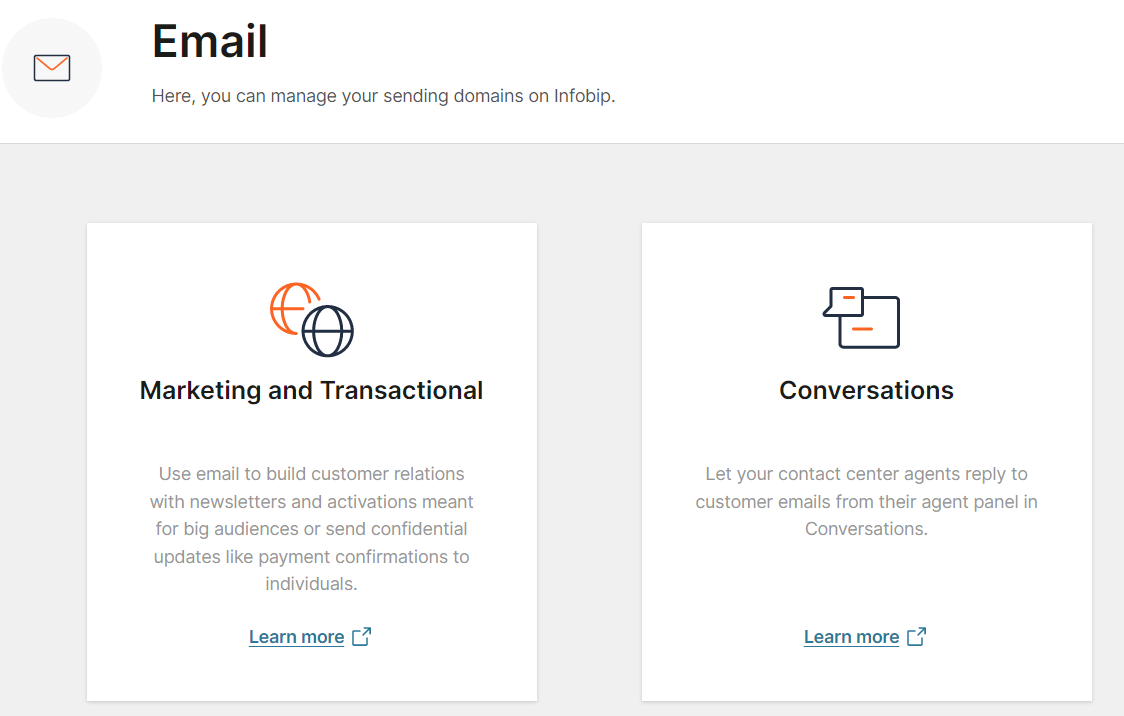
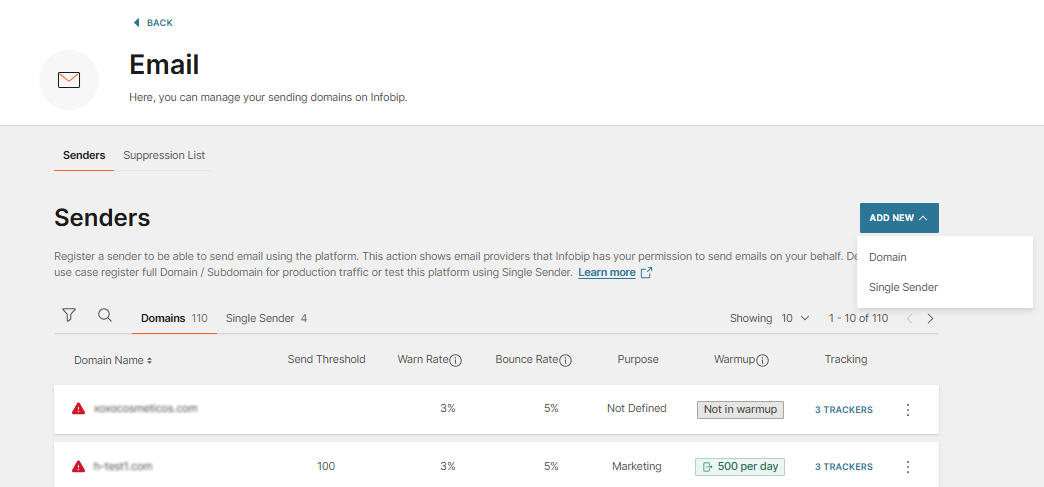
- In the web interface, select Channels and Numbers > Email and then click on Marketing and Transactional.
- You see the Senders page listing the currently registered senders that can send email on Infobip.
- Click Add New, and then select Single Sender from the drop-down list.
- On the Single Sender Registration form, enter the personal and company details:
- From email
- Sender name
- Reply-to-email
- Company address
- Optional City and Country
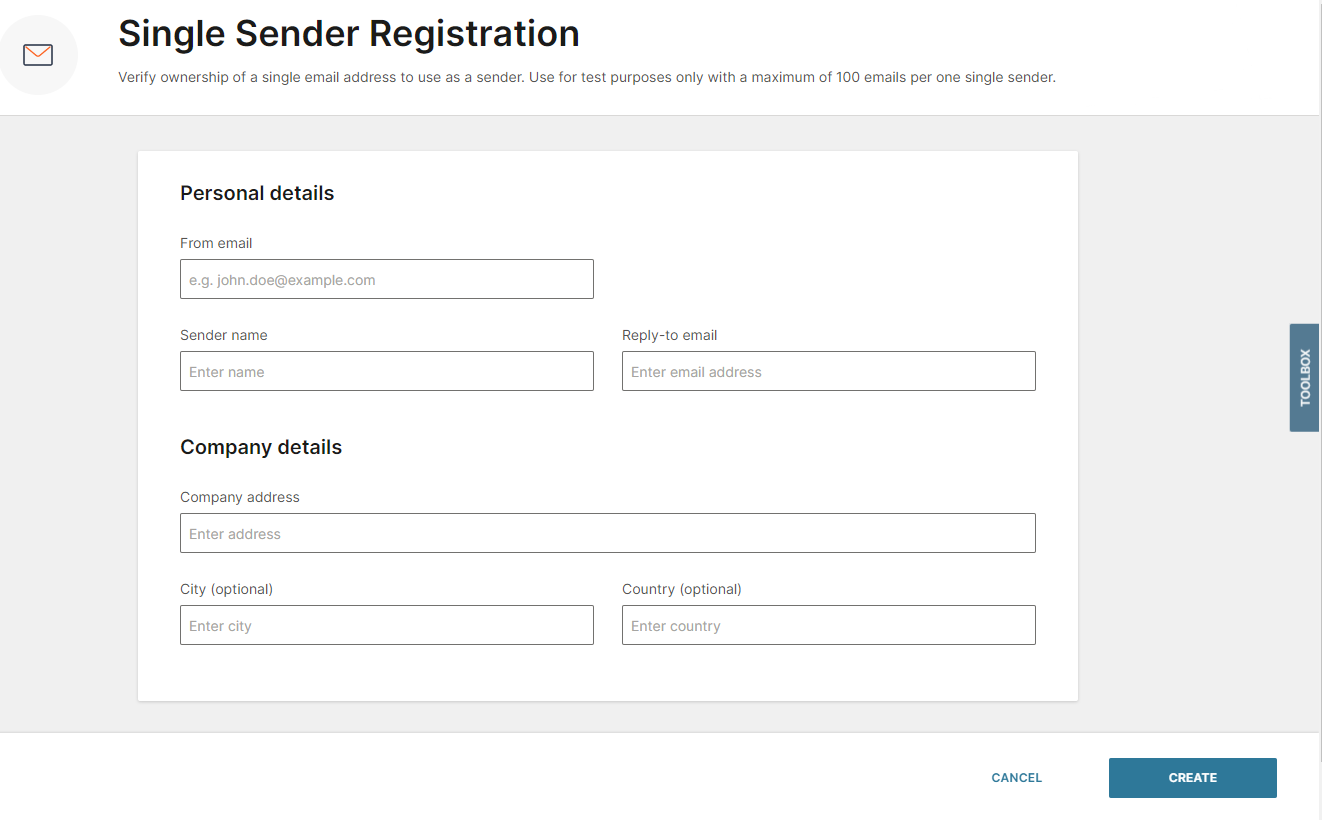
- Click Create.
A new sender is created but in the status it is unverified. An email is sent to the sender email, which contains a link. Click the link and the status changes to sender_verified.

- The single sender is available as a option in From field when sending messages with Broadcast and API.
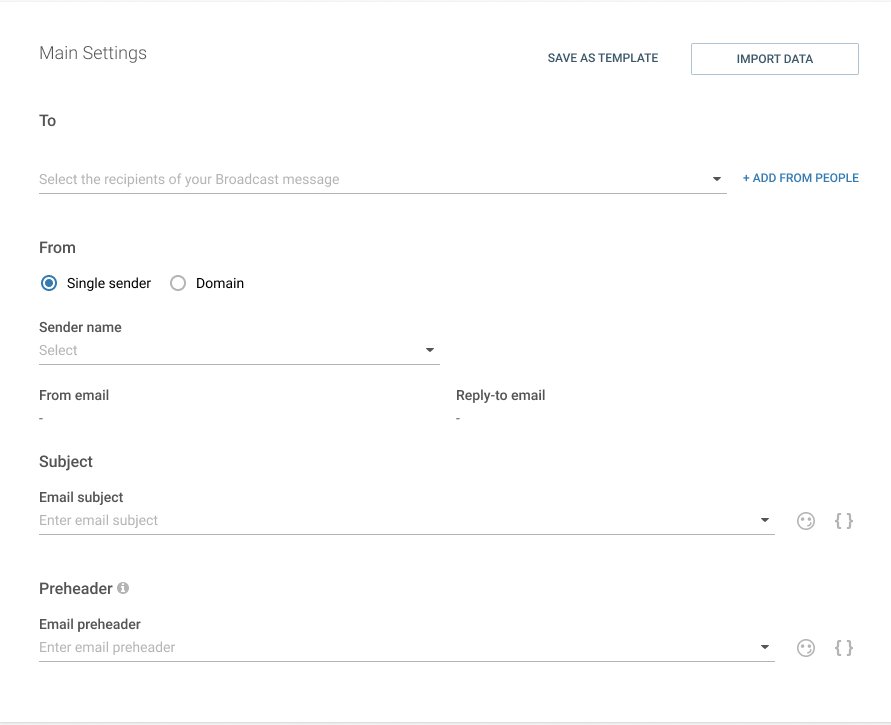
For example, verify an email name [email protected] as a single sender. All single sender email traffic is sent via internal domains, and the From field in the recipient inbox displays [email protected] via ss-messaging-1.com or ss-messaging-2.com.
Register a new domain
To use fully-featured email in Infobip, you need to register your company's domain. This step is necessary to confirm ownership of the user accounts and so enable you to send emails from any email address within that domain.
To verify your domain, you need the Domain Name System (DNS) records to apply to your hosting provider. It is possible to obtain your DNS records by requesting them from your dedicated Account Manager, however, the recommended way is to produce them in Channels and numbers in the web interface.
To set up your sender domain:
-
In the web interface, select Channels and Numbers > Channels > Email, and then click on Marketing & Transactional.
You see the list of domains that you have set up, along with information about whether they are verified or unverified. If you wish to set up email domains for using email with Conversations, go to the Conversations tab. -
Click Add New, and then select Domain from the drop-down list to add a new sender domain and set up the configuration. A sender domain is the domain name used in the From address of your emails — for example, in
[email protected], the sender domain isexample.com. It identifies the organization or service that is sending the email. -
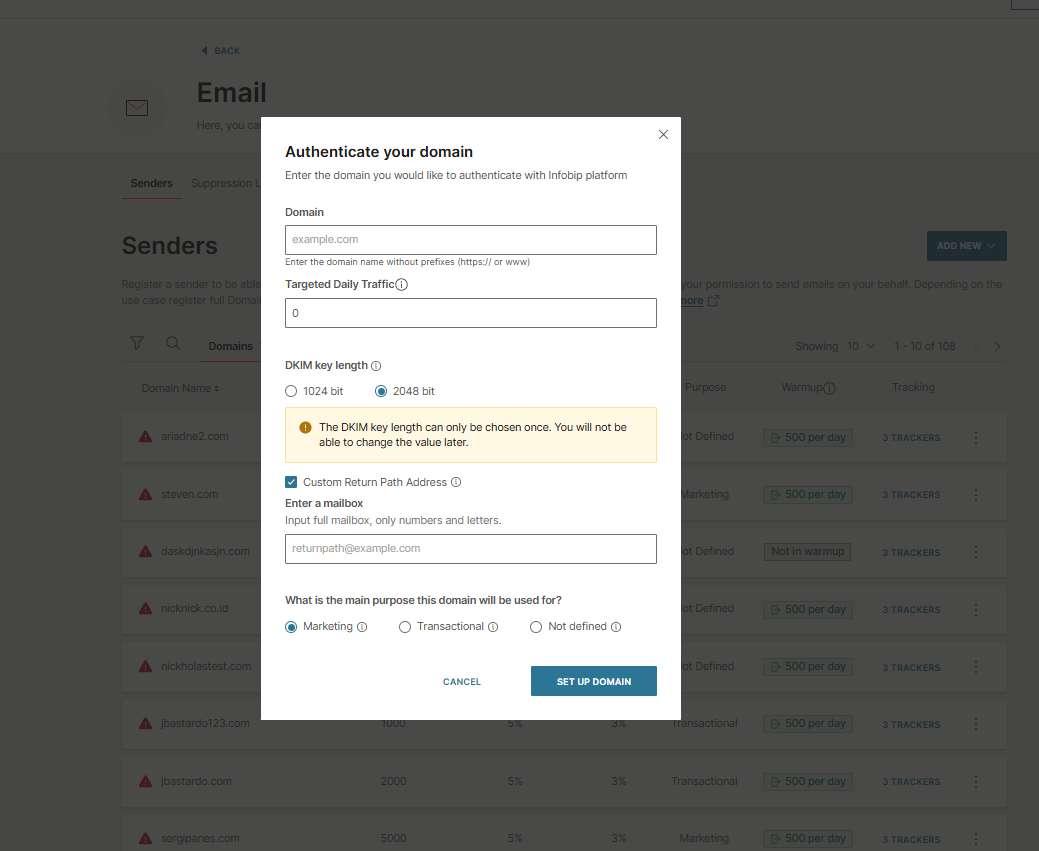
On the Authenticate your domain form, enter the domain name and the authentication settings:
- Enter a Domain name. You do not need to add a prefix, for example, https:// or www (opens in a new tab).
- Enter your Targeted Daily Traffic to be used for Automatic warmup. The limit that you set applies until your domain reaches the set targeted daily traffic. Note that automated warmup is enabled only for web interface users. For more information, see IP/Domain warmup.
- Select the DKIM key length. The Domain Keys Identified Mail (DKIM) is a protocol used so the receiver can verify the provider and requires you to specify the character length. You can select either the 1024-bit or 2048-bit character length. Higher numbers provide better security making it more difficult for hackers to break. The DKIM key length is a one-time selection and you cannot change the value later.
- Choose an option that describes the purpose of the domain:
- Marketing - for commercial emails that are promotional
- Transactional - for non-commercial emails for a commercial transaction or a website action
- Not defined - for emails that have no specific purpose when you set up the domain, and which can be changed later (see Manage domain settings)
-
Click Set Up Domain to finish your domain configuration. You see the records for your sender domain to be verified.
Envelope domain system
When using your main registered domain to send emails, it is important to protect the domain’s reputation. To help preserve that reputation, when you register a new sender domain, the system automatically creates a unique envelope domain. This envelope domain handles bounce messages and delivery issues without exposing or risking the main domain.
An envelope domain is used behind the scenes during the email delivery process. Besides protecting the domain's reputation, this domain tells the receiving servers where to send any bounce messages or delivery errors.
The recipient does not usually see the envelope domain directly, but it appears in the Return-Path field of the email headers if you view the full source of the email. It also plays a key role in email authentication mechanisms like DKIM (Domain Keys Identified Mail).
Envelope domain background mechanism
Infobip creates a subdomain (like ib38450.example.com) as the envelope domain to keep the bounce handling and deliverability management separate from your main sending domain. This setup improves email reputation and ensures better delivery rates, while also making it easier to monitor and troubleshoot issues.
Outgoing emails use the root domain in the header-from address but send using the envelope-from subdomain.
DKIM alignment for envelope domain
The envelope domain feature uses a relaxed DKIM alignment to maintain authentication despite using a different envelope domain. Relaxed DKIM alignment allows you to send from a subdomain but display a root domain to the end recipient.
If your domain is configured with strict DKIM alignment, the envelope domain feature will not work. Ensure that you have enabled a relaxed DKIM alignment. If strict alignment is detected during setup, the system will show a message advising you to update your DKIM configuration to use relaxed alignment, or contact Support to adjust the system to work with strict alignment.
Example envelope domain
If you register example.com as your sender domain, Infobip might use ib38450.example.com as the envelope domain. This means:
- The visible From address could be:
[email protected] - The envelope domain used in the background could be:
ib38450.example.com - The email headers shows something like:
Return-Path: <[email protected]>
Since the return path is created by Infobip, late bounces arrive to its address.
Note that late bounces are not reflected in reporting. This means that the message is given a final status when the provider returns a successful delivery. If late bounce information is received afterwards, the message status will not be updated.
If you wish to receive late bounces, you can subscribe to receive these events over webhook. For more information on receiving late bounce events, see Late bounce events.
Verify your sender domain
To verify your sender domain, you add the DNS records to your hosting provider and wait for the propagation of records within the DNS. Note that propagation can take up to 48 hours. Once the records are propagated, your sender domain is seen as verified and ready for use.
See the tutorials for some of the most common web providers and how to add DNS records to their websites.
Domain verification status is visible in the domain list above domain name. Verified domains are in green and unverified in red.

Manage domain settings
To see a list of the currently registered senders, in the Infobip web interface, select Channels and Numbers > Channels > Email and then click on Marketing & Transactional.
On the right-side of the domain, select the three-dot menu, and click Manage.
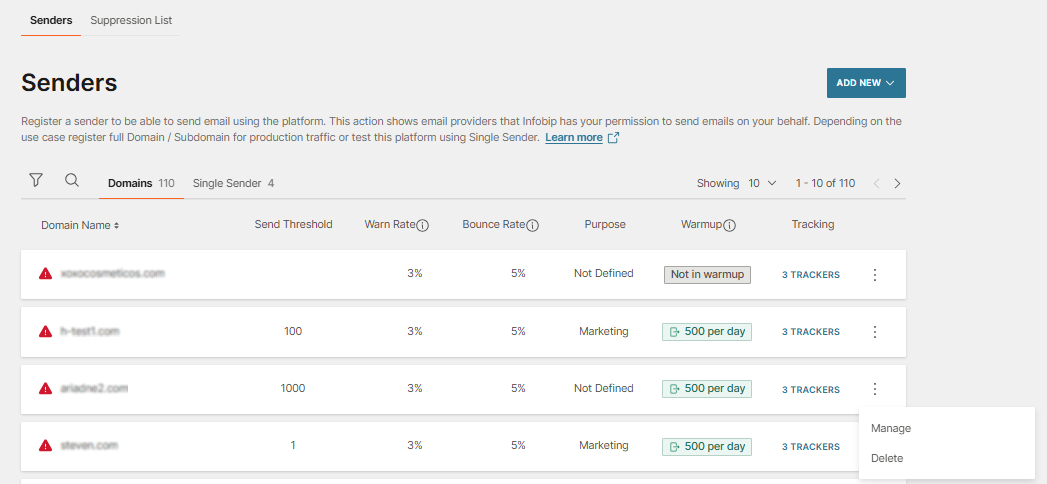
You see the Domain settings page where you can manage the options that you set when you created the domain.
The following sections describes the tabs on the Domain settings page.
DNS records
To ensure proper email delivery, you need to configure the DNS records shown in the tables below. TXT records are applied automatically to your domain.
Mandatory DNS records
| Record type | Record value | Record purpose |
|---|---|---|
| TXT | v=spf1 include:email-messaging.com ~all | SPF - Authorizes your domain to send emails and helps prevent spoofing. |
| TXT | Find the value of this record in Domain details under the Expected Value column. | DKIM - Protects your domain from spoofing and improves overall deliverability. |
| CNAME | emailtracking.email-messaging.com | Enables your emails to contain your sending domain in links instead of the Infobip default tracking domain. |
| CNAME | Find the value of this record in Domain details under the Expected Value column. The DMARC record starts with _dmarc. | DMARC - Authenticates the domain in your From address, increases trustworthiness, and provides reporting for configuration or spoofing issues. |
| MX | mx.email-messaging.com | Specifies the mail server responsible for accepting email messages on behalf of your domain and improves deliverability. Set the record priority to 10. |
Optional DNS records
These records are not mandatory but improve tracking and deliverability.
| Record type | Record value | Record purpose |
|---|---|---|
| A | Find the value of this record in Domain details under the Expected Value column. | Maps a domain name to the IP address. If your domain already has an A record, the same value should be set automatically. In some cases (for example, subdomain registration), this record might not be created. |
Once mandatory TXT and MX records are propagated, you can start sending and testing emails.
Domain purpose
You set the domain purpose when creating a domain. Use the domain purpose tab to change the main purpose for the domain usage.
Choose the purpose of the domain from the following options:
- Marketing - for commercial emails that are promotional
- Transactional - for non-commercial emails for a commercial transaction or a website action
- Not defined - for emails that have no specific purpose.
Tracking
Tracking let you choose how to track the domain by selecting options with the on/off toggle switches. The following tracking options are available:
- Open tracking - lets you know when any email you sent has been opened or clicked
- Unsubscribe tracking - collects and manages all unsubscribes with a do not contact list
- Late bounce tracking - notifies you about email delivery failures that occur after the initial delivery attempt
- Click tracking - lets you know how many times subscribers interact with links in the emails you dispatch
For more information, see Tracking.
Inbound parsing
Inbound parsing is used to parse the contents of incoming emails and direct them to a external server.
When emails are received by the reply-to address from outbound email traffic, you can set up an HTTP Push action that directs the email data to your chosen destination, which is set up using a webhook.
Infobip then automatically parses those emails and then pushes the parsed data to your chosen destination.
Prepare for inbound parsing
Before you can start using inbound parsing on emails, ensure that you have set up the following:
- Inbound parsing must be enabled for the account. If you cannot see Inbound on the Domain settings it means it has not been enabled for your account. Contact Support for more information about enabling Inbound parsing.
- Register a sender domain using the steps in Register a new domain.
- Ensure that the registered domain has a valid MX record using the steps in Email DNS records.
Manage inbound parsing
Once you have registered an enabled domain and set a valid MX record, use the following steps to set up inbound parsing:
- Go to Channels and Numbers > Channels > Email.
- Choose the registered domain that you have prepared for inbound parsing.
- Click the three dots next to the domain you want to set up inbound parsing and select Manage.
- Select the Inbound tab.
- Select the inbound parsing Action as HTTP Push.
- Enter the Webhook destination as your chosen external server. For example,
https://mywebhook.receiver.net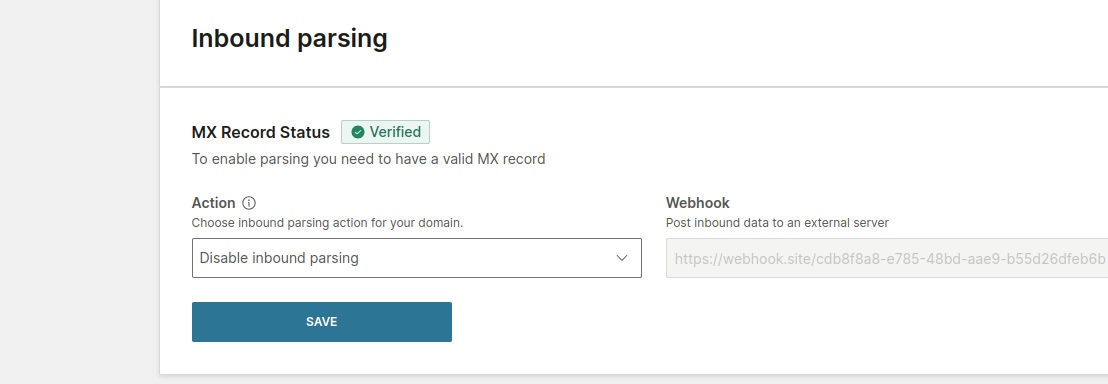
- Click Save.
Receiving parsed inbound traffic
If you have configured the reply-to address for the email you sent to use a domain enabled for inbound parsing, when replies are sent to the reply-to address, the payload is parsed and passed on to the webhook destination you chose.
An example of the pushed payload is available on Receive parsed emails (opens in a new tab) in the API documentation.
Blocklist configuration for domains
Blocklist configuration lets you choose whether to set email unsubscribes at the domain level or at the individual destination level.
When users unsubscribe, they typically intend to stop receiving emails from the entire brand, not just from a specific campaign or destination. Managing unsubscribes at the domain level gives you greater control over communication preferences, helps reduce user frustration and spam complaints, and enhances brand trust and compliance.
If you wish to optimize both the user experience and your brand’s reputation, select domain-level unsubscribes.
| Blocklist configuration | Description |
|---|---|
| From sender address | Unsubscribes are removed only from the specific sender address but not necessarily from the other lists that may be managed by this domain. |
| From this domain | Unsubscribes are removed globally from the entire domain and so fully unsubscribes from all communication from an organization. |
Email domain for Conversations
If you wish to set up an email domain within the Infobip Conversations solution to allow your call center agents to reply to customer emails from within the Conversations agent panel.
See the section on Email setup in Conversations for more information.
Manage suppressions
The Suppression list is a feature used to prevent emails from being sent to specific email addresses. It allows the owner of a sender domain to manage suppressions generated by that sender domain, and to share, view, or edit rights with others who use that same sender domain.
The suppression list gives you control over suppression without the need for intervention from Support. This feature lets you remove addresses from suppression lists immediately, ensuring timely delivery of transactional or service update emails.
Suppression list helps you to:
- Avoid repeat bounces or complaints
- Protect your sender domain/IP reputation
- Comply with opt-out requests
Suppression categories
When managing your suppression list, there are three important suppression categories.
| Suppression category | Description |
|---|---|
| Bounces | A hard bounce occurs when an email cannot be delivered to a recipient’s mailbox and is returned by the receiving server. The address is added to the suppression list to prevent repeatedly sending to invalid emails. |
| Complaints | Valid email addresses that issue a spam complaint about an email address. The recipient’s address is automatically added to the suppression list. These addresses should not be removed manually, as the user has clearly opted out. The recipient list description identifies the particular sender email address that caused the complaint. |
| Overquota bounces | Valid email addresses that have run out of storage space (and temporarily cannot accept additional emails) |
To use the Suppression list, you need an Infobip account with both the required user permissions and at least one dedicated IP to perform all possible operations (view, add, and remove):
- User Rights: The account that is the owner of a sender domain automatically has full user permissions to manage suppressions (with one exception, see next section). Accounts that are not the owner but are a user of the same sender domain can be given the required user permissions by the owner account.
- Dedicated IPs: To remove any bounces or complaints, just having the required user rights is not enough. It is also required that the sender domain in question uses at least one dedicated IP. Accounts are prevented from removing addresses for any domains that only use shared IP addresses, irrespective of user permissions.
If a domain has a dedicated IP, address removal is allowed, but without a dedicated IP, removal is not possible. For instance, if you are an owner with a dedicated IP, the
deletepermission is enabled (true). However, if you are an owner without a dedicated IP, thedeletepermission is disabled (false).
| Bounce | Complaint | Overquota | |
|---|---|---|---|
| View |
|
|
|
| Add |
|
|
|
| Delete |
|
|
|
Manage suppression over web interface
The Suppression list is available in the web interface. The Suppression list provides a visual display of all the recipients associated with the sender domains, offering selected filtering and search to assist you in finding recipient addresses. You can also add recipients and manage their permissions.
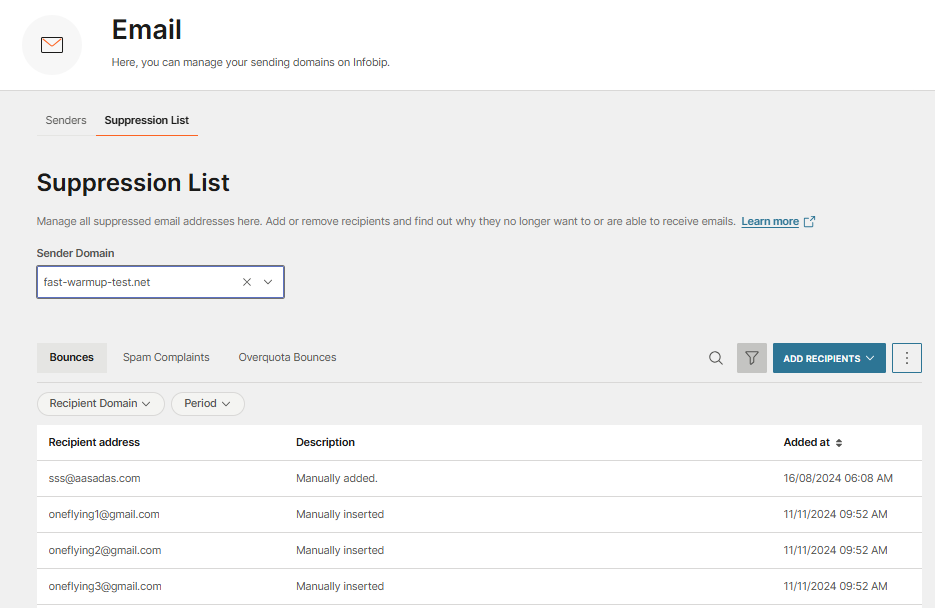
To manage suppressions, you initially need to select the sender domain:
-
In the web interface (opens in a new tab), go to Channels and Numbers > Channels > Email.
-
Select the Suppression List tab.
-
Select the sender domain from the Sender Domain drop-down list.
Suppressions are stored against sender domains, which means that each sender domain has its own suppression list. When you have selected the sender domain, you see the list of recipient addresses that have been added to this sender domain and three tabs that represent the suppression categories: Bounces, Spam Complaints, and Overquota Bounces.
Recipient list Description Recipient address The list of recipient email addresses that have been added to this sender domain. Description A description of why the recipient address no longer wants to or is able to receive emails. For example, in Bounces, the description identifies whether the recipient address was manually inserted. In Spam Complaints, the description identifies the specific email address that caused the compliant. Added at The time that the recipient address was added to the suppression category list. If you know the address, click the search icon and you can find it in the list by typing it in the search box.
-
For each of the categories, there are two filters. Use the filter icon to toggle these options. You have the choice to filter on the following:
- Recipient Domain: select one recipient domain to filter on the recipient domain.
- Period: select a duration to filter the suppressions based on a period of time, or choose a custom period start and end
Add recipients to suppression list
From the Suppression list, you can add recipients to the selected sender domain.
-
Click Add Recipients. You see a drop-down list where you can choose either:
- Bounces
- Spam complaints
Overquota bounces are not in this list because they can only be viewed and not added.
You then see a window where you can upload any bounces or spam complaints.
-
Select the Sender domain. Suppressions are stored against sender domains, so this adds the recipient addresses that bounced/complained to the selected sender domain.
-
Choose either to manually add the recipients one by one or by uploading a CSV / Excel file containing a list of recipient addresses.
- Upload from file: drag and drop a file onto the Upload from file window or click Browse to find the file in your file manager. The file must consist of email values separated by commas (CSV) or a single column with ones (XLS, XLSX). Make sure that the file does not contain records with syntax errors and empty records otherwise it will not be imported.
- Add one by one: enter the email addresses for in the text box. Add the email addresses one by one, or paste them and separate them using the Enter key. You can add up to 100 email addresses. Then click Add Records.
Manage access permissions
From the Suppression list, you can manage the permissions for other accounts who use the same sender domains. It is only possible to manage the permissions if the account the user is logged into is the owner of that sender domain.
You can assign view, edit, and delete rights for each owned sender domain and to each of the account's subaccounts.
To manage permissions, click the three vertical dots next to the Add Recipients button. You see the Manage access permissions panel. The panel contains two tabs:
- Give permissions
- Received permissions
Give permissions
To add a new permission, click Add Permission. You should provide the following information:
- The subaccount to whom you want to give permissions
- The sender domain for which you want to give permissions to that subaccount (note that Infobip stores suppressions against the sender domain)
- Whether the subaccount can view or add bounces and spam complaints, and whether it can view overquota bounces
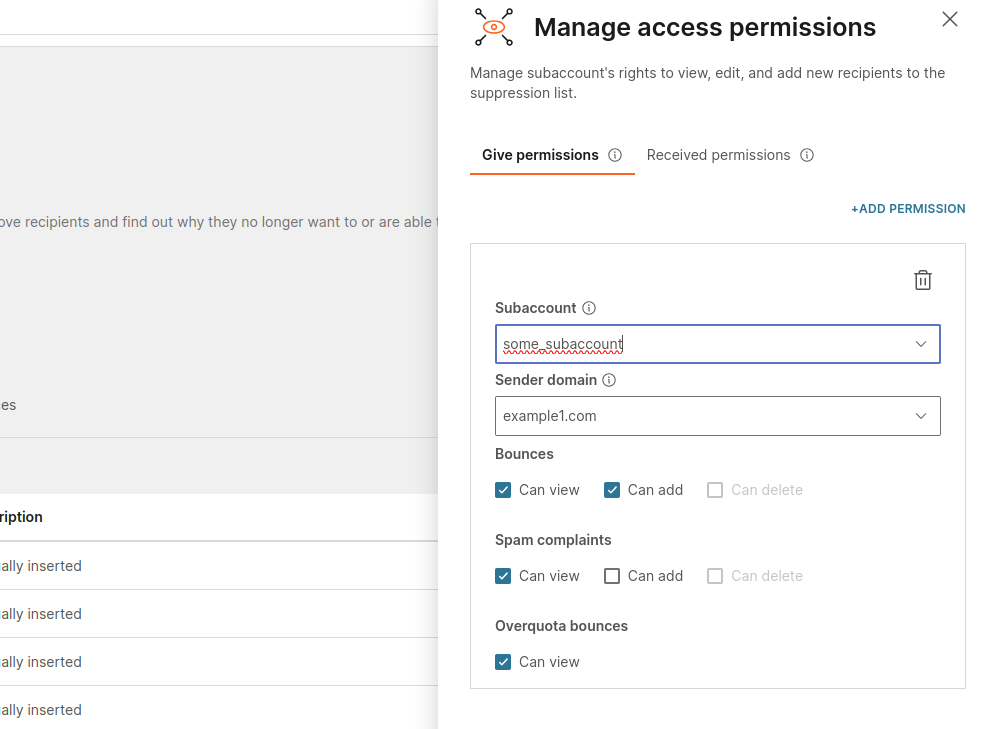
Once you've completed this form, click Save and the permissions will be applied to the subaccount you chose.
Received permissions
When you receive permissions, you can see them in the Received Permissions tab. The permissions you receive are grouped by the sender domain to which they apply. Click on the sender domain to see more details on which permissions exactly you received for that domain.

Manage suppression over API
The Email API offers four endpoints for Email suppression:
- Get suppressions (opens in a new tab): This method retrieves the suppressions for domains that are owned or have permissions granted. Per request the user can retrieve up to 1000 suppressions for up to 1 sender domain.
- Add suppressions (opens in a new tab): This method allows you to add email addresses to the suppression list. It accepts suppression requests, saves them asynchronously, and automatically ignores any duplicate entries. Per request the user can add 1000 suppressions for each sender domain provided (maximum 10 sender domains per request).
- Delete suppressions (opens in a new tab): This method allows you to delete email addresses from the suppression list. It accepts delete suppression requests and asynchronously deletes them. Per request the user provide up to 10 sender domains, and provide for each sender domain up to 1000 suppressions for removal.
- Get suppression domains (opens in a new tab): This method allows you to get domains that can be managed for suppressions and are either owned or have granted permissions.
Common providers on editing TXT records
Here is a list of some of the most common domain/hosting providers on how to edit TXT records:
- Bluehost (opens in a new tab)
- HostGator (opens in a new tab)
- Hostinger (opens in a new tab)
- GoDaddy (opens in a new tab)
- Wix (opens in a new tab)
- Hostwinds (opens in a new tab)
- Weebly (opens in a new tab)
- Hover (opens in a new tab)
- Amazon (opens in a new tab)
Infobip notifies you by email once DNS records are changed and once your domain is verified and ready to use. You’ll also see the verified label next to the domain. Note however, domain verification can take up to 48 hours due to the propagation delay between Infobip and your service provider.
You can then set up tracking for each domain. By default, tracking is enabled, but you can remove this as required.
Next steps
Now that you have set up your sender domain(s) and/or subdomain(s), go to the Deliverability Recommendations to ensure that you are following the best practices when using email as your communication channel.
This protects you from spam detectors and builds up your reputation to be a trusted email sender.